PlanMeca ProSensor Ethernet Installation Guide - FAQ
PlanMeca ProSensor Ethernet Installation Guide - FAQ
PlanMeca ProSensor Ethernet Installation Guide - FAQ

You also want an ePaper? Increase the reach of your titles
YUMPU automatically turns print PDFs into web optimized ePapers that Google loves.
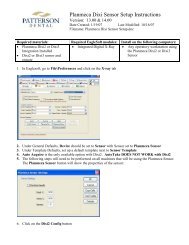
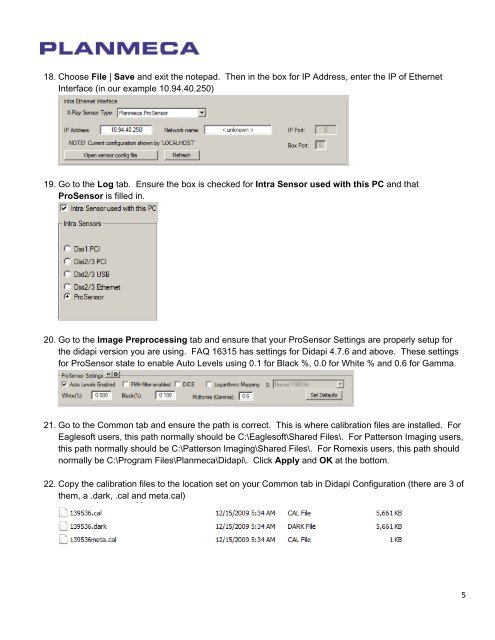
18. Choose File | Save and exit the notepad. Then in the box for IP Address, enter the IP of <strong>Ethernet</strong>Interface (in our example 10.94.40.250)19. Go to the Log tab. Ensure the box is checked for Intra Sensor used with this PC and that<strong>ProSensor</strong> is filled in.20. Go to the Image Preprocessing tab and ensure that your <strong>ProSensor</strong> Settings are properly setup forthe didapi version you are using. <strong>FAQ</strong> 16315 has settings for Didapi 4.7.6 and above. These settingsfor <strong>ProSensor</strong> state to enable Auto Levels using 0.1 for Black %, 0.0 for White % and 0.6 for Gamma.21. Go to the Common tab and ensure the path is correct. This is where calibration files are installed. ForEaglesoft users, this path normally should be C:\Eaglesoft\Shared Files\. For Patterson Imaging users,this path normally should be C:\Patterson Imaging\Shared Files\. For Romexis users, this path shouldnormally be C:\Program Files\Planmeca\Didapi\. Click Apply and OK at the bottom.22. Copy the calibration files to the location set on your Common tab in Didapi Configuration (there are 3 ofthem, a .dark, .cal and meta.cal)5