Flamco
Flamco
Flamco

Create successful ePaper yourself
Turn your PDF publications into a flip-book with our unique Google optimized e-Paper software.
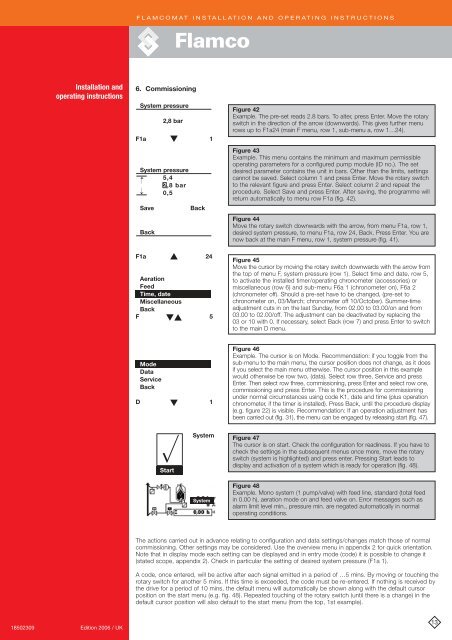
FLAMCOMAT INSTALLATION AND OPERATING INSTRUCTIONS<strong>Flamco</strong>Installation andoperating instructions6. CommissioningSystem pressure2,8 barF1a ▼1System pressure5,42,8 bar0,5→→SaveBackBackF1a ▲ 24AerationFeedTime, dateMiscellaneousBackF ▼▲ 5Figure 42Example. The pre-set reads 2.8 bars. To alter, press Enter. Move the rotaryswitch in the direction of the arrow (downwards). This gives further menurows up to F1a24 (main F menu, row 1, sub-menu a, row 1…24).Figure 43Example. This menu contains the minimum and maximum permissibleoperating parameters for a configured pump module (ID no.). The setdesired parameter contains the unit in bars. Other than the limits, settingscannot be saved. Select column 1 and press Enter. Move the rotary switchto the relevant figure and press Enter. Select column 2 and repeat theprocedure. Select Save and press Enter. After saving, the programme willreturn automatically to menu row F1a (fig. 42).Figure 44Move the rotary switch downwards with the arrow, from menu F1a, row 1,desired system pressure, to menu F1a, row 24, Back. Press Enter. You arenow back at the main F menu, row 1, system pressure (fig. 41).Figure 45Move the cursor by moving the rotary switch downwards with the arrow fromthe top of menu F, system pressure (row 1). Select time and date, row 5,to activate the installed timer/operating chronometer (accessories) ormiscellaneous (row 6) and sub-menu F6a 1 (chronometer on), F6a 2(chronometer off). Should a pre-set have to be changed, (pre-set tochronometer on, 03/March; chronometer off 10/October). Summer-timeadjustment cuts in on the last Sunday, from 02.00 to 03.00/on and from03.00 to 02.00/off. The adjustment can be deactivated by replacing the03 or 10 with 0. If necessary, select Back (row 7) and press Enter to switchto the main D menu.ModeDataServiceBackD ▼1StartSystemSystemFigure 46Example. The cursor is on Mode. Recommendation: if you toggle from thesub-menu to the main menu, the cursor position does not change, as it doesif you select the main menu otherwise. The cursor position in this examplewould otherwise be row two, (data). Select row three, Service and pressEnter. Then select row three, commissioning, press Enter and select row one,commissioning and press Enter. This is the procedure for commissioningunder normal circumstances using code K1, date and time (plus operationchronometer, if the timer is installed). Press Back, until the procedure display(e.g. figure 22) is visible. Recommendation: If an operation adjustment hasbeen carried out (fig. 31), the menu can be engaged by releasing start (fig. 47).Figure 47The cursor is on start. Check the configuration for readiness. If you have tocheck the settings in the subsequent menus once more, move the rotaryswitch (system is highlighted) and press enter. Pressing Start leads todisplay and activation of a system which is ready for operation (fig. 48).Figure 48Example. Mono system (1 pump/valve) with feed line, standard (total feedin 0.00 h), aeration mode on and feed valve on. Error messages such asalarm limit level min., pressure min. are negated automatically in normaloperating conditions.The actions carried out in advance relating to configuration and data settings/changes match those of normalcommissioning. Other settings may be considered. Use the overview menu in appendix 2 for quick orientation.Note that in display mode each setting can be displayed and in entry mode (code) it is possible to change it(stated scope, appendix 2). Check in particular the setting of desired system pressure (F1a 1).A code, once entered, will be active after each signal emitted in a period of …5 mins. By moving or touching therotary switch for another 5 mins. If this time is exceeded, the code must be re-entered. If nothing is received bythe drive for a period of 10 mins, the default menu will automatically be shown along with the default cursorposition on the start menu (e.g. fig. 48). Repeated touching of the rotary switch (until there is a change) in thedefault cursor position will also default to the start menu (from the top, 1st example).18502309 Edition 2006 / UK13