Modular rockeTs Building Baffles - National Association of Rocketry
Modular rockeTs Building Baffles - National Association of Rocketry
Modular rockeTs Building Baffles - National Association of Rocketry

Create successful ePaper yourself
Turn your PDF publications into a flip-book with our unique Google optimized e-Paper software.
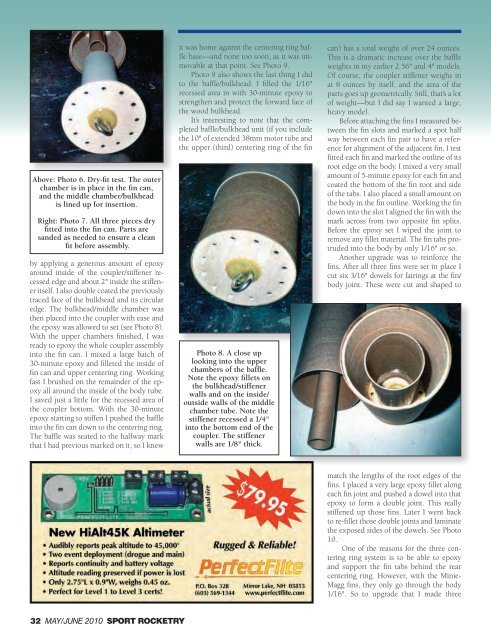
Above: Photo 6. Dry-fit test. The outerchamber is in place in the fin can,and the middle chamber/bulkheadis lined up for insertion.Right: Photo 7. All three pieces dryfitted into the fin can. Parts aresanded as needed to ensure a cleanfit before assembly.by applying a generous amount <strong>of</strong> epoxyaround inside <strong>of</strong> the coupler/stiffener recessededge and about 2" inside the stiffeneritself. I also double coated the previouslytraced face <strong>of</strong> the bulkhead and its circularedge. The bulkhead/middle chamber wasthen placed into the coupler with ease andthe epoxy was allowed to set (see Photo 8).With the upper chambers finished, I wasready to epoxy the whole coupler assemblyinto the fin can. I mixed a large batch <strong>of</strong>30-minute epoxy and filleted the inside <strong>of</strong>fin can and upper centering ring. Workingfast I brushed on the remainder <strong>of</strong> the epoxyall around the inside <strong>of</strong> the body tube.I saved just a little for the recessed area <strong>of</strong>the coupler bottom. With the 30-minuteepoxy starting to stiffen I pushed the baffleinto the fin can down to the centering ring.The baffle was seated to the halfway markthat I had previous marked on it, so I knewit was home against the centering ring bafflebase—and none too soon, as it was immovableat that point. See Photo 9.Photo 9 also shows the last thing I didto the baffle/bulkhead. I filled the 1/16"recessed area in with 30-minute epoxy tostrengthen and protect the forward face <strong>of</strong>the wood bulkhead.It’s interesting to note that the completedbaffle/bulkhead unit (if you includethe 10" <strong>of</strong> extended 38mm motor tube andthe upper (third) centering ring <strong>of</strong> the finPhoto 8. A close uplooking into the upperchambers <strong>of</strong> the baffle.Note the epoxy fillets onthe bulkhead/stiffenerwalls and on the inside/outside walls <strong>of</strong> the middlechamber tube. Note thestiffener recessed a 1/4"into the bottom end <strong>of</strong> thecoupler. The stiffenerwalls are 1/8" thick.can) has a total weight <strong>of</strong> over 24 ounces.This is a dramatic increase over the baffleweights in my earlier 2.56" and 4" models.Of course, the coupler stiffener weighs inat 8 ounces by itself, and the area <strong>of</strong> theparts goes up geometrically. Still, that’s a lot<strong>of</strong> weight—but I did say I wanted a large,heavy model.Before attaching the fins I measured betweenthe fin slots and marked a spot halfway between each fin pair to have a referencefor alignment <strong>of</strong> the adjacent fin. I testfitted each fin and marked the outline <strong>of</strong> itsroot edge on the body. I mixed a very smallamount <strong>of</strong> 5-minute epoxy for each fin andcoated the bottom <strong>of</strong> the fin root and side<strong>of</strong> the tabs. I also placed a small amount onthe body in the fin outline. Working the findown into the slot I aligned the fin with themark across from two opposite fin splits.Before the epoxy set I wiped the joint toremove any fillet material. The fin tabs protrudedinto the body by only 1/16" or so.Another upgrade was to reinforce thefins. After all three fins were set in place Icut six 3/16" dowels for fairings at the fin/body joint. These were cut and shaped tomatch the lengths <strong>of</strong> the root edges <strong>of</strong> thefins. I placed a very large epoxy fillet alongeach fin joint and pushed a dowel into thatepoxy to form a double joint. This reallystiffened up those fins. Later I went backto re-fillet those double joints and laminatethe exposed sides <strong>of</strong> the dowels. See Photo10.One <strong>of</strong> the reasons for the three centeringring system is to be able to epoxyand support the fin tabs behind the rearcentering ring. However, with the Minie-Magg fins, they only go through the body1/16". So to upgrade that I made three32 MAY/JUNE 2010 Sport <strong>Rocketry</strong>