Feeding Time Service Manual - BMI Gaming
Feeding Time Service Manual - BMI Gaming
Feeding Time Service Manual - BMI Gaming

You also want an ePaper? Increase the reach of your titles
YUMPU automatically turns print PDFs into web optimized ePapers that Google loves.
Operator's and Assembly <strong>Manual</strong> – <strong>Feeding</strong> <strong>Time</strong>© LAI GAMESAUDIT PROCEDURE ......................................................................................... 26AUDITS QUICK REFERENCE TABLE .............................................................. 27AUDITS DETAILED ............................................................................................ 28GAME HISTORY MODE ....................................................................................... 30GAME HISTORY MODE DIAGRAM .................................................................. 30GAME HISTORY PROCEDURE ......................................................................... 31GAME HISTORY QUICK REFERENCE TABLE ................................................ 31ERRORS AND TROUBLESHOOTING ................................................................. 32ERROR CODE QUICK REFERENCE TABLE ................................................... 32TROUBLESHOOTING GAME ERRORS ............................................................ 33FUSE INFORMATION ........................................................................................... 34FUSE LOCATION DIAGRAM ............................................................................. 34SECTION A: SERVICE INSTRUCTIONS ........................................................... 35LOCATING AND ACCESSING PARTS ............................................................... 36PARTS LOCATION DIAGRAM ........................................................................... 36PARTS DESCRIPTION ........................................................................................ 37LAMPS .................................................................................................................... 39MAINTENANCE .................................................................................................... 40SECTION B: TECHNICAL DETAILS ................................................................... 41MAINS VOLTAGE ADJUSTMENT ...................................................................... 42TICKET DISPENSER REFERENCE GUIDE ........................................................ 43DISPENSER PARTS DIAGRAM.......................................................................... 493 D EXPLODE PARTS ........................................................................................... 50FEEDING TIME MAIN WIRING DIAGRAM ....................................................... 54FEEDING TIME POWER WIRING DIAGRAM ................................................... 55iiTo Purchase This Item, Visit <strong>BMI</strong> <strong>Gaming</strong> | www.bmigaming.com | (800) 746-2255 | +1.561.391.7200
Operator's and Assembly <strong>Manual</strong> – <strong>Feeding</strong> <strong>Time</strong>© LAI GAMESSAFETY PRECAUTIONSThe following safety precautions and advisories are used throughout this manual andare defined as follows.* WARNING! *Disregarding this text could result in serious injury.* CAUTION! *Disregarding this text could result in damage to the machine.* NOTE! *• An advisory text to hint or help understanding.BE SURE TO READ THE FOLLOWING* WARNING! *Always turn OFF Mains AC power and unplugged the game, beforeopening or replacing any parts.Always when unplugging the game from an electrical outlet, grasp theplug, not the line cord.Always connect the Game Cabinet to grounded electrical outlet with asecurely connected ground line.Do Not install the Game Cabinet outdoors or in areas of high humidity,direct water contact, dust, high heat or extreme cold.Do Not install the Game Cabinet in areas that would present anobstacle in case of an emergency, ie. near fire equipment or emergencyexits.* CAUTION! *Always use a Digital Multimeter, logic tester or oscilloscope for testingintegrated circuit (IC) logic PC boards. The use of a continuity tester isnot permitted.Do Not Connect or disconnect any of the integrated circuit (IC) logic PCboards while the power is ON.Do Not use any fuse that does not meet the specified rating.Do Not Subject the game cabinet to extreme temperature variations.Reliability of electrical components deteriorates rapidly over 60 o C.Page 1To Purchase This Item, Visit <strong>BMI</strong> <strong>Gaming</strong> | www.bmigaming.com | (800) 746-2255 | +1.561.391.7200
Operator's and Assembly <strong>Manual</strong> – <strong>Feeding</strong> <strong>Time</strong>© LAI GAMESMACHINE INSTALLATION and INSPECTIONWhen installing and inspecting “<strong>Feeding</strong> <strong>Time</strong>”, be very careful of the following pointsand pay attention to ensure that the players can enjoy the game safely. “<strong>Feeding</strong> <strong>Time</strong>” is shipped from the factory in separate parts and requiresassembling. Please refer to the separate <strong>Feeding</strong> <strong>Time</strong> Assembly <strong>Manual</strong> fordetails. Be sure to turn the power OFF before working on the machine.* WARNING! *Always Turn OFF mains power before removing safety covers and refit all safetycovers when work is completed. Make sure the power cord is not exposed on the surface (floor, ground, etc.) wherepeople walk through. Always make complete connections for the integrated circuit (IC) logic PC Boardsand other connectors. Insufficient insertion can damage the electrical components.* CAUTION! *Before switching the machine on be sure to check that it has been set on thecorrect voltage for your area!Refer to the mains voltage adjustment section of this manual. Machines arenormally shipped on 220V AC unless otherwise specified. Only qualified personnel should inspect or test the integrated circuit (IC) logic PCBoards. If any integrated circuit (IC) logic PC Boards should need servicing. Please contactthe nearest LAI GAMES distributor. (Refer to the back page of this manual)Page 2To Purchase This Item, Visit <strong>BMI</strong> <strong>Gaming</strong> | www.bmigaming.com | (800) 746-2255 | +1.561.391.7200
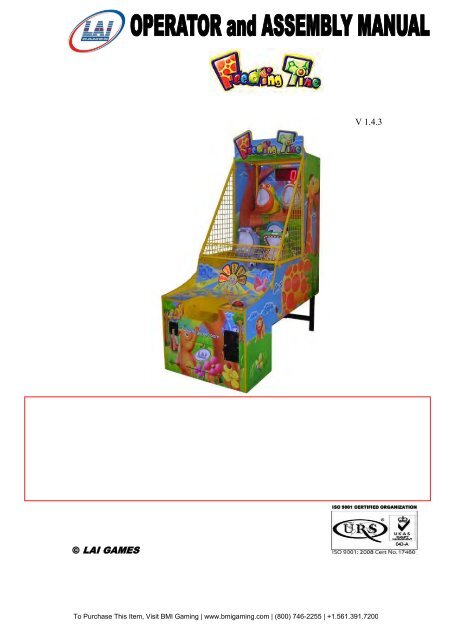
Operator's and Assembly <strong>Manual</strong> – <strong>Feeding</strong> <strong>Time</strong>© LAI GAMESINTRODUCTIONCONGRATULATIONS! You have just bought the “<strong>Feeding</strong> <strong>Time</strong>”, another excitingball throwing game from LAI Games. “<strong>Feeding</strong> <strong>Time</strong>” features a remarkable gamecabinet design with colorful graphics and five stunning animal head models on theplayfield. This game offers a simple but exciting game play with the chance to collectdouble points each time you play. Undoubtedly, “<strong>Feeding</strong> <strong>Time</strong>” will make an excitingticket redemption game to any location, on or off site.I hope you take the time to read this manual and learn about the many other features anduser-friendly adjustments that can be made to “fine-tune” the game for maximumearning potential.DESCRIPTION• The “<strong>Feeding</strong> <strong>Time</strong>” is a one player, ticket redemption game, where playersattempt to throw as many balls as they can into the animals‟ mouth to collect points.The more points they collect, the more tickets they won.PACKAGING At delivery, the machine should arrive in good condition. To move the packagedmachine for transport or placement, use a forklift and take care not to hit the packageor stack heavy objects on top, as this may cause damage to the machine.* NOTE! * <strong>Feeding</strong> <strong>Time</strong> is shipped from the factory in separate parts and requiresassembling. Please refer to the separate <strong>Feeding</strong> <strong>Time</strong> Assembly <strong>Manual</strong> fordetails.CONTENTS The “<strong>Feeding</strong> <strong>Time</strong>” cabinet Keys: 2 x coin door keys2 x front door keys2 x ticket door keys• Operator‟s manual• Assembly <strong>Manual</strong>• 300 Assorted color balls• IEC Power Cord (In cash box)• Accessories(In cash box)Page 3To Purchase This Item, Visit <strong>BMI</strong> <strong>Gaming</strong> | www.bmigaming.com | (800) 746-2255 | +1.561.391.7200
Operator's and Assembly <strong>Manual</strong> – <strong>Feeding</strong> <strong>Time</strong>© LAI GAMESSPECIFICATIONSDIMENSIONS• Weight: 203 kg (447.5lb)• Height: 2314mm (91”)• Width: 864mm (34”)• Length: 1855mm (73”)• Power: Maximum 180 w – (220V @ 0.75A)(120V @ 1.5A)Average 100 w – (220V @ 0.45A)(120V @ 0.83A)ELECTRIC SUPPLY• The game has the option to operate on, 110V, 120V, 220V or 240V AC 50/60Hzsingle phase mains electric supply.The supply must be a three wire grounded supply.* CAUTION! *Before switching the machine on be sure to check that it has been set on thecorrect voltage for your area!Please Refer to the mains voltage adjustment section of this manual. Machines arenormally shipped on 220V AC unless otherwise specified.LOCATION REQUIREMENTS• Ambient temperature: between 5 o C and 40 o C.• Ambient humidity: Low• Ambient U.V. radiation: Very low• Vibrations level: LowPage 4To Purchase This Item, Visit <strong>BMI</strong> <strong>Gaming</strong> | www.bmigaming.com | (800) 746-2255 | +1.561.391.7200
Operator's and Assembly <strong>Manual</strong> – <strong>Feeding</strong> <strong>Time</strong>© LAI GAMESFEEDING TIME ASSEMBLY Quick GuideDo’s and Don’ts for Assembling <strong>Feeding</strong> <strong>Time</strong>Do read the <strong>Feeding</strong> <strong>Time</strong> assembly manual as it will help you inthe correct step by step order of assembly.Do take note of what size bolts are used where when assembling <strong>Feeding</strong><strong>Time</strong>.Do make sure that all cables are free to move and not pinched orjammed under the playfield or other parts when assembling<strong>Feeding</strong> <strong>Time</strong>.Do make sure that all earth point cables are connected whenassembling both the Front Frames and Front Playfield SpeakerPods on <strong>Feeding</strong> <strong>Time</strong>.Don‟t forget to remove the <strong>Feeding</strong> <strong>Time</strong> cables from inside thegame cabinet before bolting the front playfield in place.Don‟t forget after assembling <strong>Feeding</strong> <strong>Time</strong> to check and tightenall the bolts.Don‟t forget to check the voltage setting of <strong>Feeding</strong> <strong>Time</strong> is set tothe mains voltage for your country before applying power.TIPS for Assembling <strong>Feeding</strong> <strong>Time</strong>oooWe recommend using two people when assembling <strong>Feeding</strong> <strong>Time</strong>. Whileone person is able to do most of the assembly, using two people will bemuch easier. A stepladder will also be very handy during assembly.We recommend that assembling <strong>Feeding</strong> <strong>Time</strong> is best done on a level andeven surface. Adjust the rubber feet on the frames to align them for easierassembly.We recommend when assembling <strong>Feeding</strong> <strong>Time</strong> not tightening all the boltsuntil all major parts are fitted. This will allow the easy alignment of holesas the frame is not held rigid.* NOTE *<strong>Feeding</strong> <strong>Time</strong> uses metric size Nuts & Bolts throughout its construction.Page 5To Purchase This Item, Visit <strong>BMI</strong> <strong>Gaming</strong> | www.bmigaming.com | (800) 746-2255 | +1.561.391.7200
Operator's and Assembly <strong>Manual</strong> – <strong>Feeding</strong> <strong>Time</strong>© LAI GAMESFEEDING TIME ASSEMBLY INSTRUCTIONS• The photograph below displays the parts and their names for you to refer to whileassembling the “<strong>Feeding</strong> <strong>Time</strong>”. This will assist you in locating the parts moreeasily.FRONTCABINETREARCABINETREAR CABINETLEGS & BRACESLEFT, RIGHT, FRONT barrierMESH, and top bracesTOP HEADERMIDDLE CABINETPage 6To Purchase This Item, Visit <strong>BMI</strong> <strong>Gaming</strong> | www.bmigaming.com | (800) 746-2255 | +1.561.391.7200
Operator's and Assembly <strong>Manual</strong> – <strong>Feeding</strong> <strong>Time</strong>© LAI GAMESTOOLS REQUIRED FOR ASSEMBLY1 x 4 mm Allen Key1 x 3 mm Allen Key1 x 150 mm Adjustable Spanner1 x 13 mm Ring and Open end Spanner1 x 10 mm Ring and Open end Spanner1 x 8 mm Ring and Open end SpannerOne person is able to do most of the assembly, but using two people will be mucheasier. A stepladder/chair will also be very handy during assembly.Unpack the machine and be sure to check that all parts are present. As a quickreference, refer to the parts displayed on the previous page.STEP ONE: Attaching Rear Cabinet Legs.• Attach to the back of the Rear Cabinet the “H” Shaped Rear Feet Frame• Firmly bolt the Rear Feet frame onto the Rear Cabinet using the *four Black M6x 60mm Knockdown bolts, four spring & flat washers and four M6 nutssupplied.* Hardware found in CashboxPage 7To Purchase This Item, Visit <strong>BMI</strong> <strong>Gaming</strong> | www.bmigaming.com | (800) 746-2255 | +1.561.391.7200
Operator's and Assembly <strong>Manual</strong> – <strong>Feeding</strong> <strong>Time</strong>© LAI GAMESSTEP TWO: Attaching Front and Rear Cabinets.* NOTE: This job is easiest using two people. One on each side to move the RearCabinet into place.• Position the Rear Cabinet intoPlace and rest on “L” Bracketattached to Front Cabinet• Bolt the two Cabinets togetherfrom underneath using the*two Silver M6 bolts,washers, spring washers andnuts supplied.• The *Silver M6 Knockdowncenter bolt is inserted fromthe topside inside the ball run* Hardware found inCashboxPage 8To Purchase This Item, Visit <strong>BMI</strong> <strong>Gaming</strong> | www.bmigaming.com | (800) 746-2255 | +1.561.391.7200
Operator's and Assembly <strong>Manual</strong> – <strong>Feeding</strong> <strong>Time</strong>© LAI GAMESSTEP THREE: Fitting Top to Rear Cabinet and Edge CoverPlates• Attach the three halves of the Cabinet Edge Cover Plates to the machine using the*10 Silver M6 knockdown bolts and dome nuts supplied.* NOTE: Place the “L” shaped bracket to the Outside Edge of the Cabinet topresent a smooth edge.* Hardware found in CashboxPage 9To Purchase This Item, Visit <strong>BMI</strong> <strong>Gaming</strong> | www.bmigaming.com | (800) 746-2255 | +1.561.391.7200
Operator's and Assembly <strong>Manual</strong> – <strong>Feeding</strong> <strong>Time</strong>© LAI GAMESSTEP FOUR: Ball Gate and Backboard Cabling.• From the Rear Cabinet are two cables, one six way Molex plug for the Ball Gateand one twelve way Molex plug for the Timing and Lights. Plug these into the twocorresponding Molex socket connectors from the Front Cabinet.• Plug the fifteen way Molex plug running fromthe Back Board in to the fifteen way Molexfrom the Front Cabinet. Then push theconnectors into the hole in the back of theFront Cabinet to protect them.* NOTE: Don‟t forget to connectthe Single Green / Yellows EARTHwire from the Front Cabinet to theBack BoardPage 10To Purchase This Item, Visit <strong>BMI</strong> <strong>Gaming</strong> | www.bmigaming.com | (800) 746-2255 | +1.561.391.7200
Operator's and Assembly <strong>Manual</strong> – <strong>Feeding</strong> <strong>Time</strong>© LAI GAMESSTEP FIVE: Attaching the Left & Right Side Mesh.• Align the mounting tabs of the Left & Right Side Mesh with the holes in the RearCabinet and tighten firmly use the * four Silver M6 Knockdown bolts, Washersand Dome Nuts provided.* Hardware found in CashboxSTEP SIX: Assembly Front Playfield• Fit the Front Playfield betweenthe two side mesh and bolt inplace using the *four Silver M6Allen Head bolt.* Hardware found in CashboxPage 11To Purchase This Item, Visit <strong>BMI</strong> <strong>Gaming</strong> | www.bmigaming.com | (800) 746-2255 | +1.561.391.7200
Operator's and Assembly <strong>Manual</strong> – <strong>Feeding</strong> <strong>Time</strong>© LAI GAMESSTEP SEVEN: Attaching Front Barrier Mesh (Optional).(Front barrier mesh is an optional can be use to cover the ball from bouncing tothe control panel or leave it open without front barrier mesh highlyrecommended).• Fit the Front Barrier Meshbetween the two side mesh andbolt in place using the *fourSilver M6 x 15mm Allen Headbolt, Spring and Flat Washers* Hardware found in CashboxSTEP EIGHT: Attaching the Backboard Cover.* NOTE: It is faster with two people for this part of the assembly.• On Backboard Connect the 4 waymolex connector for Header Lamp,also connect the 15 way molexconnector.• Bolt the Backboard to the RearCabinet using the * four M6 x 15mm bolts supplied* Hardware found in CashboxPage 12To Purchase This Item, Visit <strong>BMI</strong> <strong>Gaming</strong> | www.bmigaming.com | (800) 746-2255 | +1.561.391.7200
Operator's and Assembly <strong>Manual</strong> – <strong>Feeding</strong> <strong>Time</strong>© LAI GAMESSTEP NINE: Attaching Top Header.• Fit the Top Header between two sidemesh and bolt in place using the*Eight Silver M6 x 15 mm Allenhead bolt, flat Washers.Hardware found in Cashbox* NOTE: The Green / Yellow EARTH cable is attached to one of theSpotlight longer mounting screws using the extra nut provided.Page 13To Purchase This Item, Visit <strong>BMI</strong> <strong>Gaming</strong> | www.bmigaming.com | (800) 746-2255 | +1.561.391.7200
Operator's and Assembly <strong>Manual</strong> – <strong>Feeding</strong> <strong>Time</strong>© LAI GAMESASSEMBLY IS NOW COMPLETED.REFER TO FOLLOWING PAGE FOR PICTURE OF COMPLETED ASSEMBLYNOTE!BE SURE TO CHECK AND TIGHTEN ALL ASSEMBLY BOLTS!Page 14To Purchase This Item, Visit <strong>BMI</strong> <strong>Gaming</strong> | www.bmigaming.com | (800) 746-2255 | +1.561.391.7200
Operator's and Assembly <strong>Manual</strong> – <strong>Feeding</strong> <strong>Time</strong>© LAI GAMESHOW TO PLAYTHE PLAYER’S AIM IS TO COLLECT POINTS BYTHROWING THE BALLS INTOTHE ANIMALS’ MOUTH• Insert coin(s) for credit.• Press the Start button to start the game. The ball gate will open and balls will bereleased to the player.• Throw as many balls as you can into the animals‟ mouth in the amount of timegiven to collect points. Try to get the balls into the flashing animals‟ mouth toget double points. For each ball that went into an animal‟s mouth, players willget 5 points. For each ball that went into a flashing animal‟s mouth, players willget 10 points.* NOTE! *The maximum number of points a player can collect per play is 999. When thatvalue is reached in a play, the score will stop incrementing.• When the time is up, the ball gate will close and tickets will be paid according tothe points collected. The exact number of points per ticket is dependent onprogram settings P5.* NOTE! *Recommended: fit 12 balls per Game.Page 15To Purchase This Item, Visit <strong>BMI</strong> <strong>Gaming</strong> | www.bmigaming.com | (800) 746-2255 | +1.561.391.7200
Operator's and Assembly <strong>Manual</strong> – <strong>Feeding</strong> <strong>Time</strong>© LAI GAMESOPERATIONThe “<strong>Feeding</strong> <strong>Time</strong>” has 6 operational modes: Attract mode, Play mode, Test Mode,Programmable Adjustments mode, Audits mode and Game History mode.OPERATIONAL DIAGRAMPOWER UPATTRACT MODEPLAY MODEPRESS TESTTEST MODEPRESS TEST* NOTE! *Entering test mode willclear any stored creditsPROGRAMMABLE ADJUSTMENTS MODEPRESS TESTAUDITS MODEPRESS TESTGAME HISTORY MODEPRESS TESTATTRACT MODE The Attract mode provides a light and sound display, while the game is not beingplayed. This feature is to attract potential customers to play the game. The attractmode sound can be turned on and off.PLAY MODE The <strong>Feeding</strong> <strong>Time</strong> has two play modes. The Standard Coin Play mode, where acoin, or coins are inserted. Or Free Play where no coins are necessary.COIN PLAY The Coin Play mode is entered from Attract mode, by inserting coins in any of thetwo coin slots on the front of the machine cabinet, then following the instructionsin the “How to Play” section of this manual.FREE PLAY The free play mode is entered from attract mode by holding the <strong>Service</strong> button forlonger than five second, F r E will be displayed on the 3-digit LED display. For a single free game, just press the <strong>Service</strong> button once. When issuing singlefree games in this manner, tickets will be dispensed as normal.Page 16To Purchase This Item, Visit <strong>BMI</strong> <strong>Gaming</strong> | www.bmigaming.com | (800) 746-2255 | +1.561.391.7200
Operator's and Assembly <strong>Manual</strong> – <strong>Feeding</strong> <strong>Time</strong>© LAI GAMESTEST MODEThe <strong>Feeding</strong> <strong>Time</strong> Test mode has three test configurations allowing you to test thefunction of the Sound, LED & Credit Displays, the Game Switches, all game lamps,and the ball gate. (Refer to the Test Mode Diagram on next page).The Test mode is also used for Clearing Game Errors. If there is an active error, itscode will be displayed. To try to clear the error code, press the red Test button once.The error can be bypass by quickly pressing the red Test button twice.* NOTE! * Entering Test Mode will CLEAR any CREDITS remaining in the game. If during test mode no ADJUSTMENTS or actions are made to the game forapproximately four minutes, it will automatically RETURN to Attract Mode.Page 17To Purchase This Item, Visit <strong>BMI</strong> <strong>Gaming</strong> | www.bmigaming.com | (800) 746-2255 | +1.561.391.7200
Operator's and Assembly <strong>Manual</strong> – <strong>Feeding</strong> <strong>Time</strong>© LAI GAMESTEST MODE DIAGRAMATTRACT MODEPRESS TESTPLAY MODESOUND, LAMPS & DISPLAY TESTThe Display counts, all lamps flash,and Sound is played.0190 01 19 9PRESS TESTGAME SWITCHES TESTSWITCH INPUT TESTNo INPUT is activeC- 0TICKET notchis activeSERVICE switchis activeToTarget 4 sensoris activeTarget 5 sensoris activeC - 1 C - 2C - 9 C 1 0PRESS TESTRUN TESTRUN TEST PRESS MODEPRESSr r r r 0 1r 0 2RSERVICESERVICERREPEATEDLYLoops backBALL GATE TESTTo step fromR01 to R02 to R01 R01 = Opening the gate R02 = Closing the gatePRESS TESTPROGRAMMABLE ADJUSTMENTS MODEPage 18To Purchase This Item, Visit <strong>BMI</strong> <strong>Gaming</strong> | www.bmigaming.com | (800) 746-2255 | +1.561.391.7200
Operator's and Assembly <strong>Manual</strong> – <strong>Feeding</strong> <strong>Time</strong>© LAI GAMESSOUND, LAMPS & DISPLAY TEST ENTER The Sound, Lamp & Display test is entered from Attract mode bypressing the Test button once.* NOTE! * If there is an active error displayed, press the red Test button once to try andclear the error. If the error code will not clear, it can be bypass by quickly pressing the redTest button twice.DURING THE TEST:o Game music will be played.o The <strong>Time</strong> Indicator lamps will light on and off in sequence.o The Credit display will count from 000 to 999 and then repeat.o The target lamps will light on and off in sequence.o The Start button lamps will flash on and off. EXITThe Sound, Lamp & Display test is exited by pressing the Test button.The next test will be switch test.SWITCH TEST ENTERThe Switch Test can be entered by pressing the Test button once whilein the Sound, Light & display test or by pressing the Test button twicewhile in Attract mode, C - X will be displayed on the 3-digit displaywhere „XX‟ is a number representing the switch that is active. TESTING THE GAME SWITCHESAll game switches have a code from C1 to C10 as tabled below. Byactivating any of the switches, their code will be displayed on the 3-digit display. If no switches are active then C - 0 will be displayed.CODE DISPLAY SWITCH FUNCTION SWITCH LOCATIONC0 C - 0 No Switch Active -C1 C - 1 Ticket Notch is Active Ticket DoorC2 C - 2 <strong>Service</strong> Switch is Active <strong>Service</strong> BracketC3 C - 3 Start button is Active Player Control panelC4 C - 4 Coin 1 Switch is Active Coin DoorC5 C - 5 Ball Gate Switch is Active Ball GateC6 C - 6 Target 1 sensor is Active PELICANC7 C - 7 Target 2 sensor is Active GORILLAC8 C - 8 Target 3 sensor is Active HIPPOC9 C - 9 Target 4 sensor is Active WHALEC10 C 1 0 Target 5 sensor is Active CROCODILENormal condition for the game is C - 0 , no switches are active.* NOTE! *• Several switches can be simultaneously activated in Switch test. The displaywill then consecutively show their codes, indicating which switches areactive. However, it is much easier to test the game switches individually.Page 19To Purchase This Item, Visit <strong>BMI</strong> <strong>Gaming</strong> | www.bmigaming.com | (800) 746-2255 | +1.561.391.7200
Operator's and Assembly <strong>Manual</strong> – <strong>Feeding</strong> <strong>Time</strong>© LAI GAMES TICKET DISPENSER NOTCHThe Ticket Notch Switch (C1) can be activated or deactivated from theTicket Feed Button on the Ticket Dispenser PCB or by manuallypushing the tickets from the ticket holder through the dispenser afterpulling the ticket release rod upwardsTicket TensioningmechanismTicket release rod* NOTE! *• For more information on the servicing and testing the ticket please look at theDispenser Reference guide. EXITThe Switch Test is exited into Run Test Mode by pressing the TestButton once.Page 20To Purchase This Item, Visit <strong>BMI</strong> <strong>Gaming</strong> | www.bmigaming.com | (800) 746-2255 | +1.561.391.7200
RUN TESTOperator's and Assembly <strong>Manual</strong> – <strong>Feeding</strong> <strong>Time</strong>© LAI GAMES ENTERThe Run Test can be entered by pressing the Test button once while inthe Switch Test or by pressing the Test button three times while inAttract mode, r r r will be displayed on the 3-digit display. SELECT The <strong>Service</strong> button is pressed once to start the run test mode. Thecredit display will show r 0 1 , opening ball gate. The <strong>Service</strong> buttonis then pressed again to close the gate, showing r 0 2 on the 3-digitdisplay. EXITThe Run Test is exited into Programmable Adjustments Mode bypressing the Test button once.Page 21To Purchase This Item, Visit <strong>BMI</strong> <strong>Gaming</strong> | www.bmigaming.com | (800) 746-2255 | +1.561.391.7200
Operator's and Assembly <strong>Manual</strong> – <strong>Feeding</strong> <strong>Time</strong>© LAI GAMESPROGRAMMABLE ADJUSTMENTS MODEThe <strong>Feeding</strong> <strong>Time</strong> has eight programmable adjustments that can be changed in thismode. They are P01 to P08 and their codes and values are displayed alternativelyduring the adjustment procedure.Example: Code P01 (Number of Coins Mech 1) is displayed as P 0 1 and its valueof 1 as 1 on the 3-digit display.PROGRAMMABLE ADJUSTMENTS MODE DIAGRAMRUN TEST MODEPRESS TESTPROGRAMMABLE ADJUSTMENTS MODEPRESSPRESSP P PSERVICEP 0 1P 0 80PRESS STARTto change value1, 2, 3, 4 … 10SERVICEREPEATEDLYTo step from1 P01 to P081Loops back to P01PRESS TESTAUDIT MODEPROGRAMMABLE ADJUSTMENTS PROCEDURE ENTERThe Programmable Adjustments Mode can be entered by pressing theTest button once while in the Run Test or by pressing the Test buttonfour times while in Attract mode, P P P will be displayed on the 3-digit credit display. SELECT The green <strong>Service</strong> button is pressed to step through each of theadjustment configurations, starting from the P P P display, P01 beingthe first step, continuing through to P08, and then looping again fromP01 to P08 until the mode is exited. CHANGE The Start button is pressed to change the displayed value. The valuecan only be stepped up by using the Start button, but the value willloop back to its minimum value the next step after its max value.* NOTE! *• Certain program adjustments have a fast adjustment feature. By holding theStart button down, the values step through quicker. EXITThe Programmable Adjustments mode is exited into Audits mode, bypressing the Test button once.Page 22To Purchase This Item, Visit <strong>BMI</strong> <strong>Gaming</strong> | www.bmigaming.com | (800) 746-2255 | +1.561.391.7200
Operator's and Assembly <strong>Manual</strong> – <strong>Feeding</strong> <strong>Time</strong>© LAI GAMESPROGRAMMABLE ADJUSTMENTS QUICKREFERENCE TABLE (V 1.4.3)CODEPROGRAMMABLEADJUSTMENTSOPTIONALVALUESDEFAULTSETTINGSFEATURESP01 1 – 10 1, 2, 3…10 1 Coin Slot 1 – Coins / CreditP02 1 – 10 1, 2, 3…10 1 Coin Slot 1 – Games / CreditP03 ON or OFF ON or OFF ON Attract Mode SoundP04 20s – 90s 20, 21, 22, …90 45 Game DurationP05 5 – 100 5, 6,7 …100 5 Number of Points / TicketP06 0 – 10 0, 1, 2 …10 4 Minimum Tickets payoutP07 OFF, P06 – 100 OFF, P06, …100 10 Maximum Tickets payoutP08 1 – 5 1, 2, 3…5 1 Flashing Target Reposition <strong>Time</strong>P09 OFF – ON OFF,ON ON Ticket OptionP10 0 – 5s 0,1,2,3…20 s 0 Ball gate time outPROGRAMMABLE ADJUSTMENTS DETAILED• P01 = COIN MECH 1: NUMBER OF COINS PER CREDIT(Default 01) (Adjustable 1 – 10)This sets the number of coins that need to be inserted into coin mechanism 1, foreach credit. It can be set to either of 1, 2, 3… to 10 coins for one credit.• P02 = COIN MECH 1: NUMBER of PLAYS PER CREDIT(Default 01) (Adjustable 1 – 10)This sets the number of games for each credit inserted into coin mechanism 1. Itcan be set to either of 1, 2, 3… to 10 plays for each credit.• P03 = ATTRACT MODE SOUND(Default ON) (Adjustable ON or OFF)This adjustment turns the attract mode sound ON or OFF. This is the sound andmusic that the game generates to attract customers when it is not being played.• P04 = GAME DURATION(Default 45s) (Adjustable 20s – 90s)This variable sets the number of seconds the game can be played per play. It isadjustable from 20s to 90s per play.• P05 = NUMBER OF POINTS PER TICKET(Default 5) (Adjustable 5 – 100)This setting sets the number of points a player must collect to win ONE ticket. Theadjustment values are from 5 to 100.• P06 = MINIMUM TICKETS PAYOUT(Default 5) (Adjustable 0 – 10)This variable sets the minimum number of tickets the machine dispenses per play,regardless to how many points a player has collected. It is adjustable from 0 to 10.Page 23To Purchase This Item, Visit <strong>BMI</strong> <strong>Gaming</strong> | www.bmigaming.com | (800) 746-2255 | +1.561.391.7200
Operator's and Assembly <strong>Manual</strong> – <strong>Feeding</strong> <strong>Time</strong>© LAI GAMESGAME HISTORY MODEBy using the Game History Mode the operator can view the results of the last fivegames played. This enables the operator to verify player‟s win results.Example: The diagram below shows the game history for the very last game and 5 thlast game played. H1P displays the points collected by player for the verylast game played. H5t shows the number of tickets paid out for the 5 th lastgame played.GAME HISTORY MODE DIAGRAMAUDIT MODEPRESS TESTGAME HISTORY MODEPRESSPRESSH H HSERVICEH 1 PH 5 tA5 5Points collected for lastgame playedSERVICETo step fromH1P to H5t1 2Continue through H5tand loops back to H1PPRESS TESTGAME ATTRACT MODE* NOTE! *• Score Histories will be erased if the game is switched off then on.Empty score histories show as - - - on the 3-digit displayPage 30To Purchase This Item, Visit <strong>BMI</strong> <strong>Gaming</strong> | www.bmigaming.com | (800) 746-2255 | +1.561.391.7200
Operator's and Assembly <strong>Manual</strong> – <strong>Feeding</strong> <strong>Time</strong>© LAI GAMESGAME HISTORY PROCEDURE ENTERThe Game History mode is entered from Audits mode by pressing theTest button once or from Attract mode by pressing the Test button sixtimes. H H H will be displayed on the 3-digit display. SELECT The green <strong>Service</strong> button is pressed for advancing each step throughthe set of Game Histories, starting from the H H H display, H1Pbeing the first step, continuing through to H5t, and then looping againfrom H1P to H5t until the mode is exited. EXITThe Game History mode is exited into Game Attract mode, by pressingthe Test button once.GAME HISTORY QUICK REFERENCE TABLECODE DISPLAYHISTORY RESULTSH1P H 1 P Number of Points for Very Last Game PlayedH1t H 1 t Number of Tickets for Very Last Game PlayedH2P H 2 P Number of Points for 2 nd Last Game PlayedH2t H 2 t Number of Tickets for 2 nd Last Game PlayedH3P H 3 P Number of Points for 3 rd Last Game PlayedH3t H 3 t Number of Tickets for 3 rd Last Game PlayedH4P H 4 P Number of Points for 4 th Last Game PlayedH4t H 4 t Number of Tickets for 4 th Last Game PlayedH5P H 5 P Number of Points for 5 th Last Game PlayedH5t H 5 t Number of Tickets for 5 th Last Game PlayedPage 31To Purchase This Item, Visit <strong>BMI</strong> <strong>Gaming</strong> | www.bmigaming.com | (800) 746-2255 | +1.561.391.7200
Operator's and Assembly <strong>Manual</strong> – <strong>Feeding</strong> <strong>Time</strong>© LAI GAMESERRORS AND TROUBLESHOOTINGIf the Game microprocessor detects any problems with the operation of the game, anError will be displayed on the 3-digit display and the machine will play a voicemessage. “Please Call the Attendant”. Some error Messages will only be displayedwhen test mode is entered. Errors are displayed on the displays as E r X , where „X‟is the error number, listed as follows:ERROR CODE QUICK REFERENCE TABLECODE ERROR DESCRIPTION SOLUTIONErr1TICKET DISPENSE ERRORJammed tickets, no tickets or noticket notch pulse for longer than3 seconds.Err2Err3Err4Err5COIN INPUT ERRORCoin switches are active for morethan 5 secondsEEPROM ERRORProblem with on-boardEEPROMBALL GATE ERRORBall gate switch is not properlyclosedTARGET SENSOR BLOCKEDTarget sensor are blocked forlonger than 3 secondsClear ticket dispenser jam or replenishtickets. After this, push Test buttononce to clear error.Check coin switches for coin jam andclear the jam. Use the Switch Test modeto check coin switches. Adjust, and/orreplace if necessary.The main MCU is getting errors readingthe EEPROM (24C16 IC on MCU).Check ball gate switch for jam and clearthe jam. Use Switch Test to check gateswitch. Press Test button to clear theerror and close the gate.Clear Blockage from between targetsensors or test sensor using Switch Test.Page 32To Purchase This Item, Visit <strong>BMI</strong> <strong>Gaming</strong> | www.bmigaming.com | (800) 746-2255 | +1.561.391.7200
Operator's and Assembly <strong>Manual</strong> – <strong>Feeding</strong> <strong>Time</strong>© LAI GAMESTROUBLESHOOTING GAME ERRORS CLEARING GAME ERRORSGame errors can be cleared, by pushing the test button ONCE. The gamewill try and check if the error is fixed. If the reason for the error is fixed,the game will continue as normal. If the error is not fixed, the error willremain on the display. Err1 – TICKET ERRORThis error usually occurs if the game has run out of tickets or there is aticket/capsule jam. A less common reason is if the game PCB tries todispense tickets/capsules but doesn‟t get a notch pulse for approximatelythree seconds. Use the Switch Test and test the notch pulse by passing aticket in and out of the notch sensor or manually activating the microswitchon the capsule dispenser, an active notch will be display as C1.Ifthe game was out of tickets, replace the tickets, clear the ticket/capsule jamand then push the test button once to clear the error. The game will thenpayout any owed tickets/capsules. Err2 – COIN INPUT ERRORThis error occurs if one of the coin switches is closed for more than 5seconds. The problem can be a coin stuck in the coin switch path or thecoin switch is out of adjustment or faulty. Enter Switch Test mode tocheck the coin mechanisms. Err3 – EEPROM ERRORThis Error is only displayed in test mode and means that the CPU cannotread the EEPROM, or is receiving errors during communication with theEEPROM (The 24C16 IC on the main MCU PCB). This could causeproblems with the game audits and program settings. The first thing to dois trying to switch ON and OFF the machine in at least 2 cycles, if messagestill appear than replace the EEPROM IC Atmel 24C16 on the CPU PCBwith the new EEPROM, If still Error massage, this could be a problemswith the game audits and program. If this error occurs, send your mainMCU PCB to the nearest authorized LAI games dealer for repair. Err4 – BALL GATE ERRORThis error occurs if the ball gate switch is not properly closed after a gameis played. Enter Switch Test mode to check the ball gate switch. If C5 isdisplayed, then the switch is not closed. The problem can be somethingobstructing the gate/gate switch from closing. Check for ball gate jam andclear the jam. Err5 – TARGET SENSOR BLOCKEDThis error usually occurs if the target sensor is blocked or a ball is jammedin the ball exit, blocking the infrared beam of the target sensor for longerthan 3 seconds. The sensor can be tested using the switch test. If the sensoris blocked C6, C7, C8, C9, or C10 will be displayed in this test (dependson the target). Clear whatever is blocking the sensor and the error willclear itself. If you cannot find anything blocking the sensor, there could befaulty infrared sensors. The sensor PCB‟s should be returned to yournearest LAI Games distributor for repair.Page 33To Purchase This Item, Visit <strong>BMI</strong> <strong>Gaming</strong> | www.bmigaming.com | (800) 746-2255 | +1.561.391.7200
Operator's and Assembly <strong>Manual</strong> – <strong>Feeding</strong> <strong>Time</strong>© LAI GAMESFUSE INFORMATION* WARNING! *Always turn OFF Mains power and unplugged the game, before replacing any fuses. MAIN AC SUPPLY FUSE (1 x 6 AMP FAST BLOW, M205 TYPE)This fuse is for the main AC supply and is situated in the IEC mains input socket.* NOTE! *• The power cord must be removed before the fuse can be accessed. MCU POWER FUSE (1 x 1.5 AMP FAST BLOW, M205 TYPE)This fuse is for the power supply to the MCU PCB. MCU CONTROL FUSES (2 x 5 AMP FAST BLOW, M205 TYPE)These fuses are for the DC transistor drivers on the MCU PCB. DOWN LIGHT FUSES (2 x 5 AMP FAST BLOW, 3AG TYPE)These fuses are for the two 12VAC 20W Down Light Lamps. AC DRIVER FUSES (2 x 5 AMP FAST BLOW, M205 TYPE)These fuses are for target, double points, and time lamps.* CAUTION! *Do Not use any fuse that does not meet the specified rating.FUSE LOCATION DIAGRAMAll fuses are located in front cabinetAC DriverFuses5A QB M205MCU PowerFuse1.5A QB M205Main AC SupplyFuse6A QB M205(Access is frombehind the frontcabinet)MCU ControlFuses5A QB M205FluorescentFuses5A QB 3AGPage 34To Purchase This Item, Visit <strong>BMI</strong> <strong>Gaming</strong> | www.bmigaming.com | (800) 746-2255 | +1.561.391.7200
Operator's and Assembly <strong>Manual</strong> – <strong>Feeding</strong> <strong>Time</strong>© LAI GAMESSECTION A: SERVICE INSTRUCTIONSBE SURE TO READ THE FOLLOWINGCarefully before servicing this machineAPage 35To Purchase This Item, Visit <strong>BMI</strong> <strong>Gaming</strong> | www.bmigaming.com | (800) 746-2255 | +1.561.391.7200
Operator's and Assembly <strong>Manual</strong> – <strong>Feeding</strong> <strong>Time</strong>© LAI GAMESLOCATING AND ACCESSING PARTSPARTS LOCATION DIAGRAMAs viewed from frontCabinetHeader3-DigitDisplayUpper BallTargetsLower BallTargets<strong>Time</strong>IndicatorSpeakers(2 units)BallThroughSound CPUPCBPlayfieldDisplay LampsUpper & LowerPlayfieldsBall Gate(Inside)StartButtonPowerInlet (IEC)(Access is frombehind)CoinMechanismCoinDoorMain MCUPCBTicketHolderTicketMechanismTicketDoor+12VDCPower Supply<strong>Service</strong>Bracket/CashBox Housing16 ChannelAC Driver PCBAmplifierPCBDownlightTransformerPage 36To Purchase This Item, Visit <strong>BMI</strong> <strong>Gaming</strong> | www.bmigaming.com | (800) 746-2255 | +1.561.391.7200
Operator's and Assembly <strong>Manual</strong> – <strong>Feeding</strong> <strong>Time</strong>© LAI GAMESPARTS DESCRIPTION• COIN MECHANISMThe coin mechanism is located inside the coin door located to the right on the front ofthe machine.• CASH BOXThe cash box is located inside the coin door. Access is from the front of the machine.• TICKET MECHANISMThe ticket mechanism is located inside the ticket door located to the left on the frontof the machine.• SPEAKERSTwo speakers are located to the front of the cabinet inside the ball receiving through.Access is through the ticket and coin doors.• GAME CONTROLSLocated in the Right side of the front cabinet, when facing the machine. The controlpanel can be accessed through the coin door.• START BUTTON: The Start button is the large red round illuminated button locatedat the right-hand side of the control panel. This button is used to start a game and fortest and program adjustments.• SERVICE CONTROLSLocated on the service panel mounted on top of the cash box and accessed throughthe coin door.1. SERVICE BUTTON: Used to input credits to the game without activatingthe coin counter, and to perform test procedures in combination with the testbutton.2. TEST BUTTON: Used to perform the test mode, in combinationwith the <strong>Service</strong> button.3. VOLUME KNOB: Used to adjust the speaker‟s soundPage 37To Purchase This Item, Visit <strong>BMI</strong> <strong>Gaming</strong> | www.bmigaming.com | (800) 746-2255 | +1.561.391.7200
Operator's and Assembly <strong>Manual</strong> – <strong>Feeding</strong> <strong>Time</strong>© LAI GAMES• POWER CORDThe power cord is a standard IEC power cord (as used on computers) that is pluggedin to the power inlet socket at the rear of the machine. The power cord can beremoved for transport.• POWER INLETThe power inlet is located at the rear of the machine on the left-hand side as viewedfrom the rear. It is a standard IEC inlet socket.• MAINS SWITCHThe mains switch is located on the power inlet assembly along with the mains fuse,and IEC inlet socket.• FUSESFor locations of all fuses refer to Fuses and Fuse location of this manual.* WARNING! *Always turn OFF Mains power and unplugged the game, before replacing anyfusesAlways use the correct rated fuse. Refer to for fuse information.• 7-SEG DISPLAYThere is a 3-digit display located on the playfield. Access is through the back of thecabinet.• PCB’sFor location of all game PCB‟s, refer to the Parts Location diagram page of thismanual.• POWER SUPPLYThe power supply is located at the front of the cabinet and is accessed from the frontdoor. It is a 12V 13A switching power supply.• DOWN LIGHT TRANSFORMERThe down light transformer is located at the front of the cabinet and is accessed fromthe front door. It is 2 x 12VAC 5A supply output.• TARGET SENSORSAll five target sensors are located on the playfield. Two target sensors are located onthe underside of the upper playfield. The other three are located under the lowerplayfield.Page 38To Purchase This Item, Visit <strong>BMI</strong> <strong>Gaming</strong> | www.bmigaming.com | (800) 746-2255 | +1.561.391.7200
Operator's and Assembly <strong>Manual</strong> – <strong>Feeding</strong> <strong>Time</strong>© LAI GAMESLAMPS* WARNING! *Always turn OFF Mains power and unplugged the game, before replacing anylamps.Always allow time for cooling as Lamps that have been active for a time may stillbe too hot to touch.• COIN DOOR LAMPSThe coin door lamps all are 12V/DC GE194 or equivalent and can be accessedthrough the coin door.• BUTTON LAMPSThe button lamp is 12V/DC GE194 or equivalent and can be accessed through thecoin door.• TARGET LAMPSThe target lamps are all bayonet 12VR10W. Each target has two target lamps. Fortarget lamps in the upper playfield, access is from the underside of the playfield.Target lamps in the lower playfield are accessed by the removing of the lowerplayfield.• TIME INDICATOR LAMPSThe time indicator lamps are all 12V/DC GE906 and can be accessed from theplayfield.• PLAYFIELD DISPLAY LAMPSThere is one standard F18T8 18W fluorescent tube for the playfield display. Access isfrom the top of the machine.* CAUTION! *Always replace the lamps with the same or equivalent size, wattage and voltage.Page 39To Purchase This Item, Visit <strong>BMI</strong> <strong>Gaming</strong> | www.bmigaming.com | (800) 746-2255 | +1.561.391.7200
Operator's and Assembly <strong>Manual</strong> – <strong>Feeding</strong> <strong>Time</strong>© LAI GAMESMAINTENANCECLEANING AND CHECK UP• EXTERIORRegularly dust and clean the external cabinet areas as required, using a soft waterdampcloth and mild soap. Check for blown bulbs and replace as required.Any scratches or marks in the fiberglass or acrylic can be buffed out using car polishor cut and polish.* CAUTION! *Do not use solvents on the panels as it may affect the artwork.• INTERIORRegularly dust and vacuum the interior of the cabinet, taking care to remove anyobjects that may have fallen on the PCBs. Check and tighten all fixing hardware andfasteners as required.* WARNING! *Always turn OFF Mains power and unplugged the game, before cleaning theinterior of the machine.Always after cleaning the cabinet interior, check all harness connectors andrestore all loose or interrupted connections.Regularly check that all the Display and Button Lamps are operating through theSounds, Lamps and Display Test. Replace any globes that are not operational.Page 40To Purchase This Item, Visit <strong>BMI</strong> <strong>Gaming</strong> | www.bmigaming.com | (800) 746-2255 | +1.561.391.7200
Operator's and Assembly <strong>Manual</strong> – <strong>Feeding</strong> <strong>Time</strong>© LAI GAMESSECTION B: TECHNICAL DETAILSIt is advised that anybody using SECTION B forrepairing or modifying any of the components of thegame should be a qualified technician, having at least abasic knowledge of digital components, integratedcircuits and electricity.BPage 41To Purchase This Item, Visit <strong>BMI</strong> <strong>Gaming</strong> | www.bmigaming.com | (800) 746-2255 | +1.561.391.7200
Operator's and Assembly <strong>Manual</strong> – <strong>Feeding</strong> <strong>Time</strong>© LAI GAMESMAINS VOLTAGE ADJUSTMENT POWER SUPPLYThe Switch Mode Power Supply has a switch to set the mains voltage range. It islocated at the rear of the game cabinet, and is accessed via the back door. Use a thinblade screwdriver to move the selector switch to the desired mains voltage (SeeDiagram Below) TRANSFORMER CONNECTORSLocate the machine transformer(s) in the base of the cabinet. If unsure of the locationof the transformer(s), refer to Parts location diagram on page 36 of this manual.Change the position of the „ACTIVE‟ or „HOT WIRE‟ input, (marked brown on thediagram), to the position for the desired mains voltage. (See Diagram Below)6 WAY CONNECTOR PINOUTPIN FUNCTION1 240VAC2 220VAC3 120VAC4 110VAC5 0VAV (NEUTRAL)6 EARTHPage 42To Purchase This Item, Visit <strong>BMI</strong> <strong>Gaming</strong> | www.bmigaming.com | (800) 746-2255 | +1.561.391.7200
Operator's and Assembly <strong>Manual</strong> – <strong>Feeding</strong> <strong>Time</strong>© LAI GAMESTICKET DISPENSER REFERENCE GUIDEPage 43To Purchase This Item, Visit <strong>BMI</strong> <strong>Gaming</strong> | www.bmigaming.com | (800) 746-2255 | +1.561.391.7200
Operator's and Assembly <strong>Manual</strong> – <strong>Feeding</strong> <strong>Time</strong>© LAI GAMESPage 44To Purchase This Item, Visit <strong>BMI</strong> <strong>Gaming</strong> | www.bmigaming.com | (800) 746-2255 | +1.561.391.7200
Operator's and Assembly <strong>Manual</strong> – <strong>Feeding</strong> <strong>Time</strong>© LAI GAMESPage 45To Purchase This Item, Visit <strong>BMI</strong> <strong>Gaming</strong> | www.bmigaming.com | (800) 746-2255 | +1.561.391.7200
Operator's and Assembly <strong>Manual</strong> – <strong>Feeding</strong> <strong>Time</strong>© LAI GAMESPage 46To Purchase This Item, Visit <strong>BMI</strong> <strong>Gaming</strong> | www.bmigaming.com | (800) 746-2255 | +1.561.391.7200
Operator's and Assembly <strong>Manual</strong> – <strong>Feeding</strong> <strong>Time</strong>© LAI GAMESPage 47To Purchase This Item, Visit <strong>BMI</strong> <strong>Gaming</strong> | www.bmigaming.com | (800) 746-2255 | +1.561.391.7200
Operator's and Assembly <strong>Manual</strong> – <strong>Feeding</strong> <strong>Time</strong>© LAI GAMESPage 48To Purchase This Item, Visit <strong>BMI</strong> <strong>Gaming</strong> | www.bmigaming.com | (800) 746-2255 | +1.561.391.7200
Operator's and Assembly <strong>Manual</strong> – <strong>Feeding</strong> <strong>Time</strong>© LAI GAMESDISPENSER PARTS DIAGRAMDiagram is for referenceonly. Parts are not availableseparatelyPage 49To Purchase This Item, Visit <strong>BMI</strong> <strong>Gaming</strong> | www.bmigaming.com | (800) 746-2255 | +1.561.391.7200
Operator's and Assembly <strong>Manual</strong> – <strong>Feeding</strong> <strong>Time</strong>© LAI GAMES3 D EXPLODE PARTSPage 50To Purchase This Item, Visit <strong>BMI</strong> <strong>Gaming</strong> | www.bmigaming.com | (800) 746-2255 | +1.561.391.7200
Operator's and Assembly <strong>Manual</strong> – <strong>Feeding</strong> <strong>Time</strong>© LAI GAMESPage 51To Purchase This Item, Visit <strong>BMI</strong> <strong>Gaming</strong> | www.bmigaming.com | (800) 746-2255 | +1.561.391.7200
Operator's and Assembly <strong>Manual</strong> – <strong>Feeding</strong> <strong>Time</strong>© LAI GAMESPage 52To Purchase This Item, Visit <strong>BMI</strong> <strong>Gaming</strong> | www.bmigaming.com | (800) 746-2255 | +1.561.391.7200
Operator's and Assembly <strong>Manual</strong> – <strong>Feeding</strong> <strong>Time</strong>© LAI GAMESPage 53To Purchase This Item, Visit <strong>BMI</strong> <strong>Gaming</strong> | www.bmigaming.com | (800) 746-2255 | +1.561.391.7200
Operator's and Assembly <strong>Manual</strong> – <strong>Feeding</strong> <strong>Time</strong>© LAI GAMESFEEDING TIME MAIN WIRING DIAGRAMPage 54To Purchase This Item, Visit <strong>BMI</strong> <strong>Gaming</strong> | www.bmigaming.com | (800) 746-2255 | +1.561.391.7200
Operator's and Assembly <strong>Manual</strong> – <strong>Feeding</strong> <strong>Time</strong>© LAI GAMESFEEDING TIME POWER WIRING DIAGRAMPage 55To Purchase This Item, Visit <strong>BMI</strong> <strong>Gaming</strong> | www.bmigaming.com | (800) 746-2255 | +1.561.391.7200
Operator's and Assembly <strong>Manual</strong> – <strong>Feeding</strong> <strong>Time</strong>© LAI GAMESDISCLAIMEROPERATOR WILL TAKE NOTE.BY ACCEPTING DELIVERY OF AND PLACING THIS HARDWARE ANDLICENSED SOFTWARE INTO OPERATION, OPERATOR REPRESENTS ANDWARRANTS THAT IT WILL ONLY OPERATE THE HARDWARE AND LICENSEDSOFTWARE PROVIDED BY LAI GAMES IN COMPLIANCE WITH THEREGULATORY REQUIREMENTS OF THE COUNTRY, STATE, AND/ORMUNICIPALITY IN WHICH THE HARDWARE AND LICENSED SOFTWARE AREUSED AND/OR OPERATED. LAI GAMES HAS PROVIDED THIS HARDWAREAND LICENSED THE SOFTWARE ONLY FOR LEGITIMATE AND LEGAL USE,AND ANY USE OF THE HARDWARE AND LICENSED SOFTWARE IN AMANNER THAT VIOLATES ANY LAWS OF THE COUNTRY, STATE, AND/ORMUNICIPALITY IN WHICH THE HARDWARE AND LICENSED SOFTWARE AREUSED AND/OR OPERATED IS WHOLLY UNAUTHORIZED AND SHALL BE ATOPERATOR‟S SOLE AND COMPLETE RISK.Operator assumes any and all risk and liability for any civil or criminal legal claims orcauses of action arising from the unauthorized use and/or operation of the providedhardware and licensed software, such improper and unauthorized use specificallyincluding, but not limited to:(a) Operating or allowing the operation of the hardware and licensed software in amanner that violates the laws and regulations of the country, state, and/ormunicipality in which the hardware and licensed software are used oroperated;(b) Assembling or causing the assembly of the hardware in a manner notauthorized by or disclosed in this manual;(c) Any tampering with, changes to, or modifications of the licensed software thatoccur after the software leaves LAI GAMES‟ factory that is not made byauthorized LAI GAMES personnel and that is directly or indirectly caused byOperator; and(d) Any tampering with the computer chip/electronic programmable read onlymemory (EPROM) by or on behalf of Operator that directly or indirectlycauses the tamper-indicating holographic seal on the computer chip/EPROMto be broken or damaged in any way.LAI GAMES shall have no liability related to such improper and unauthorized use and/oroperation of the hardware and licensed software, and Operator shall indemnify, defend,and hold LAI GAMES harmless for any claim or cause of action brought against LAIGAMES arising from Operator‟s or Operator‟s representative‟s improper andunauthorized use and/or operation of the hardware and licensed software.ANY IMPROPER AND UNAUTHORIZED USE SHALL COMPLETELY ANDTOTALLY VOID ANY AND ALL WARRANTIES, BOTH EXPRESS AND IMPLIED,OF THE HARDWARE AND LICENSED SOFTWARE PROVIDED BY LAI GAMES.Page 56To Purchase This Item, Visit <strong>BMI</strong> <strong>Gaming</strong> | www.bmigaming.com | (800) 746-2255 | +1.561.391.7200
WARRANTYLAI GAMES warrants its manufactured products for a period of 3 months inclusive ofparts and labor from the date of sale.LAI GAMES exclusive obligation is to repair any item with any defects as a result offaulty workmanship or materials, providing the defective item or items of equipmentare returned to the LAI GAMES distributor from which the machine was purchased.LAI GAMES shall have no obligation to make repairs necessitated by negligence orinterference to any component by any unauthorized personal. This will automaticallyvoid any existing warranty.IF MAKING A WARRANTY CLAIM:(a) A Copy of the sales invoice must accompany the claim.(b) To and from Transport and freight costs are not covered by thewarranty.(c) Warranty is not transferable with the sale of a machine from oneowner to another.LAI GAMESsales@laigames.com www.laigames.comTo Purchase This Item, Visit <strong>BMI</strong> <strong>Gaming</strong> | www.bmigaming.com | (800) 746-2255 | +1.561.391.7200