Unbalancer 9-pin.pdf - Tube CAD Journal
Unbalancer 9-pin.pdf - Tube CAD Journal
Unbalancer 9-pin.pdf - Tube CAD Journal

Create successful ePaper yourself
Turn your PDF publications into a flip-book with our unique Google optimized e-Paper software.
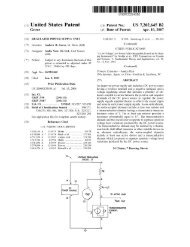
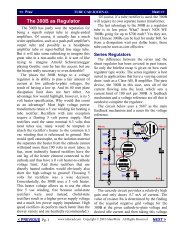
GlassWare Audio Design 15Double-Sided Board Because the board is double sided, with traces and platedthroughpads on each side, it is often easier to solder the resistors from the top side.In addition, it is often easier to attach the LD1085 (heater regulator) to its heatsinkfirst (using heatsink hardware kit) and then to solder both heatsink and device to thePCB at once. You may solder the tube sockets on the top of the PCB and solder allthe remaining parts on the bottom, which allows attaching the PCB to the chassis’stop panel, with the tubes protruding through holes, which can easily be done with the<strong>Unbalancer</strong> PCB, as the solid-state regulator and LM334 can be soldered on thebottom without having to twist their leads to conform to the inverted pad positions,as the heater regulator gets a redundant set of solder pads on the PCB's bottom side.Just be sure to attach the regulator the other side of the heatsink.Capacitors Because the PCB is so overbuilt, it is extremely difficult to remove anincorrectly placed part. Thus, be sure to confirm all the electrolytic capacitororientations, as a reversed polarized capacitor can easily vent (or even explode) whenpresented with high-voltage. Confirm twice, solder once. In addition, large couplingand bypass capacitors should be adhered to the.Fusing Usually a fuse is placed in series with the power transformer’s primary, butboth the high voltage and the heater secondaries can receive fuses as well. Use a slowblow fuse for the heater and quick blow fuse with the B+ output.Standoffs <strong>Tube</strong>s are microphonic by nature, being mechanical structures. Thus, itpays to prevent vibrations from reaching the tubes. One easy technique is to use smallrubber O-rings below and above the PCB where the screws enter the PCB’s mountingholes. The screws should be just tightened enough to keep the PCB from ringing orrattling when tapped.RC Power-Supply FilterResistors R17 and R12 are the voltage-drop<strong>pin</strong>g resistors in the two RC powersupply filters used in the <strong>Unbalancer</strong>. Resistor R17 is used in the first RC filter. Itsvalue can be anything between 1 to 1kohms. This resistor will see the entire highvoltagecurrent draw of the <strong>Unbalancer</strong> line-stage amplifier. (This resistor can bereplaced by a low-DCR choke that mounts on the chassis.)The CCA kit supplies five pairs 3W resistors for R12 use: 1.6k, 2k, 3k, 3.9k, and10k. Page 9 holds a chart that shows the voltage drop across the R12 versus thecurrent flow. Remember each channel gets it own R12 resistor. For example, a<strong>Unbalancer</strong> line-stage amplifier might run a total of 20mA of idle current perchannel, for a total of 40mA for the entire line-stage amplifier. So by looking up the20mA column, we can see the resulting voltage drops. Thus, a 2k resistor will drop40V, so a 300Vdc raw DC power supply will deliver 260Vdc to the input and outputtubes. An * denotes excessive current or voltage, so that resistor value cannot be usedwithout risking damaging the at least one of the resistors.from C7R17R12to tubesC8C5C4