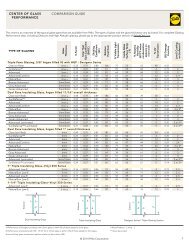
FOR DOUBLE-HUNG WINDOWS USING FRAME ... - Pella.com
FOR DOUBLE-HUNG WINDOWS USING FRAME ... - Pella.com
FOR DOUBLE-HUNG WINDOWS USING FRAME ... - Pella.com

You also want an ePaper? Increase the reach of your titles
YUMPU automatically turns print PDFs into web optimized ePapers that Google loves.
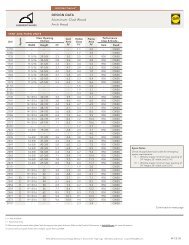
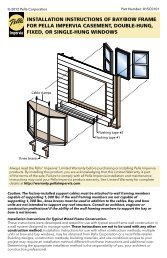
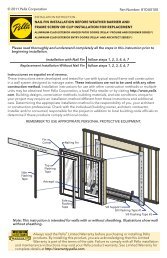
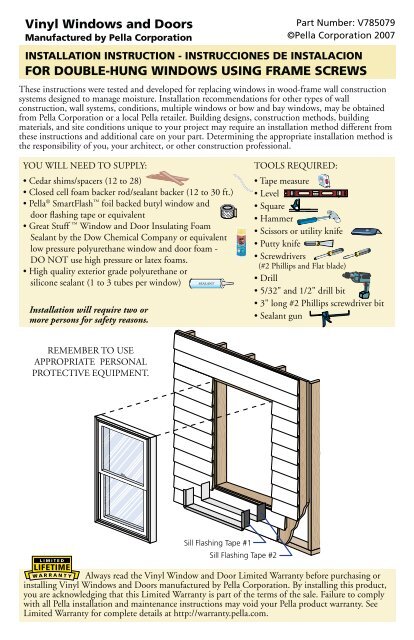
Vinyl Windows and DoorsManufactured by <strong>Pella</strong> CorporationPart Number: V785079©<strong>Pella</strong> Corporation 2007INSTALLATION INSTRUCTION - INSTRUCCIONES DE INSTALACION<strong>FOR</strong> <strong>DOUBLE</strong>-<strong>HUNG</strong> <strong>WINDOWS</strong> <strong>USING</strong> <strong>FRAME</strong> SCREWSThese instructions were tested and developed for replacing windows in wood-frame wall constructionsystems designed to manage moisture. Installation re<strong>com</strong>mendations for other types of wallconstruction, wall systems, conditions, multiple windows or bow and bay windows, may be obtainedfrom <strong>Pella</strong> Corporation or a local <strong>Pella</strong> retailer. Building designs, construction methods, buildingmaterials, and site conditions unique to your project may require an installation method different fromthese instructions and additional care on your part. Determining the appropriate installation method isthe responsibility of you, your architect, or other construction professional.YOU WILL NEED TO SUPPLY: ® SmartFlash foil backed butyl window anddoor flashing tape or equivalent Window and Door Insulating FoamSealant by the Dow Chemical Company or equivalentlow pressure polyurethane window and door foam -DO NOT use high pressure or latex foams. Installation will require two ormore persons for safety reasons.SEALANTTOOLS REQUIRED: REMEMBER TO USEAPPROPRIATE PERSONALPROTECTIVE EQUIPMENT.Always read the Vinyl Window and Door Limited Warranty before purchasing orinstalling Vinyl Windows and Doors manufactured by <strong>Pella</strong> Corporation. By installing this product,you are acknowledging that this Limited Warranty is part of the terms of the sale. Failure to <strong>com</strong>plywith all <strong>Pella</strong> installation and maintenance instructions may void your <strong>Pella</strong> product warranty. SeeLimited Warranty for <strong>com</strong>plete details at http://warranty.pella.<strong>com</strong>.
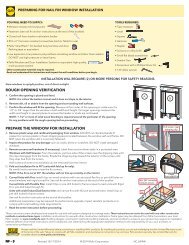
1 PREPARE THE OPENINGA. Prepare the rough opening. rough opening on both sides, the top and the bottom.Note: If installing new blocking, install the blocking so it’s flush with the exteriorsheathing of the house. DO NOT attempt to install a window in an undersized opening.B. Apply sill flashing tape #1. width. Apply at the bottom of the opening as shown. If the sheathing or water resistive water resistive barrier.Note: The tape is cut 12" longer than the width so that it will extend 6" up each sideof the opening.6"1B1"6"1B1/2"1/2"1CC. Tab the sill flashing tape and fold. barrier.Note: This step is not required if the exterior trim has not been removed.1"1F1DD. Apply sill flashing tape #2. E. Verify that the installation screws will fasten into solid wood. at screw locations.F. Install and level sill. center. Adjust shims as necessary to ensure the sill is level.
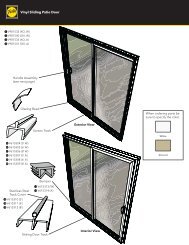
2 PREPARE THE WINDOW <strong>FOR</strong> INSTALLATIONA. Remove packing material from the window.Note: Check product for any crack or penetrationin the frame. DO NOT install damaged units.B. Drill 5/32" installation screw holes through the frame head.DO NOT drill holes through the sill.For single units pre-drill two installation holes. Each hole should interior face of the window. Position the holes so there is not more Note: Jamb installation screw holes are predrilled.Windows with frame height > 62" only: in each jamb. Position a hole midwaybetween the top two factory drilled screwholes and a hole midway between thebottom two factory drilled screw holes.Note: It is necessary to raise the lower sashto drill the bottom screw holes. C. Counter drill using a 1/2" drill bit witha drill guide the frame. DO NOT penetrate the outer D. Install self-adhesive plastic spacers. Prior to setting thewindow into the opening, install a self adhesive plasticspacer to the frame at each installation screw location in thejambs and head. Position the spacer between the accessorygroove legs on the window frame.
E. Pre-drill installation screw holes in the sillattachment clips. two holes in each clip. The holes should be located interior edge of the clip. F. Install the sill attachment clips (provided)into the sill of the double-hung window. Usea mallet or hammer to drive the clips into theaccessory groove at the sill.Two and Three Wide Units: Place one clip mullion and an additional clip centered mullion.Single Units: Place one clipcentered on the sill.3 SETTING AND FASTENING THE WINDOWA. Slide the window into the opening. Place the bottom of the window on the spacers atthe bottom of the opening. Position the window so that the exterior face of the frame installation screw holes in the jamb. This will hold the window in place while shimmingit plumb and square.B. Place shims at each installation screw hole between thewindow and rough opening. Adjust the shims as required toplumb and square the window in the opening.Note: DO NOT shim between the window sill and the roughopening. DO NOT over shim.3BC. Drill 5/32” pilot holes through the head and jamb screwinstallation holes, and through the shims. DO NOT drill intothe wood framing.Note: Raise the lower sash to access the bottom installationscrew holes. Windows with frame height >62” will have six holesper side, all other windows will have four holes per side.
D. Fasten the window in the opening through the installation holes and the shims and into thewall members. DO NOT over tighten. Over tighteningwill distort the frame and may interfere with theperformance of the window.E. Insert a plastic screw cover into each installation screw hole in the jambs.F. Locate the jamb adjusting screw in the sash track, justabove the bottom sash. Turn the screw clockwise untilit is flush or slightly below flush with the surface of thesash track to prevent interference with the balance.3DShim#10 x 2"screw3EShimScrewcover Fasten the sill through each pre-drilled holes in the sill clips. Check window operation. Lock and unlock the window. Raise and lower both sash.Note: If there are any problems with the operation of the window, recheck shimlocations and adjust for plumb and square.4 SEALING THE WINDOW TO THE EXTERIOR WALL CLADDINGNote: The sealant details shown are standard re<strong>com</strong>mendations from the sealant industry.Contact your sealant supplier for re<strong>com</strong>mendations and instructions for these and anyother applications.
A. Insert closed cell foam backer rod into the space around the window. Place thebacker rod between the window frame and the rough opening, then push it until it is justbehind the accessory groove of the window frame.Note: Backer rod adds shape and depth for the sealant line.B. Apply a bead of high quality exteriorgrade sealant to the entire exterior space from the backer rod to the exterioredge of the accessory groove.4AC. Shape, tool and clean excess sealant. the shape of an hourglass.Note: This method creates a more flexible sealant line capable ofexpanding and contracting.4B5 INTERIOR SEALCaution: Ensure use of low pressure polyurethane window and door insulating foams and strictlyfollow the foam manufacturer’s re<strong>com</strong>mendations for application. Use of high pressure foams orimproper application of the foam may cause the window frame to bow and hinder operation.A. Apply insulating foam sealant at the head, jambsand sill. From the interior, insert the nozzle of the between the window and the rough opening and apply expansion of the foam and will minimize squeeze out. Window andDoor Insulating Foam Sealant by the Dow Chemical Note: It may be necessary to squeeze the end of thetube with pliers to be able to insert into the spacebetween the window frame and the rough opening.DO NOT <strong>com</strong>pletely fill the space between thewindow frame and the rough opening.5AInterior ViewB. Check window operation by opening and closing the window.Note: If the window does not operate correctly, check to make sure it is stillplumb, level, square and that the sides are not bowed. If adjustments arerequired, remove the foam with a serrated knife. Adjust the shims, and reapplythe insulating foam sealant.
CLEANING INSTRUCTIONSRemove labels and clean the glass, using a soft, clean, grit-free cloth and mild soap or detergent.Be sure to remove all liquid by wiping dry or use a clean squeegee. The vinyl frame may be cleaned ® or Soft Scrub ®may be used. DO NOT use solvents such as mineral spirits, toluene, xylene, naphtha or muriatic Keep window tracks clear of dirt and debris. Keep weep holes open and clear of obstructions.IMPORTANT NOTICE designed and constructed to properly manage moisture. <strong>Pella</strong> Corporation is not responsible for claims of moisture within the wall systems. The determination of the suitability of all building <strong>com</strong>ponents,including the use of <strong>Pella</strong> products, as well as the design and installation of flashing and sealing systemsare the responsibility of the Buyer or User, the architect, contractor, installer, or other constructionprofessional and are not the responsibility of <strong>Pella</strong>.<strong>Pella</strong> products should not be used in barrier wall systems which do not allow for proper management of New Mexico, Arizona, Nevada, Utah, and Colorado, <strong>Pella</strong> makes no warranty of any kind on andassumes no responsibility for <strong>Pella</strong> windows and doors installed in barrier wall systems. In thestates listed above, the installation of <strong>Pella</strong> Products in barrier wall or similar systems must be inaccordance with <strong>Pella</strong>’s installation instructions.