Giving a subcutaneous injection - National Institutes of Health
Giving a subcutaneous injection - National Institutes of Health
Giving a subcutaneous injection - National Institutes of Health

You also want an ePaper? Increase the reach of your titles
YUMPU automatically turns print PDFs into web optimized ePapers that Google loves.
<strong>Giving</strong> a <strong>subcutaneous</strong> <strong>injection</strong><br />
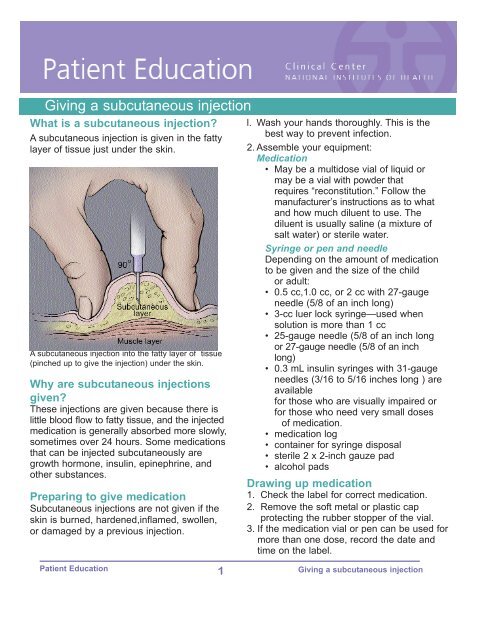
What is a <strong>subcutaneous</strong> <strong>injection</strong>?<br />
A <strong>subcutaneous</strong> <strong>injection</strong> is given in the fatty<br />
layer <strong>of</strong> tissue just under the skin.<br />
A <strong>subcutaneous</strong> <strong>injection</strong> into the fatty layer <strong>of</strong> tissue<br />
(pinched up to give the <strong>injection</strong>) under the skin.<br />
Why are <strong>subcutaneous</strong> <strong>injection</strong>s<br />
given?<br />
These <strong>injection</strong>s are given because there is<br />
little blood flow to fatty tissue, and the injected<br />
medication is generally absorbed more slowly,<br />
sometimes over 24 hours. Some medications<br />
that can be injected <strong>subcutaneous</strong>ly are<br />
growth hormone, insulin, epinephrine, and<br />
other substances.<br />
Preparing to give medication<br />
Subcutaneous <strong>injection</strong>s are not given if the<br />
skin is burned, hardened,inflamed, swollen,<br />
or damaged by a previous <strong>injection</strong>.<br />
l. Wash your hands thoroughly. This is the<br />
best way to prevent infection.<br />
2. Assemble your equipment:<br />
Medication<br />
• May be a multidose vial <strong>of</strong> liquid or<br />
may be a vial with powder that<br />
requires “reconstitution.” Follow the<br />
manufacturer’s instructions as to what<br />
and how much diluent to use. The<br />
diluent is usually saline (a mixture <strong>of</strong><br />
salt water) or sterile water.<br />
Syringe or pen and needle<br />
Depending on the amount <strong>of</strong> medication<br />
to be given and the size <strong>of</strong> the child<br />
or adult:<br />
• 0.5 cc,1.0 cc, or 2 cc with 27gauge<br />
needle (5/8 <strong>of</strong> an inch long)<br />
• 3cc luer lock syringe—used when<br />
solution is more than 1 cc<br />
• 25gauge needle (5/8 <strong>of</strong> an inch long<br />
or 27gauge needle (5/8 <strong>of</strong> an inch<br />
long)<br />
• 0.3 mL insulin syringes with 31gauge<br />
needles (3/16 to 5/16 inches long ) are<br />
available<br />
for those who are visually impaired or<br />
for those who need very small doses<br />
<strong>of</strong> medication.<br />
• medication log<br />
• container for syringe disposal<br />
• sterile 2 x 2inch gauze pad<br />
• alcohol pads<br />
Drawing up medication<br />
1. Check the label for correct medication.<br />
2. Remove the s<strong>of</strong>t metal or plastic cap<br />
protecting the rubber stopper <strong>of</strong> the vial.<br />
3. If the medication vial or pen can be used for<br />
more than one dose, record the date and<br />
time on the label.<br />
Patient Education 1 <strong>Giving</strong> a <strong>subcutaneous</strong> <strong>injection</strong>
4. Clean the exposed rubber stopper<br />
using an alcohol swab.<br />
5. Remove the syringe from the plastic<br />
or paper cover. If necessary, attach<br />
the needle securely.<br />
6. Pull back and forth on the plunger by<br />
grasping the plunger handle. Grasping<br />
the handle end will prevent contamination<br />
<strong>of</strong> the plunger shaft (which is<br />
sterile).<br />
7. With the needle capped, pull back the<br />
plunger, filling the syringe with air<br />
equal to the amount <strong>of</strong> medication to<br />
be administered.<br />
8. Remove the cap covering the needle<br />
and set it on its side to prevent contamination.<br />
Be careful not to touch the<br />
needle. The inside <strong>of</strong> the cap and<br />
needle is sterile, and the needle will<br />
be covered again with this cap.<br />
9. With the vial in an upright position,<br />
push the needle through the cleansed<br />
rubber stopper on the vial. Push the<br />
needle in at a 90 degree angle, being<br />
careful not to bend the needle.<br />
10.Inject the air in the syringe into<br />
the vial. Air is injected into a multidose<br />
vial to prevent a vacuum<br />
from forming. If too little or no air is<br />
injected, withdrawing the medication<br />
may be difficult. If too much air<br />
is injected, the plunger may be<br />
forced out <strong>of</strong> the barrel causing the<br />
medication to spill.<br />
11.Turn the vial upside down, with the<br />
needle remaining in the vial. The<br />
needle will be pointing upward.<br />
12.Make sure that the tip <strong>of</strong> the needle<br />
is completely covered by the<br />
medication. This will make it easier to<br />
withdraw the solution (and not air).<br />
13.Pull back on the plunger to fill the<br />
syringe with the correct dose <strong>of</strong><br />
medication.<br />
14.Keep the vial upside down, with the<br />
needle in the vial pointed upward.<br />
Tap the syringe, or “flick” it with your<br />
fingertips. This helps move bubbles to<br />
the top <strong>of</strong> the syringe.<br />
15.Once the bubbles are at the top <strong>of</strong> the<br />
syringe, gently push on the plunger to<br />
force the bubbles out <strong>of</strong> the syringe<br />
and back into the vial.<br />
Or, you may push all the medication<br />
solution back into the vial, withdraw<br />
again slowly, and repeat steps 14 and<br />
15.<br />
Note: It is important to eliminate large air<br />
bubbles because they take up space needed<br />
for the medication, and they may cause pain<br />
or discomfort when injected.<br />
16.After removing the bubbles, check the<br />
dose <strong>of</strong> medication in the syringe to<br />
be sure you have drawn up the correct<br />
amount.<br />
If using a pen, skip steps 5 to 16.<br />
Do the following:<br />
a. Attach needle to pen by cleaning<br />
the top with alcohol and screwing<br />
on the needle.<br />
b. Dial in your prime volume (usually<br />
0.02 mL) using the manufacturer’s<br />
directions. .<br />
c. With pen needle pointed up, push<br />
the <strong>injection</strong> button completely.<br />
You should see a drop or stream<br />
<strong>of</strong> liquid. If you do not, repeat<br />
priming steps until this occurs.<br />
d. Dial in prescribed dose <strong>of</strong><br />
medication.<br />
17. After the medication is correctly<br />
drawn up, carefully replace the<br />
needle cap to prevent contamination.<br />
Patient Education 2 <strong>Giving</strong> a <strong>subcutaneous</strong> <strong>injection</strong>
Locating <strong>injection</strong> sites<br />
Subcutaneous <strong>injection</strong>s can be given in the arms, legs, or abdomen. Your nurse or<br />
doctor will help you select the best sites to administer your medication.<br />
1. To locate <strong>injection</strong> sites<br />
on the arms, fold one arm<br />
across the chest. Place<br />
your hand on the shoulder<br />
and draw an imaginary<br />
line below your hand.<br />
Place another hand on the<br />
elbow..Draw an imaginary<br />
line down the outer side <strong>of</strong> t<br />
the arm and down the<br />
center front <strong>of</strong> the arm,<br />
starting at the elbow.<br />
The area inside these<br />
imaginary lines is where<br />
<strong>injection</strong>s are given.<br />
(If you are injecting<br />
imagine the hand<br />
placement.)<br />
Injection sites on the side <strong>of</strong> the<br />
arm.<br />
2. To locate <strong>injection</strong> sites on the thighs, sit down,<br />
place your hand above the knee, and draw an<br />
imaginary line above it. Place your hand at the<br />
uppermost part <strong>of</strong> the thigh and draw an imaginary<br />
line below your hand. Draw an imaginary line down<br />
the outer side <strong>of</strong> the leg and down the center front<br />
<strong>of</strong> the leg. The area within these imaginary lines<br />
is where <strong>injection</strong>s may be given.<br />
3.To locate <strong>injection</strong> sites on the abdomen, place your<br />
hands on the lower ribs and draw an imaginary line<br />
them. Use this area below your hands for <strong>injection</strong>s,<br />
as far around as you can pinch up fatty tissue.<br />
use a 1inch area around the navel.<br />
yourself,<br />
Injection sites on the back <strong>of</strong> the arm.<br />
below<br />
Do not<br />
Injection sites on the front <strong>of</strong> the thigh.<br />
Patient Education 3 <strong>Giving</strong> a <strong>subcutaneous</strong> <strong>injection</strong>
Rotating <strong>injection</strong> sites<br />
It is extremely important to rotate sites to keep<br />
the skin healthy. Repeated <strong>injection</strong>s in the<br />
same spot can cause scarring and hardening<br />
<strong>of</strong> fatty tissue that will interfere with absorption<br />
<strong>of</strong> medication. Each <strong>injection</strong> should be<br />
about 1 inch apart. Each <strong>injection</strong> site can be<br />
measured with a small dot BandAid, providing<br />
the patient is not sensitive to the adhesive.<br />
Start <strong>injection</strong>s at the highest point <strong>of</strong> the area<br />
and continue down toward the point farthest<br />
away from the body (for example, upper arm<br />
down toward elbow). It is preferable to use all<br />
sites available on one body part (arm or leg)<br />
before moving on to another. However, some<br />
parents find that children are more accepting<br />
Injection sites on the abdomen<br />
<strong>of</strong> <strong>injection</strong>s if they are rotated from one body<br />
part to another (arm, leg, arm, leg). Avoid giving <strong>injection</strong>s in areas that are burned,<br />
reddened, inflamed, swollen, or damaged by prior <strong>injection</strong>s.<br />
Preparing the skin<br />
Since the skin is the body’s first defense<br />
against infection, it must be cleansed<br />
thoroughly before a needle is inserted.<br />
Cleanse the skin with a backandforth<br />
motion using an alcohol swab. This<br />
motion moves bacteria away from the<br />
<strong>injection</strong> site. Allow the alcohol to dry<br />
completely by air.<br />
<strong>Giving</strong> the <strong>injection</strong><br />
1. Take the cover <strong>of</strong>f the needle. Be<br />
careful not to contaminate the needle.<br />
Place the cover on its side.<br />
2. Hold the syringe in one hand like<br />
pencil or a dart.<br />
3. Grasp the skin between the thumb and<br />
index finger with your other hand and<br />
pinch up.<br />
4. Quickly thrust the needle all the way<br />
into the skin. Do not “push” the needle<br />
into the skin slowly or thrust the needle<br />
into the skin with great force.<br />
Patient Education 4 <strong>Giving</strong> a <strong>subcutaneous</strong> <strong>injection</strong>
Do not press down on the top <strong>of</strong> the<br />
plunger while piercing the skin.<br />
5. Insert the needle at a 90degree (right)<br />
angle. This angle is important to<br />
ensure that the medications will be<br />
injected into the fatty tissue. However,<br />
for small children, and persons with little<br />
<strong>subcutaneous</strong> fat on thin skin, you<br />
may be taught to use a 45degree<br />
angle.<br />
If using a pen, insert the pen needle<br />
at a 90degree angle.<br />
6. After the needle is completely inserted<br />
into the skin, release the skin that you<br />
are grasping.<br />
Press down on the plunger to release<br />
medication into the <strong>subcutaneous</strong><br />
layer in a slow, steady pace.<br />
If using a pen, press the <strong>injection</strong><br />
button completely (or until it clicks).<br />
Count 10 seconds before removing<br />
the needle from the skin.<br />
7. As the needle is pulled out <strong>of</strong> the skin,<br />
gently press a 2 x 2 gauze onto the needle<br />
insertion site. Pressure over the site<br />
while removing the needle prevents skin<br />
from pulling back, which may be uncomfortable.<br />
The gauze also helps seal the<br />
punctured tissue and prevents leakage.<br />
8. If instructed to do so, press or rub the<br />
site for a few seconds.<br />
9. It is not serious if you notice blood at<br />
the site after the needle is removed.<br />
You may have nicked a surface blood<br />
vessel when you injected, and blood is<br />
following the needle track out to the surface.<br />
Simply press the site with a 2 x 2<br />
gauze pad. Also, a small amount <strong>of</strong><br />
clear fluid may appear at the site. This<br />
may be medication that is following the<br />
needle track to the surface. Again,<br />
apply pressure using a 2 x 2 gauze<br />
pad.<br />
If using a pen:<br />
Untwist needle on the pen and safely<br />
dispose the needle. Replace pen cap<br />
and store as instructed.<br />
Safe needle disposal<br />
Please refer to the Clinical Center pamphlet<br />
“Handling Sharp Objects Safely at<br />
Home.”<br />
o Place the syringe or needle in a hard<br />
plastic or metal container with a tightly<br />
secured lid.<br />
o Do not recap needles after use.<br />
Keep the container out <strong>of</strong> the reach <strong>of</strong><br />
children or pets.<br />
o When the container is threequarters<br />
full, take it to a health care facility<br />
(hospital or doctor’s <strong>of</strong>fice) for proper<br />
disposal. If you live within driving<br />
distance <strong>of</strong> NIH, you can bring your<br />
container to NIH for proper disposal.<br />
Patient Education 5 <strong>Giving</strong> a <strong>subcutaneous</strong> <strong>injection</strong>
Medication<br />
Dose<br />
Schedule<br />
Primary Nurse<br />
Phone<br />
Physician<br />
Phone<br />
This information is prepared specifically for persons<br />
taking part in clinical research at the <strong>National</strong><br />
<strong>Institutes</strong> <strong>of</strong> <strong>Health</strong> Clinical Center and may not apply<br />
to patients elsewhere. If you have questions about the<br />
information presented here, talk to a member <strong>of</strong> your<br />
health care team.<br />
Products/resources named serve as examples and do<br />
not imply endorsement by NIH. The fact that a certain<br />
product/resource is not named does not imply that<br />
such product/resource is unsatisfactory.<br />
<strong>National</strong> <strong>Institutes</strong> <strong>of</strong> <strong>Health</strong> Clinical Center<br />
Bethesda, MD 20892<br />
Questions about the Clinical Center?<br />
http://www.cc.nih.gov/comments.shtml<br />
6/2012<br />
NIH...Turning Discovery Into <strong>Health</strong><br />
Patient Education 6 <strong>Giving</strong> a <strong>subcutaneous</strong> <strong>injection</strong>