Garden Grove by Henry Glass & Co. - 3 Dudes Quilting
Garden Grove by Henry Glass & Co. - 3 Dudes Quilting
Garden Grove by Henry Glass & Co. - 3 Dudes Quilting

You also want an ePaper? Increase the reach of your titles
YUMPU automatically turns print PDFs into web optimized ePapers that Google loves.
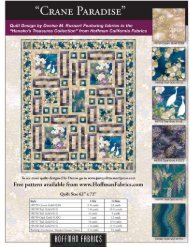
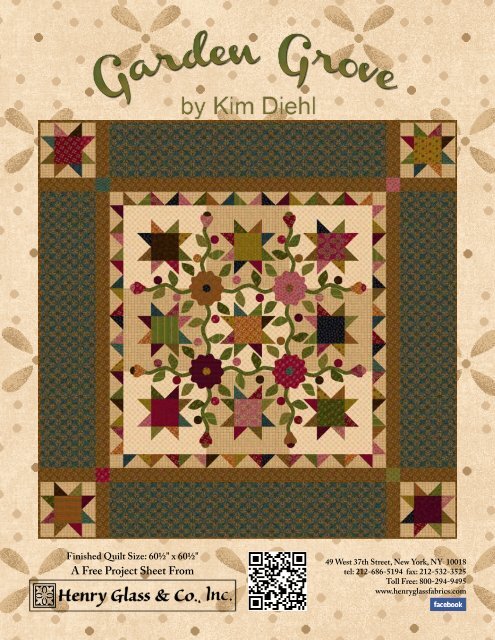
<strong>Garden</strong> <strong>Grove</strong>Finished Quilt Size: 60½" x 60½"Finished Block Size: 12" x 12"Fabrics in the <strong>Co</strong>llection5953-22 5953-77 5953-88 5954-44 5954-66 5954-885955-44 5955-46 5955-77 5956-30 5956-33 5956-665957-30 5957-33 5957-88 5958-33 5958-77 5958-885959-22 5959-66 5959-77 5960-44 5960-66 5960-88
<strong>Garden</strong> <strong>Grove</strong>Materials∙ 1 1/4 yards of tan print for blocks and borders(5955-44)∙ 1 yard of cream print for blocks (5954-44)∙ 1 1/8 yards of medium brown print for blocks,borders, appliqués, and binding (5957-33)∙ 1 1/8 yard of teal print for outer border (5953-77)∙ 1/2 yard of green print for blocks, borders, vines,and appliqués (5959-66)∙ 19 fat eighths (9” x 22”) of assorted prints forblocks, borders, and appliqués (5953-22, 88;5954-66, 88; 5955-46, 77; 5956-30, 33, 66;5957-30, 88; 5958-33, 77, 88; 5959-22, 77;5960-44, 66, 88)∙ 3 3/4 yards of gold print fabric for backing(5960-44)∙ 1 square, 66” x 66”, of batting∙ 3/8” bias bar∙ Water-soluble liquid glue for fabric∙ Basic supplies for quiltmaking and your favoriteappliqué methodCutting InstructionsPlease cut all pieces across the width of the fabric in theorder given, unless otherwise noted.From the tan print, cut:4 strips, 4 1/2” x 42”; crosscut into 32 squares,4 1/2” x 4 1/2”8 strips, 2 1/2” x 42”; crosscut into 52rectangles,2 1/2” x 4 1/2”, and 20 squares,2 1/2” x 2 1/2”From the cream print, cut:5 strips, 4 1/2” x 42”; crosscut into 40 squares,4 1/2” x 4 1/2”From the medium brown print, cut:4 strips, 2 1/2” x 40 1/2”8 strips, 2 1/2” x 42”; crosscut 2 strips into 8rectangles, 2 1/2” x 8 1/2”. The remainingstrips will be used for the binding.Reserve the scraps.From the teal print, cut:4 strips, 8 1/2” x 40 1/2”Reserve the scraps.From the 1/2 yard cut of green print, cut:Enough 1 1/4”-wide bias strips to make four strips,40” each, when joined together end to end usingstraight, not diagonal, seams. Reserve the scraps.Page 1From each of the assorted print fat eighths, and thereserved brown, teal, and green print scraps, cut:8 squares, 2 1/2” x 2 1/2” (combined total of 176)From the remainder of the prints listed above, cut anadditional:13 squares, 4 1/2” x 4 1/2” (star block centersquares)4 squares, 2 1/2” x 2 1/2” (middle bordersashing squares)Reserve the scraps for the appliqués.From the reserved scraps of assorted green prints, cut:20 leaves20 reversed leaves8 calyxes’s (bud base)From the remaining reserved prints, cut:4 flowers36 circles (flower centers, berries, and buds)Piecing the Star Blocksand the Quilt CenterAll pieces are sewn with right sides together using a 1/4”seam allowance unless otherwise noted.1. Use a pencil and an acrylic ruler to draw a sewingline from corner to corner on the wrong side of 176 of theassorted print 2 1/2” squares.2. Layer a prepared assorted print 2 1/2” square over onecorner of a tan print 4 1/2” square. Stitch the pair togetheron the drawn line. Press the resulting inner triangle open,aligning the corner with the bottom layers to keep itsquare. Trim away the layers underneath the top triangle,leaving a 1/4” seam allowance. In the same manner, stitch,press, and trim a second prepared assorted print square tothe tan square to make a mirror-image point. Repeat for atotal of 16 star point units.3. Lay out one assorted print 4 1/2” square, four starpoint units, and four tan print 4 1/2” squares as shown.Join the pieces in each horizontal row. Press the seamallowances away from the star points. Join the rows. Pressthe seam allowances away from the middle row. Repeatfor a total of four tan print Star blocks measuring 12 1/2”square, including the seam allowances.
<strong>Garden</strong> <strong>Grove</strong>Page 24. Repeat steps 2 and 3 to piece 20 cream print star pointunits and make a total of five cream print Star blocks.5. Referring to the pictured quilt, lay out the Star blocksto form the quilt center. Join the blocks in each horizontalrow. Press the seam allowances open. Join the rows. Pressthe seam allowances open. The pieced quilt center shouldmeasure 36” square, including the seam allowances.Appliquéing the Quilt Center1. Join the 1 1/4”-wide green print bias strips togetherend to end to make four pieced 40” strips. Press theseam allowances to one side, all in the same direction.With wrong sides together, fold each pieced strip in halflengthwise and use a scant 1/4” seam to stitch along thelong raw edges to make a tube. Use the bias bar to presseach tube flat, centering the seam so that it will be hiddenfrom the front. After removing the bias bar, apply tiny dotsof liquid fabric glue underneath each pressed seam and usea hot, dry iron to heat set the seam in place.2. Lay out nine pieced sawtooth units end to end to forma pieced strip. Join the units. Press the seam allowancesopen. Repeat for a total of four pieced sawtooth strips.3. Join a pieced sawtooth strip to the right and left sidesof the quilt center. Press the seam allowances towardthe quilt center. Join a tan print 2 1/2” square to eachend of the remaining pieced sawtooth strips. Press theseam allowances toward the tan print. Join these stripsto the remaining sides of the quilt center. Press the seamallowances toward the quilt center.4. Join a medium brown print 2 1/2” x 40 1/2” stripto the right and left sides of the quilt top. Press the seamallowances toward the brown print. Join an assorted print2 1/2” square to each end of the remaining 2 1/2” x 401/2” brown print strips. Press the seam allowances towardthe brown print. Join these strips to the remaining sides ofthe quilt top. Press the seam allowances toward the brownprint.5. Lay out one assorted print 4 1/2” square, four piecedsawtooth units, and four tan print 2 1/2” squares asshown. Join the pieces in each horizontal row. Press theseam allowances away from the sawtooth units. Join therows. Press the seam allowances away from the middlerow. Repeat for a total of four pieced border Star blocksmeasuring 8 1/2” square, including the seam allowances.2. Dot the seam allowance of each prepared vine withliquid fabric glue. Referring to the pictured quilt, laythe vines out along the Star block seams, forming gentlecurves as you position them; trim away any excess vinelength. From the back of the quilt top, use a hot, dry iron toheat set the glue-basted vines. Use your favorite appliquémethod to stitch the vines in place.3. Using the pictured quilt as a guide, work from thebottom layer to the top to lay out, baste and stitch theappliqués to the quilt center.Piecing and Adding the Borders1. Layer a prepared assorted print 2 1/2” square onto oneend of a tan print 2 1/2” x 4 1/2” rectangle. Stitch the pairtogether on the drawn line. Press and trim the resultingpoint as previously instructed. Position, press, and trima second prepared assorted print 2 1/2” square onto theremaining end of the rectangle to make a sawtooth unit.Repeat for a total of 52 pieced sawtooth units.6. Join a medium brown print 2 1/2” x 8 1/2” rectangleto each end of the teal print 8 1/2” x 40 1/2” strips. Pressthe seam allowances toward the teal print. Join a piecedteal strip to the right and left sides of the quilt top. Pressthe seam allowances toward the teal print. Join a borderStar block to each end of the remaining pieced teal strips.Press the seam allowances away from the Star blocks.Join these pieced strips to the remaining sides of the quilttop. Press the seam allowances away from the quilt center.The finished quilt top should now measure 60 1/2” square,including the seam allowances.<strong>Co</strong>mpleting the QuiltLayer the quilt top, batting, and backing. Quilt the layersas desired. Join the brown print 2 1/2” x 42” strips into onelength and use it to bind the quilt.©2012 <strong>Henry</strong> <strong>Glass</strong> & <strong>Co</strong>., Inc.