Blade Seal Replacement (HCD Series) - Greenheck
Blade Seal Replacement (HCD Series) - Greenheck
Blade Seal Replacement (HCD Series) - Greenheck

You also want an ePaper? Increase the reach of your titles
YUMPU automatically turns print PDFs into web optimized ePapers that Google loves.
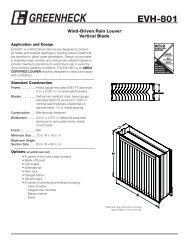
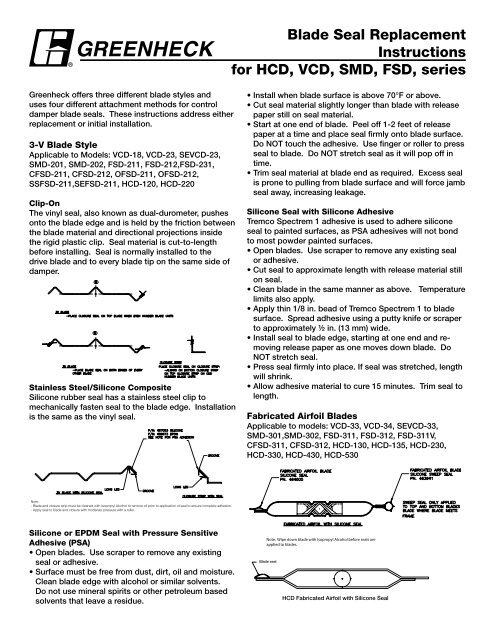
<strong>Blade</strong> <strong>Seal</strong> <strong>Replacement</strong>Instructionsfor <strong>HCD</strong>, VCD, SMD, FSD, series<strong>Greenheck</strong> offers three different blade styles anduses four different attachment methods for controldamper blade seals. These instructions address eitherreplacement or initial installation.3-V <strong>Blade</strong> StyleApplicable to Models: VCD-18, VCD-23, SEVCD-23,SMD-201, SMD-202, FSD-211, FSD-212,FSD-231,CFSD-211, CFSD-212, OFSD-211, OFSD-212,SSFSD-211,SEFSD-211, <strong>HCD</strong>-120, <strong>HCD</strong>-220Clip-OnThe vinyl seal, also known as dual-durometer, pushesonto the blade edge and is held by the friction betweenthe blade material and directional projections insidethe rigid plastic clip. <strong>Seal</strong> material is cut-to-lengthbefore installing. <strong>Seal</strong> is normally installed to thedrive blade and to every blade tip on the same side ofdamper.Stainless Steel/Silicone CompositeSilicone rubber seal has a stainless steel clip tomechanically fasten seal to the blade edge. Installationis the same as the vinyl seal.• Install when blade surface is above 70°F or above.• Cut seal material slightly longer than blade with releasepaper still on seal material.• Start at one end of blade. Peel off 1-2 feet of releasepaper at a time and place seal firmly onto blade surface.Do NOT touch the adhesive. Use finger or roller to pressseal to blade. Do NOT stretch seal as it will pop off intime.• Trim seal material at blade end as required. Excess sealis prone to pulling from blade surface and will force jambseal away, increasing leakage.Silicone <strong>Seal</strong> with Silicone AdhesiveTremco Spectrem 1 adhesive is used to adhere siliconeseal to painted surfaces, as PSA adhesives will not bondto most powder painted surfaces.• Open blades. Use scraper to remove any existing sealor adhesive.• Cut seal to approximate length with release material stillon seal.• Clean blade in the same manner as above. Temperaturelimits also apply.• Apply thin 1/8 in. bead of Tremco Spectrem 1 to bladesurface. Spread adhesive using a putty knife or scraperto approximately ½ in. (13 mm) wide.• Install seal to blade edge, starting at one end and removingrelease paper as one moves down blade. DoNOT stretch seal.• Press seal firmly into place. If seal was stretched, lengthwill shrink.• Allow adhesive material to cure 15 minutes. Trim seal tolength.Fabricated Airfoil <strong>Blade</strong>sApplicable to models: VCD-33, VCD-34, SEVCD-33,SMD-301,SMD-302, FSD-311, FSD-312, FSD-311V,CFSD-311, CFSD-312, <strong>HCD</strong>-130, <strong>HCD</strong>-135, <strong>HCD</strong>-230,<strong>HCD</strong>-330, <strong>HCD</strong>-430, <strong>HCD</strong>-530Note:- <strong>Blade</strong> and closure strip must be cleaned with Isopropyl Alcohol to remove oil prior to application of seal to ensure complete adhesion.- Apply seal to blade and closure with moderate pressure with a roller.Silicone or EPDM <strong>Seal</strong> with Pressure SensitiveAdhesive (PSA)• Open blades. Use scraper to remove any existingseal or adhesive.• Surface must be free from dust, dirt, oil and moisture.Clean blade edge with alcohol or similar solvents.Do not use mineral spirits or other petroleum basedsolvents that leave a residue.Note: Wipe down blade with Isopropyl Alcohol before seals areapplied to blades.<strong>Blade</strong> seal<strong>HCD</strong> Fabricated Airfoil with Silicone <strong>Seal</strong>
Silicone or EPDM <strong>Seal</strong> with Pressure SensitiveAdhesive (PSA)• Open blades. Use scraper to remove any existing seal oradhesive.• Surface must be free from dust, dirt, oil and moisture.Clean blade edge with alcohol or similar solvents. Donot use mineral spirits or other petroleum based solventsthat leave a residue.• Install when blade surface is above 70°F or above.• Cut seal material slightly longer than blade with releasepaper still on seal material.• Start at one end of blade. Peel off 1-2 feet of releasepaper at a time and place seal firmly onto blade surface.Do NOT touch the adhesive. Use finger or roller to pressseal to blade. Do NOT stretch seal as it will pop off intime.• Trim seal material at blade end as required. Excess sealis prone to pulling from blade surface and will force jambseal away, increasing leakage.Silicone <strong>Seal</strong> with Silicone AdhesiveTremco Spectrem 1 adhesive is used to adhere siliconeseal to painted surfaces, as PSA adhesives will not bond tomost powder painted surfaces.• Open blades. Use scraper to remove any existing seal oradhesive.• Cut seal to approximate length with release material stillon seal.• Clean blade in the same manner as above. Temperaturelimits also apply.• Apply thin 1/8 in. bead of Tremco Spectrem 1 to bladesurface. Spread adhesive using a putty knife or scraperto approximately ½ in. (13 mm) wide.• Install seal to blade edge, starting at one end andremoving release paper as one moves down blade. DoNOT stretch seal.• Press seal firmly into place. If seal was stretched,length will shrink.• Allow adhesive material to cure 15 minutes. Trim sealto length.SS/Silicone CompositeSilicone rubber seal has a stainless steel clip tomechanically fasten seal to the blade edge. <strong>Seal</strong>material is cut-to-length before installing. <strong>Seal</strong> isnormally installed to the drive blade and to every bladetip on the same side of damper.Aluminum Airfoil <strong>Blade</strong>s<strong>Blade</strong> <strong>Seal</strong><strong>Blade</strong> <strong>Seal</strong>Applicable to models: VCD-40, VCD-42, VCD-43,SMD-401, ICD-45, <strong>HCD</strong>-140, <strong>HCD</strong>-240, HSD-401Extruded aluminum blades have a groove at both bladeedges to hold seal. <strong>Blade</strong> ends are crimped to preventseal from sliding out.• Open blades. Remove existing seal. It is usuallyeasiest to pull seal from blade end rather than pullingit out of groove along blade edge.• Cut seal slightly longer than blade length. Do NOTstretch, as seal will creep back to original length.• Start at one blade end. The non-attached seallip is installed away from the blade surface. <strong>Seal</strong>can usually be stretched sufficiently to pass underexisting blade end crimp. Needle nose pliers workswell in grasping seal end.• Use a center punch to re-crimp blade end ifnecessary.• Trim seal to length.<strong>Blade</strong> TypeElastomer <strong>Blade</strong><strong>Blade</strong> Thickness <strong>Greenheck</strong> Temperature °F (°C)Material AttachmentPart numberMinimum Maximum Minimum Maximum3-V Vinyl Clip-on 16 ga. 14 ga. 455501 -20 180Silicone Adhesive All All 457053 -60 400SS/Silicone Clip-on 16 ga. 12 ga. 220108 -60 400Fabricated Silicone PSA All All 464605 -60 350AirfoilSilicone Adhesive All All 457053 -60 400EPDM PSA All All 468644 -20 250SS/Silicone Clip-on 16 ga. 12 ga. 220108 -60 400Aluminum Silicone Groove n/a n/a 461254 -60 400AirfoilEPDM Groove n/a n/a 460115 -20 250Copyright © 2008 <strong>Greenheck</strong> Fan Corporation<strong>Blade</strong> <strong>Seal</strong> <strong>Replacement</strong> InstructionsRev. 2 Nov 2008