CombiFlash Torrent Solvent Tanks Instruction Sheet - Isco
CombiFlash Torrent Solvent Tanks Instruction Sheet - Isco
CombiFlash Torrent Solvent Tanks Instruction Sheet - Isco

Create successful ePaper yourself
Turn your PDF publications into a flip-book with our unique Google optimized e-Paper software.
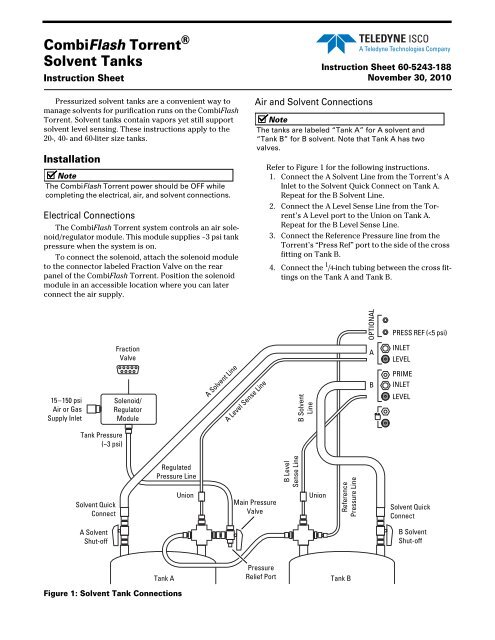
<strong>CombiFlash</strong> <strong>Torrent</strong> ®<strong>Solvent</strong> <strong>Tanks</strong><strong>Instruction</strong> <strong>Sheet</strong><strong>Instruction</strong> <strong>Sheet</strong> 60-5243-188November 30, 2010Pressurized solvent tanks are a convenient way tomanage solvents for purification runs on the <strong>CombiFlash</strong><strong>Torrent</strong>. <strong>Solvent</strong> tanks contain vapors yet still supportsolvent level sensing. These instructions apply to the20-, 40- and 60-liter size tanks.InstallationNoteThe <strong>CombiFlash</strong> <strong>Torrent</strong> power should be OFF whilecompleting the electrical, air, and solvent connections.Electrical ConnectionsThe <strong>CombiFlash</strong> <strong>Torrent</strong> system controls an air solenoid/regulatormodule. This module supplies ~3 psi tankpressure when the system is on.To connect the solenoid, attach the solenoid moduleto the connector labeled Fraction Valve on the rearpanel of the <strong>CombiFlash</strong> <strong>Torrent</strong>. Position the solenoidmodule in an accessible location where you can laterconnect the air supply.Air and <strong>Solvent</strong> ConnectionsNoteThe tanks are labeled “Tank A” for A solvent and“Tank B” for B solvent. Note that Tank A has twovalves.Refer to Figure 1 for the following instructions.1. Connect the A <strong>Solvent</strong> Line from the <strong>Torrent</strong>’s AInlet to the <strong>Solvent</strong> Quick Connect on Tank A.Repeat for the B <strong>Solvent</strong> Line.2. Connect the A Level Sense Line from the <strong>Torrent</strong>’sA Level port to the Union on Tank A.Repeat for the B Level Sense Line.3. Connect the Reference Pressure line from the<strong>Torrent</strong>’s “Press Ref” port to the side of the crossfitting on Tank B.4. Connect the 1 /4-inch tubing between the cross fittingson the Tank A and Tank B.OPTIONALPRESS REF (
<strong>Instruction</strong> <strong>Sheet</strong> 60-5243-188 November 30, 20105. Connect the tubing between the Solenoid/regulatormodule and the top connection on the MainPressure Valve (Tank A).6. Connect the pressurized air or gas supply to theinlet on the Solenoid/regulator Module. The supplyshould be dry and regulated to 15–150 psi.7. Locate the 1 /8-inch plug (209-0165-21) in the <strong>CombiFlash</strong><strong>Torrent</strong> Accessory Kit (60-5249-002).Attach this plug to the B Prime port on the <strong>Torrent</strong>.8. Ensure that the A and B <strong>Solvent</strong> Shut-off valvesare open (in-line).System Configuration SettingsThe system configuration settings must be modifiedto disable the B Prime Pump. To do so:1. Place the front panel power switch in the ONposition.2. When the main PeakTrak ® window is displayed,select the Tools>Configuration menu command.3. On the Instrument Configuration tab, deselectthe “Enable solvent B priming pump” option.4. Click OK to save the new configuration setting.The <strong>CombiFlash</strong> <strong>Torrent</strong> is ready for operationOperationBefore operating the <strong>CombiFlash</strong> <strong>Torrent</strong> with pressurizedtanks, first verify the following:● the Air or Gas supply is on● the Main Pressure Valve points up● the A and B <strong>Solvent</strong> Shut-off valves are open(in-line)● the pressure gauge on each tank reads about 3psi.The system is ready when the above conditions aremet. The tanks should be filled with solvent before arun, and re-filled if the <strong>CombiFlash</strong> <strong>Torrent</strong> detects thata tank solvent level is low.Filling the <strong>Tanks</strong>To fill a tank:NoteThe tank pressure must be at 0 psi before opening thetank or disconnecting any air or solvent fitting.1. Observe the pressure gauge on the tank. If thetank is pressurized, turn the Main Pressure Valvedown to relieve the pressure in both tanks.2. When the gauge indicates 0 psi, lift the bail(latch) to loosen the cap. Rotate the cap andremove it from the tank.3. Fill the tank. Leave at least 5 cm (2 inches) ofhead space.4. Replace the cap and latch the bail.5. Repeat steps 2 through 4 to fill the other solventtank.6. Turn the Main Pressure Valve up to pressurizethe tank. Note that the <strong>CombiFlash</strong> <strong>Torrent</strong> mustbe powered on to actuate the Solenoid/regulatormodule and pressurize the tanks.Replacing <strong>Tanks</strong>If additional tanks are on hand to quickly replenishthe solvent during a run, swap the tanks using theinstructions below:NoteThe tank pressure must be at 0 psi before opening thetank or disconnecting any air or solvent fitting.1. Observe the pressure gauge on the tank. If thetank is pressurized, turn the Main Pressure Valvedown to relieve the pressure in both tanks.2. Close the <strong>Solvent</strong> Shut-off valve on the tank.3. Obtain a container that will hold the volume ofsolvent in the inlet line.4. When the gauge indicates 0 psi, disconnect the<strong>Solvent</strong> Quick Connect fitting on the tank. Drainthe inlet line into the container.5. Disconnect the air lines from the tank.6. Swap the tank with a full one.7. Reconnect the air lines and solvent line.8. Open the <strong>Solvent</strong> Shut-off valve.Repeat steps 2 through 8 to replace the othertank if necessary.9. Turn the Main Pressure Valve up to pressurizethe tank.Assistance AvailableShould you require assistance with these instructions,contact your Teledyne <strong>Isco</strong> representative or thefactory.Last modified November 30, 2010Teledyne <strong>Isco</strong>, Inc.P.O. Box 82531, Lincoln, Nebraska, 68501 USAToll-free: (800) 775-2965 • Phone: (402) 464-0231 • Fax: (402) 465-3001E-mail: <strong>Isco</strong>Service@teledyne.comTeledyne <strong>Isco</strong> is continually improving its products and reserves the right to change productspecifications, replacement parts, schematics, and instructions without notice.