Select Series - Clear Creek Spas
Select Series - Clear Creek Spas
Select Series - Clear Creek Spas

You also want an ePaper? Increase the reach of your titles
YUMPU automatically turns print PDFs into web optimized ePapers that Google loves.
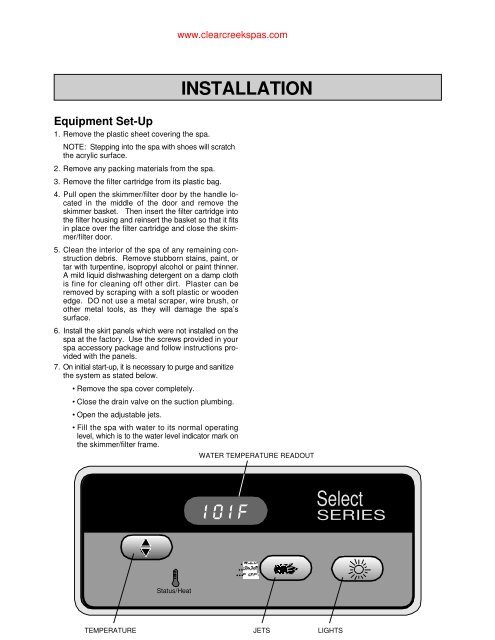
www.clearcreekspas.comEquipment Set-Up1. Remove the plastic sheet covering the spa.NOTE: Stepping into the spa with shoes will scratchthe acrylic surface.2. Remove any packing materials from the spa.3. Remove the filter cartridge from its plastic bag.4. Pull open the skimmer/filter door by the handle locatedin the middle of the door and remove theskimmer basket. Then insert the filter cartridge intothe filter housing and reinsert the basket so that it fitsin place over the filter cartridge and close the skimmer/filterdoor.5. Clean the interior of the spa of any remaining constructiondebris. Remove stubborn stains, paint, ortar with turpentine, isopropyl alcohol or paint thinner.A mild liquid dishwashing detergent on a damp clothis fine for cleaning off other dirt. Plaster can beremoved by scraping with a soft plastic or woodenedge. DO not use a metal scraper, wire brush, orother metal tools, as they will damage the spa’ssurface.6. Install the skirt panels which were not installed on thespa at the factory. Use the screws provided in yourspa accessory package and follow instructions providedwith the panels.7. On initial start-up, it is necessary to purge and sanitizethe system as stated below.• Remove the spa cover completely.• Close the drain valve on the suction plumbing.• Open the adjustable jets.• Fill the spa with water to its normal operatinglevel, which is to the water level indicator mark onthe skimmer/filter frame.INSTALLATIONWATER TEMPERATURE READOUT<strong>Select</strong>SERIES••••••Status/HeatTEMPERATURE JETS LIGHTS