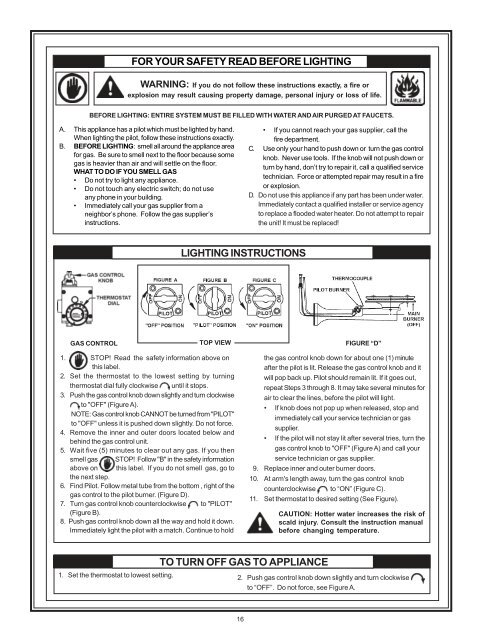
FOR YOUR SAFETY READ BEFORE LIGHTINGWARNING: If you do not follow these instructions exactly, a fire orexplosion may result causing property damage, personal injury or loss of life.BEFORE LIGHTING: ENTIRE SYSTEM MUST BE FILLED WITH WATER AND AIR PURGED AT FAUCETS.A. This appliance has a pilot which must be lighted by hand.When lighting the pilot, follow these instructions exactly.B. BEFORE LIGHTING: smell all around the appliance areafor gas. Be sure to smell next to the floor because somegas is heavier than air and will settle on the floor.WHAT TO DO IF YOU SMELL GAS• Do not try to light any appliance.• Do not touch any electric switch; do not useany phone in your building.• Immediately call your gas supplier from aneighbor’s phone. Follow the gas supplier’sinstructions.• If you cannot reach your gas supplier, call thefire department.C. Use only your hand to push down or turn the gas controlknob. Never use tools. If the knob will not push down orturn by hand, don’t try to repair it, call a qualified servicetechnician. Force or attempted repair may result in a fireor explosion.D. Do not use this appliance if any part has been under water.Immediately contact a qualified installer or service agencyto replace a flooded water heater. Do not attempt to repairthe unit! It must be replaced!LIGHTING INSTRUCTIONSGAS CONTROLTOP VIEWFIGURE “D”1. STOP! Read the safety information above onthis label.2. Set the thermostat to the lowest setting by turningthermostat dial fully clockwise until it stops.3. Push the gas control knob down slightly and turn clockwiseto "OFF" (Figure A).NOTE: Gas control knob CANNOT be turned from "PILOT"to "OFF" unless it is pushed down slightly. Do not force.4. Remove the inner and outer doors located below andbehind the gas control unit.5. Wait five (5) minutes to clear out any gas. If you thensmell gas STOP! Follow "B" in the safety informationabove on this label. If you do not smell gas, go tothe next step.6. Find Pilot. Follow metal tube from the bottom , right of thegas control to the pilot burner. (Figure D).7. Turn gas control knob counterclockwise to "PILOT"(Figure B).8. Push gas control knob down all the way and hold it down.Immediately light the pilot with a match. Continue to holdthe gas control knob down for about one (1) minuteafter the pilot is lit. Release the gas control knob and itwill pop back up. Pilot should remain lit. If it goes out,repeat Steps 3 through 8. It may take several minutes forair to clear the lines, before the pilot will light.• If knob does not pop up when released, stop andimmediately call your service technician or gassupplier.• If the pilot will not stay lit after several tries, turn thegas control knob to "OFF" (Figure A) and call yourservice technician or gas supplier.9. Replace inner and outer burner doors.10. At arm's length away, turn the gas control knobcounterclockwise to “ON” (Figure C).11. Set thermostat to desired setting (See Figure).CAUTION: Hotter water increases the risk ofscald injury. Consult the instruction manualbefore changing temperature.TO TURN OFF GAS TO APPLIANCE1. Set the thermostat to lowest setting. 2. Push gas control knob down slightly and turn clockwiseto “OFF”. Do not force, see Figure A.16
Short repeated heating cycles caused by small hot water uses cancause temperatures at the point of use to exceed the thermostat settingby up to 30°F (16.7°C). If you experience this type of use you shouldconsider using lower temperature settings to reduce scald hazards.Any water heater’s intended purpose is to heat water. Hot water isneeded for cleansing, cleaning, and sanitizing (bodies, dishes, clothing).Untempered hot water can present a scald hazard. Depending on thetime element, and the people involved (adults, children, elderly, infirm,etc.) scalding may occur at different temperatures.TEMPERATURE TURE REGULATIONNever allow small children to use a hot water tap, or to draw their ownbath water. Never leave a child or handicapped person unattended ina bathtub or shower.NOTE: A water temperature range of 120°F-140°F (49°C-60°C) isrecommended by most dishwasher manufacturers.The thermostat of this water heater has been factory set at its lowestposition (PILOT LIGHTING). It is adjustable and must be reset to thedesired temperature setting to reduce the risk of scald injury. The mark( ) indicative of approximately 120°F (49°C) is preferred startingpoint. Some States have a requirement for a lower setting.Turn the water temperature dial clockwise ( ) to decrease thetemperature, or counterclockwise ( ) to increase the temperature.Should overheating occur or the gas supply fail to shut off, turn off themanual gas control valve to the appliance.HOTTER WATER CAN SCALD: Water heaters are intended to producehot water. Water heated to a temperature which will satisfy spaceheating, clothes washing, dish washing, and other sanitizing needscan scald and permanently injure you upon contact. Some people aremore likely to be permanently injured by hot water than others. Theseinclude the elderly, children, the infirm, or physically/mentallyhandicapped. If anyone using hot water in your home fits into one ofthese groups or if there is a local code or state law requiring a certaintemperature water at the hot water tap, then you must take specialprecautions. In addition to using the lowest possible temperature settingthat satisfies your hot water needs, a means such as a mixing valve,shall be used at the hot water taps used by these people or at thewater heater. Mixing valves are available at plumbing supply orhardware stores, see Figure 2. Follow manufacturer’s instructions forinstallation of the valves. Before changing the factory setting on thethermostat, read the “Temperature Regulation” section in this manual,see Figures 15 and 16.FIGURE 15.TemperatureTime to Produce 2nd & 3rdSettingsDegree Burns on Adult SkinVERY HOT= approx. 160°F (71°C) About 1/2 secondC = approx. 150°F (66°C)About 1-1/2 secondsB = approx. 140°F (60°C)Less than 5 secondsA = approx. 130°F (54°C)About 30 seconds= approx. 120°F (49°C) More than 5 minutesLOW = approx. 80°F (27°C) - - - - - - - - - - - - - - - -FIGURE 16.START UP CONDITIONSDRAFT HOOD OPERATIONCheck draft hood operation by performing a worst case depressurizationof the building. With all doors and windows closed, and with all airhandling equipment and exhaust fans operating such as furnaces, clothesdryers, range hoods and bathroom fans, a match flame should still bedrawn into the draft hood of the water heater with its burner firing. If theflame is not drawn toward the draft hood, shut off water heater andmake necessary air supply changes to correct.CONDENSATIONWhenever the water heater is filled with cold water, some condensateFOR YOUR INFORMATION17will form while the burner is on. A water heater may appear to be leakingwhen in fact the water is condensation. This usually happens when:a. A new water heater is filled with cold water for the first time.b. Burning gas produces water vapor in water heaters, particularlyhigh efficiency models where flue temperatures are lower.c. Large amounts of hot water are used in a short time and the refillwater in the tank is very cold.Moisture from the products of combustion condense on the cooler tanksurfaces and form drops of water which may fall onto the burner orother hot surfaces to produce a “sizzling” or “frying” noise.Excessive condensation can cause pilot outage due to water runningdown the flue tube onto the main burner and putting out the pilot.