Rectangle Pot Rack Hanging Instructions - Pot Racks
Rectangle Pot Rack Hanging Instructions - Pot Racks
Rectangle Pot Rack Hanging Instructions - Pot Racks

You also want an ePaper? Increase the reach of your titles
YUMPU automatically turns print PDFs into web optimized ePapers that Google loves.
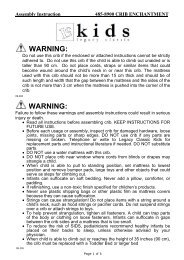
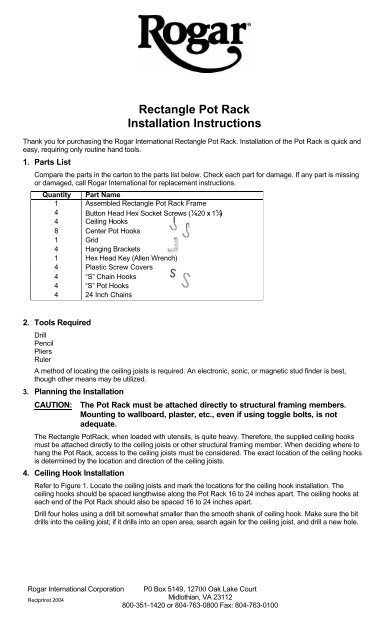
<strong>Rectangle</strong> <strong>Pot</strong> <strong>Rack</strong>Installation <strong>Instructions</strong>Thank you for purchasing the Rogar International <strong>Rectangle</strong> <strong>Pot</strong> <strong>Rack</strong>. Installation of the <strong>Pot</strong> <strong>Rack</strong> is quick andeasy, requiring only routine hand tools.1. Parts ListCompare the parts in the carton to the parts list below. Check each part for damage. If any part is missingor damaged, call Rogar International for replacement instructions.Quantity Part Name1 Assembled <strong>Rectangle</strong> <strong>Pot</strong> <strong>Rack</strong> Frame4 Button Head Hex Socket Screws (¼-20 X 1¼)4 Ceiling Hooks8 Center <strong>Pot</strong> Hooks1 Grid4 <strong>Hanging</strong> Brackets1 Hex Head Key (Allen Wrench)4 Plastic Screw Covers4 “S” Chain Hooks4 “S” <strong>Pot</strong> Hooks4 24 Inch Chains2. Tools RequiredDrillPencilPliersRulerA method of locating the ceiling joists is required. An electronic, sonic, or magnetic stud finder is best,though other means may be utilized.3. Planning the InstallationCAUTION: The <strong>Pot</strong> <strong>Rack</strong> must be attached directly to structural framing members.Mounting to wallboard, plaster, etc., even if using toggle bolts, is notadequate.The <strong>Rectangle</strong> <strong>Pot</strong><strong>Rack</strong>, when loaded with utensils, is quite heavy. Therefore, the supplied ceiling hooksmust be attached directly to the ceiling joists or other structural framing member. When deciding where tohang the <strong>Pot</strong> <strong>Rack</strong>, access to the ceiling joists must be considered. The exact location of the ceiling hooksis determined by the location and direction of the ceiling joists.4. Ceiling Hook InstallationRefer to Figure 1. Locate the ceiling joists and mark the locations for the ceiling hook installation. Theceiling hooks should be spaced lengthwise along the <strong>Pot</strong> <strong>Rack</strong> 16 to 24 inches apart. The ceiling hooks ateach end of the <strong>Pot</strong> <strong>Rack</strong> should also be spaced 16 to 24 inches apart.Drill four holes using a drill bit somewhat smaller than the smooth shank of ceiling hook. Make sure the bitdrills into the ceiling joist; if it drills into an open area, search again for the ceiling joist, and drill a new hole.Rogar International Corporation P0 Box 5149, 12700 Oak Lake CourtRectprInst 2004Midlothian, VA 23112800-351-1420 or 804-763-0800 Fax: 804-763-0100
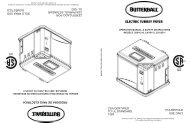
Rogar International Corporation<strong>Rectangle</strong> <strong>Pot</strong> <strong>Rack</strong> Installation <strong>Instructions</strong>Screw a ceiling hook into each hole ½” past the point the threads are no longer visible, or until the threads areentirely into the ceiling joist. Turn the ceiling hook so the open end of the hook points outward from therectangle formed by the four hooks, as shown in Figure 3. This reduces the chance of the chains slipping offthe hooks.5. Assembling the Grid to the <strong>Rectangle</strong> <strong>Pot</strong> <strong>Rack</strong>Refer to Figure 2. The hanging brackets attach to the long side rails of the <strong>Pot</strong> <strong>Rack</strong>. Note the holes drilled inthe side rail are not centered vertically. Set the <strong>Pot</strong> <strong>Rack</strong> so the holes are closer to the top edge. Attach twohanging brackets to one of the side rails using two button head hex socket screws, arranging the hangingbracket so the rounded end with the hole is above the top edge of the side rail. Attach the remaining hangingbrackets to the other side rail, but only start the screws into the holes. Do not tighten. Set the grid in place,resting it on top of the horizontal tabs of the hanging brackets, and under the two tightened screws. Tighten theremaining two hanging bracket screws. Install a plastic screw cover over the threads of each of the fourscrews.6. <strong>Hanging</strong> the <strong>Rectangle</strong> <strong>Pot</strong> <strong>Rack</strong>Refer to Figure 3. Install a small “S” hook onto each of the hanging brackets on the <strong>Pot</strong> <strong>Rack</strong>, with the openend of the hook facing outward. Connect a chain to the open end of each “S” hook. Hook the opposite ends ofthe chains to the ceiling hooks. The chains may be shortened to hang the <strong>Pot</strong> <strong>Rack</strong> closer to the ceiling or toaccomodate sloped ceilings. Extra chain is available from Rogar International.7. <strong>Pot</strong> Hook InstallationThe eight center pot hooks hook over the side rails of the <strong>Rectangle</strong> <strong>Pot</strong> <strong>Rack</strong> wherever desired. The four “S”pot hooks hook onto the grid wherever desired.The <strong>Rectangle</strong> <strong>Pot</strong> <strong>Rack</strong> installation is now complete.Rogar International Corporation P0 Box 5149, 12700 Oak Lake CourtRectprInst 2004Midlothian, VA 23112800-351-1420 or 804-763-0800 Fax: 804-763-0100