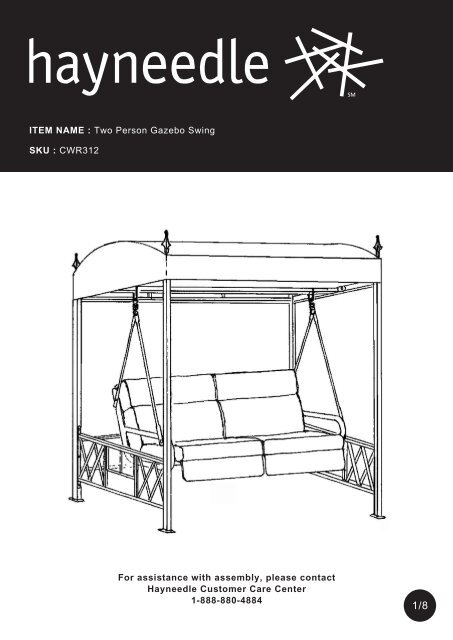
ITEM NAME : Two Person Gazebo Swing SKU ... - Hayneedle
ITEM NAME : Two Person Gazebo Swing SKU ... - Hayneedle
ITEM NAME : Two Person Gazebo Swing SKU ... - Hayneedle

Create successful ePaper yourself
Turn your PDF publications into a flip-book with our unique Google optimized e-Paper software.
<strong>ITEM</strong> <strong>NAME</strong> : <strong>Two</strong> <strong>Person</strong> <strong>Gazebo</strong> <strong>Swing</strong><strong>SKU</strong> : CWR312For assistance with assembly, please contact<strong>Hayneedle</strong> Customer Care Center1-888-880-48841/8
HARDWARE LIST:(N) Chair Seat Bar Qty: 3 (O) Arrowhead Qty: 4 (U) Seat & Back Qty: 1(V) Top Cover Qty: 1 (W) Seat & Back Cushion Qty: 2 (Y) Stake Qty: 8HARDWARE LIST:(H1) Bolt M6x16mm longand washer Qty: 20(H2) Bolt M6x32mm longand Washer Qty: 11(H3) Bolt M6x45mm long,washer, nut and nut cap Qty: 8(H4) Bolt M8x35mm long,washer, nut and nut cap Qty: 4(H5) Bolt M8x45mm longand nut Qty: 4(H6) Bolt M8x55mm long,washer, nut and nut cap Qty: 9TOOLS REQUIRED:Hex Wrench Qty: 1 Double-end Wrench Qty: 13/8
STEP-BY-STEP ASSEMBLY:STEP 1Step 1:Attach Lower Side Screen (Part C) to Front Leg (Part A) and Back Leg (Part B )using Bolt and Washer (H1x6).Attach Upper Side Screen (Part F) to Part A and B using Bolt, Washer, Nut and NutCap (H6x4).Repeat for opposite side.Attach Lower Support Shelf (Part D) to Part B (x2) using Bolt and Washer (H2x4).H6FH6FH6H6H6H6DB1CH1A1H2H2B2CH1A24/8
STEP-BY-STEP ASSEMBLY:STEP 2Step 2:Attach Upper Support Shelf (Part E) to Part A using Bolt and Washer (H1x4).Repeat for opposite side.Attach Upper Center Support Shelf (Part G - x3) to Part F using Bolt and Washer(H2x4). Repeat for opposite side.H2Attach Horizontal Shelf (Part K) to Part F using Bolt, Washer, Nut and Nut Cap(H4X2). Repeat for opposite side.H1H2H1GEF H4H4FH1EH1H4KH4STEP 3B1A1Step 3:Insert Chair Seat Bar (Part N) through the slits in Seat & Back (Part U). Attach Part Nto Arm Rest (Part I) using Bolt, Washer, Nut and Nut Cap (H3x3).Attach Chair Back Top Bar (Part M) to Part I using Bolt, Washer, Nut and Nut Cap(H3X3). Repeat for opposite side.MH3NB2A2H3H3UNNIH3I5/8
STEP-BY-STEP ASSEMBLY:STEP 4Step 4:Attach Arm-rest Support Bar - Front (Part J1) to Part I using Bolt and Nut (H5).Attach Arm-rest Support Bar – Back (Part J2) to Part I using Bolt Bolt and Nut (H5).Repeat for opposite side.Attach Spring Hook (Part S) to Parts J1 and J2.Hang the <strong>Swing</strong> by Part S from Part K.Attach Arrowhead (Part O - x4) to Parts A and B. Repeat for opposite side.OKOOKOSSJ2H5J2J1H5H5J1II6/8
STEP-BY-STEP ASSEMBLY:STEP 5Step 5:Extend Side Tables in Part C and secure with brace as pictured.Position the assembled canopy swing in desired location. Secure the canopy tothe ground by inserting Stakes (Part Y – x4) through the pre-drilled holes of theposts Parts A and B (x2).WWYYA/B** BE SURE ALL FASTENERS ARE FULLY TIGHTENED BEFORE USING THE <strong>ITEM</strong>.7/8
For assistance with assembly, please contact customer service1-888-880-48848/8