Installation and mounting manual for EK-FC285 GTX ... - EKWB
Installation and mounting manual for EK-FC285 GTX ... - EKWB
Installation and mounting manual for EK-FC285 GTX ... - EKWB

Create successful ePaper yourself
Turn your PDF publications into a flip-book with our unique Google optimized e-Paper software.
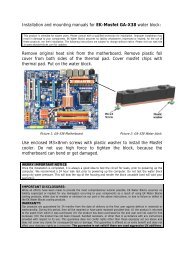
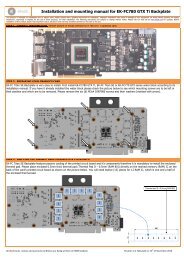
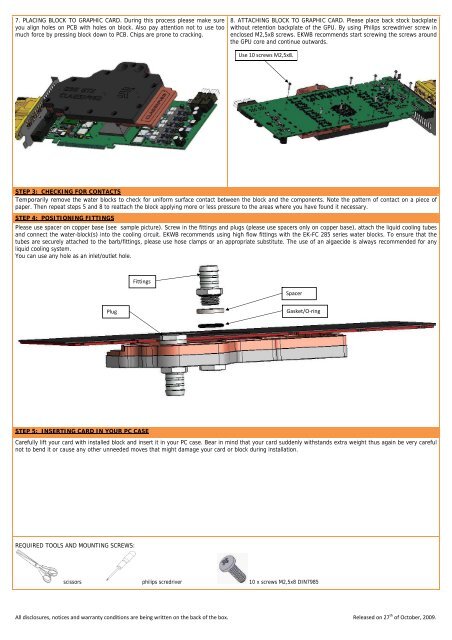
7. PLACING BLOCK TO GRAPHIC CARD. During this process please make sureyou align holes on PCB with holes on block. Also pay attention not to use toomuch <strong>for</strong>ce by pressing block down to PCB. Chips are prone to cracking.8. ATTACHING BLOCK TO GRAPHIC CARD. Please place back stock backplatewithout retention backplate of the GPU. By using Philips screwdriver screw inenclosed M2,5x8 screws. <strong>EK</strong>WB recommends start screwing the screws aroundthe GPU core <strong>and</strong> continue outwards.Use 10 screws M2,5x8.STEP 3: CHECKING FOR CONTACTSTemporarily remove the water blocks to check <strong>for</strong> uni<strong>for</strong>m surface contact between the block <strong>and</strong> the components. Note the pattern of contact on a piece ofpaper. Then repeat steps 5 <strong>and</strong> 8 to reattach the block applying more or less pressure to the areas where you have found it necessary.STEP 4: POSITIONING FITTINGSPlease use spacer on copper base (see sample picture). Screw in the fittings <strong>and</strong> plugs (please use spacers only on copper base), attach the liquid cooling tubes<strong>and</strong> connect the water-block(s) into the cooling circuit. <strong>EK</strong>WB recommends using high flow fittings with the <strong>EK</strong>-FC 285 series water blocks. To ensure that thetubes are securely attached to the barb/fittings, please use hose clamps or an appropriate substitute. The use of an algaecide is always recommended <strong>for</strong> anyliquid cooling system.You can use any hole as an inlet/outlet hole.FittingsSpacerPlugGasket/O‐ringSTEP 5: INSERTING CARD IN YOUR PC CASECarefully lift your card with installed block <strong>and</strong> insert it in your PC case. Bear in mind that your card suddenly withst<strong>and</strong>s extra weight thus again be very carefulnot to bend it or cause any other unneeded moves that might damage your card or block during installation.REQUIRED TOOLS AND MOUNTING SCREWS:scissors philips scredriver 10 x screws M2,5x8 DIN7985All disclosures, notices <strong>and</strong> warranty conditions are being written on the back of the box. Released on 27 th of October, 2009.