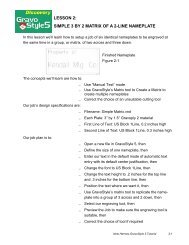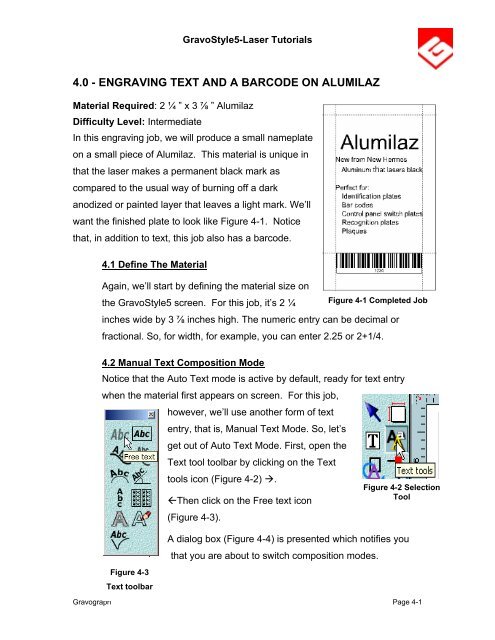
Engraving Text And A Barcode On Alumilaz
Engraving Text And A Barcode On Alumilaz
Engraving Text And A Barcode On Alumilaz

Create successful ePaper yourself
Turn your PDF publications into a flip-book with our unique Google optimized e-Paper software.
GravoStyle5-Laser Tutorials4.0 - ENGRAVING TEXT AND A BARCODE ON ALUMILAZMaterial Required: 2 ¼ ” x 3 ⅞ ” <strong>Alumilaz</strong>Difficulty Level: IntermediateIn this engraving job, we will produce a small nameplateon a small piece of <strong>Alumilaz</strong>. This material is unique inthat the laser makes a permanent black mark ascompared to the usual way of burning off a darkanodized or painted layer that leaves a light mark. We’llwant the finished plate to look like Figure 4-1. Noticethat, in addition to text, this job also has a barcode.4.1 Define The MaterialAgain, we’ll start by defining the material size onthe GravoStyle5 screen. For this job, it’s 2 ¼ Figure 4-1 Completed Jobinches wide by 3 ⅞ inches high. The numeric entry can be decimal orfractional. So, for width, for example, you can enter 2.25 or 2+1/4.4.2 Manual <strong>Text</strong> Composition ModeNotice that the Auto <strong>Text</strong> mode is active by default, ready for text entrywhen the material first appears on screen. For this job,however, we’ll use another form of textentry, that is, Manual <strong>Text</strong> Mode. So, let’sget out of Auto <strong>Text</strong> Mode. First, open the<strong>Text</strong> tool toolbar by clicking on the <strong>Text</strong>tools icon (Figure 4-2) .Then click on the Free text icon(Figure 4-3).Figure 4-2 SelectionToolFigure 4-3<strong>Text</strong> toolbarGravographA dialog box (Figure 4-4) is presented which notifies youthat you are about to switch composition modes.Page 4-1
GravoStyle5-Laser TutorialsClick Yes. Margins are removed and you are free to place text anywhereLook FurtherOther tools in the “<strong>Text</strong>Tools” fly-out toolbarlet you enter verticaltext, text on an angle,text on an arc or alonga curve, text in columnsand free form text entry.You can also checkyour spelling andconvert your text fromtext objects to outlinevectors.within the material boundaries.Figure 4-4 Entering Manual Mode4.3 Using GuidelinesLet’s specify that the text must fit within arectangle whose sides are about ¼ inch infrom each side, ½ inch from the top and ¾of an inch from the bottom. We’ll use“Guidelines” to define this area. Guidelinesare construction lines that do not print (orengrave). They are generated by leftclickingin the left and top rulers (for verticalFigure 4-5 Guide Linesand horizontal guidelines respectively), andkeeping the mouse button depressed while dragging each line to theposition we want. Figure 4-5 illustrates guidelines positioned for this job.They appear as dashed lines that extend across the entire width andheight of the screen’s work area. You can close the <strong>Text</strong> toolbar if it is inthe way. While you can generate guidelines in either text or selectionmode, you may only move a guideline in Selection mode. So, let’s click onto go into Selection mode. As you are dragging the guidelines intoposition, you can see the coordinate position in the status lineGravograph Page 4-2
GravoStyle5-Laser Tutorials. There is a precise method for positioning objects thatwill be left for later. For now, just estimate the guideline positions.4.4 Composing <strong>Text</strong> in a BoxClick the “<strong>Text</strong> into Rectangle”icon in the <strong>Text</strong> toolbar. A cursor willappear as a cross and a smallrectangle with the letters “Ab” insideit. This rectangle will be below andto the right side of the cross.Center the cross on the top leftcorner of the text area, as defined bythe guidelines. Then, click and dragthe cursor to its diagonally oppositecorner. Release the mouse buttonand the text cursor appears in thecenter of the first line (Figure 4-6).Figure 4-6 <strong>Text</strong> Into RectangleThis should look familiar – it looks just likethe “Auto <strong>Text</strong>” mode screen that we’vepreviously seen. In fact, “<strong>Text</strong> intoRectangle” mode works just the sameway as “Auto <strong>Text</strong>” mode. It’s just that thetext here is confined to the rectangle wecreated by dragging the cursor, instead ofbeing confined to the material’s borders.What does this mean for yourproductivity? It means that you can applythe power of “Auto <strong>Text</strong>” mode to anyGravographFigure 4-7 <strong>Text</strong> EntryPage 4-3
GravoStyle5-Laser Tutorialslocal area of your job that you care to define.Let’s now type in our text, making use of the text justification and textsizing and formatting tools. You may choose your own formatting, but asa guide, for the heading you can use .3 in character height Arial font. Forthe remainder of the text, you can use .1 in character height Arial font.When finished typing and formatting, our work will look similar to Figure 4-7.4.5 Creating the Bar CodeTo make our bar code, we’ll make use ofanother of GravoStyle5’s fly-out toolbars.It’s labeled “Special Tools” and Figure 4-8shows it opened. Get back into Selectmode and click on the second tool upfrom the bottom – it’s the Bar Code tool.When we click on it, a large dialog box(Figure 4-9) will appear in the center of thescreen. This is a ‘Wizard’ that will guide usas we design our bar code.Figure 4-8 Special ToolsGravographLook FurtherOther tools on the“Special Tools” fly-outtoolbar let you designstraight rulers and scales,round dials, and rubberstamps. You can alsooptimize the layout(nested shapes) tominimize material waste,enter standard symbolsfrom a large library, enterand work with variabletext (equivalent to mailmerge in word processingprograms) and mark drillpoint locations on yourjobPage 4-4
GravoStyle5-Laser TutorialsFirst, select from thedrop down list ofavailable standard barcode formats. For thisjob, we’ll use code-39.Select the color redfrom the pull-down.Click “Next” afterselecting it.In the next dialog box,(Figure 4-10) enter thedimensions we want forour bar code. Let’s useFigure 4-9 Selecting Bar Code Standarda vertical height of .4 inches and a width of .02 inches for the thinnestbars. We’ll also check the Show <strong>Text</strong> checkbox to display humanreadable text in addition to the encoded bar code. <strong>On</strong>ce enabled, thehuman readable text height can be modified. We’ll keep the default valueof 12 (12 points).Again we’ll click “Next”and in the next dialogbox (Figure 4-11) we’llenter the data to beencoded. Let’s use1234 and click on“Finish”.The finished bar codenow appears on ourGravographFigure 4-10 Specifying Minimum Bar Width Page 4-5
GravoStyle5-Laser Tutorialsjob. We could havepositioned it by enteringan origin location in the1 st dialog box. But,since we didn’t knowthe overall size of thebar code until after wefinished we’ve left finalFigure 4-11 Entering Bar Codepositioning for last.4.6 Positioning the Bar Code Using SnapsLet’s specify that the top ofthe bar code is to bepositioned precisely 0.75inches above the bottom ofthe plate and that thebarcode is to be centeredleft-to-right between thematerial edges.For the vertical positioning,let’s first double-click on theFigure 4-12 Guide Line Dialog WindowGravograph Page 4-6
GravoStyle5-Laser Tutorialslower of the two horizontal guidelines and enter the precise value of 0.75inches for its location (Figure 4-12). Click Change.Next, we’ll press the keyboard F3 key,which brings up a tool pallet called Snap(Figure 4-13). (We can also bring upthe snap tool pallet by clicking on “SnapMode” in GravoStyle5’s “Edit” menu.)Snaps work like virtual magnets. WeFigure 4-13 Snap Toolbarcan choose the kind of object that we want to snap to, and when we draganother object close to it, the one we’re dragging will behave just as if itwere drawn by a magnet. We can choose to snap to any point on a line,to the center of an object or to an intersection of two lines. In this case,we’ll select the tool that allows us to snap to grids and guidelinesshown in Figure 4-13., asFigure 4-14 shows the snap tool inaction. The cursor has changed to across with an arrowhead at the end ofeach arm as we drag the bar code. Aswe approach the guideline, a smallcircle appears on it, under the cursor, tosignal that the snap location has beenrecognized. We just move closer andthe top of the bar code will snap intoposition.Figure 4-14 Snapping to a GuidelineGravograph Page 4-7
GravoStyle5-Laser TutorialsNext, click the top leftmost Snap button, None and close out the Snap toolpallet.Now, we’ll turn our attention to the task of centering the bar code left-toright.Let’s open the “Alignment Tool” fly-out tool pallet (Figure 4-15).Click the “Horizontal Center”horizontally in the material.icon to center the selected bar codeThe job is done except for the saving.Make sure to save this job file – we’ll be usingit again.4.7 <strong>Engraving</strong> the jobLike most materials, there is a range ofvalues of power and speed that will yield anacceptable dark mark. <strong>Alumilaz</strong> works on theprinciple that when the material is heated, itcompletes the anodization process. We knowfrom experience that to get consistent results,a speed of less than 100% is required. Thereis an <strong>Alumilaz</strong> Calibration test plate that youcan run on your laser that will show you amatrix from which you can pick the bestFigure 4-15 Alignment toolsresults. For example, on a typical 60W laser,we have gotten acceptable results at a power of 40% and speed of 50% at600 dpi for the text. For the barcode, use power at 35 and speed at 40.4.8 What We’ve LearnedThis job has taught us:• How to use guidelines• How to snap to guidelinesGravograph Page 4-8
GravoStyle5-Laser Tutorials• How to use manual text mode• How to access and use alignment tools• How to access GravoStyle5-Laser’s “Special Tools”• How to design a bar codeGravograph Page 4-9