How to Set Up Microsoft Outlook XP to Access ... - York University
How to Set Up Microsoft Outlook XP to Access ... - York University
How to Set Up Microsoft Outlook XP to Access ... - York University

Create successful ePaper yourself
Turn your PDF publications into a flip-book with our unique Google optimized e-Paper software.
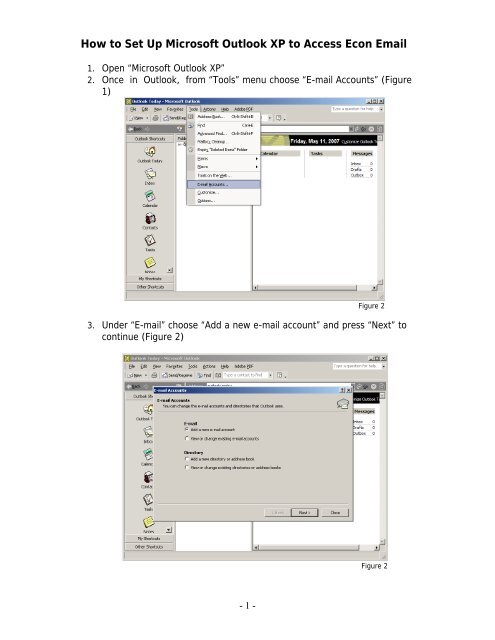
<strong>How</strong> <strong>to</strong> <strong>Set</strong> <strong>Up</strong> <strong>Microsoft</strong> <strong>Outlook</strong> <strong>XP</strong> <strong>to</strong> <strong>Access</strong> Econ Email1. Open “<strong>Microsoft</strong> <strong>Outlook</strong> <strong>XP</strong>”2. Once in <strong>Outlook</strong>, from “Tools” menu choose “E-mail Accounts” (Figure1)Figure 23. Under “E-mail” choose “Add a new e-mail account” and press “Next” <strong>to</strong>continue (Figure 2)Figure 2- 1 -
4. Choose “IMAP” option and press “Next” (Figure 2)Figure 35. Under “User Information” type in the name which you’d like <strong>to</strong> appear inthe “sender address” field of your future emails, next <strong>to</strong> “Your Name” Alsoyour complete Econ email address (ex. testuser@econ.yorku.ca) next <strong>to</strong>“E-mail Address” (Figure 4)Figure 4- 2 -
6. Under “Logon Information” enter your “User Name” (ex. testuser) and“Password”. Please DO NOT postfix the username with “@econ.yorku.ca”(Figure 4)7. Under “Server Information” enter “dept.econ.yorku.ca” in “Incoming mailserver (IMAP)” textbox. (Figure 4)8. If you are setting up MS <strong>Outlook</strong> <strong>XP</strong> on a computer that is connected <strong>to</strong><strong>York</strong> <strong>University</strong> network, enter “dept.econ.yorku.ca” in “Outgoing mailserver (SMTP)” textbox (Figure 4). <strong>How</strong>ever, if you’d like <strong>to</strong> use anInternet provider other than <strong>York</strong>U you need <strong>to</strong> get the “SMTP Server”information from your provider. In that case enter the server address (ex.smtp.rogers.ca) in<strong>to</strong> “Outgoing …” textbox.9. Press “More <strong>Set</strong>tings …” but<strong>to</strong>n as shown in “Figure 4” <strong>to</strong> open “InternetE-mail <strong>Set</strong>tings” dialog box. (Figure 5)Figure 510. If you’d like <strong>to</strong> use a different name for your email account in the <strong>Outlook</strong>environment, under “Mail Account” replace the default name (most likelydept.econ.yorku.ca) with the name of your choice.11. Click on “Advanced” tap on <strong>to</strong>p of the dialog box. Under “Folders” enter“~/Mail/” (the letters case is very important so ~/mail/ and ~/Mail/ arenot the same). Press “OK”.(Figure 6)- 3 -
13. Since IMAP email folders (ex. “Sent Mail”, “Junk Mails” and …) do notau<strong>to</strong>matically appear in <strong>Microsoft</strong> <strong>Outlook</strong> <strong>XP</strong>, you need <strong>to</strong> add themmanually. Also notice that when your mailbox grows excessively, all yourmessages au<strong>to</strong>matically will be moved <strong>to</strong> a new folder. Hence, you mightneed <strong>to</strong> repeat the next few steps every once in while <strong>to</strong> make sure youcan access all your messages from within <strong>Outlook</strong>.14. Right-click on your newly created account and choose “IMAP Folders”from the menu. (Figure 8)Figure 8Figure 9- 5 -