

TM 9-2920-243-34
TM 9-2920-243-34
TM 9-2920-243-34

Create successful ePaper yourself
Turn your PDF publications into a flip-book with our unique Google optimized e-Paper software.
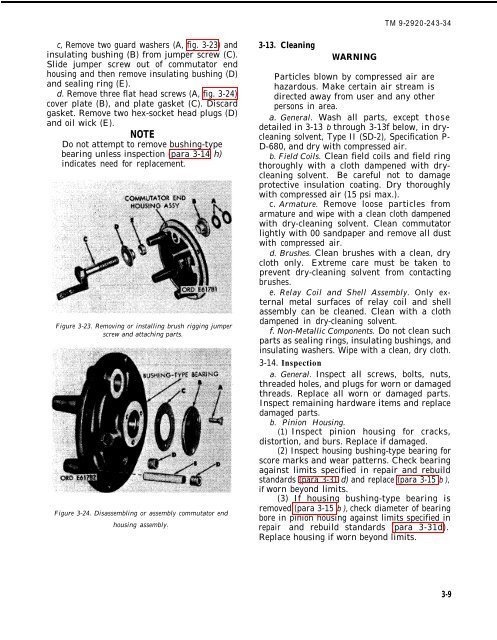
<strong>TM</strong> 9-<strong>2920</strong>-<strong>243</strong>-<strong>34</strong>c, Remove two guard washers (A, fig. 3-23) andinsulating bushing (B) from jumper screw (C).Slide jumper screw out of commutator endhousing and then remove insulating bushing (D)and sealing ring (E).d. Remove three flat head screws (A, fig. 3-24)cover plate (B), and plate gasket (C). Discardgasket. Remove two hex-socket head plugs (D)and oil wick (E).NOTEDo not attempt to remove bushing-typebearing unless inspection (para 3-14 h)indicates need for replacement.Figure 3-23. Removing or installing brush rigging jumperscrew and attaching parts.Figure 3-24. Disassembling or assembly commutator endhousing assembly.3-13. CleaningWARNINGParticles blown by compressed air arehazardous. Make certain air stream isdirected away from user and any otherpersons in area.a. General. Wash all parts, except thosedetailed in 3-13 b through 3-13f below, in drycleaningsolvent, Type II (SD-2), Specification P-D-680, and dry with compressed air.b. Field Coils. Clean field coils and field ringthoroughly with a cloth dampened with drycleaningsolvent. Be careful not to damageprotective insulation coating. Dry thoroughlywith compressed air (15 psi max.).c. Armature. Remove loose particles fromarmature and wipe with a clean cloth dampenedwith dry-cleaning solvent. Clean commutatorlightly with 00 sandpaper and remove all dustwith compressed air.d. Brushes. Clean brushes with a clean, drycloth only. Extreme care must be taken toprevent dry-cleaning solvent from contactingbrushes.e. Relay Coil and Shell Assembly. Only externalmetal surfaces of relay coil and shellassembly can be cleaned. Clean with a clothdampened in dry-cleaning solvent.f. Non-Metallic Components. Do not clean suchparts as sealing rings, insulating bushings, andinsulating washers. Wipe with a clean, dry cloth.3-14. Inspectiona. General. Inspect all screws, bolts, nuts,threaded holes, and plugs for worn or damagedthreads. Replace all worn or damaged parts.Inspect remaining hardware items and replacedamaged parts.b. Pinion Housing.(1) Inspect pinion housing for cracks,distortion, and burs. Replace if damaged.(2) Inspect housing bushing-type bearing forscore marks and wear patterns. Check bearingagainst limits specified in repair and rebuildstandards (para 3-31 d) and replace (para 3-15 b ),if worn beyond limits.(3) If housing bushing-type bearing isremoved (para 3-15 b ), check diameter of bearingbore in pinion housing against limits specified inrepair and rebuild standards (para 3-31d).Replace housing if worn beyond limits.3-9


