Windermere SS131D - Taylors Garden Buildings
Windermere SS131D - Taylors Garden Buildings
Windermere SS131D - Taylors Garden Buildings

Create successful ePaper yourself
Turn your PDF publications into a flip-book with our unique Google optimized e-Paper software.
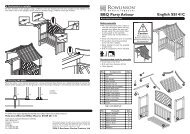
9.Attaching roof panelsLift 3 roof panels on to 1 side of the building, hooking the roof battens over the upper purlin. Ensure the front panel is flush with the front of the building and the backpanel is flush with the back of the building. Fix each panel in place using 9 x 38mm nails, secure to the 2 roof purlins and to the top frame of the side panel. Repeat forthe other side of the roof.To the inside of the roof fit the roof cover board to the 2 upper purlins using 6 x 32mm screws.Side view of roof panelRoof batten is set 12mm from the end ofthe panel.Felt batten is flushwith the end of thepanel.38mmSide viewRoof PurlinsNote:Ensure roof is flushwith the front of thebuilding.Side panel top frameNote:Ensure roof is flushwith the back of thebuilding.View from inside the buildinglooking up at the roof apexApex panel32mmRoof cover boardNail through roof into roof purlins andto the top frame of side panels.Apex panelStagger screws as shown, screwthrough the apex cover into thepurlins.10.Attaching verandah roof panelsLift each verandah roof panel up, ensure it is flush with the roof line and level with the other roof panels. Secure to the front of the building using 4 x 50mm screws perpanel, screw through the roof rafter into the apex panel. Secure the verandah roof supports using 1 x 50mm screw per support, screw through the support in to the roofrafter. Fit the gussets on the inside of the verandah roof to the roof rafters front and back.Attach each gusset using 4 x 50mm screws, screwed through the gusset intothe roof rafters.Secure verandahroof support with1 x 50mm screw.Attach gussets here.4mmDrillroof raftersVerandah roofsupport fits intothe inside cornerof the roof panel.50mm50mmSecure gussets to roofrafters using 4 x 50mmscrews per gusset.Gusset50mmSecure verandah roofs to thefront of the apex panel using4 x 50mm screws per panel.
11. Roofing feltCut the roofing felt roll into 3 equal lengths. Place a length over half of the roof. At the front and along the lower edge of the roof leave an overhang of felt of at least45mm. Fold down the felt along the lower edge and secure to the felt batten using 25 x10mm felt nails evenly spaced.Tension the felt over the roof and secure along theupper edge using 5 x 10mm felt nails. Repeat this for the second piece of felt on the other half of the roof. Once the 2 pieces of felt are in place take the third piece andplace over the roof apex, ensure it sits centrally over the roof ridge and overlaps the other 2 felt pieces.Attach using 25 x 10mm felt nails evenly spaced, along the 2 longedges of the ridge felt. Dress down the ends of the felt and at the front attach to the felt batten with 6 x 10mm felt nails. Repeat at the back but attach the felt to theapex panel. Once secured trim off the excess felt.10mmFeltnailsUpper edgeLower edgeFelt batten10mmFeltnailsUpper edgeFelt battenLower edge10mmFeltnails10mmFeltnails10mmFeltnails
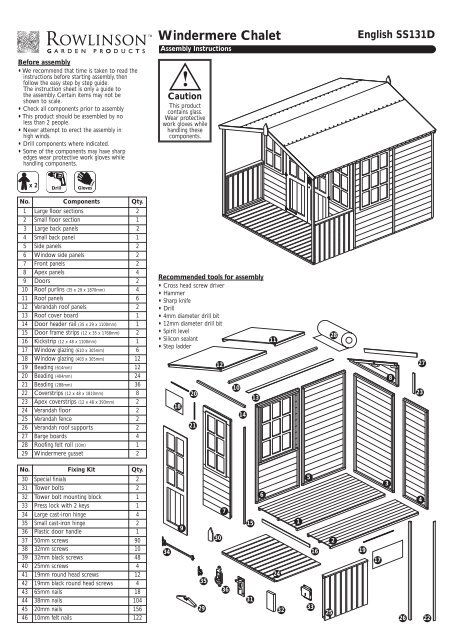
15.Tower boltsSecure the tower bolt mounting block at the top on the inside of the left door as shown using 4 x 32mm screws.Attach the tower bolts to the inside of the left door asshown using 4 x 19mm round head screws per bolt.With the doors shut, drop the bolt at the bottom of the door and mark where it touches the floor. Drill a 12mm holein the floor for the bolt to fit in.32mm19mm12mmDrill12mm diameter hole16. GlazingIt is recommended that a waterproof sealant is applied around the edge of the glazing before fitting. Place window pane on the inside of the window frame. For the doorsand front panels nail the beading into position using 2 x 20mm nails per beading strip. For the side panel windows use 2 x 20mm nails for the short beading and 3 x 20mm nailsfor the long beading.Door and front panel glazingGlovesWear protective work gloveswhile handling these components.Window frameWindow paneWooden beadingSide window panel glazingGlazing288mm beading404mm beading20mmFor the door and front panel glazing, use2 x 20mm nails per length of beading.Glazing288mm beading614mm beading20mmFor the side window panelglazing, use 2 x 20mm nails perlength of short beading and3 x 20mm nails per length oflong beading.Important information - retain for future referenceShiplap buildings come ready stained but this is only a preparatory treatment.To VALIDATE the guarantee, the building must be properly treated with a recognisedexternal wood preserver WITHIN 3 MONTHS of assembly and RE-TREATED ANNUALLY thereafter.The building must also be erected on 75mm x 50mmtreated wooden or similar bearers (These are not supplied with the kit.) Ground contact must be avoided.Timber Information.As timber is a natural material, there are certain weather conditions that may affect the materials properties. In times of excessive dry spells the material may losesome of its internal moisture causing a certain degree of shrinkage on a panel and in periods of excessive rain there will be a certain amount of swelling throughoutthe wooden panels.This process can not be avoided. If you have problems with certain boards shrinking in dry spells try to decrease the amount of direct sunlight onthe building or the amount of air passing over the building. During hot spells spray water directly onto the panels with the aid of a garden hose.If in doubt of any aspect regarding the assembly, use or safety of your building please contact us :Help Line (Normal Office Hours) 01829 261121ROWLINSON GARDEN PRODUCTS LIMITEDUnit 2 Green LaneWardle Nr.NantwichCheshireCW5 6BNTel : 01829 262080Fax : 01829 262089We constantly improve the quality of our products,occasionally the components may differ from thecomponents shown and are only correct at time ofprinting. We reserve the right to change thespecification of our products without prior notice.2006 © Rowlinson <strong>Garden</strong> Products Ltd