X50 Touch Screen Calibration Procedure.pdf
X50 Touch Screen Calibration Procedure.pdf
X50 Touch Screen Calibration Procedure.pdf

Create successful ePaper yourself
Turn your PDF publications into a flip-book with our unique Google optimized e-Paper software.
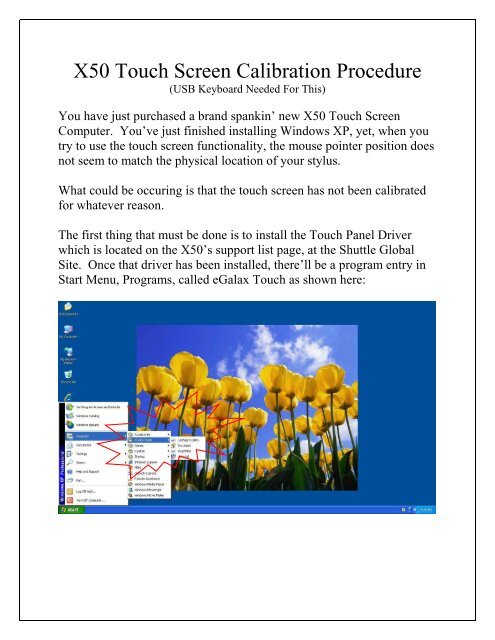
<strong>X50</strong> <strong>Touch</strong> <strong>Screen</strong> <strong>Calibration</strong> <strong>Procedure</strong>(USB Keyboard Needed For This)You have just purchased a brand spankin’ new <strong>X50</strong> <strong>Touch</strong> <strong>Screen</strong>Computer. You’ve just finished installing Windows XP, yet, when youtry to use the touch screen functionality, the mouse pointer position doesnot seem to match the physical location of your stylus.What could be occuring is that the touch screen has not been calibratedfor whatever reason.The first thing that must be done is to install the <strong>Touch</strong> Panel Driverwhich is located on the <strong>X50</strong>’s support list page, at the Shuttle GlobalSite. Once that driver has been installed, there’ll be a program entry inStart Menu, Programs, called eGalax <strong>Touch</strong> as shown here:
<strong>X50</strong> <strong>Touch</strong> <strong>Screen</strong> <strong>Calibration</strong> <strong>Procedure</strong>Within the eGalax <strong>Touch</strong> entry in Programs, there is a program calledConfigure Utility. When we click on that program, this will bring up theeGalaxy <strong>Touch</strong>: USB Controller Dialog Box as demonstrated here:Within that dialog, you’ll find a Tools Tab. If we click on that, we’llfind a few calibration options available for us. For this FAQ, we aregoing to concentrate on the 4 Points <strong>Calibration</strong> Button.
<strong>X50</strong> <strong>Touch</strong> <strong>Screen</strong> <strong>Calibration</strong> <strong>Procedure</strong>The 4 Points <strong>Calibration</strong> Button is shown in the following image:To calibrate our <strong>X50</strong>, touch screen, we need to press the 4 Points<strong>Calibration</strong> button. Once that occurs, we shall be presented with thefollowing screens which will then walk us step by step through thecalibration procedure.
<strong>X50</strong> <strong>Touch</strong> <strong>Screen</strong> <strong>Calibration</strong> <strong>Procedure</strong>The calibration screens will appear as follows:1 234NOTE: Square Numbers were added for your convenience.Basically, the calibration utility will prompt you to apply pressure on theareas highlighted in color for a few seconds as it calibrates that area ofthe touch screen. Once the calibration is finished on that area, a redcircle with a crosshair will appear until you stop touching the screen. Atthat point, the calibration mark will move to another corner of the screenafter which the process will begin again. This will happen for allcorners of the screen until the calibration process has finished.
<strong>X50</strong> <strong>Touch</strong> <strong>Screen</strong> <strong>Calibration</strong> <strong>Procedure</strong>Once calibration has been completed for each individual points, on theLCD, an image similar to the following will be displayed:This basically means that each point has been calibrated and theapplication is ready to move on to the next point that needs to becalibrated.
<strong>X50</strong> <strong>Touch</strong> <strong>Screen</strong> <strong>Calibration</strong> <strong>Procedure</strong>Once all points have been calibrated, you will receive the followingdialog box indiating that the process is done:At this point, the <strong>X50</strong>’s touch screen has been calibrated for you and isready for everyday use. ☺