operator's manual miter saw stand a18ms01 save this ... - Ryobi
operator's manual miter saw stand a18ms01 save this ... - Ryobi
operator's manual miter saw stand a18ms01 save this ... - Ryobi

You also want an ePaper? Increase the reach of your titles
YUMPU automatically turns print PDFs into web optimized ePapers that Google loves.
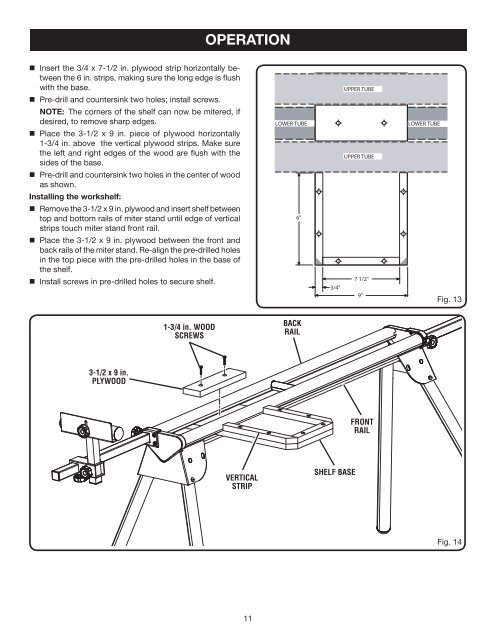
operationn Insert the 3/4 x 7-1/2 in. plywood strip horizontally betweenthe 6 in. strips, making sure the long edge is flushwith the base.n Pre-drill and countersink two holes; install screws.NOTE: The corners of the shelf can now be <strong>miter</strong>ed, ifdesired, to remove sharp edges.n Place the 3-1/2 x 9 in. piece of plywood horizontally1-3/4 in. above the vertical plywood strips. Make surethe left and right edges of the wood are flush with thesides of the base.n Pre-drill and countersink two holes in the center of woodas shown.Installing the workshelf:n Remove the 3-1/2 x 9 in. plywood and insert shelf betweentop and bottom rails of <strong>miter</strong> <strong>stand</strong> until edge of verticalstrips touch <strong>miter</strong> <strong>stand</strong> front rail.n Place the 3-1/2 x 9 in. plywood between the front andback rails of the <strong>miter</strong> <strong>stand</strong>. Re-align the pre-drilled holesin the top piece with the pre-drilled holes in the base ofthe shelf.n Install screws in pre-drilled holes to secure shelf.6"Fig. 131-3/4 in. WOODSCREWSbackrail3-1/2 x 9 in.plywoodfrontrailverticalstripshelf baseFig. 1411