

US $5.95 • Can $7.95 - O scale trains
US $5.95 • Can $7.95 - O scale trains
US $5.95 • Can $7.95 - O scale trains

Create successful ePaper yourself
Turn your PDF publications into a flip-book with our unique Google optimized e-Paper software.
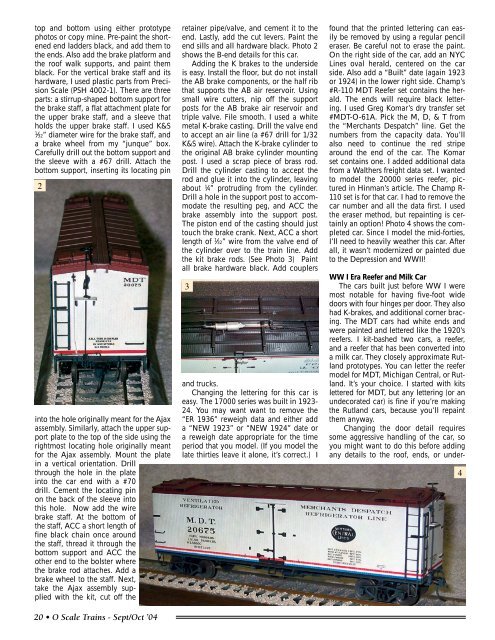
top and bottom using either prototypephotos or copy mine. Pre-paint the shortenedend ladders black, and add them tothe ends. Also add the brake platform andthe roof walk supports, and paint themblack. For the vertical brake staff and itshardware, I used plastic parts from PrecisionScale (PSH 4002-1). There are threeparts: a stirrup-shaped bottom support forthe brake staff, a flat attachment plate forthe upper brake staff, and a sleeve thatholds the upper brake staff. I used K&S1⁄32” diameter wire for the brake staff, anda brake wheel from my “junque” box.Carefully drill out the bottom support andthe sleeve with a #67 drill. Attach thebottom support, inserting its locating pin2into the hole originally meant for the Ajaxassembly. Similarly, attach the upper supportplate to the top of the side using therightmost locating hole originally meantfor the Ajax assembly. Mount the platein a vertical orientation. Drillthrough the hole in the plateinto the car end with a #70drill. Cement the locating pinon the back of the sleeve intothis hole. Now add the wirebrake staff. At the bottom ofthe staff, ACC a short length offine black chain once aroundthe staff, thread it through thebottom support and ACC theother end to the bolster wherethe brake rod attaches. Add abrake wheel to the staff. Next,take the Ajax assembly suppliedwith the kit, cut off the20 <strong>•</strong> O Scale Trains - Sept/Oct ’04retainer pipe/valve, and cement it to theend. Lastly, add the cut levers. Paint theend sills and all hardware black. Photo 2shows the B-end details for this car.Adding the K brakes to the undersideis easy. Install the floor, but do not installthe AB brake components, or the half ribthat supports the AB air reservoir. Usingsmall wire cutters, nip off the supportposts for the AB brake air reservoir andtriple valve. File smooth. I used a whitemetal K-brake casting. Drill the valve endto accept an air line (a #67 drill for 1/32K&S wire). Attach the K-brake cylinder tothe original AB brake cylinder mountingpost. I used a scrap piece of brass rod.Drill the cylinder casting to accept therod and glue it into the cylinder, leavingabout 1 ⁄4” protruding from the cylinder.Drill a hole in the support post to accommodatethe resulting peg, and ACC thebrake assembly into the support post.The piston end of the casting should justtouch the brake crank. Next, ACC a shortlength of 1 ⁄32” wire from the valve end ofthe cylinder over to the train line. Addthe kit brake rods. (See Photo 3) Paintall brake hardware black. Add couplers3and trucks.Changing the lettering for this car iseasy. The 17000 series was built in 1923-24. You may want want to remove the“ER 1936” reweigh data and either adda “NEW 1923” or “NEW 1924” date ora reweigh date appropriate for the timeperiod that you model. (If you model thelate thirties leave it alone, it’s correct.) Ifound that the printed lettering can easilybe removed by using a regular pencileraser. Be careful not to erase the paint.On the right side of the car, add an NYCLines oval herald, centered on the carside. Also add a “Built” date (again 1923or 1924) in the lower right side. Champ’s#R-110 MDT Reefer set contains the herald.The ends will require black lettering.I used Greg Komar’s dry transfer set#MDT-O-61A. Pick the M, D, & T fromthe “Merchants Despatch” line. Get thenumbers from the capacity data. You’llalso need to continue the red stripearound the end of the car. The Komarset contains one. I added additional datafrom a Walthers freight data set. I wantedto model the 20000 series reefer, picturedin Hinman’s article. The Champ R-110 set is for that car. I had to remove thecar number and all the data first. I usedthe eraser method, but repainting is certainlyan option! Photo 4 shows the completedcar. Since I model the mid-forties,I’ll need to heavily weather this car. Afterall, it wasn’t modernized or painted dueto the Depression and WWII!WW I Era Reefer and Milk CarThe cars built just before WW I weremost notable for having five-foot widedoors with four hinges per door. They alsohad K-brakes, and additional corner bracing.The MDT cars had white ends andwere painted and lettered like the 1920’sreefers. I kit-bashed two cars, a reefer,and a reefer that has been converted intoa milk car. They closely approximate Rutlandprototypes. You can letter the reefermodel for MDT, Michigan Central, or Rutland.It’s your choice. I started with kitslettered for MDT, but any lettering (or anundecorated car) is fine if you’re makingthe Rutland cars, because you’ll repaintthem anyway.Changing the door detail requiressome aggressive handling of the car, soyou might want to do this before addingany details to the roof, ends, or under-4


