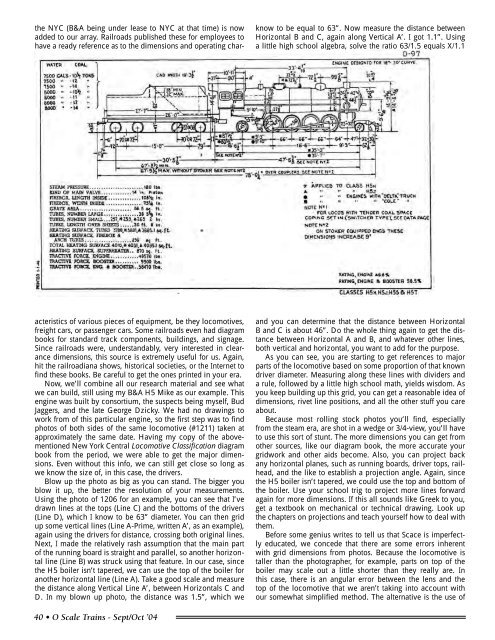
know to be equal to 63”. Now measure the distance betweenHorizontal B and C, again along Vertical A’. I got 1.1”. Usinga little high school algebra, solve the ratio 63/1.5 equals X/1.1the NYC (B&A being under lease to NYC at that time) is nowadded to our array. Railroads published these for employees tohave a ready reference as to the dimensions and operating characteristicsof various pieces of equipment, be they locomotives,freight cars, or passenger cars. Some railroads even had diagrambooks for standard track components, buildings, and signage.Since railroads were, understandably, very interested in clearancedimensions, this source is extremely useful for us. Again,hit the railroadiana shows, historical societies, or the Internet tofind these books. Be careful to get the ones printed in your era.Now, we’ll combine all our research material and see whatwe can build, still using my B&A H5 Mike as our example. Thisengine was built by consortium, the suspects being myself, BudJaggers, and the late George Dzicky. We had no drawings towork from of this particular engine, so the first step was to findphotos of both sides of the same locomotive (#1211) taken atapproximately the same date. Having my copy of the abovementionedNew York Central Locomotive Classification diagrambook from the period, we were able to get the major dimensions.Even without this info, we can still get close so long aswe know the size of, in this case, the drivers.Blow up the photo as big as you can stand. The bigger youblow it up, the better the resolution of your measurements.Using the photo of 1206 for an example, you can see that I’vedrawn lines at the tops (Line C) and the bottoms of the drivers(Line D), which I know to be 63” diameter. You can then gridup some vertical lines (Line A-Prime, written A’, as an example),again using the drivers for distance, crossing both original lines.Next, I made the relatively rash assumption that the main partof the running board is straight and parallel, so another horizontalline (Line B) was struck using that feature. In our case, sincethe H5 boiler isn’t tapered, we can use the top of the boiler foranother horizontal line (Line A). Take a good <strong>scale</strong> and measurethe distance along Vertical Line A’, between Horizontals C andD. In my blown up photo, the distance was 1.5”, which weand you can determine that the distance between HorizontalB and C is about 46”. Do the whole thing again to get the distancebetween Horizontal A and B, and whatever other lines,both vertical and horizontal, you want to add for the purpose.As you can see, you are starting to get references to majorparts of the locomotive based on some proportion of that knowndriver diameter. Measuring along these lines with dividers anda rule, followed by a little high school math, yields wisdom. Asyou keep building up this grid, you can get a reasonable idea ofdimensions, rivet line positions, and all the other stuff you careabout.Because most rolling stock photos you’ll find, especiallyfrom the steam era, are shot in a wedge or 3/4-view, you’ll haveto use this sort of stunt. The more dimensions you can get fromother sources, like our diagram book, the more accurate yourgridwork and other aids become. Also, you can project backany horizontal planes, such as running boards, driver tops, railhead,and the like to establish a projection angle. Again, sincethe H5 boiler isn’t tapered, we could use the top and bottom ofthe boiler. Use your school trig to project more lines forwardagain for more dimensions. If this all sounds like Greek to you,get a textbook on mechanical or technical drawing. Look upthe chapters on projections and teach yourself how to deal withthem.Before some genius writes to tell us that Scace is imperfectlyeducated, we concede that there are some errors inherentwith grid dimensions from photos. Because the locomotive istaller than the photographer, for example, parts on top of theboiler may <strong>scale</strong> out a little shorter than they really are. Inthis case, there is an angular error between the lens and thetop of the locomotive that we aren’t taking into account withour somewhat simplified method. The alternative is the use of40 <strong>•</strong> O Scale Trains - Sept/Oct ’04
3-dimensional angular projections, which is a really uglyreverse-engineering technique. Our method, salted with a goodeye to proportions and whatever info we can get from othersources, will still get you pretty darned close. Also on your side,at least in the locomotive world, many components, such asair pumps, are common to many locomotives and available ascommercial castings. Their dimensions are yet another piece ofthe puzzle solved for us.I have very rarely found that I have to use this grid/projectionmethod as the sole basis for building any model, but I stilluse projections and grids, in combination with info from theprototype railroad (diagram books as an example) when thereare no plans to be had. Even with plans in hand, I’ll use thismethod to determine the dimensions and locations of modificationsand features seen in photos which may not be reflectedin the drawings. Remember, do your best to match photos anddrawings carefully regarding dates taken, try to get photos ofthe same locomotive, car, or whatever, to work from, and useyour eye’s sense of proportion to detect errors. If it doesn’t quitelook right, it probably isn’t. You can judge for yourself how ourH5 came out.◆NarrowMindedBobber GibbsAs I look back at my many years ofinvolvement with O Scale <strong>trains</strong>, I can vividlyrecall my first real attraction to narrowgauge. I had previously learned that quite afew railroads had initially built narrow gaugelines and later widened them out to standardgauge, but I was deeply into the standardgauge learning curve and not really interestedin the subject until one special eventoccurred. At a train show, I saw a new, large<strong>scale</strong>, LGB Denver & Rio Grande Westernhigh side gondola and I was captivated bythe look and feel of it. That’s when I startedto get serious about narrow gauge.I read about the tiny Hunslets and Avonsidesthat worked the Welsh quarries, andstudied the history and development of narrowgauge around the world.I began to research the numerous Coloradonarrow gauge railroads and, for severalyears, I became totally immersed in learningall I could. I visited Colorado numeroustimes, followed the old lines, studied thepreserved equipment, rode all the <strong>trains</strong>,attended National Narrow Gauge Conventions,bought a lot of books and became aLife Member of the Colorado Railroad Museum.Along the way, I bought narrow gauge<strong>trains</strong> in HOn3, Sn3, On2, On3 and most ofthe garden railroad size/gauge combinations.I bought and built riding equipment on 7.25”gauge and eventually topped it all off witha 1300 foot railroad around my two acrehome, dual gauged for full sized 24” and 15”equipment. At the peak of my involvement,I owned four gas locomotives, over 40 expeatcars, a complete Chance Manufacturingamusement park passenger train and a 15”speeder with work trailer.The more I learned about narrow gaugerailroading, the more I became attracted tolarger <strong>scale</strong> models of smaller equipmentand began to shy away from the larger locomotives,freight and passenger equipment.I started the Critters List on the Internet andthen the O Scale Trains List (now O<strong>trains</strong>)followed by the On30 Conspiracy andProto48.You may be surprised to learn that, inNorth America and around the world, therehave been significantly more 30” gauge mainline and industrial railways than there everwere in 3-foot or 2-foot gauges.No, I was not the first to get involvedwith On30. I created the On30 Conspiracyin 1996 and have enjoyed watching this particular<strong>scale</strong>/gauge combination grow anddevelop into the biggest narrow gauge list onthe Internet with 1,661 members (comparedto 777 for O<strong>trains</strong>, 721 for On3 and 216 forProto48). A large number of manufacturersare producing excellent On30 equipment atfair prices and many proficient modelers arebuilding beautiful models and sharing theirskills with newcomers.What have I learned about O Scale narrowgauge train operations? Mainly, tiny4-wheel locomotives that pick up currentfrom the rails can have significant operatingproblems if they are not heavily weighted ordo not have independent suspension on atleast one axle. For slow speed and falter-freeoperation, I prefer can motors, flywheels, lowgearing and a minimum of six (and preferablyeight) current conducting wheels.That brings us to the real subject for thismonth, creating a narrow gauge industrialline in conjunction with a standard gauge OScale railroad and some dual gauge trackwork.My friend, Neville Rossiter, who alsowrites for O Scale Trains Magazine, hasinstalled an On30 line on his standard gaugeswitching railroad in Perth, Australia, primarilyfor some of his friends and fellow operatorswho have On30 equipment.I hope to encourage a few OST readersand some O<strong>trains</strong> members to considerinstalling a third rail on part of a standardgauge main line or spur track to create a sectionof dual gauge for visual interest and anoperating challenge. It could be On42, On3,On30, On2 or even smaller and it couldbe incorporated into traditional O Scale orProto48 standard gauge.If any readers have created sections ofdual gauge track, please contact me and offersome decent digital photos that we might beable to run in future columns. I am in the processof building my own dual gauge moduleto Proto48 and On30 standards and photoswill be ready for our next issue.Those on the Internet might want to checkout my new O Scale, modular, dual gaugeconcept at:http://groups.yahoo.com/group/ODUALHappy <strong>trains</strong> to you until we meet again. ◆Sept/Oct ’04 - O Scale Trains <strong>•</strong> 41