US $5.95 • Can $7.95 - O scale trains
US $5.95 • Can $7.95 - O scale trains
US $5.95 • Can $7.95 - O scale trains
Create successful ePaper yourself
Turn your PDF publications into a flip-book with our unique Google optimized e-Paper software.
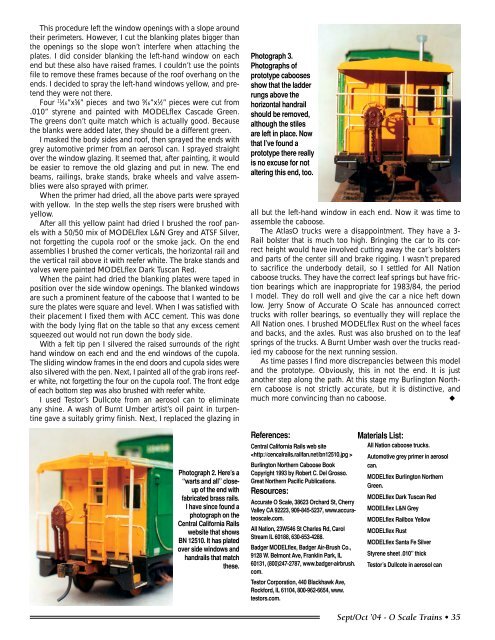
This procedure left the window openings with a slope aroundtheir perimeters. However, I cut the blanking plates bigger thanthe openings so the slope won’t interfere when attaching theplates. I did consider blanking the left-hand window on eachend but these also have raised frames. I couldn’t use the pointsfile to remove these frames because of the roof overhang on theends. I decided to spray the left-hand windows yellow, and pretendthey were not there.Four 11 ⁄16”x 5 ⁄8” pieces and two 9 ⁄16”x 1 ⁄2” pieces were cut from.010” styrene and painted with MODELflex Cascade Green.The greens don’t quite match which is actually good. Becausethe blanks were added later, they should be a different green.I masked the body sides and roof, then sprayed the ends withgrey automotive primer from an aerosol can. I sprayed straightover the window glazing. It seemed that, after painting, it wouldbe easier to remove the old glazing and put in new. The endbeams, railings, brake stands, brake wheels and valve assemblieswere also sprayed with primer.When the primer had dried, all the above parts were sprayedwith yellow. In the step wells the step risers were brushed withyellow.After all this yellow paint had dried I brushed the roof panelswith a 50/50 mix of MODELflex L&N Grey and ATSF Silver,not forgetting the cupola roof or the smoke jack. On the endassemblies I brushed the corner verticals, the horizontal rail andthe vertical rail above it with reefer white. The brake stands andvalves were painted MODELflex Dark Tuscan Red.When the paint had dried the blanking plates were taped inposition over the side window openings. The blanked windowsare such a prominent feature of the caboose that I wanted to besure the plates were square and level. When I was satisfied withtheir placement I fixed them with ACC cement. This was donewith the body lying flat on the table so that any excess cementsqueezed out would not run down the body side.With a felt tip pen I silvered the raised surrounds of the righthand window on each end and the end windows of the cupola.The sliding window frames in the end doors and cupola sides werealso silvered with the pen. Next, I painted all of the grab irons reeferwhite, not forgetting the four on the cupola roof. The front edgeof each bottom step was also brushed with reefer white.I used Testor’s Dullcote from an aerosol can to eliminateany shine. A wash of Burnt Umber artist’s oil paint in turpentinegave a suitably grimy finish. Next, I replaced the glazing inPhotograph 2. Here’s a“warts and all” closeupof the end withfabricated brass rails.I have since found aphotograph on theCentral California Railswebsite that showsBN 12510. It has platedover side windows andhandrails that matchthese.Photograph 3.Photographs ofprototype caboosesshow that the ladderrungs above thehorizontal handrailshould be removed,although the stilesare left in place. Nowthat I’ve found aprototype there reallyis no excuse for notaltering this end, too.all but the left-hand window in each end. Now it was time toassemble the caboose.The AtlasO trucks were a disappointment. They have a 3-Rail bolster that is much too high. Bringing the car to its correctheight would have involved cutting away the car’s bolstersand parts of the center sill and brake rigging. I wasn’t preparedto sacrifice the underbody detail, so I settled for All Nationcaboose trucks. They have the correct leaf springs but have frictionbearings which are inappropriate for 1983/84, the periodI model. They do roll well and give the car a nice heft downlow. Jerry Snow of Accurate O Scale has announced correcttrucks with roller bearings, so eventually they will replace theAll Nation ones. I brushed MODELflex Rust on the wheel facesand backs, and the axles. Rust was also brushed on to the leafsprings of the trucks. A Burnt Umber wash over the trucks readiedmy caboose for the next running session.As time passes I find more discrepancies between this modeland the prototype. Obviously, this in not the end. It is justanother step along the path. At this stage my Burlington Northerncaboose is not strictly accurate, but it is distinctive, andmuch more convincing than no caboose.◆References:Central California Rails web siteBurlington Northern Caboose BookCopyright 1993 by Robert C. Del Grosso.Great Northern Pacific Publications.Resources:Accurate O Scale, 38623 Orchard St, CherryValley CA 92223, 909-845-5237, www.accurateo<strong>scale</strong>.com.All Nation, 23W546 St Charles Rd, CarolStream IL 60188, 630-653-4288.Badger MODELflex, Badger Air-Brush Co.,9128 W. Belmont Ave, Franklin Park, IL60131, (800)247-2787, www.badger-airbrush.com.Testor Corporation, 440 Blackhawk Ave,Rockford, IL 61104, 800-962-6654, www.testors.com.Materials List:All Nation caboose trucks.Automotive grey primer in aerosolcan.MODELflex Burlington NorthernGreen.MODELflex Dark Tuscan RedMODELflex L&N GreyMODELflex Railbox YellowMODELflex RustMODELflex Santa Fe SilverStyrene sheet .010” thickTestor’s Dullcote in aerosol canSept/Oct ’04 - O Scale Trains <strong>•</strong> 35


