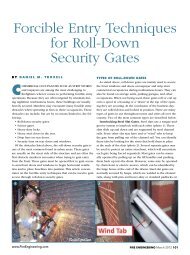
<strong>Curved</strong> stairs add interest to a deck, solve design issues,differentiate your work, and wow clients. They can alsobe a profitable upsell, and they’re not that hard to build; afteryou’ve done one or two, the process becomes ingrained andgoes quickly.My method of building curved stairs breaks down intofour basic steps: layout, stringer assembly, tread and riserassembly, and finish work. None require specialized tools orjigs and all can be done on site. Key to my process is a set oftemporary curved stud walls that I build to use as a layouttool, a form for laminating plywood for the curved stringers,and an assembly template.If you’re working on a sloping grade, the rough staircasecan be built elsewhere on the site or even inside, using thesame process, and then carried into position.Like any other stairs, curved ones have to meet code. Themain section in the 2012 IRC that covers curved stairs isR311.7.5.2.1, Winder Treads, but other sections also apply. Ingeneral, the requirements are the same as for straight stairs,with a few additions that address the different shape of thetreads. On curved stairs, the minimum depth of the treads attheir narrow end is 6 inches, and the minimum depth at the“walkline” is 10 inches. The walkline is measured 12 inchesin from the narrowest part of the treads and follows an arcFigure 1. Lay out the inner and outer arcs of the stair ona temporary floor made from a double layer of plywood.that’s concentric to the one at the inner stair edge. Thoughthe code doesn’t specify a maximum depth, keep in mindthat extra-deep treads — more than 14 inches or so — canmake stairs uncomfortable to climb. Your local code mayhave different requirements, so be sure to check.Lay Out and Build a Bending FrameI calculate the number of risers and treads as I would withstraight stairs. General layout includes locating where thestairs will leave the deck, picking a curve for the stairs, andtargeting an area for the bottom landing. To rough out thestair’s arc, I walk heel-toe-heel-toe in the imaginary centerof the stairs, starting at the deck and curving in the directionof the planned landing. This establishes the approximateradius and the location of the bottom riser within afoot or two.Bending-frame base. Next, I lay out and assemble the framefor bending the stringers. For the base, which will serve as atemplate and as a bottom plate for the frame walls, I lay twolayers of plywood sheets over an area about a foot wider thanthe stairs will cover. The joints should overlap at least 6 inchesand be screwed together at 2- to 3-foot intervals.Template layout. Mark arcs on the plywood at the radii ofthe inside and outside stringers and walkline (Figure 1). Tofind the center of the arcs — a pointequidistant from the top and bottomof the stairs — first plumb downfrom the middle of where the stairswill land on the deck, and mark theplywood base below. Next, mark theplywood at the middle of the plannedbottom-riser location. Then pull tapemeasures from these two marks, keepingthe tape from the first mark parallelwith the deck edge and sliding theother tape along it. When the measurementsmatch up, you’ve found the centerof the stair arc.Drive a stake at that point. Hooka tape measure to it and swing threearcs on the plywood, from the deckedge to the bottom landing area.The first arc defines the inside of thecurve, the second arc — 12 inches outfrom the first — marks the walkline,and the third defines the outside edgeof the stairs.2 Professional <strong>Deck</strong> Builder • July/August 2012
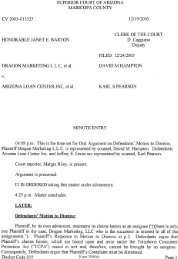
<strong>Curved</strong> <strong>Deck</strong> <strong>Stairs</strong>Figure 2. After laying out the inner and outer radii andthe radius of the walkline, mark the tread locations onthe latter at 10-inch-minimum intervals.Figure 3. Snap chalk lines between the centerpoint and two adjacent walkline tread marksto outline a tread. Verify that the minimumtread width is at least 6 inches.Step off the treads at the walkline with equally spaced tickmarks10 inches (code minimum) or more apart (Figure 2).I generally limit tread depth at the walkline to 12 inches forcomfort. The final tread/riser mark pinpoints the bottomlanding. Pull a string from the radius stake to the outer stairFigure 4. Outline every tread on the stair by snapping lines betweenthe center and the walkline marks.line at the last tread/riser to see if you like how the angle ofthe bottom riser relates to your plans for a bottom landing.If the last tread doesn’t land where you expected it to, youcan make adjustments by increasing or decreasing the riserheight to change the number of treads; by changing the treadmeasurement at the walkline to extend orcontract the bottom tread; or by changingthe radius of the stairs to make the arcstighter or broader. These are all easy changesto make before you start building.Check that the minimum tread depth isat least 6 inches by snapping two chalk linesfrom the radius stake through two successivetread marks at the walkline arc. The distancebetween the points where the chalklines cross the inner arc is the dimension ofthe narrow end of the treads (Figure 3).Once you’re happy with the geometry ofthe stair, pull a chalk line from the radiusstake all the way across the outer stair-edgearc and snap lines on the plywood at eachtread mark along the walkline to define thestair treads (Figure 4).Plywood top. For the top of the bendingframe, make a second plywood assembly thatmirrors the base — complete with the stairlayout, though there’s no need to mark thewalkline arc. Trim the edges 3 1 ⁄2 inches wide3 Professional <strong>Deck</strong> Builder • July/August 2012