Flat panel lift and rotate system -Flat panel lift and hatch ... - Audipack
Flat panel lift and rotate system -Flat panel lift and hatch ... - Audipack
Flat panel lift and rotate system -Flat panel lift and hatch ... - Audipack

Create successful ePaper yourself
Turn your PDF publications into a flip-book with our unique Google optimized e-Paper software.
®<br />
AUDIPACK<br />
AUDIPACK<br />
Industriestraat 2-4<br />
2751 GT Moerkapelle<br />
the Netherl<strong>and</strong>s<br />
Tel: +31(0)795931671<br />
Fax: +31(0)795933115<br />
Email: audipack@audipack.com<br />
www.audipack.com<br />
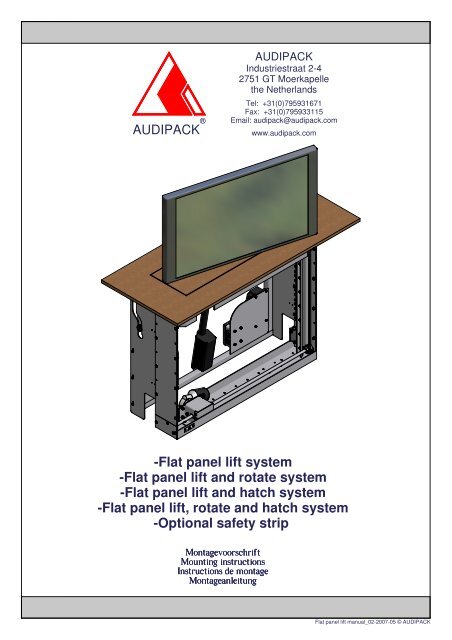
-<strong>Flat</strong> <strong>panel</strong> <strong>lift</strong> <strong>system</strong><br />
-<strong>Flat</strong> <strong>panel</strong> <strong>lift</strong> <strong>and</strong> <strong>rotate</strong> <strong>system</strong><br />
-<strong>Flat</strong> <strong>panel</strong> <strong>lift</strong> <strong>and</strong> <strong>hatch</strong> <strong>system</strong><br />
-<strong>Flat</strong> <strong>panel</strong> <strong>lift</strong>, <strong>rotate</strong> <strong>and</strong> <strong>hatch</strong> <strong>system</strong><br />
-Optional safety strip<br />
<strong>Flat</strong> <strong>panel</strong> <strong>lift</strong> manual_02-2007-05 © AUDIPACK
®<br />
AUDIPACK<br />
$ % %<br />
AUDIPACK<br />
Industriestraat 2-4<br />
2751 GT Moerkapelle<br />
the Netherl<strong>and</strong>s<br />
Tel: +31(0)795931671<br />
Fax: +31(0)795933115<br />
Email: audipack@audipack.com<br />
#<br />
www.audipack.com<br />
! " #<br />
& '<br />
<strong>Flat</strong> <strong>panel</strong> <strong>lift</strong> manual_03-2007-05<br />
© AUDIPACK
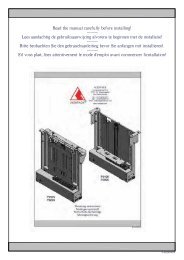
Attention!<br />
safety hook<br />
A1,2<br />
A 1<br />
Max.<br />
80 kg<br />
middle<br />
A 2<br />
<strong>Flat</strong> <strong>panel</strong> <strong>lift</strong> manual_04-2007-05<br />
© AUDIPACK
B<br />
Mounting the <strong>lift</strong> <strong>system</strong>.<br />
St<strong>and</strong>ard colour RAL 9005 (black).<br />
1. Mounting instructions -screws-<br />
A<br />
Screw min length: 25mm, (min 18x)<br />
Horizontal use only.<br />
A<br />
Max.<br />
80 kg<br />
Mounting instructions -bolts-<br />
M6 x ... (8.8)<br />
A<br />
B<br />
A<br />
A<br />
B<br />
<strong>Flat</strong> <strong>panel</strong> <strong>lift</strong> manual_05-2007-05<br />
© AUDIPACK
Cable guidance<br />
ALWAYS use the cable guidance(s)<br />
<strong>Flat</strong> <strong>panel</strong> <strong>lift</strong> manual_06-2007-05<br />
© AUDIPACK
Lift <strong>system</strong>.<br />
St<strong>and</strong>ard colour RAL 9005 (black).<br />
Application.<br />
Adjusting limit switches <strong>lift</strong>.<br />
A (lower position)<br />
B (Upper position)<br />
1. untighten M4 nut.<br />
2. adjust M4 screw.<br />
3. tighten M4 nut again.<br />
Limit switch.<br />
Mounting holes<br />
side mounting.<br />
A<br />
Cable guidance<br />
Part of cabinet<br />
(not supplied).<br />
Monitor housing<br />
(not supplied).<br />
B<br />
<strong>Flat</strong> <strong>panel</strong> <strong>lift</strong> manual_07-2007-05<br />
Optional monitor<br />
mounting device.<br />
Mounting holes for<br />
monitor housing.<br />
Mounting holes base.<br />
St<strong>and</strong>ard <strong>lift</strong> <strong>system</strong>.<br />
© AUDIPACK
Lift <strong>and</strong> <strong>hatch</strong> <strong>system</strong>.<br />
St<strong>and</strong>ard colour RAL 9005 (black).<br />
Application.<br />
Adjusting limit switches <strong>hatch</strong>.<br />
A<br />
1. loosen M4 screws.<br />
2. move the limit switch up or down.<br />
3. tighten M4 screws again.<br />
Part of cabinet,<br />
to close when <strong>lift</strong> is up<br />
(not supplied).<br />
A<br />
(Limit switch<br />
<strong>hatch</strong> open)<br />
Hatch <strong>system</strong>.<br />
B<br />
(Limit switch<br />
<strong>hatch</strong> closed)<br />
B<br />
<strong>Flat</strong> <strong>panel</strong> <strong>lift</strong> manual_08-2007-05<br />
Part of cabinet<br />
(not supplied).<br />
Optional monitor<br />
mounting device.<br />
Optional monitor<br />
bracket.<br />
Spacers<br />
(included).<br />
St<strong>and</strong>ard <strong>lift</strong> <strong>system</strong>.<br />
1. loosen M4 nut.<br />
2. adjust M4 screw.<br />
3. tighten M4 nut again.<br />
© AUDIPACK
Lift <strong>and</strong> <strong>rotate</strong> <strong>system</strong>.<br />
St<strong>and</strong>ard colour RAL 9005 (black).<br />
Application.<br />
A<br />
St<strong>and</strong>ard monitor mounting<br />
device (included).<br />
Hatch<br />
(not supplied).<br />
Optional monitor<br />
mounting device.<br />
Part of cabinet,<br />
to close when <strong>lift</strong> is up<br />
(not supplied).<br />
Monitor cable guidance.<br />
Adjusting limit switches rotation.<br />
Adjustable limit ring.<br />
Limit switches rotation.<br />
Mountingholes for rough<br />
adjusting the <strong>rotate</strong> angle.<br />
A<br />
<strong>Flat</strong> <strong>panel</strong> <strong>lift</strong> manual_09-2007-05<br />
Safety magnets.<br />
Optional monitor<br />
bracket.<br />
Fine tuning rotation zero point:<br />
-Remove monitor from <strong>lift</strong><strong>system</strong>.<br />
-Rotate the <strong>system</strong> in up position<br />
to approx. 10 deg.<br />
-Untighten M6 bolts.<br />
-Rotate the limit ring a little at<br />
the time.<br />
-Tighten M6 bolts again.<br />
© AUDIPACK
Attention!<br />
Min. 5 mm<br />
Min. 5 mm<br />
Min. 5 mm<br />
Min. 5 mm<br />
<strong>Flat</strong> <strong>panel</strong> <strong>lift</strong> manual_10-2007-05<br />
Min. 10 mm<br />
© AUDIPACK
Safety strips<br />
Beware of moving parts<br />
during <strong>system</strong> activation!<br />
Positioning the rubber safety strips<br />
A<br />
A<br />
B C<br />
B C<br />
Min 5 mm<br />
safety strip<br />
Min 5 mm<br />
Do not cut, shorten or bend the rubber safety strip!<br />
A-A<br />
<strong>Flat</strong> <strong>panel</strong> <strong>lift</strong> manual_11-2007-05 © AUDIPACK
Panel dimensions electric <strong>hatch</strong>.<br />
36<br />
L<br />
L<br />
A<br />
A<br />
36<br />
170,5<br />
MAX 18<br />
L W<br />
MODEL<br />
A<br />
A1<br />
B<br />
B1<br />
C<br />
C1<br />
min. 5<br />
102<br />
86 1<br />
W<br />
L W<br />
818<br />
1018<br />
1108<br />
1308<br />
1273<br />
1473<br />
min<br />
200<br />
200<br />
200<br />
200<br />
200<br />
200<br />
NOTE: All dimensions are ±..., in mm.<br />
Wmax<br />
Wmin<br />
Cut-out for optional rotation.<br />
Wmax<br />
243<br />
243<br />
283<br />
283<br />
283<br />
283<br />
25<br />
<strong>Flat</strong> <strong>panel</strong> <strong>lift</strong> manual_12-2007-05 © AUDIPACK
Disc cut-out optional rotation.<br />
SCALE 1:1<br />
168<br />
<strong>Flat</strong> <strong>panel</strong> <strong>lift</strong> manual_13-2007-05 © AUDIPACK
Table top finishing, electric <strong>hatch</strong>.<br />
Min. 5<br />
Min. 5<br />
Min. 80<br />
Min. 5<br />
Min. 5<br />
Max. 18mm<br />
<strong>Flat</strong> <strong>panel</strong> <strong>lift</strong> manual_14-2007-05 © AUDIPACK
Maintenance: bearings of <strong>rotate</strong> <strong>system</strong> A<br />
For readjusting the rotation bearings follow the next instructions:<br />
Position the <strong>lift</strong> in the upper position.<br />
Remove the flat screen from the <strong>lift</strong>.<br />
Release the screws in the top of the round plate.<br />
By removing the round plate all bearings are visible.<br />
A<br />
Twinge key<br />
<strong>Flat</strong> <strong>panel</strong> <strong>lift</strong> manual_15-2007-05<br />
Excenter bearings<br />
Explanation:<br />
The bearings are mounted on a base plate.<br />
By loosening the M5 screws below the plate, it is possible to <strong>rotate</strong> the bearing with the special twinge key.<br />
With the special Twinge key the excentric bearing can be adjusted. In this way the tolerance can be made smaller.<br />
After adjusting, firmly tighten the M5 screws below the base plate.<br />
Limit switch plate<br />
Performed by authorised personnel only!<br />
untighten<br />
© AUDIPACK
Electrical equipment.<br />
Llat <strong>panel</strong> <strong>lift</strong> manual_16-2007-05<br />
© AUDIPACK
Lift with <strong>hatch</strong><br />
Lift Hatch<br />
See page<br />
'CONTROL BOX 260134'<br />
for wiring.<br />
Lift<br />
Hatch must be<br />
completely<br />
opened to be<br />
able to move<br />
the <strong>lift</strong> up.<br />
Was connected.<br />
End switch<br />
<strong>hatch</strong> open.<br />
End switch<br />
<strong>lift</strong> up.<br />
End switch<br />
<strong>lift</strong> down.<br />
Additional condition<br />
See page<br />
'CONTROL BOX<br />
260134' for wiring.<br />
Beware; there is no condition yet, so the <strong>lift</strong><br />
can go up while the <strong>hatch</strong> is closed!<br />
Please see next drawing.<br />
Hatch<br />
Lift has to be<br />
completely<br />
down to be<br />
able to close<br />
the <strong>hatch</strong>.<br />
Was connected.<br />
See page<br />
'CONTROL BOX 260134'<br />
for wiring.<br />
End switch<br />
<strong>lift</strong> down.<br />
End switch<br />
<strong>hatch</strong> closed.<br />
End switch<br />
<strong>hatch</strong> open.<br />
See page<br />
'CONTROL BOX<br />
260134' for wiring.<br />
<strong>Flat</strong> <strong>panel</strong> <strong>lift</strong> manual_17-2007-05 © AUDIPACK
Detail A<br />
(Normally Closed)<br />
Lift with <strong>hatch</strong>, with rotation<br />
Lift Hatch<br />
See page<br />
'CONTROL BOX 260134'<br />
for wiring.<br />
Rotation<br />
See page<br />
'CONTROL BOX 260134'<br />
for wiring.<br />
End switch<br />
<strong>lift</strong> up.<br />
End switch<br />
<strong>lift</strong> down.<br />
Beware; there is no condition yet!<br />
The <strong>lift</strong> can go up <strong>and</strong>/or <strong>rotate</strong> while the <strong>hatch</strong> is closed,<br />
<strong>and</strong>/or when the <strong>lift</strong> is not up!<br />
Please see next page.<br />
A<br />
UP/DOWN<br />
DOWN/UP<br />
See page<br />
'CONTROL BOX 260134'<br />
for wiring.<br />
End switch<br />
<strong>hatch</strong> closed.<br />
End switch<br />
<strong>hatch</strong> open.<br />
<strong>Flat</strong> <strong>panel</strong> <strong>lift</strong> manual_18-2007-05 © AUDIPACK
Lift<br />
The monitor must be at zero position,<br />
otherwise the <strong>lift</strong> can't move.<br />
The drawer must be open,<br />
otherwise the <strong>lift</strong> can't move.<br />
UP<br />
DOWN<br />
COMMON<br />
Rotation<br />
Lift must be<br />
completely<br />
up to be<br />
able to <strong>rotate</strong><br />
the monitor.<br />
See page<br />
'MOTOR CONTROL<br />
BOX 460101, 460102<br />
<strong>and</strong> 460112'<br />
for wiring.<br />
(Normally Open)<br />
Lift with <strong>hatch</strong>, with rotation<br />
White wire<br />
(COMMON)<br />
End switch<br />
drawer open.<br />
Was connected.<br />
Additional condition<br />
A<br />
End switch<br />
rotation zero.<br />
Detail A<br />
Box 2<br />
Must be the correct wire to<br />
the CONTROL BOX:<br />
when this wire is in contact<br />
with the common, the rotation<br />
must go to the angle position,<br />
away from the zero position.<br />
End switch<br />
<strong>lift</strong> up.<br />
Hatch<br />
Hatch can<br />
close when<br />
the <strong>lift</strong> is<br />
down.<br />
Was connected.<br />
Was connected.<br />
See page<br />
'CONTROL BOX<br />
260134' for wiring.<br />
Box 1<br />
End switch<br />
<strong>lift</strong> down.<br />
See page<br />
'MOTOR CONTROL<br />
BOX 460101, 460102<br />
<strong>and</strong> 460112'<br />
for wiring.<br />
See page<br />
'CONTROL BOX<br />
260134' for wiring.<br />
See page<br />
'MOTOR CONTROL<br />
BOX 460101, 460102<br />
<strong>and</strong> 460112'<br />
for wiring.<br />
<strong>Flat</strong> <strong>panel</strong> <strong>lift</strong> manual_19-2007-05 © AUDIPACK
Lift<br />
Hatch must be<br />
completely<br />
opened to be<br />
able to move<br />
the <strong>lift</strong> up.<br />
The rotation must<br />
be in zero position<br />
to move the <strong>lift</strong> down.<br />
Was connected.<br />
See page<br />
'CONTROL BOX<br />
260134' for wiring.<br />
Rotation<br />
Lift with <strong>hatch</strong>, with rotation, with safety strips<br />
End switch<br />
<strong>lift</strong> up.<br />
End switch End switch<br />
<strong>hatch</strong> open. rotation zero.<br />
(Normally Open)<br />
Additional condition<br />
15. 16.<br />
Safety relay<br />
Was connected.<br />
See page<br />
'CONTROL BOX<br />
260134' for wiring.<br />
Lift must be<br />
completely<br />
up to be<br />
able to <strong>rotate</strong><br />
the monitor.<br />
Hatch<br />
Lift must be<br />
completely<br />
down to be<br />
able to close<br />
the <strong>hatch</strong>.<br />
Was connected.<br />
Safety<br />
End switch<br />
<strong>lift</strong> down.<br />
12. 13.<br />
Safety relay<br />
See page<br />
'CONTROL BOX<br />
260134' for wiring.<br />
See page<br />
'SAFETY RELAY<br />
260189' for wiring.<br />
<strong>Flat</strong> <strong>panel</strong> <strong>lift</strong> manual_20-2007-05 © AUDIPACK
UP DOWN<br />
K1<br />
k2<br />
External cable control box<br />
(not the motor control box!)<br />
A<br />
1. EXTERNAL CONTROL: control by relay.<br />
WARNING:<br />
The tension on these wires<br />
can be 12-24 VDC <strong>and</strong> 230 VAC!<br />
UP DOWN COMMON<br />
M<br />
Controlled by computer (for example).<br />
-K1 <strong>and</strong> K2 are relays.<br />
-k1 <strong>and</strong> k2 are relays.<br />
B<br />
K2<br />
k1<br />
External cable control box<br />
(not the motor control box!)<br />
k1<br />
Wall switch<br />
(with neutral position)<br />
(not supplied)<br />
UP DOWN COMMON<br />
2. EXTERNAL CONTROL: control by switch or remote.<br />
-A <strong>and</strong> B are potential free contacts.<br />
-A: up or down.<br />
-B: down or up.<br />
-M: middle position (!).<br />
k2<br />
(Optional)<br />
remote control<br />
Manual 260134_01_2007-03 © AUDIPACK
Limit<br />
UP<br />
4. DOWN<br />
3. UP<br />
CONTROL BOX 260134<br />
motor<br />
controlbox<br />
(see next<br />
page)<br />
10. COMMON<br />
DOWN<br />
8. UP<br />
External control<br />
7. DOWN<br />
5. COMMON<br />
Lift: Hatch: Rotation:<br />
UP = <strong>lift</strong> up, UP = <strong>hatch</strong> close, UP = <strong>rotate</strong> to angle,<br />
DOWN = <strong>lift</strong> down. DOWN = <strong>hatch</strong> open. DOWN = <strong>rotate</strong> to zero position.<br />
Limit<br />
Explanation UP <strong>and</strong> DOWN:<br />
Service switch<br />
Fuse max. 2A.<br />
Manual 260134_02_2007-02 © AUDIPACK
MOTOR CONTROL BOX 460101, 460102 <strong>and</strong> 460112<br />
U in: 230 VAC 50 Hz<br />
I in: max. 2,5 A<br />
U out: 27VDC max 240 VA<br />
Duty cycle: max 1 min./9 min.<br />
Channel 1<br />
red wire (common)<br />
green wire (DOWN or UP)<br />
orange wire (UP or DOWN)<br />
24 VDC motor<br />
24 VDC motor<br />
OR<br />
Manual 460101_01_2007-02 © AUDIPACK
U in: 230 VAC 50 Hz<br />
I in: max. 2,5 A<br />
U out: 27VDC max 240 VA<br />
Duty cycle: max 1 min./9 min.<br />
Channel 1<br />
Channel 2<br />
MOTOR CONTROL BOX (double) 460114<br />
red wire (common)<br />
green wire (UP or DOWN)<br />
orange wire (UP or DOWN)<br />
grey wire (common)<br />
blue wire (UP or DOWN)<br />
white wire (UP or DOWN)<br />
24 VDC motor<br />
24 VDC motor<br />
for example<br />
Manual 460114_01_2007-02 © AUDIPACK
SAFETY RELAY 260189<br />
U in: 230 VAC 50 Hz<br />
I in: max. 5 VA<br />
U out: 24VDC max 120 VA<br />
Duty cycle: 100 %<br />
Switching Capacity: 250 VAC/2A (Ohm load)<br />
2A (inductive load)<br />
250 VDC/350 mA (ohm load)<br />
150mA (inductive load)<br />
30 VDC/2A (ohm load)<br />
1.5A (inductive load)<br />
1. Signal Sensor 1 (Safety Rubber 1)<br />
2. Signal Sensor 1 (Safety Rubber 1)<br />
3. Signal Sensor 2 (Safety Rubber 2) (or resistor 8.2 kOhm)<br />
4. Signal Sensor 2 (Safety Rubber 2) (or resistor 8.2 kOhm)<br />
5. External Reset (NC contact)<br />
6. External Reset (NC contact)<br />
7. Indication Relay<br />
8. Indication Relay<br />
9. Supply Voltage<br />
10. Supply Voltage<br />
11. Not Used<br />
12. Output Relay 1<br />
13. Output Relay 1<br />
14. Not Used<br />
15. Output Relay 2<br />
16. Output Relay 2<br />
Rubber safety strip<br />
RESET<br />
Manual 260189_01_2007-02 © AUDIPACK
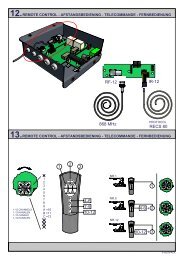
INFRA-RED RECEIVER 260097/260198/260174<br />
IR receiver<br />
U in: 2 2 0 -2 4 0 V A C 5 0 H z<br />
I in: m a x. 2 ,5 A<br />
S yste m o f p ro tectio n: IP 4 0<br />
W o rk ing tem p eratu re: 0 °C to 4 0 °C<br />
O u tp ut m o to r tem p o r isat io n: 3 m in .<br />
O u tp ut rela ys: 3 .1 5 A 2 5 0 V A C<br />
IR sensor<br />
260100<br />
B e a w a r e th a t th e re a r e se v er a l ty p es o f re ce iv e rs!!<br />
D escrip t io n 2 6 0 0 9 7 :<br />
- IR rece iver, E R IT 7 2 8 8 4 0<br />
-W he n p u shin g sho rt U P o r D O W N , the re la y<br />
w ill be co ntacted fo r 3 m in u tes (u ntil the syste m re aches its<br />
end sw itc he s).<br />
-W he n p u sh the S T O P bu tto n, the syste m w ill sto p.<br />
-T he o utp ut tensio n C , U <strong>and</strong> D is 2 3 0 V A C m a x 2 ,5 A m p !<br />
-N o t to b e u sed in co m b in a tio n w ith 2 6 0 1 3 4, on ly 2 6 0 0 6 8 !<br />
D escrip t io n 2 6 0 1 9 8 :<br />
- IR rece iver, E R IT 7 2 8 8 5 0 po tentia l free sw itc h.<br />
-W he n p u sh -<strong>and</strong> ho ld - U P o r D o w n, the rela y w ill b e<br />
co ntacted (u ntil the syste m reac he s its end sw itc he s).<br />
-W he n p u shin g the S T O P bu tto n, bo th o f the rela y s w ill be<br />
co ntacted!<br />
-T he C , U <strong>and</strong> D are 2 po tentia l free sw itc he s:<br />
C = C o m m o n, U = U p <strong>and</strong> D = D o w n.<br />
-N o t to b e u sed in co m b in a tio n w ith 2 6 0 0 6 8, on ly 2 6 0 1 3 4 !<br />
D escrip t io n 2 6 0 1 7 4 :<br />
-IR receiver, p o tentia l free sw itc h.<br />
(based o n E R IT 7 2 8 8 4 0 ).<br />
-W he n p u shin g sho rt U P o r D O W N , the re la y<br />
w ill be co ntacted fo r 3 m in u tes (u ntil the syste m re aches its<br />
end sw itc he s).<br />
-W he n p u sh the S T O P bu tto n, the syste m w ill sto p.<br />
-T he C , U <strong>and</strong> D are 2 po tentia l free sw itc he s:<br />
C = C o m m o n, U = U p <strong>and</strong> D = D o w n.<br />
-C a n b e u sed in com b in a tio n w ith 2 6 0 0 6 8 a n d 26 0 1 3 4 .<br />
260068<br />
To external controll<br />
of <strong>system</strong> controll<br />
(See page of controll).<br />
260134<br />
C = COMMON = C<br />
UP = U<br />
DOWN = D<br />
1 channel IR transmitter<br />
260098<br />
-260097<br />
-260198<br />
-260174<br />
Power 230 VAC<br />
Power 230 VAC<br />
EARTH<br />
EARTH<br />
EARTH<br />
8 channel IR transmitter<br />
260202<br />
WHITE = SI<br />
YELLOW = +<br />
BLUE = C<br />
External controll UP = U<br />
External controll DOWN = D<br />
External controll COMMON = C<br />
IR sensor 260100<br />
(See page 'EXTER-<br />
NAL CONTROLL').<br />
Manual 260097_01_2007-02 © AUDIPACK
<strong>Audipack</strong>'s general conditions of sales <strong>and</strong> delivery apply to all of <strong>Audipack</strong>'s deliveries.<br />
These conditions can be downloaded from <strong>Audipack</strong>'s website, www.audipack.com, or will be sent<br />
by post on request.<br />
<strong>Audipack</strong> liefert ausschließlich unter die allgemeine Verkauf- und Lieferungsbedingungen von<br />
<strong>Audipack</strong>.<br />
Diese Bedingungen sind zum downloaden verfügbar auf die Webseite von <strong>Audipack</strong>,<br />
www.audipack.com, oder werden Ihnen auf Anfrage per Post gesendet.<br />
Alle leveringen geschieden uitsluitend volgens de Algemene Verkoop- en Leveringsvoorwaarden<br />
van <strong>Audipack</strong>.<br />
Een afschrift hiervan kunt u downloaden van de website van <strong>Audipack</strong>, www.audipack.com, of<br />
wordt u op aanvraag gestuurd per post.<br />
Les conditions de vente et de livraison de <strong>Audipack</strong> s'appliquent à tous les livraisons de <strong>Audipack</strong>.<br />
Cettes conditions sont disponible sur le site internet de <strong>Audipack</strong>, www.audipack.com, où seront<br />
envoyé par poste sur dem<strong>and</strong>e.<br />
<strong>Audipack</strong> reserves the right to make changes in specifications <strong>and</strong> other information<br />
contained in this document without prior written notice. The information provided herein<br />
is subject to change without notice. In no event shall <strong>Audipack</strong> be liable for any<br />
incidental, special, indirect, or consequential damages whatsoever, including but not<br />
limited to lost profits, arising out of or related to this manual or the information contained<br />
herein, even if <strong>Audipack</strong> has been advised of, known, or should have known, the<br />
possibility of such damages.<br />
®<br />
AUDIPACK<br />
AUDIPACK<br />
Industriestraat 2-4<br />
2751 GT Moerkapelle<br />
the Netherl<strong>and</strong>s<br />
Tel: +31(0)795931671<br />
Fax: +31(0)795933115<br />
Email: audipack@audipack.com<br />
www.audipack.com<br />
© AUDIPACK
<strong>Audipack</strong> ®<br />
www.audipack.com<br />
Industriestraat 2-4<br />
2751 GT Moerkapelle<br />
The Netherl<strong>and</strong>s<br />
audipack@audipack.com<br />
Product : <strong>Flat</strong> Panel <strong>lift</strong><br />
Type : various models<br />
D Konformitätserklärung für Maschinen<br />
Wir erklären hiermit daß die Produkte konform sind mit den einschlägigen<br />
Bestimmungen der EG-Maschinen richtlinie:<br />
Maschinenrichtlinie 89/392/EEG mit 91/368/EEG und 93/44/EEG<br />
EMC 89/336/EEG mit EN 55014 und EN 55104<br />
Niederspannung 73/23/EEC mit EN 60335/1<br />
F Declaration CE de Conformite pour les machines<br />
Nous declare que les produits sont en conformité avec<br />
la Directive pour les machines<br />
Machine 89/392/EEG with 91/368/EEG <strong>and</strong> 93/44/EEG<br />
EMC 89/336/EEG with EN 55014 <strong>and</strong> EN 55104<br />
(Low voltage 73/23/EEC with EN 60335/1)<br />
GB EC-declaration of conformity for machines<br />
We declare that aforesaid product is constructed in compliance with the following directives<br />
with the following directives<br />
Machine 89/392/EEG with 91/368/EEG <strong>and</strong> 93/44/EEG<br />
EMC 89/336/EEG with EN 55014 <strong>and</strong> EN 55104<br />
(Low voltage 73/23/EEC with EN 60335/1)<br />
E EC-Declaracio'n de la conformidad para las máquinas<br />
Declaramos que el producto antedicho está construido en conformidad<br />
con los directorios siguientes<br />
Machine 89/392/EEG with 91/368/EEG <strong>and</strong> 93/44/EEG<br />
EMC 89/336/EEG with EN 55014 <strong>and</strong> EN 55104<br />
(Low voltage 73/23/EEC with EN 60335/1)<br />
NL EG-verklaring van overeenstemming voor machines<br />
Wij verklaren dat bovengenoemd produkt volgens de ondersta<strong>and</strong>e<br />
normen en richtlijnen is geconstrueerd:<br />
Machine 89/392/EEG with 91/368/EEG <strong>and</strong> 93/44/EEG<br />
EMC 89/336/EEG with EN 55014 <strong>and</strong> EN 55104<br />
(Low voltage 73/23/EEC with EN 60335/1)<br />
S EG-försäkran om överensstämmelse<br />
Tillverkare försäkrar härmed att produkt<br />
är tillverkade i överensstämmelse med EG's Maskindirektiv:<br />
Machine 89/392/EEG with 91/368/EEG <strong>and</strong> 93/44/EEG<br />
EMC 89/336/EEG with EN 55014 <strong>and</strong> EN 55104<br />
(Low voltage 73/23/EEC with EN 60335/1)<br />
<strong>Audipack</strong>,<br />
Moerkapelle (NL), 24-11-2006 R&D<br />
subject to change without prior notice. Copyright <strong>Audipack</strong> ® 2005