USER GUIDE - AXYZ design
USER GUIDE - AXYZ design
USER GUIDE - AXYZ design

Create successful ePaper yourself
Turn your PDF publications into a flip-book with our unique Google optimized e-Paper software.
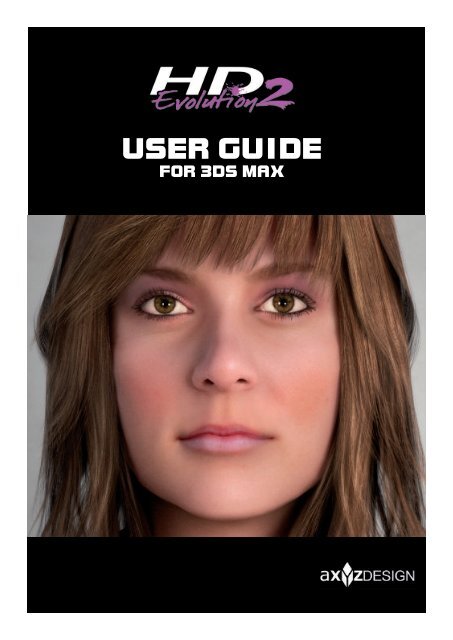
<strong>USER</strong> <strong>GUIDE</strong>FOR 3DS MAX
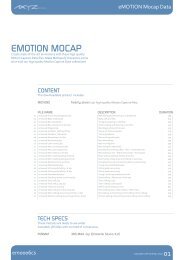
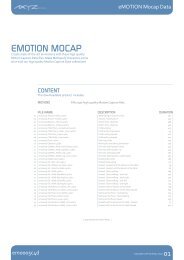
0INDEXFEATURES .1SETUP .2ANIMATING .7aXYZ <strong>design</strong> - User Guide
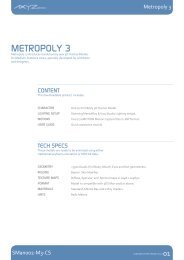
1RIGGING:Full Body & Hand (SKIN modifier) ready to be animatedusing either traditional keyframe animation or MOCAP data.FEATURESGEOMETRY:About 30000 Quads forBody, Clothing, Hair, Mouth, Teeth and Tongue meshes.The level of detail can be controlled by changing the numberof iterations on the TurboSmooth modifier.TEXTURE MAPS:4K High quality Maps(Difuse, Specular, Bump, Normal, Displacemet, etc).MATERIALS:Mental Ray ready.FORMAT:3D Studio Max 2008 or above.UNITS:Centimeters and Inches.VERSIONS:Model files with suffix "_Full Body" contain the body belowthe clothing and were specially <strong>design</strong>ed for cloth simulation.aXYZ <strong>design</strong> - User Guide1
2SETUPUNITS SETUP - SKIN MODIFIER .3MOVE AND ROTATE .6In this chapter you will learn how to set up units and scale a character beforeimporting it into your 3D project. After that, you will take a quick look on how toplace the virtual actors in your scene.aXYZ <strong>design</strong> - User Guide2
UNITS SETUP - SKIN MODIFIERBefore you start populating your project with Metropoly 3D Humans you must besure that the characters and your scene use the same working units.aXYZ <strong>design</strong> Metropoly HD evo2models are <strong>design</strong>ed incentimeters and inches.1. Open a character.2. On the Main menu go to"Customize" and select "UnitsSetup...".3. Inside the "Units Setup"window set "Display UnitScale" to your drawing unit.Click on "System Unit Setup"button andrepeat the operation.4. Select the Group thatcontains the mesh parts (Ex:BWom0001-HD2-Mesh) andchoose "Open" from theGroup main menu.5. Select one of the meshesinside the Group (Ex:BWom0001-HD2-Teeth).6. Go to "Modify" andinside "Skin" uncheck"Always Deform" in theadvanced parameters option.Repeat this step with all themeshes inside the Group.aXYZ <strong>design</strong> - User Guide3
UNITS SETUP - SKIN MODIFIER7. Go to "Select by name"and click on the character'sroot. (Ex: BWom0001-HD2-Bip).Ensure that the character'sroot does not have anykeyframe assigned.Otherwise, just select thosekeys and delete them.8. Go to "Motion" and select"Figure Mode" inside the"Biped" rollout menu.9. Inside the "Structure" rolloutmenu modify the character'sheight.Scaling factors:cm x 0.3937 = incm x 0.03281 = feetin x 2.54 = cmin x 0.0254 = mIf the character is 168 cm andyou would like to convert it toinches you must enter:168 cm x 0.3937 = 66,1416 inAt this point you have scaledthe Biped while Meshes are stillin their original sizes.The next step is to scale meshes.aXYZ <strong>design</strong> - User Guide4
UNITS SETUP - SKIN MODIFIER10. Select the Group thatcontains the mesh parts (Ex:BWom0001-HD2-Mesh).Ensure that the pivot is in 0,0,011. Right-Click "Select andUniform Scale" button todisplay the "Scale TransformType-In" window.Inside the "Offset:Local"dialog box type the new meshscaling factor.The Mesh scaling factor will be:168cm - 66,1416 in100% 39,37%12. Select one of the meshesinside the Group(Ex: BWom0001-HD2-Teeth)go to "Modify" andinside "Skin" check "AlwaysDeform" in the advancedparameters option.Repeat this step with all themeshes inside the Group.13. Save your scaled character.You can now merge it into yourscene without problems.aXYZ <strong>design</strong> - User Guide5
MOVE AND ROTATETo move and rotate the characters to the correct place in your scene there are twosimple methods: the "Move all mode" and using a Dummy helper.Move all mode:1. Merge a character into yourscene. By default it will beplaced at 0,0,0.Esure that your drawing andcharacter units are the same.2. Go to "Motion" andselect "Move all Mode"inside the "Biped" rolloutmenu.You can either type in thecoordinates or use the move androtate tools to place thecharacter in the desire position.Dummy helper:1. Go to "Create" and select"Helpers" .Select "Dummy" and createone at 0,0,0. If you wantyou can rename it toCMan0024-Move.2. Use "Select and Link" tooland link the character's root(Ex: CMan0024-Bip) to theDummy object you have justcreated. The Dummy can nowbe used to place the character.aXYZ <strong>design</strong> - User Guide6
3ANIMATINGMOCAP DATA .8MOTION FLOW .10MOTION MIXER .14MIXDOWN . 16In this chapter you will learn how to load a .bip file onto a character and adjustthe animation with any of Character StudioÊs tools, append one motion to anotherand combine motions to create completely new animated sequences.aXYZ <strong>design</strong> - User Guide7
MOCAP DATAThe easiest way to animate a Metropoly 3d character is using Motion Capture clips.MOCAP provides an accurate digital representation of natural human movements,allows you to save time and to achieve professional animation results.1. Open a character (See Chapter1 - Scaling) and select anybone. Click on "Motion"and then on the "Load file"icon in the "Biped" rolloutmenu.In the pop-up window browsethe folder where you haveinstalled the MOCAP .bip filesand load the Motion Clip thatyou will use in your animationproject.If the Biped disappears fromthe viewport, zoom and pan asneeded to get a new view.2. After loading the MOCAPfile you may need to fix thecharacter pose.Again, on "Motion"select the "Layers" rolloutmenu and click on "CreateLayer" icon.You will notice in the new TrackBar that there are no keyframemarkers.aXYZ <strong>design</strong> - User Guide8
MOCAP DATAAt this point you can start to correctthe character pose.3. Select the body part that youwant to correct and change the„Reference Coordinate System‰to „Local‰ .Use „Select and Rotate‰tool to place the body part in anew posture.Set a new key in frame „0‰using the Set Key toolinside the „Key Info‰ rolloutmenu.A keyframe marker at frame "0"will appear in the Track Bar.4. Repeat Step 3 with all the bodyparts that need to be correctedand remember always to setthe keys at keyframe "0".5. When you consider that youranimation is ready, collapseall the layers into a singlelayer using the "Collapse"button inside the „Key Info‰rollout menu.6. Save the new Motion Clipusing the "Save File"button inside "Biped" rolloutmenu.aXYZ <strong>design</strong> - User Guide9
MOTION FLOW MODEWith Motion Flow you can create a network of multiple .bip clips to createcompletely new animated sequences.1. Select a character bone, go to"Motion" and click on the"Motion Flow Mode" iconin the "Biped" rollout menu.2. On the "Motion Flow" rolloutmenu click on the "ShowGraph" icon.The Motion Flow Graph willbe displayed. From here youcan control all the clips andtransitions of your animationsequences.3. Inside "Motion Flow Graph"select "Create Clip" tooland then click on the graph foreach clip you want to load.Once clips are created, you canuse „Move Clip‰ tool tomove them around on the graph.aXYZ <strong>design</strong> - User Guide10
MOTION FLOW MODE4. To load the clips, Right-Clickon each clip you have justcreated. Click on "Browse" andload the .bip files you want touse. Then click OK.After loading each clip, you willneed to define a script for the allof them.The script is where you controlthe transitions between clips,the order they are played, andthe number of times each one islooped.5. Click on the "Define Script"button in the "MotionFlow" rollout menu and select"Create New Script". If youwant, you can name the script.6. In the "Motion Flow Graph",click once on each clip to beused in the order that you wantthem to flow.If you click more than once ona clip, a duplicate clip will beloaded into the script which willmake the clip loop.After you have filled up the scriptwith all the clips, you need to editthe transitions between them.aXYZ <strong>design</strong> - User Guide11
MOTION FLOW MODE7. Click on the "Edit Transition"button.This will bring up a dialoguefor editing the transition toavoid sliding of the characterfeet.8. In the "Transition Editor", youcan set the starting frames oneach clip and the length of thetransition to line up the twoclips as best as possible.In the View Ports you will see avisual representation of how thetwo clips fit together. The startingclip is represented by a yellowstick figure and the second clip isrepresented by a red stick figure.If either of the sequences is arun or walk motion, try to do thetransition while the character'sfeet are in the air, otherwise thefeet will "skate" or slide.Use the length setting to make thetransition happen faster or moreslowly.9. Click on OK and edit thetransition of all of the rest ofyour clips.aXYZ <strong>design</strong> - User Guide12
MOTION FLOW MODE10. There is one useful tool tooptimize transtitions. It islocated inside the "TransitionEditor" and in the "MotionFlow Graph".Click the "Optimize"button and in the "TransitionOptimization" dialog boxchoose either "Search EntireClip" or "Search Near ExistingTransition".You should try which methodworks better for your specificproject.11. When you are satisfied withthe entire sequence, you cansave the whole thing as oneBiped file by clicking on"Create Unified Motion"in the "Motion Flow" rolloutmenu.12. Exit "Motion Flow Mode" byclicking on the "Motion FlowMode" icon in the "Biped"rollout menu.Go to the "Save File" icon,name your file and browse tothe location where you want tosave it.Congratulations!You have just created ananimation sequence usingmultiple clips.aXYZ <strong>design</strong> - User Guide13
MOTION MIXER MODEMotion Mixer will allow you to combine multiple sets of MOCAP files to createlonger sequences with varied motions and blend them together similarly to a videoediting programme.1. Select a character bone, clickon "Motion" and then onthe "Mixer mode" icon inthe "Biped" rollout menu.Press the "Mixer"button in the "Biped Apps"rollout menu to display the"Motion Mixer Graph".When you open the Motion MixeryouÊll see a track for each Bipedin the scene.The tracks are labelled with thename of the Biped.2. Right-Click on a blankarea of the "Motion Track"and select "Convert toTransition Track".A Transition Track consists ofthree slots. The upper andlower slots are for .bip files,and the middle slot holds atransition between the two.aXYZ <strong>design</strong> - User Guide14
MOTION MIXER MODE3. Right-Click on the track againand choose "New Clips > FromFiles".Load the first motion clip onyour animation sequence andrepeat this step with the rest ofthe .bip files you intend to usein your project.To make the active time segmentbe long enough for all theanimation click on the"Set Range" button.Use "Zoom Extents" in the"Motion Mixer" toolbar to seethe animation in its totality.4. In the middle slot a transitionbetween two consecutivemotion clips was created.Right-Click on a transition andchoose "Edit" to bring up the"Transition Editor".Set the starting frames on eachclip, and the length of thetransition to line up the twoclips as best as possible.The "Transition Editor" is thesame as in the "Motion FlowMode". Remember that you canalso use the "Optimize"tool to search for a smoothtransition.aXYZ <strong>design</strong> - User Guide15
MIXDOWNIf you want to use your Motion Mixed sequences on multiple characters you canperform a Mixdown.A "Mixdown" is used to convertall the motions in the "MotionMixer" into a single animationand save it as a .bip file.1. Right-Click on thename of your character(Ex: CMan0024-Bip) andchoose "Compute Mixdown"from the pop-up menu.2. In the "Mixdown Options"box, keep "A Keyframe PerFrame" option turned on whenyou use motion capture files.Click OK.The motions are computed into aMixdown track that appearsbelow the other Trackgroups.3. Right-Click on the "MixdownTrack" and choose "Copy toBiped" from the pop-up menu.4. Close the "Motion Mixer"window and click on the"Mixer mode" icon in the"Biped" rollout menu to turn itoff.5. Save the new motion clip usingthe "Save File" buttoninside the "Biped" rolloutmenu.aXYZ <strong>design</strong> - User Guide16
Information in this document is subject to change without notice.(c) 2009 aXYZ <strong>design</strong>. All Rights Reserved.Reproduction in any manner whatsoever without the writtenpermission of aXYZ <strong>design</strong> is strictly forbidden.Metropoly and eMOTION are Trademarks of aXYZ <strong>design</strong>3ds Max is a Trademark of Autodeskhttp://www.axyz-<strong>design</strong>.comemail: info@axyz-<strong>design</strong>.comaXYZ <strong>design</strong> - User Guide17