UV texture mapping of a 3D head - Tinkering.net
UV texture mapping of a 3D head - Tinkering.net
UV texture mapping of a 3D head - Tinkering.net

You also want an ePaper? Increase the reach of your titles
YUMPU automatically turns print PDFs into web optimized ePapers that Google loves.
Go to Window > Rendering Editor > Hypershade > Select the Texture tab
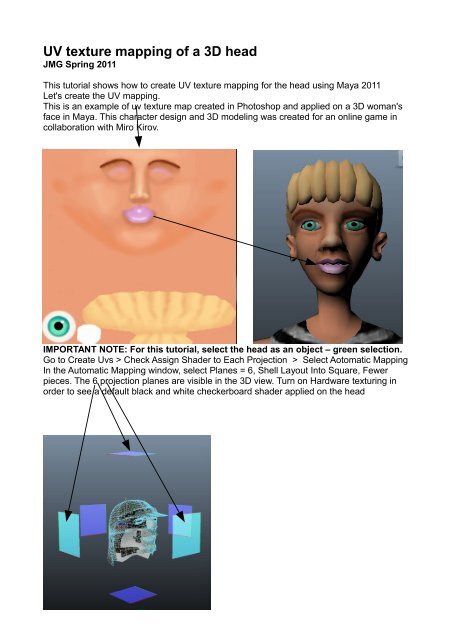
Several examples <strong>of</strong> images <strong>of</strong> uv reference grids can be found online for example athttp://www.duber.cz/dump/uv_map_reference.jpgor athttp://www.taunise.com/download/<strong>UV</strong>_Mapping_Grid.jpgSave the image in your Maya project image folderLMB + Drag a <strong>UV</strong> <strong>texture</strong> grid from your Maya project > image folder to HypershadeWindow > Texture tabMMB + Drag te <strong>texture</strong> icon to the Work Space, MMB + DRAG the icon on the DefaultPolygon Shader icon. Choose Default in the list <strong>of</strong> options <strong>of</strong> the contextual menu. Theicon <strong>of</strong> the <strong>head</strong>'s shader turns into a color sphere. Go to Window > <strong>UV</strong> Texture Editor.Troubleshooting: if you don't see the Uvs in the Texture Editor, make sure that the <strong>head</strong> isselected as an object.
Several ways to view the vertices and the uv reference grid in the <strong>UV</strong> Texture EditorGo to the <strong>UV</strong> Texture Editor, RMD on the mesh, select <strong>UV</strong> in the contextual menu.Select the <strong>UV</strong>s for the front <strong>of</strong> the face. For example the mesh <strong>of</strong> the front <strong>of</strong> the face.Select the move tool. Move and center the face on the pattern <strong>of</strong> the checkerboard. Thiswill be used as a reference for the placement <strong>of</strong> your <strong>texture</strong> in Photoshop. You can seethe <strong>texture</strong> moving accordingly in the <strong>3D</strong> view.
You can unfold the <strong>head</strong> in order to flatten all the vertices. Go to <strong>UV</strong> Texture Ediror >Polygons > Unfold, This will be more easy for painting in Photoshop.After reorganizing the Uvs, Go to Polygons > Take a Snapshot. Save a a jpg that you willbe able to edit in Photoshop.In PhotoshopThe new layer to paint the <strong>head</strong>The refrence layer witht the <strong>UV</strong> <strong>mapping</strong> gridThe snapshot <strong>of</strong> the mesh saved in Maya's <strong>UV</strong> Texture Editor
We will use a different method for the <strong>UV</strong> <strong>texture</strong>s <strong>of</strong> the body. This will be covered inanother tutorial