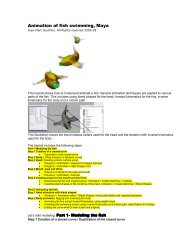
Animating a flock of birds a flock of birds in Maya - Tinkering.net
Animating a flock of birds a flock of birds in Maya - Tinkering.net
Animating a flock of birds a flock of birds in Maya - Tinkering.net

Create successful ePaper yourself
Turn your PDF publications into a flip-book with our unique Google optimized e-Paper software.
<strong>Animat<strong>in</strong>g</strong> a <strong>flock</strong> <strong>of</strong> <strong>birds</strong> <strong>in</strong> <strong>Maya</strong><br />
JMG, ANDA Spr<strong>in</strong>g 2009<br />
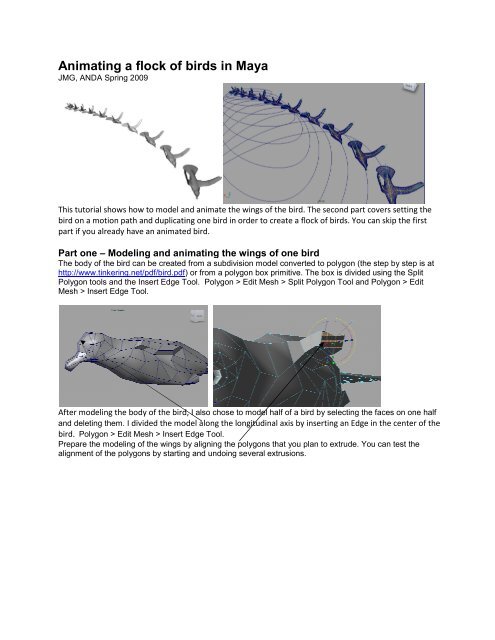
This tutorial shows how to model and animate the w<strong>in</strong>gs <strong>of</strong> the bird. The second part covers sett<strong>in</strong>g the<br />
bird on a motion path and duplicat<strong>in</strong>g one bird <strong>in</strong> order to create a <strong>flock</strong> <strong>of</strong> <strong>birds</strong>. . You can skip the first<br />
part if you already have an animated bird.<br />
Part one – Model<strong>in</strong>g and animat<strong>in</strong>g the w<strong>in</strong>gs <strong>of</strong> one bird<br />
The body <strong>of</strong> the bird can be created from a subdivision model converted to polygon (the he step by step is at<br />
http://www.t<strong>in</strong>ker<strong>in</strong>g.<strong>net</strong>/pdf/bird.pdf<br />
pdf/bird.pdf) or from a polygon box primitive. The box is divided us<strong>in</strong>g u the Split<br />
Polygon tools and the Insert Edge Tool. Polygon > Edit Mesh > Split lit Polygon Tool and Polygon > Edit<br />
Mesh > Insert Edge Tool.<br />
After model<strong>in</strong>g the body <strong>of</strong> the bird, I also chose to model half <strong>of</strong> a bird by select<strong>in</strong>g ct<strong>in</strong>g the faces on one half<br />
and delet<strong>in</strong>g them. I divided the model along the longitud<strong>in</strong>al axis by <strong>in</strong>sert<strong>in</strong>g an Edge <strong>in</strong> the center <strong>of</strong> the<br />
bird. Polygon > Edit Mesh > Insert Ed Edge Tool.<br />
Prepare re the model<strong>in</strong>g <strong>of</strong> the w<strong>in</strong>gs by aalign<strong>in</strong>g<br />
the polygons that you plan to extrude. You can test the<br />
alignment <strong>of</strong> the polygons by start<strong>in</strong>g and undo<strong>in</strong>g several extrusions.
Test extrusion to get more familiar with the process.<br />
The tip <strong>of</strong> the w<strong>in</strong>g requires your attention, repeat extrude and scale several times. Test <strong>in</strong> the Smooth<br />
mode. Select the half bird (green selection), ggo<br />
to Polygons > Mesh > Smooth<br />
Let’s duplicate mirror the half bird. . Select as an object, green selection. Go to Polygon > Edit > Duplicate<br />
Special, translate = 0, , rotate = 0, scale x= x=-1, y=0, z=0<br />
Align the two half <strong>birds</strong> next to each other, make sure that the vertices and edge aare<br />
e aligned
SHIFT select the two halves. Select as an object, green selection, go to Polygon > Mesh > Comb<strong>in</strong>e<br />
And merge the polygons. Go to Polygon > Edit Mesh > Merge, move the slider <strong>of</strong> the merge m threshold by<br />
very small <strong>in</strong>crements.<br />
Lets create a rig for the bird. Go to Animation > Skeleton > Jo<strong>in</strong>t Tool. Trace the jo<strong>in</strong>ts start<strong>in</strong>g from the<br />
ponit located <strong>in</strong> the middle <strong>of</strong> the bird, between the w<strong>in</strong>gs, and mov<strong>in</strong>g towards the edge <strong>of</strong> the bird. bird<br />
Draw a cha<strong>in</strong> <strong>of</strong> jo<strong>in</strong>ts follow<strong>in</strong>g the right w<strong>in</strong>g<br />
Draw an identical cha<strong>in</strong> <strong>of</strong> jo<strong>in</strong>ts (with the same number <strong>of</strong> jo<strong>in</strong>ts and same locations) follow<strong>in</strong>g the left<br />
w<strong>in</strong>g. You can duplicate the previous cha<strong>in</strong><br />
Draw a third cha<strong>in</strong> <strong>of</strong> jo<strong>in</strong>ts from body to head,<br />
Draw a fourth cha<strong>in</strong> <strong>of</strong> jo<strong>in</strong>ts from body to tail.<br />
.
Let’s parent arent each jo<strong>in</strong>t <strong>of</strong> each cha<strong>in</strong> to jo<strong>in</strong>t 1. In Outl<strong>in</strong>er, select a jo<strong>in</strong>t MMB + DRAG on Jo<strong>in</strong>t 1<br />
Move (translation only, , NO rotation) some <strong>of</strong> the jo<strong>in</strong>ts <strong>in</strong> order to align the rig <strong>in</strong> the center <strong>of</strong> the bird.<br />
bird
SHIFT T select jo<strong>in</strong>t 1 (the skeleton) and the mesh. Go to Animation > Sk<strong>in</strong> > B<strong>in</strong>d Sk<strong>in</strong> > Smooth B<strong>in</strong>d<br />
Let’s create a simple animation <strong>of</strong> the w<strong>in</strong>gs with a flight cycle <strong>of</strong> 300 frames.<br />
Frame 0 Frame 75 Frame 150 Frame 175 Frame 300<br />
The cycle will <strong>in</strong>clude<br />
(Frame 0 : w<strong>in</strong>gs <strong>in</strong> default position Frame 75 : w<strong>in</strong>gs go<strong>in</strong>g up Frame 150 : w<strong>in</strong>gs return to default<br />
position Frame 175 : w<strong>in</strong>gs go<strong>in</strong>g down Frame 300 : w<strong>in</strong>gs return to default position) position<br />
Let’s animate the right w<strong>in</strong>g. First, we create three <strong>in</strong>termediary keyframes s <strong>in</strong> order to establish the<br />
default position <strong>of</strong> the w<strong>in</strong>gs at 0, 150 and 300 300.<br />
Select a lower jo<strong>in</strong>t at the beg<strong>in</strong>n<strong>in</strong>g <strong>of</strong> the left w<strong>in</strong>g. Create 3 keyframes at 0, 150 and 300. 300 (press S)
Select a middle right w<strong>in</strong>g jo<strong>in</strong>t. . Create 3 keyframe s at 0, 150 and 300. (press S)<br />
Go to keyframe 75, rotate the middle right w<strong>in</strong>g jo<strong>in</strong>t, down, create a key. Please note that add<strong>in</strong>g a a slight<br />
translation to the w<strong>in</strong>g can ease the visual look and feel <strong>of</strong> the rotation deformation.<br />
Go to keyframe 175, rotate the middle jo<strong>in</strong>t <strong>of</strong> the right w<strong>in</strong>g, up, create a key,
Select a lower right w<strong>in</strong>g jo<strong>in</strong>t. Create 3 default keyframes at 0, 150 and 300. (press S)<br />
Select a middle left w<strong>in</strong>g jo<strong>in</strong>t. . Create 3 default keyframes (press S) at 0, 150 and 300. (press S)<br />
Go to keyframe 75, rotate and slightly move the middle jo<strong>in</strong>t <strong>of</strong> the left w<strong>in</strong>g, down, create a key,<br />
Go to keyframe 175, rotate and slightly move the middle jo<strong>in</strong>t <strong>of</strong> the left w<strong>in</strong>g, up, create a key,<br />
Check the animation, both w<strong>in</strong>gs are now mov<strong>in</strong>g together.<br />
Add opposite a few keyframes with ith opposite motions <strong>of</strong> tail and head.
You can view all the keyframes for your animation <strong>in</strong> the Dope Sheet,<br />
Select Jo<strong>in</strong>t 1 <strong>in</strong> Outl<strong>in</strong>er. Go to Edit > Select HHierarchy.<br />
This will make sure that all the jo<strong>in</strong>ts are visble <strong>in</strong><br />
the Dope Sheet w<strong>in</strong>dow. Go to W<strong>in</strong>dow > Animation Ed Editors > Dope Sheet.<br />
Lasso on the keyframes that you choose to select select.<br />
RMB <strong>in</strong> the green w<strong>in</strong>dow, , select View > Frame All All. You can select the move tool > MMB on the selected s<br />
keyframe(s) and move the keyframe right or left on the timel<strong>in</strong>e.<br />
Let’s cycle the animation <strong>in</strong> the Gaph Editor. The Graph Editor can be used to visualize and edit each<br />
motion channel thru time. Cycl<strong>in</strong>g the motion will repeat the animation beyond the keyframes that you<br />
have already created.<br />
Select Jo<strong>in</strong>t 1 <strong>in</strong> Outl<strong>in</strong>er. Go to Edit > Select HHierarchy.<br />
Go to W<strong>in</strong>dow > Animation Editors tors > Graph Editor<br />
RMB <strong>in</strong> the grey w<strong>in</strong>dow, , select View > Frame All<br />
RMB <strong>in</strong> the grey w<strong>in</strong>dow, select Curves > Post Inf<strong>in</strong>ity > Cycle Cycle. . Test the animation over 1200 frames.
Let’s put the animated bird on a motion path.<br />
First we create a curve. Go to Create > CV Curve. Click at least 3 po<strong>in</strong>t on the grid <strong>in</strong> n the top view. view<br />
Close the curve. Go to Surfaces > Edit Curve Curves > Open/Close Curves, , check the ignore option for a circular<br />
curve. Check Preserve for a curve identical to the one that you created.<br />
SHIFT select Jo<strong>in</strong>t1 and the curve. . Go to Animation > Animate > Motion Path Paths > Attach to Motion Path<br />
The bird follows the motion path while play<strong>in</strong>g the w<strong>in</strong>gs animation
You can adjust the Motion otion Paths sett<strong>in</strong>gs <strong>in</strong> the Attribute Editor <strong>in</strong> order to fly the bird <strong>in</strong> the right<br />
direction<br />
Let’s s adjust the length <strong>of</strong> the motion path or the speed <strong>of</strong> the bird.<br />
Select the Curve as an object (green selection) Go to W<strong>in</strong>dow > Hypergraph Connections, select the<br />
Motion Path icon (yellow llow selection). Go to Graph > Input Input-Output Output Connections > Motion Path Values. Edit<br />
the value <strong>in</strong> the Attribute Editor.<br />
Let’s s duplicate the animated bird on a path.<br />
First, let create a group. We will duplicate the group as a system <strong>in</strong>clud<strong>in</strong>g the bird bird’s s mesh, me the jo<strong>in</strong>ts, the<br />
w<strong>in</strong>g animation, , the curve and the motion path path.
Go to Create > Empty Group<br />
Let’s parent each element <strong>of</strong> the group <strong>in</strong>clud<strong>in</strong>g mesh, jo<strong>in</strong>t1, curve with the Empty Group. G<br />
MMB and drag for jo<strong>in</strong>t1. MMB and drag for the mesh. MMB and drag for curve<br />
Second, select the Empty Group only!! Go to Edit > Duplicate with Transform > select Instance. The shape<br />
<strong>of</strong> the <strong>flock</strong> <strong>of</strong> <strong>birds</strong> will follow values alues <strong>of</strong> Translate, Rotate and Scale. For example, Translate Y puts the<br />
<strong>birds</strong> on top <strong>of</strong> each other. Rotate tate Y <strong>of</strong>fsets the start<strong>in</strong>g po<strong>in</strong>ts <strong>of</strong> the animations on the curves. Scale XYZ<br />
puts the fly<strong>in</strong>g bird <strong>in</strong> a fake perspective perspective.<br />
Play the animation. Render the animation. Please note that you may need to create a new shader for each<br />
clone.<br />
RMB on a clone > select Assign New Material > for example Lambert or Bl<strong>in</strong>n.<br />
Repeat for all the clones. Save and Render your animation.<br />
Now it’s time to import your r file <strong>in</strong>side the fluid 3D conta<strong>in</strong>er created for the clouds <strong>in</strong> the sky.<br />
The step by step can be found at http://www.t<strong>in</strong>ker<strong>in</strong>g.<strong>net</strong>/pdf/<br />
http://www.t<strong>in</strong>ker<strong>in</strong>g.<strong>net</strong>/pdf/clouds.pdf