MAN EC 16~45 Ins 230201 Cover.p65 - RVR.ie
MAN EC 16~45 Ins 230201 Cover.p65 - RVR.ie
MAN EC 16~45 Ins 230201 Cover.p65 - RVR.ie

Create successful ePaper yourself
Turn your PDF publications into a flip-book with our unique Google optimized e-Paper software.
IndexPageSection4 1.0 User <strong>Ins</strong>tructions8 2.0 General Notes8 3.0 Product Description10 4.0 Technical Data & Dimensions11 5.0 Delivery Consignment/Unpacking The Boiler11 6.0 Boiler Location11 7.0 <strong>Ins</strong>tallation Clearances12 8.0 Wall Mounting12 9.0 Gas Connection13 9.1 Gas Conversion14 10.0 System Flow & Return Connections14 11.0 Condensate Connection15 12.0 Flue Combustion Air Connection - General16 13.0 Flue Systems19 14.0 Calculating Flue Resistance22 15.0 Ventilation Requirements Single Appliances24 16.0 Hydraulic system Design (circuit diagrams)33 16.1 Water Treatment System Cleaning33 16.2 Care With The Use of Soldering Flux33 17.0 Electrical Connections43 18.0 Commissioning The MICROMAT <strong>EC</strong> Boiler44 18.1 Pre-Commissioning Checks45 18.2 <strong>Ins</strong>tallation codes48 18.3 First Firing50 18.4 Commissioning -- pop-up menu and weather compensation52 18.5 Commissioning -- the status indicator
1.0 user instructions forthe micromat boilerBoiler Switch PanelDisplayON/Off switchMenu/ResetButtonWater pressureguageSummer/Winterand “+” buttonEngineersand “-” buttonTest buttonBefore operating the boiler:Check that the boiler has been installed in strict accordance with the instructions contained in this manual. Noncompliance with the instructions may result in injury and/or damage to property. the warranty on the boiler is void ifthe boiler is not installed in accordance with these instructions.Check the following points with the installer:A suitable corrosion inhibitor has been added to the water in the system. (see page 33)The water used to fill the system is within the purity limits specif<strong>ie</strong>d (page 33)Any soldering fluxes used are compatible with the boiler.A low pressure cut out switch has been fitted (<strong>RVR</strong> stock no. S<strong>EC</strong>569) This must interrupt the power supply to theboiler if the pressure is less than 0.4bar.The installer should inform the user about the operation and use of the MICROMAT <strong>EC</strong> boiler and in particularpoint out:- Any safety provisions- The need to carry out regular maintenance when the screen display shows a “SERVICE” messageThe installer must provide the user with all documentation relating to the MICROMAT <strong>EC</strong> boiler and any ancillaryitems.Important!The Micromat <strong>EC</strong> boiler requires an annual service. The boiler display will display [Service] when a service is duealthough the boiler will continue to operate normally. An <strong>RVR</strong> approved service technician should carry out theannual service.Switching ON the MICROMAT <strong>EC</strong>1) Ensure the pressure gauge indicates a pressure within the system of not less than 0.5 bar andnot more than 3 bar.2) Ensure the gas supply is turned on.3) Switch on the on/off switch on the appliance control panel.After switching on the boiler the MICROMAT <strong>EC</strong> operates automatically.Switching OFF the MICROMAT <strong>EC</strong>1) Switch off the on/off switch on the appliance control panel.2) Turn off the gas supplyTurning off the boiler will leave the system at risk of freezing during the winter months and will disable the automaticpump exercising routine. If the only reason for shutdown is that normal heating is not required, then it is recommendedto leave the boiler on and turn off or turn down any external controls.4
1.0 user instructions forthe micromat boilerDescription of Boiler ControlsolsMenu/Reset ButtonThis button has three functions1. Resetting of fault conditions: - When the display text is flashing on and off, a boiler fault is indicated. The typeof fault is displayed on the screen. Please refer to the fault finding section on page 56 for a description of thesefaults. The boiler control is reset by pressing the Menu/Reset button once.2. <strong>Ins</strong>pection of boiler operating parameters:- When the display is not flashing (<strong>ie</strong> when the boiler is in normaloperation), the Menu/Reset button may be used to inspect the boiler operating parameters.Press once - Display shows “T1 Sup --°C” - This is the flow water temperature from the boiler.Press twice - Display shows “T4 Ret --°C “ - This is the return water temperature to the boiler.Press three times - Display shows “T5 DHW --°C” - This is the domestic hot water storage temperature. A temperatureis shown only if the hot water temperature sensor (<strong>RVR</strong> Stock no: SBA021) is connected to terminals 1 & 2 on thefront terminal block of the boiler.Press four times - Display shows “T6 Out --°C” - This is the outside air temperature. A temperature is shown onlyif the outside air temperature sensor (<strong>RVR</strong> Stock no: SPR950) is connected to terminals 3 & 4 on the front terminalblock of the boiler.Press five times - Display shows “T7 Sec --°C” - This is the mixed flow temperature in the secondary heating circuit.This menu item is displayed only if the boiler is configured for a mixing valve circuit and the MR03 regulator isinstalled.Press six times - “Revolu -- R/s” - This is the burner blower speed.Press seven times - Display shows “Pump 1 --%” - This is the speed of the circulation pump as a percentage of itsmaximum speed.Press an eighth time and the display returns to normal displaying the supply water temperature and the date & time.3. Pop-Up menu function - This function is accessed by pressing and holding the button for at least three seconds.The following parameters may now be adjusted.Day setpoint temperatureTimeclock overide functionDomestic hot water storage temperatureCurrent Day and TimeTimeclock On and Off times for central heating and water heating.Setback temperatureHoliday fuction<strong>Ins</strong>tallation codesThe pop-up menu is navigated using the “+” and/or “-” buttons. The user may move between the menu points asshown in table 1. Menu parameters are adjusted by pressing the menu/reset button when the required menu pointis shown on the screen. Values are then adjusted using the “+” and/or “-” buttons. After adjustment the value issaved by pressing the menu/reset button once.When all adjustments are completed, exit the pop-up menu by moving to [Back] using the “+” and/or “-” buttons andpressing the menu/reset once.[*1] Day TemperatureThis may be used to adjust the boiler output when weather compensation is used. The default value is 20°C and canbe adjusted between 5C and 30C. Press the menu/reset once to enter adjustment mode. The “+” and/or “-” buttonsmay be used to alter the value and cause a parallel displacement in the weather compensation line. The new valueis saved by pressing the menu/reset button. Note: This menu point is visible only when weather compensation isenabled.[*2] PartyThe “Party” menu point overides the boiler time programs. It can be set from 0 - 24 hours and returns to 0 once thetime has expired. Press the menu/reset button once and then adjust the value using the “+” and/or “-” buttons.Press the menu/reset button once again to save.[*3] Temp DHWPress the menu/reset once to enter adjustment mode. The domestic hot water storage temperature is adjustedusing the “+” and/or “-” buttons and saved by pressing the menu/reset once. The adjustment range is between 40and 60°C.[*4] Day/TimeThe current day, hour and minute may be adjusted. Move between the day, hour and minute values using the menu/reset button and change the settings using the “+” and/or “-” buttons as required.Ltd.E n e r g y T e c h n o l o g y5
1.0 user instructions forthe micromat boiler[*5] Set CH TimesThe central heating on and off times are adjusted using this menu point. There are three ON times and three OFFtimes per day.There are two sub-menus in this menu.a) Day requiredb) On and Off times for central heatingWith the menu item [Set CH Times] displayed, press the menu/reset once and [Monday] appears in the display. Onecan move between the days using the ‘+’ and/or ‘-’ buttons. When the required day is reached, the time program forthat day may be entered by pressing the menu/reset button once. [COPY ...>...] now appears on the display. Pressthe ‘+’ button once to move to the first switching time [SWITCH ON 1]. Press the Menu/Reset button once, the hourvalue flashes and may be adjusted using the ‘+’ and/or ‘+’ buttons. Press the menu button once more. The minutevalue now flashes. This may now be adjusted using the ‘+’ and/or ‘-’ buttons. When adjustments have been made,press the menu/reset once again and the new switching time is saved. Use the ‘+’ and/or ‘-’ buttons to movebetween the switching times for the day which you are adjusting. If no switching times are required then use thevalue 00:00. When adjustments for the day are completed, repeatedly press the ‘+’ button until [BACK] is displayedand then press menu/reset once. The next day will be displayed. Perform all of the adjustments required for eachday and then press the ‘+’ button until [BACK] appears.Press the Menu/Reset button once to exit CH times. The next menu item [Set HW Times] will now be displayed.Note: It is also possible to copy a complete switching programme for one day to the next day by using the [Copy]menu item. When [COPY] is displayed press the menu/reset button once. This cop<strong>ie</strong>s one days programme to thenext day. The display will show the next day in sequence once the copy operation is completed.[*6] Set HW TimesThe hot water heating on and off times are adjusted using this menu point. There are three ON times and three OFFtimes per day. The programming procedure for this is the same as for menu point [*5].[*7] Set MV TimesWhen a mixing valve circuit is used for a low temperature circuit (e.g. underfloor heating circuit) , this menu point isavailable. The mixing valve on and off times are adjusted using this menu point. There are three ON times and threeOFF times per day. The programming procedure for this is the same as for menu point [*5].[*8] SetbackThis menu point may be used to set the temperature to be maintained during the off periods. It may be set at anyvalue up to 10°C below the day temperature.[*9] HolidayThis may be used to overide all of the time programmes for a fixed number of days. The room temperature setpointwill be reduced to the level set using the ‘SETBACK’ menu point and the domestic water temperature setpoint will be20°C.[*10] <strong>Ins</strong>tallConfiguration of the boiler and the setting of operating parameters is carr<strong>ie</strong>d out using this menu point. This willgenerally be done when the boiler is first commissioned. Great care should be taken when altering these parametersas the adjustments can greatly affect the boiler performance.To access the configuration level in the Pop Up menu, enter the code (21) in menu point [*10]. This is done using the“+” and/or “-” buttons and then pressing the Menu/Reset button. A range of parameter settings then becomes available.These are described in the Commissioning section of this manual.[*11] BackPress the Menu/Reset button to exit the Pop-Up menu.6
1.0 user instructions forthe micromat boilerEngineers ButtonThe user will not normally need to use this button. It is used by the service technician to enable measurement offlue emissions even without heat requirement being present.NOTE: This function will not be available if the MICROMAT <strong>EC</strong> and the heating system have reached their maximumtemperatures.If the Engineers button is pressed once then the MICROMAT <strong>EC</strong> operates with half power. The display shows [FlueEmissi]. If the Engineers button is not pressed again within 10 minutes the MICROMAT <strong>EC</strong> will switch back toautomatic operation after this period. Pressing the button again when [Flue-Emissi] is displayed brings [10min Low]onto the display. In this condition the power output of the boiler can be adjusted using the ‘+’ and ‘-’ keysPressing the ‘-’ key will reduce the power & pressing the ‘+’ key will increase power.Pressing the Engineers button again while [10 min. low] is shown in the display switches the MICROMAT <strong>EC</strong> backto automatic operation. After 10 minutes partial output the MICROMAT <strong>EC</strong> will return to automatic operationTEST ButtonThe Test button is used to simulate the operation of the hot water high limit stat.Whilst theTEST-button is pressed the display shows [Limit F/R W/D]. During this display the function of theMICROMAT <strong>EC</strong> is blocked. When the button is released the boiler will return to normal operation.If the button is pressed for more than 3 minutes [STB-Supply] will blink on the display. The function of the MICROMAT<strong>EC</strong> is then locked.The MICROMAT <strong>EC</strong> can also be locked more quickly by simultaneously pressing the TEST and ENGINEERS button.When the RESET button is pressed again the MICROMAT <strong>EC</strong> returns to automatic operation.Ltd.E n e r g y T e c h n o l o g y7
2.0 generalnotesThese instructions are intended to assist the installer, commissioning engineer, maintenance engineer and user withthe installation, maintenance and usage of MICROMAT <strong>EC</strong> 16/22, 24/28, 31/36 & 38/45 models gas fired condensingboilers.Please read this manual fully before commencing the installation of the appliance. The MICROMAT <strong>EC</strong> must only beinstalled by persons deemed to be competent. This manual must be handed to the appliance user following completionof the installation.3.0 productdescriptionThe MICROMAT <strong>EC</strong> range of wall mounted gas fired condensing boilers are state of the art appliances which includea comprehensive range of features. The appliance must only be used on sealed and pressurised systems. Systemdesign must take into account the boiler operating Dt of 20 o C.Wall mounted with compact dimensionsAt 900H x 458W x 355D the MICROMAT <strong>EC</strong> boiler provides maximum heat from minimum dimensions withoutcompromising serviceability.fully modulating heat outputThe output of the boiler is fully variable, sliding between (approx.) 20% to 100%, which automatically and instantlyadjusts to match the needs of the system. The percentage of power at any given time can be dictated by eitheroutside air temperature, flow temperature, return temperature, stored domestic hot water temperature, or roomtemperature, or a combination of the aforementioned.fully condensing stainless steel heat exchangerThe MICROMAT <strong>EC</strong> boiler is designed with extended heat exchange surface area and is fabricated from corrosionresistant long-life stainless steel. The unique Spiranox heat exchanger will return operating effic<strong>ie</strong>nc<strong>ie</strong>s from 88%gross (96% nett) at 60°C return temperature, up to 96% gross (104% nett), at 30°C return temperature.extremely low harmful emissionsThe boiler utilises 100% pre-mix gas/air fed at positive pressure to the metal fibre sheathed radiant burners. Thecombustion system incorporates internal flue gas re-circulation and this combined with the precise nature of pre-mixfuel/air control, gives ultra low emissions to satisfy the most stringent emission regulations in the world currently.That is:
3.0 productdescriptionenergy savingIn addition to the extremely effic<strong>ie</strong>nt burner and heat exchanger system employed in the MICROMAT <strong>EC</strong> eachappliance includes a modulating speed boiler primary pump.This feature allows the boiler to self-maintain a 20°C ∆t across the heat exchanger, optimising the heatexchanger effic<strong>ie</strong>ncy and reducing also the electrical consumption of the pump motors. The result is aseasonal increase in boiler effic<strong>ie</strong>ncy of a further 7-10% and a reduction in pump electricity consumption ofup to 70%.natural gas or LPGAppliances can be suppl<strong>ie</strong>d for use with natural gas (G20) or LPG (G31).comprehensive microprocessor controlThe boiler control panel includes a user fr<strong>ie</strong>ndly microprocessor control centre which manages the entire function ofthe appliance and encompasses: -1. Management of the essential safety functions of burner ignition and flame monitoring.2. Water high temperature and flue gas high temperature safety cut out.3. Modulation of the boiler output and pump speeds in conjunction with operating temperature control.4. LCD display screen with two lines of text to continuously display operational or fault status.5. In built weather compensator to provide direct-on boiler VT flow temperature (if required).6. Remote stored hot water temperature control.7. In built 2 stage boiler frost protection program.8. In built pump exercising program to avoid standstill seizure.9. Cold start boost facility.10. PC compatibility with data logging which allows communication with the boiler via a lap-top computer torev<strong>ie</strong>w / modify operational parameters and access operational history as an aid to fault finding andpreventative maintenance.11. Range rate adjustment which allows the power to be set to accurately match the maximum needs ofthe system, with the facility to set a different firing rate for heating. Output to hot water self adjusts tothe heat transfer capability of the calorif<strong>ie</strong>r.12. Facility to connect optional matched control components which allow the boiler to control a heating circuitpump, HWS primary pump or diverter valve and an underfloor circuit mixing valve and pump, plus theability for the boiler to be controlled by a remote multi function modulating room unit. Multiple boilers maybe connected to a modulating Kaskade manager which further enhances the operating effic<strong>ie</strong>ncy of alarger load modular boiler system.room sealed optionIf required, the boiler may be installed to be completely room sealed, taking combustion air directly from outside thebuilding, using a 125/70 concentric air duct/flue system. Inherent safety is afforded by the negative pressure withinthe boiler casing, which in the event of incorrect sealing results in safe inward air leakage only.extended flue lengthsThe excess fan pressure from the combustion system is 100 Pa, which allows the appliance to be exhausted usingsmall diameter PPS plastic flue components, over long distances, allowing for complete flexibility in boiler siting.designed for ease of maintenanceAlthough compact, the MICROMAT <strong>EC</strong> does not compromise serviceability. The appliance has been engineered tobe easy to maintain with even the most major of service operations being able to be completed easily and quicklywith the minimum of tools.guaranteeThe heat exchanger carr<strong>ie</strong>s a five year guarantee against manufacturing or material defect provided that INIBALcorrosion inhibitor is used in the system and a service contract is in place with an <strong>RVR</strong> approved service agent.Please contact the <strong>RVR</strong> Customer Care Dept. for details.Ltd.E n e r g y T e c h n o l o g y9
4.0 technical data& dimensions11060underside - models <strong>EC</strong>16/22, <strong>EC</strong>24/28, <strong>EC</strong>31/36 & <strong>EC</strong>38/45H39 102294 6040100 100145 14545890045605 6 7plan - models <strong>EC</strong>16/22, <strong>EC</strong>24/28,<strong>EC</strong>31/36 & <strong>EC</strong>38/45H850ModelMICROMAT <strong>EC</strong> 16/2224/2831/3638/45NominalHeat Input Nett (max)NominalHeat Output 80/60°CNominalHeat Output 50/30°CInputRate Nat Gas (max)InputRate LPG (max)Minimum/Maximum Gas PressureFlueGas Volume (hot)Pressureat Flue OutletMaximum Working PressureMinimum Working PressureMaximum Flow TemperaturePowerSupplyFuseratingAveragePower ConsumptionWaterContentWeight(Dry)Design DtkW2.9-15.0 3.4-22.0 4.8-29.0 6.4-36. 0kW2.5-14.3 3.1-21.4 4.5-28.4 6.0-35. 1kW3.1-15.8 3.6-23.1 5.1-30.7 6.8-38. 0m3/h 1.6 2.3 3.1 3. 3m3/h 0.6 0.891.141. 2mbar15/6015/6015/6015/60m3/ hpa100100100100bar3.0 3.0 3.0 3. 0bar0.5 0.5 0.5 0. 5° C 85858585Volts230230230230Amps3.0 3.0 3.0 3. 0Watts60606070litres1.5 1.8 2.1 2. 5kg34363945° C 202020201.Air Duct (OD)125mm125mm125mm125mm1553552.Flue Gas (OD)70mm70mm70mm70mm3.Flow22mm22mm22mm22mm4.Flow DHW (<strong>EC</strong>...HS & S) 22mm22mm22mm22mm1 25.Return DHW (<strong>EC</strong>...HS & S) 22mm22mm22mm22mm6.Return22,mm22,mm22,mm22,mm7.Condense Waste20mm20mm20mm20mm8.Gas15mm15mm15mm15mm9. Condense Siphon CleaningPoint (capped)10.Cable Entr<strong>ie</strong>sMultiple3/4"BSP 3/4"BSP3/4"BSP3/4" BSPGrommets10
5.0 delivery consignmentunpacking the boilerThe boiler is delivered as a consignment of a carton containing the boiler and associated fittings, plus any otheroptional ancillary flue or control components in separate cartons.The boiler carton contains• Assembled Boiler• Wall mounting bracket• Fittings bag attached to corner bracket of packaging containing outside air temperature sensor, vent keyand hose connection.To unpack the boiler, the carton should be laid on the floor with the top carton seam uppermost. Carefully removetape from seam and open carton flaps, remove packing material, wall mounting bracket and fittings carton. For easeof boiler handling from the carton it is suggested that the carton be slit down each corner and the carton sides laidout flat. The boiler should only be lifted by contact with the rear (grey) chassis assembly.To remove the casing from the boiler, slacken the screw in the underside of the casing, unlatch left and right handcatches on underside of case, pull casing slightly to the front and lift upwards to disengage casing hooks from rearchassis and then remove casing to the front.6.0 boilerlocationThe MICROMAT <strong>EC</strong> Boiler is not suitable for installation external to a building. The position chosen for the boilermust be a structurally sound wall capable of supporting the weight of the boiler and any ancillar<strong>ie</strong>s. The positionshould allow for access to a condensate drain nearby or an alternative is to install a condensate sump receptacleand condensate disposal pump which should remove the condensate water to a remote drain. The wall mountingposition of the boiler must allow the boiler to be true plumb vertical to ensure correct operation of the internal gravityflow condense system. The position for the boiler must satisfy the requirements of BS6798: 1987 or BS6644: 1991.7.0 installationclearancesFor ease of installation, commissioning and maintenance the following minimum clearances should be observed.SidesAboveBelowFront50mm250mm150mm450mmLtd.E n e r g y T e c h n o l o g y11
8.0 wallmountingThe MICROMAT <strong>EC</strong> boiler mounts to the wall via a wallmounting bracket which interlocks to a rail mounted on therear of the boiler. The wall mounting bracket should be firmlyfixed to the wall using suitable fixings with a countersunkhead. The wall mounting bracket positioning detail is shownin fig 1. The boiler must be carefully offered up to the wallso that the rail on the rear of the boiler is just above thewall mounting bracket and then the boiler should be loweredto engage the bracket and rail. Lifting is advised with 2persons. Do NOT lift the boiler by the internal parts of theappliance.importantWhen v<strong>ie</strong>wed from the side, the north/south axis of theboiler must be vertical. The appliance must not be inclinedout from the top, if necessary block or shim behind thebottom rear of the boiler to ach<strong>ie</strong>ve a vertical installation.2x35x12∅12458165 165785 115 459459.0 gasconnectionThe gas connection is located at the base of the appliancerear r/h side, see fig 2.The pipe size used to supply the appliance must not besmaller than the gas connection size on the appliance.The connection to the appliance must include a suitablemethod of disconnection and a gas control cock must beinstalled adjacent to the appliance for isolation purposes.The gas pipe used to supply the appliance must not allow apressure drop of greater than 1mbar from the meter to theappliance.The nominal inlet working gas pressure measured at theappliance should be 20.0 mbar for Nat Gas(G20) or 37 mbar for LPG (G31).GasConnection12
9.1 gasThe MICROMAT <strong>EC</strong> is factory fitted for Natural Gas (G20). However the unit can easily be converted to LPG(G31) by using the kit suppl<strong>ie</strong>d (part no. 251588) and following the instructions below.•Remove cover from boiler•Open the outlet flange joints at the gas combi valve.•On the outlet side of the gas combi valve add the Ø 5.7mm LPG jets from the conversion kit.•Re-tighten the flange joint. Do not forget the O-ring.•Check for Leakage.conversion•Plug all the air holes (front and back) on the gas/air mixing chamber using the blind grommets suppl<strong>ie</strong>d.Enter the gas type to which the MICROMAT <strong>EC</strong> is converted on the label next to the type labelLtd.E n e r g y T e c h n o l o g y13
10.0 system flow& return connectionsNOTE: The MICROMAT <strong>EC</strong> boiler must only be installed on sealed and pressurised systems. The maximum workingpressure of the boiler = 3 bar. It is recommended that the final working pressure (hot) of the system does not exceed2.3 bar.The boiler is equipped with a 22mm flow connection on the left (when looking head on at the boiler) and one returnon the right (22mm).fig 3 fig 4Exhaust (125mm)Air Intake (70mm)Return DHW/StorageConnection (<strong>EC</strong>...HS& <strong>EC</strong>...S)Flow DHW/StorageConnection (<strong>EC</strong>...HS& <strong>EC</strong>...S)Flow ConnectionCondensateConnectionReturn Connection11.0 condensateconnectionThe condensate connection is located at the underside rear of the appliance see fig 5.The condensate syphon cleaning point is factory fitted with a heavy grade black plastic cap which MUST NOT BEREMOVED (see fig 5) apart from routine maintenance cleaning operations and must be in place whenever theappliance is in operation. WARNING operating the appliance with the cap removed from the syphon cleaning pointwill cause products of combustion to be discharged from the cleaning point.The condensate connection is a ¾” BSP Male threaded stub fabricated from plastic.The installer must connect to this stub, a ccondensate pipe fabricated from plastic tube and fittings (¾”, 22mm,overflow pipe is considered suitable). Copper Tube is not acceptable. The condensate pipe must fall continuouslyfrom the appliance to suitable nearby drain.14
11.0 condensateconnection (contd.)If any part of the condensate pipe is to be run external to the building or is at risk of freezing, then the pipe must besuitably insulated to protect from freezing.If a suitable drain for accepting the condensate is not available nearby to, and below the boiler (e.g. boiler installedin a basement below ground level location), then a suitable condensate sump receptacle with a discharge pumpshould be installed below the boiler to remove the condensate to a remote drain.When making the condensate pipe connection to the boiler, do not use adhesives, it is recommended tolightly apply a suitable jointing tape (PTFE or similar) and use only light pressure to connect fittings to theappliance to avoid damage to the condensate outlet assembly.It is recommended that the condensate pipework should include a method of disconnection and cleaning points.12.0 flue/combustionair connectionThe flue connection and combustion air inlet to the appliance are located on the top of the appliance, see fig 6.These connections are arranged concentrically with the 70mm flue gas connection centrally within the 125mm airinlet connection.There are two options for flueing the MICROMAT <strong>EC</strong> boiler.i) Conventionally, using flue gas tube only and air for combustion from the room or compartment in which theappliance is installed. If using a conventional flue arrangement then the room or compartment must beventilated in accordance with the requirements of BS 6644 or BS5440 as appropriate. For guidance onventilation see section 15.ii) Room sealed using concentric 70/125 components where air for combustion is taken from outside of thebuilding. When using a room sealed flue, where air for combustion is provided from outside of the buildingdirectly to the appliance, ventilation to a compartment may still be required - See section 15 for generalspace cooling.Multiple BoilersFor detail and advice on common flues serving multiple boilers, contact <strong>RVR</strong> Ltd.Important NoteWhere the MICROMAT <strong>EC</strong> is to be installed in an application where the combustion air is likely to be contaminatedwith oxidising agents, such as swimming pool areas, special industrial processes etc, then theappliance must be room sealed.Fig 5 Fig 6Exhaust (125mm)Air Intake (70mm)CondensateConnectionCondensateConnectionLtd.E n e r g y T e c h n o l o g y15
13.0 fluesystemsThe MICROMAT <strong>EC</strong> has an excess pressure combustion system that allows the appliance to be exhausted over extendeddistances using small OD flue components.The flue gas temperature is extremely low (typically the same as the flow water temperature), which allows the use of easyto install PPS (polypropylene) flue pipe and fittings.The appliance can take combustion air from the room in which it is installed (conventional application) or can be roomsealed (fanned balanced flue) using a concentric flue arrangement of a 70mm PPS flue duct within a 125mm galvanisedmetal air duct, finished in off-white RAL 7035. A full range of flue pipe and air duct components including roof and wallterminals is available from <strong>RVR</strong> Limited.Flue ProductsSampling Tee.Concentric WallTerminal SetOrder CodeSBA050MICROMAT <strong>EC</strong>Flue System Option No. 1Horizontal Balanced Flue SystemUsing this sytem the air for combustion and the flueproducts are piped to/from outside the space.The balanced flue may pass through the wall directlybehind, or, on either side of the MICROMAT <strong>EC</strong>.The following components and options are available from<strong>RVR</strong> Limited:--•70/125 concentric wall terminal set complete with flueproducts sampling tee, 500mm straight concentric flue,wall sealing plates and outside terminal. These arefinished in RAL 7035 (the 125mm galvanised pipe) andlight grey (natural coulour of 70mm PPS pipe). <strong>RVR</strong>Order Code - SBA050Horizontal Balanced Flue with side exit.The system may be extended using the following accessor<strong>ie</strong>s:•125mm Ø Extension pipe RAL7035, 250mm long. <strong>RVR</strong> OrderCode - SBA053•125mm Ø Extension pipe RAL7035, 500mm long. <strong>RVR</strong> OrderCode - SBA054•125mm Ø Extension pipe RAL7035, 1000mm long. <strong>RVR</strong> OrderCode - SBA055•125mm Ø 90° bend RAL7035. <strong>RVR</strong> Order Code - SBA056•70mm Ø Extension Pipe PPS, 250 mm long. <strong>RVR</strong> Order Code- SBA057•70mm Ø Extension Pipe PPS, 500mm long. <strong>RVR</strong> Order Code -SBA058•70mm Ø Extension Pipe PPS, 1000mm long. <strong>RVR</strong> Order Code- SBA059•70mm Ø 90° bend PPS. . <strong>RVR</strong> Order Code - SBA060•Birdscreen for 70mm Pipe. <strong>RVR</strong> Order Code - ACB002Flue ProductsSampling Tee.Concentric WallTerminal SetOrder CodeSBA050MICROMAT <strong>EC</strong>Horizontal Balanced Flue with rear exit.16
13.0 fluesystemsFlue System Option No. 2Verertical Balanced Flue SystemUsing this system the air for combustion and the flue products are piped vertically to/from outside the space.The balanced flue may exit through both flat and pitched roofs. Suitable flashings are available for either case.This following components and options are available from <strong>RVR</strong> Limited:•70/125 concentric roof terminal set, complete with concentric pipes and terminal. The air pipe is finished in blackPPS and the flue pipe in grey PPS. The length is 1150mm. <strong>RVR</strong> Order Code - SBA051•70/125 concentric roof terminal set, complete with concentric pipes and terminal. The air pipe is finished in blackPPS and the flue pipe in grey PPS. The length is 2000mm. <strong>RVR</strong> Order Code - SBA061•Flue Products Sampling Tee (RAL 7035). <strong>RVR</strong> Order Code - SBA052 (Note: This item must be used with either ofthe above kits)•Pitched Roof Flashing (20° - 45°). <strong>RVR</strong> Order Code - SBA062or• Flat Roof Flashing. <strong>RVR</strong> Order Code - SBA063The system may be extended using the following accessor<strong>ie</strong>s:•125mm Ø Extension Pipe, Black PPS, 1020mm long. <strong>RVR</strong> Order Code - SBA064•125mm Ø Extension Pipe, Black PPS, 2000mm long. <strong>RVR</strong> Order Code - SBA065•70mm Ø Extension Pipe, Grey PPS, 1000mm long. <strong>RVR</strong> Order Code - SBA059•70mm Ø Extension Pipe, Grey PPS, 2000mm long. <strong>RVR</strong> Order Code - SBA066•45° Bend Black PPS, Male and Female Connections. <strong>RVR</strong> Order Code - SBA067•45° Bend Black PPS, two Female Connections. <strong>RVR</strong> Order Code - SBA068•70mm Ø 90° bend PPS. <strong>RVR</strong> Order Code - SBA060Pitched RoofFlashing 20°-45°Order CodeSBA062Flat RoofFlashingOrder CodeSBA063Vertical Balanced FlueKit (Black PPS)Order Code SBA051/SBA061(1150mm/2000mm)Vertical BalancedFlue Kit (Black PPS)Order CodeSBA051/SBA061(1150mm/2000mm)Flue ProductsSampling Tee(RAL 7035)Order CodeSBA052Flue ProductsSampling Tee(RAL 7035)Order CodeSBA052MICROMAT <strong>EC</strong>MICROMAT <strong>EC</strong>Vertical Concentric System (Pitched Roof)Vertical Concentric System (Flat Roof)Ltd.E n e r g y T e c h n o l o g y17
13.0 fluesystemsCut FlueHole Dia130mmLine Top ofAppliance Chassis15517070mm Ø GreyPPS PipeOrder CodeSBA05970mm Ø GreyPPS Pipe250mm longOrder CodeSBA05770mm Ø GreyPPS Pipe500mm longOrder CodeSBA058Flue ProductsSampling TeeOrder CodeSBA05270mm Ø 90°Bend Grey PPSOrder CodeSBA060170Cut Flue HoleDia 130mmMICROMAT <strong>EC</strong>CLFlue System Option No. 3Horizontal ontal Discharharge e with air for Combustion taken en from Room.Using this sytem the air for combustion is taken in from the room at the sampling Tee and the flue productsare exhausted horizontally through a wall.This sytem comprises :•Flue Products Sampling Tee (RAL 7035). <strong>RVR</strong> Order Code - SBA052 ( This must always be used)•70mm Ø Extension Pipe, Grey PPS, 1000mm long. <strong>RVR</strong> Order Code - SBA059The system may be extended using the following accessor<strong>ie</strong>s:•70mm Ø Extension Pipe PPS, 250 mm long. <strong>RVR</strong> Order Code - SBA057•70mm Ø Extension Pipe PPS, 500mm long. <strong>RVR</strong> Order Code - SBA058•70mm Ø Extension Pipe PPS, 2000mm long. <strong>RVR</strong> Order Code - SBA066•70mm Ø 90° bend PPS. <strong>RVR</strong> Order Code - SBA060.•Birdscreen for 70mm Pipe. <strong>RVR</strong> Order Code - ACB002.18
14.0 calculatingflue resistanceThe excess pressure available for overcoming the frictional resistance of a flue system is 100 Pa. The table belowof flue component resistances will assist the designer in calculating total flue system frictional loss.If the total installed flue system resistance exceeds 100 Pa., then the result will be a reduction in boiler output.Reference to the ‘Effect of Flue System Resistance On Boiler Output”, graphs will assist. If the resistance of aproposed flue system has an unacceptable effect on boiler output, then a larger diameter flue tube should beselected.Thermal up-draught is generated in a vertical flue system, reducing the resistance of the system. Reference to the‘Thermal Up-draught Graph’ will provide a figure in Pa., which may be deducted from the total calculated flue systemresistance.NB. Thermal up-draught does not apply to horizontal sections of a flue system.ComponentResistance (Pa).Boiler Model16/2224/2831/3638/4570/125Concentric Wall Terminal6 8.510.6 12. 770/125Concentric Roof Terminal Without Rain Cap 6 8.510.6 12. 770/125 Concentric Roof Terminal With Rain Cap 8.912.715.819Im length 70/I25 Concentric Tube4.56.47.99. 593°C 70/I25 Concentric Bend4.56.47.99. 545°C 70/I25 Concentric Bend2.43.44.25Im length DN 70 PPS Tube Carrying Fluegas4 5.77.18. 5Im length DN 70 PPS Tube Carrying CombustionAir2.43.44.2590°DN 70 PPS Bend Carrying Fluegas4 5.77.18. 590°DN 70 PPS Bend Carrying Combustion Air2.43.44.2545°DN 70 PPS Bend Carrying Fluegas2 2.83.4445°DN 70 PPS Bend Carrying Combustion Air1 1.41.72Room Sealed Chimney Cap DN 705.68 1012DN 70 x 100 PPS Increaser P<strong>ie</strong>ce-Fluegas or Air 0.81.11.31. 590°DN 100 PPS Bend Carrying Fluegas1.72.43 3. 590°DN 100 PPS Bend Carrying Combustion Air 1.21.72.12. 545°DN 100 PPS Bend Carrying Fluegas0.81.11.31. 545°DN 100 PPS Bend Carrying Combustion Air 0.81.11.31. 5Im length DN 100 PPS Tube Carrying Fluegas0.81.11.31. 5Im length DN 100 PPS Tube Carrying CombustionAir0.81.11.31. 5DN 70 Open Termination With Mesh3.44.85.97DN 100 Open Termination with Mesh0.81.11.31. 570/125To 100/150 Concentric Increaser1.42 2.5390°DN 100 PPS Bend Carrying Fluegas0.60.80.91. 090°DN 100 PPS Bend Carrying Combustion Air 0.60.80.91. 045°DN 100 PPS Bend Carrying Fluegas0.60.80.91. 045°DN 100 PPS Bend Carrying Combustion Air 0.30.40.50. 5Im length DN 100 PPS Tube Carrying Fluegas0.81.11.31. 5Ltd.E n e r g y T e c h n o l o g y19
14.0 calculating flue resistancefluepressure lossexample IA MICROMAT <strong>EC</strong> 62 boiler is installed with a concentricflue system which takes an all horizontal route to a wallterminal. Length of flue = 3m including one 90° bend.Resistance =3 x 1m length 70/125 concentric tube @ 16.6 Pa = 49.81 x 90° 70/125 concentric bend @ 16.6 Pa =16.6I x 70/125 concentric wall terminal @ 21.4 Pa = 21.4Total Resistance = 87.6Paconclusion: Total resistance is less than 100 Pa. therefore,no alternative design required and no effect on boiler output,or positioning requiredexample 2A MICROMAT <strong>EC</strong> 45 boiler is installed with a concentricflue system which takes a part horizontal, part vertical routeto a roof terminal with rain cap.Length of horizontal section = 1m, vertical section = 6m,system includes 1 x 90 o bend.Resistance =7 x 1m lengths 70/125 concentric tube @ 10.7 Pa = 74.91 x 90° 70/125 concentric bend @ 10.7 Pa= 10.71 x 70/125 roof terminal @ 21.9 Pa = 21.9Total Resistance = 107.5 PaTake into account that 6m of vertical (assume uninsulated,as air for combustion direct from outside air surrounds theflue gas tube) flue creates 10 Pa of up-draught,then final resistance = 107.5 - 10 = 97.5 Pa.conclusion: Final operating resistance is less than 100 Pa,therefore, no alternative design required and no effect onboiler output.example 3A MICROMAT 1-75 boiler is installed (non room sealed) witha proposed flue using DN 70 PPS single skin flue componentswhich takes a part horizontal, part vertical route to avertical open termination with bird mesh.Length of horizontal section = 4m, length of vertical(uninsulated) section = 11m with 4 x 90 o bends,and 2 x 45 o bends.Resistance =15 x 1m lengths DN 70 PPS tube @ 21.4 Pa = 3214 x 90 o DN 70 PPS bends @ 21.4 Pa = 85.62 x 45 o DN 70 bends @ 10.7 Pa = 21.41 x DN 80 open termination @ 15.6 Pa = 15.6Total Resistance: 443.6 PaTake into account that 11m of vertical uninsulated fluecreates 18 Pa of up-draught, then final resistance would be443.6-18 = 425.6 Pa.Reference to the graph of resistance effect on boiler outputshows the output would be reduced to approximately 59kW.If this is unacceptable, then the flue resistance must be recalculatedusing a larger size flue tube as shown below orconsideration given to moving the boiler position.Re-calculating proposed flue installation using DN 100.15 x 1m lengths DN 100 PPS tube @ 3.0 Pa = 454 x 90 o DN 100 bends @ 3.0 Pa = 122 x 45 o DN 100 bends @ 1.5 Pa = 3.01 x DN 100 open termination @ 4.0 Pa = 4.0Total Resistance: 64 PaTake into account thermal up-draught created (as before)18 Pa. Therefore operating resistance = 64 – 18 = 46 Pa,with no effect on boiler output.thermal updraught whenflue gas temp 80°C and outside temp -5°CA <strong>Ins</strong>ulated or within the buildingB = Uninsulated and exterior to thebuilding140A130120110100908070B60504030201000 2 4 6 8 101214161820 2224262830323436 3840Vertical Flue Lengths - metresDraught - PaBoiler output kW at: flow 80°C Return 60°C7371696765636159575553514947454341393735333129effect of flue system resistanceon boiler outputMICROMAT <strong>EC</strong>76MICROMAT <strong>EC</strong> 62MICROMAT <strong>EC</strong> 450 50 100 150 200 250 300 350 400 450 500Flue System resistance - Pa20
14.0 calculating flue resistancefluepressure lossMinimum dimensions of flue terminal positions see fig. 7 belowDimensionTerminalPositionBalancedFlue Room SealedNon Room SealedABCDirectly below an opening, air brick,windows etc.Not RecommendedBelow gutters, soil pipes or drainpipesBelow eaves300mm300mm75mm75mm200mm200mmDBelow balcon<strong>ie</strong>s or carNot Recommendedport roof.200mmBut installation notrecommended200mmBut installation notrecommendedEFGHIJKLMNPFrom vertical drain pipe or soil pipeFrom an internal or external cornerAbove ground,balcony levelintersecting roof orFrom a surface facing the termina lFrom a terminal facing the termina lFrom an opening in the cardoor, window) into dwellingport (e.g.Vertically from a terminal on the samewallHorizontally from a terminal on thesame wallFrom themountedwallon which the terminal isFrom a vertical structure on the roofAboveintersection with roof75mm75mm300mm300mm300mm300mm2000mm2000mm2000mm2000mm1200mmBut installation notrecommended1200mmBut installation notrecommended1500mm1500mm300mm300mmn/a50mm500mm500mm500mm500mmflue terminal positionsNThe flue terminal of a MICROMAT <strong>EC</strong> boilerwill plume heavily and care must be takenwhen selecting a terminal position to ensurethat a ‘nuisance situation’ is not created.AGPPB,CPIf a flue terminal is positioned within 2 mabove ground level or any upper part of abuilding where people have general access(e.g. balcony etc) then the terminal shouldbe fitted with an appropriate guard.H,IFDJEAGFFLKLKFig 7Ltd.E n e r g y T e c h n o l o g y21
15.0 ventilation requirementssingle appliancesThe room or space in which the Micromat <strong>EC</strong> boiler is installed is required to be ventilated in accordance withBS 5440: Part 2:2000.The following tables must be read to ascertain the amount of ventilation required.Table 1Room Intallation - Non Room Sealed Flue.Natural Ventilation Direct to Outside AirBoiler Model Ventilation openings Free Area cm 2High Level Low LevelMicromat <strong>EC</strong> 16/22 75 ---Micromat <strong>EC</strong> 24/28 105 ---Micromat <strong>EC</strong> 31/36 145 ---Micromat <strong>EC</strong> 38/45 190 ---Tabel 2Boiler ModelMicromat <strong>EC</strong> 16/22Micromat <strong>EC</strong> 24/28Micromat <strong>EC</strong> 31/36Micromat <strong>EC</strong> 38/45Table 3Room <strong>Ins</strong>tallation - Non Room Sealed Flue.Natural Ventilation from Adjacent RoomVentilation openings Free Area75 with adjacent room similarly ventilated to outside air105 with adjacent room similarly ventilated to outside air145 with adjacent room similarly ventilated to outside air190 with adjacent room similarly ventilated to outside airRoom <strong>Ins</strong>tallation - Room Sealed FlueThere are no specific requirements for a room to be ventilated where the applianceis room sealed. However consideration should be given to providing ventilation for general cooling, (BS 6644specif<strong>ie</strong>s room temperature limits) and the following free ventilation areas are recommended to be installed.Boiler Model Recommended Natural Ventilation free Area cm 2Micromat <strong>EC</strong> 16/22 75 with adjacent room similarly ventilated to outside airMicromat <strong>EC</strong> 24/28 105 with adjacent room similarly ventilated to outside airMicromat <strong>EC</strong> 31/36 145 with adjacent room similarly ventilated to outside airMicromat <strong>EC</strong> 38/45 190 with adjacent room similarly ventilated to outside airTable 4Compartment <strong>Ins</strong>tallation - Non room sealed flueNatural Ventilation Direct to Outside AirBoiler Model Ventilation Openings free Area cm 2High Level Low LevelMicromat <strong>EC</strong> 16/22 110 220Micromat <strong>EC</strong> 24/28 140 280Micromat <strong>EC</strong> 31/36 180 360Micromat <strong>EC</strong> 38/45 225 450Table 5Compartmetn <strong>Ins</strong>tallation - Non Room Sealed FlueNatural Ventilation from Adjacent RoomBoiler Model Ventilation Openings free Area cm 2High Level Low LevelMicromat <strong>EC</strong> 16/22 220 440Micromat <strong>EC</strong> 24/28 280 560Micromat <strong>EC</strong> 31/36 360 720Micromat <strong>EC</strong> 38/45 450 90022
15.0 ventilation requirementssingle appliancesTable 6Compartment <strong>Ins</strong>tallation - Room Sealed FlueNatural Ventilation Direct to Outside AirBoiler Model Ventilation openings Free Area cm 2High Level Low LevelMicromat <strong>EC</strong> 16/22 110 110Micromat <strong>EC</strong> 24/28 140 140Micromat <strong>EC</strong> 31/36 180 180Micromat <strong>EC</strong> 38/45 225 225Table 7Compartment <strong>Ins</strong>tallation - Room Sealed FlueNatural Ventilation from Adjacent roomBoiler Model Ventilation Openings Free Area cm 2High Level Low LevelMicromat <strong>EC</strong> 16/22 220 220Micromat <strong>EC</strong> 24/28 280 280Micromat <strong>EC</strong> 31/36 360 360Micromat <strong>EC</strong> 38/45 450 450Ltd.E n e r g y T e c h n o l o g y23
16.0 hydraulic systemdesign• The MICROMAT <strong>EC</strong> boiler can be operated to serve a heating load in a number of ways:I.Constant flow temperature, with the option to set either high temperature (85°C), medium temperature(75°C) or low temperature (55°C).2.Direct-on-boiler weather compensated flow temperatures, with adjustable maximum flow temperature.3.Underfloor heating coils via a VT mixing valve with a maximum flow temperature of 55°C plus a secondcircuit (eg. radiators) operating with direct-on-boiler weather compensated temperatures.• Flow to return drop (∆t). The microprocessor controls monitor return temperature and the facility to dictate a set ∆t(by pump speed modulation) is a standard and most important feature and will maintain the ∆t across the boiler at20°C, as the lower the return temperature, the higher the operating effic<strong>ie</strong>ncy. HT and MT systems should be designedfor ∆t 20°C and LT (underfloor coils via a mixing valve) systems ∆t 10°C. Designing for a ∆t 20°C gives the addedcost saving advantage of smaller pipe sizes and pumps.• The MICROMAT <strong>EC</strong> includes ‘in built’ primary pumps with a residual head pressure as listed below.• Appliances may be installed as single units or in multiples.• Single units may or may not require additional system pumps which will be dictated by the system configurationand by the index resistance.• Multiple units (and single units which require additional pumps), should always be installed with a low loss mixingheader or similar arrangement – see table below.• The MICROMAT <strong>EC</strong> boiler has in built domestic hot water (remote stored) temperature control ability, and if required,the in built pumps may be used to provide the primary flow to a nearby indirect cylinder or calorif<strong>ie</strong>r with theboiler controlling a diverter valve in the main flow or return pipework.The following system schematics show a number of typical installation types to which the MICROMAT <strong>EC</strong> boiler maybe connected.The MICROMAT <strong>EC</strong> is not limited to just the systems shown, and may be used in conjunction with manycommercially available control items.For further advice or guidance on schematic designs or control options contact <strong>RVR</strong> Ltd.Boilerlow velocity mixing headerdiameter sizing guideUpTube DiametersPower kWto 45Design∆t20° C40mm7550mm10065mm12065mm15080mm20080mm250100mm270100mm300100mm340100mmrefer to steel pipe andCIBSE Guide C4calculated fromInbuilt boiler pumpsapprox residual head pressure at∆t 20°CBoilerModelPressure Metres wc16/22124/28131/36138/45124
16.0 hydraulic systemdesignSystem type 1Typical Typical Single MICROMAT <strong>EC</strong> boiler installation serving heating only where the boiler’s own in-built circulatingpump is used to circulate the water around the system (used only where system index resistance
16.0 hydraulic systemdesignSystem type 2Typical Single MICROMAT <strong>EC</strong> boiler installation serving domestic hot water and heating where hot water has priorityvia a divertor valve. The in-built circulating pump in the boiler is used to circulate the system (used only wheresystem index resistance
16.0 hydraulic systemdesignSystem type 3Typical Single MICROMAT <strong>EC</strong> boiler installation serving heating only and using a low velocity mixing headerwhere system index resistance exceeds 1 metre. Flow temperature may be fixed/constant or weather variable.OSCMicromat <strong>EC</strong>boilerPRO 1AAVSafety ValveLSVFlow tosystem circuitsIVDOCDOCCondensateReturn fromsystem circuitsIVIVExpansion VesselStrainerDOCLow velocity mixing headerMax. velocity 0.5m/sCWMOS = Outside air temperature sensor, used where direct-on-boiler weathercompensated flow temperatures are required.C = Room temperature controls e.g. RE2132 modulating room unit from <strong>RVR</strong> Ltd.,or, separated time clock & room thermostat.PR01 = Pump regulation module from <strong>RVR</strong> Ltd. Allows heating pump to be drivenfrom boiler, providing for auto operation, frost protector running & summer standstillexercising.Must be used where RE2132 modulating room unit is installed. Max pump motorload 2A.Ltd.E n e r g y T e c h n o l o g y27
16.0 hydraulic systemdesignSystem type 4Typical Single MICROMAT <strong>EC</strong> boiler installation serving heating & domestic hot water. Hot water is priority and isserved via a divertor valve and the boiler’s in built circulating pump where index loss through HWS primar<strong>ie</strong>s is lessthan 1 metre. Heating circuit index loss exceeds 1 metre and is served via a low velocity mixing header and aseparate pump. Heating flow temperature may be fixed/constant or weather variable.OSCMicromat <strong>EC</strong>boilerWPRO 1AVSafety ValveFlow tosystem circuitsStrainerCondensateReturn fromsystem circuitsDOCLSVDOCExpansion VesselTSIVIVIVLow velocity mixing headerMax. velocity 0.5m/sDOCCalorif<strong>ie</strong>rCWMOS = Outside air temperature sensor, used where direct-on-boiler weathercompensated flow temperatures are required.C = Room temperature controls e.g. RE2132 modulating room unit from <strong>RVR</strong> Ltd.,or, separated time clock & room thermostat.S = HWS sensor from <strong>RVR</strong> Ltd. Gives 24hr HWS operation.W/T = Alternative to “S” where “W” is a time switch in ser<strong>ie</strong>s with a cylinderthermostat “T”. Allows for timed HWS.PR01=Pump regulation module from <strong>RVR</strong> Ltd. Allows heating pump to be drivenfrom boiler, providing for auto operation, frost protector running & summer standstillexercising.Must be used where RE2132 modulating room unit is installed. Max pump motorload 2A.Divertor valve will require SPDT relay if not spring return.Divertor valve must be so installed as to spring return to heating.28
16.0 hydraulic systemdesignSystem type 5Typical Single MICROMAT <strong>EC</strong> boiler installation serving heating & domestic hot water with hot water priority. Hotwater & heating circuits both have index resistance exceeding 1 metre & are served by independent pumps from alow velocity mixing header. Heating flow temperature may be fixed/constant or weather variable.OSCMicromat <strong>EC</strong>boilerWPRO 1AVFlow tosystem circuitsSafety ValveIVLSVDOCCondensateSTHWS PrimaryPump Max 1ADOCExpansion VesselCalorif<strong>ie</strong>rDOCIVIVIVReturn fromsystem circuitsIVDOCLow velocity mixing headerMax. velocity 0.5m/sStrainerOS = Outside air temperature sensor, used where direct-on-boiler weathercompensated flow temperatures are required.C = Room temperature controls e.g. RE2132 modulating room unit from <strong>RVR</strong> Ltd.,or, separated time clock & room thermostat.S = HWS sensor from <strong>RVR</strong> Ltd. Gives 24hr HWS operationW/T = Alternative to “S” where “W” is a time switch in ser<strong>ie</strong>s with a cylinderthermostat “T”. Allows for timed HWS.PR01= Pump regulation module from <strong>RVR</strong> Ltd. Allows heating pump to be drivenfrom boiler, providing for auto operation, frost protector running & summer standstillexercising.Must be used where RE2132 modulating room unit is installed. Max pump motorload 2A.CWMLtd.E n e r g y T e c h n o l o g y29
16.0 hydraulic systemdesignSystem type 6Typical Multiple MICROMAT <strong>EC</strong> installation. Boilers controlled by modulating Kaskade manager which also has thefacility to control heating & domestic hot water production. Heating flow temperature may be fixed/constant or weathervariable. Hot water has priority.OSCKKM 2Flow to SystemCircuitsHeating pump2A. MaxMicromat<strong>EC</strong> boilerMicromat<strong>EC</strong> boilerMicromat<strong>EC</strong> boilerFSHWS PrimaryPump 2A. MaxSVSVSVSCalorif<strong>ie</strong>rLow Velocity Mixing headerMax Velocity 0.5m/sNRVDOCNRVDOCNRVDOCCondensateIVIVIVIVIVIVDOCIVIVRSReturn fromsystem circuitsDOCLSVCWMOS = Outside air temperature sensor, used where direct-on-boiler weathercompensated flow temperatures are required.C = Room temperature controls e.g. RE2132 modulating room unit from <strong>RVR</strong> Ltd.,or, separated time clock & room thermostat.FS = Flow temperature sensorRS = Return temperature sensorS = Hot water temperature sensor or thermostat.KKM2 = Modulating Kaskade Manager. Up to 9Nr boilers may be controlled using2Nr linked KKm2’s.30
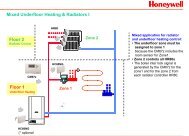
16.0 hydraulic systemdesignSystem type 7Typical Single MICROMAT <strong>EC</strong> boiler installation serving domestic hot water and radiator heating zone and an underfloorcoil zone all via a low velocity mixing header. The HWS will always have priority. The 2Nr heating zones may operateindependently via 2 Nr separate room units. The 2 Nr heating zones will always be weather compensated but mayhave differing compensation slopes.OSRCMicromat<strong>EC</strong> boilerRadiator ZoneRadiatorZonePumpSTWUnder Floor ZoneVT PumpHWS PrimaryPumpVSUnder FloorVT MixingValveLow VelocityMixing HeaderMRO3SVIVDOCIVCondensateCalorif<strong>ie</strong>rRC2V max 0.5m/sStrainerUnder Floor CoilsZone ∆t 10°CDOCIVLSVDOCExpansionVesselDOCDOCIVIVDOCFilling PointCWMOS = Outside air temperature sensor. Provides outside air temperature references for both heatingzonesMR03 = Pumps and mixer regulation control box from <strong>RVR</strong> Ltd. provides pump control for both heatingzones i.e. auto operation, frost protection and summer stand still protection running.Provides drive for underfloor coil zone VT mixing valve with max flow temperature limitation set at 55°C.Includes ratio setter for compensation of under floor coils. Max pump motor loads 2A.RC1 = RE2132 modulating room unit from <strong>RVR</strong> Ltd. provides Time & Temperature control for radiatorheating zone.RC2 = As RC1 but for underfloor coil zone.VS = Underfloor zone VT flow sensor (suppl<strong>ie</strong>d with MR03)S = HWS sensor from <strong>RVR</strong> Ltd. Gives 24hr operation.W/T = Alternative to “S” where “W” is a time switch in ser<strong>ie</strong>s with a cylinder thermostat “T”. Allows fortimed HWS.Ltd.E n e r g y T e c h n o l o g y31
16.0 hydraulic systemdesignSystem type 8Typical Single MICROMAT <strong>EC</strong> boiler installation serving heating and domestic hotwater via a system pump and 2Nr2Port motorised valves with conventional controls i.e. programmer, room stat & cylinder stat.NOTE: system temperature will be fixed constant and direct-on-boiler weather compensation is not possible.RSPMicromat<strong>EC</strong> boilerReturn fromsystem circuitsFlow to SystemCircuitsWCCHM/ValveHWM/ValveSystem PumpAVSafety ValveIVDOCLSVDOCCondensateCSReg ValveIVIVExpansion VesselDOCStrainerLow velocity mixing headerMax. velocity 0.5m/sCWMP = Programmer WC = Wiring Centre/Junction Box RS = Room Thermostat CS = Cylinder ThermostatTypical schematic arrangement where system has multiplepumps that will operate at the same time.FlowHeaderCircuit pumps thatcan / will run at thesame timeTo / FromBoiler/sLow velocity mixingheadermax velocity 0.5m/s32
16.1 water treatmentsystem cleaningThe entire system must be thoroughly cleansed and flushed to remove debris, flux residues etc before opening theboiler isolation valves & flooding the boiler. Particular care must be taken where the MICROMAT <strong>EC</strong> boiler is beingretro-fitted into an old/existing system, as system silt or magenite can be very damaging to the new boiler.The system must be filled with clean chemically neutral water. Water hardness must not exceed 3.6 mol/m 3 (=20°dH).Chloride Concentrations must not exceed 150mg/l.Following cleansing and flushing, the system must be dosed with a good quality water treatment to prevent corrosionand the formation of scale. A suitable corrosion inhibitor ‘INIBAL’ is available from <strong>RVR</strong> Limited and should be usedin all systems. The required concentration is 1-2% of system capacity.Failure to observe these requirements will render the guarantee on the product void.Cleansing, flushing and water treatment must be carr<strong>ie</strong>d out in accordance with the requirements of BS 7593:1992.16.2 care with the use ofsoldering fluxThe MICROMAT <strong>EC</strong> boiler has heat exchangers fabricated from 316L stainless steel. It is most important that thecompatibility of any flux is checked with the flux suppl<strong>ie</strong>r before use, and that any flux manufacturers recommendationsare strictly followed with regards to use in conjunction with stainless steel.17.0 electricalconnectionThe electrical connections to the MICROMAT <strong>EC</strong> boiler are made via a Weiland Plug and socket (incoming live,neutral and earth) and two terminal blocks which are located within the boiler case and below the control panel. Thelower terminal block is 24V d.c. and the upper terminal block is 220V a.c.Connections must only be made using appropriate diameter multi strand flex cables and cable entry must only bevia the rubber glanded cable entry points located at the bottom rear r/h side of the appliance. If the boiler is to beroom sealed flued then care must be taken to ensure the cable entr<strong>ie</strong>s are reasonably air tight.For electrical connection plug/socket & terminal function and location see fig below.W<strong>ie</strong>land plug no. 1 -Incoming PowerBack Terminal BlockL1 N L1 N L2 L1 NL1PENEarthFront Terminal Block1 2 3 4 R1 R2 R3 5 6CableglandsDHWSensorOutside AirSensorRE2132Not UsedExternal gasvalve or externalpumpMR03 and/or Roomthermostat2way 3portmixing valveor storagewater pumpLtd.E n e r g y T e c h n o l o g y33
17.0 electricalconnectionsPlan of internal electrical connectionsX1 X2 X3 X4 X5Fuse 24V3 4 2011 106 169 6 42RS 2321 101 51 81 3 1X91 2Alarm contactX6 X7 X8 61 4HSP Top23565142 53 66 35 24 1PRO1/MRO37X161 26LNPELN4 132PEPE35 24 1PES1 S4 S3 S5X32PEIgnition / IonisationPEK7X21X10X12X14X13X17X18X19X20K20K20K5K5K6K6K7K7K0K0K4K8K6K0K7K14K3K9K9K8K8K18K12K19K17K31 2 1 2 1 2 1 2 1 2 1 2LPENNLLimit ThermostatWaterLimit ThermostatFluegasBurner Fan24 VDCFanX26X22X23X25X27X28X29X30X31Gas ValveLPENX41TransformerPump 1BoilerKO = whiteK2 = brownK3 = greenK4 = greyK5 = orangeK6 = blueK7 = redK8 = blackK9 = violetK12 = yellow/whiteK13 = brown/whiteK14 = green/whiteK17 = blue/whiteK18 = red/whiteK19 = black/whiteK20 = violet/whiteSupply230 VAC1234R1R2R3Flow temperature sensorReturn temperature sensorDHW Flow water sensor(S-models only)DHW Inlet water sensor(S-models only)not usedRE2132Outside temperature sensorDHW Thermostator DHW Temperature sensorFuse 230VACFuse230VAC3-way divertorvalve3-way divertor valve or pump(H-models only)Room thermostat or MR03External gas valveor external pump34
17.0 electricalconnectionsTypical electrical connection schematic to suit system type 1***<strong>Ins</strong>tall only if direct-on-boiler weathercompensated flow temperature arerequired.<strong>Ins</strong>tall only one method of external time androom temperature control. If room and stattime switch are required, then do not installRE2132 room unit and vice versa.On LPG installations where an additionalgas safety shut off valve is required,connect to L1 and N terminals on left sideof lower terminal strip.upper terminal strip2 pin plug on X4lower terminal strip X3X161062 151Not Used<strong>Ins</strong>tallation codeOutside sensorinstalled. Room stat &time switch installed.No outside sensor.Room stat & time switchinstalled.Outside sensorinstalled. RE2132modulating room unitinstalled.No outside sensor.RE2132 modulatingroom unit installed.Supply230VL1PEN34R1R2R3**Room ThermostatAnd Time SwitchL1NL2L1N1 2O S* OutsideAir Sensor4 3 2 5 112QAW44optionalRemote Sensor**RE2132ModulatingRoom unitGNDPMW+24V56L1NDescription623320Ltd.E n e r g y T e c h n o l o g y35
17.0 electricalconnectionsTypical electrical connection schematic to suit system type 2***<strong>Ins</strong>tall only if direct-on-boiler weathercompensated flow temperature arerequired.<strong>Ins</strong>tall only one method of external time androom temperature control. If room and stattime switch are required, then do not installRE2132 room unit and vice versa.upper terminal stripX310651Not Used<strong>Ins</strong>tallation code2 1Outside sensorinstalled. Room stat &time switch installed.No outside sensor.Room stat & time switchinstalled.Outside sensorinstalled. RE2132modulating room unitinstalled.No outside sensor.RE2132 modulatingroom unit installed.Supply230VL1PEN34R1R2R3**Room ThermostatAnd Time SwitchL1NL2L1N1 2O S* OutsideAir Sensor4 3 2 5 1lower terminal strip6233202 pin plug on X4X16Cylinderthermostat ***HWSsensor12QAW44optionalRemote Sensor**RE2132ModulatingRoom unitGNDPMW+24V56L1NL1NL2L1NL1NHWS divertor valvespring return type***<strong>Ins</strong>tall only one method of HWS temperaturecontrol. The use of an HWS sensor will allowno time control over hot water production.If timed hot water control is required then donot install an HWS sensor, but install onlytimeswitch & cylinder thermostat.On LPG installations where anadditional gas safety shut offvalve is required, connect toL1 and N terminals on left sideof lower terminal strip.Alternative connectionfor floating actuatoropenclosedDescription36
17.0 electricalconnectionsTypical electrical connection schematic to suit system type 3***<strong>Ins</strong>tall only if direct-on-boiler weathercompensated flow temperature arerequired.<strong>Ins</strong>tall only one method of external time androom temperature control. If room and stattime switch are required, then do not installRE2132 room unit and vice versa.upper terminal striplower terminal strip X3X161062 151<strong>Ins</strong>tallation codeOutside sensorinstalled. Room stat &time switch installed.No outside sensor.Room stat & time switchinstalled.Outside sensorinstalled. RE2132modulating room unitinstalled.No outside sensor.RE2132 modulatingroom unit installed.Supply230VL1PEN34R1R2R3**Room ThermostatAnd Time SwitchL1NL2L1N1 2O S* OutsideAir Sensor4 3 2 5 12 pin plug on X412QAW44optionalRemote Sensor**RE2132ModulatingRoom unitGNDPMW+24V56L1NOn LPG installations where an additional gassafety shut off valve is required, connect to L1and N terminals on left side of lower terminalstrip.PRO 1LPENHeating Pump 2A MaxDescription623320Ltd.E n e r g y T e c h n o l o g y37
17.0 electricalconnectionsTypical electrical connection schematic to suit system type 4***<strong>Ins</strong>tall only if direct-on-boiler weathercompensated flow temperature arerequired.<strong>Ins</strong>tall only one method of external time androom temperature control. If room and stattime switch are required, then do not installRE2132 room unit and vice versa.upper terminal stripX361015PRO 1<strong>Ins</strong>tallation code2 1LPENHeating Pump 2A MaxOutside sensorinstalled. Room stat &time switch installed.No outside sensor.Room stat & time switchinstalled.Outside sensorinstalled. RE2132modulating room unitinstalled.No outside sensor.RE2132 modulatingroom unit installed.Supply230VL1PEN34R1R2R3**Room ThermostatAnd Time SwitchL1NL2L1N1 2O S* OutsideAir Sensor4 3 2 5 1lower terminal strip6233202 pin plug on X4cylinderthermostat ***HWSsensor12QAW44optionalRemote Sensor**RE2132ModulatingRoom unitGNDPMW+24V56L1NL1NL2L1NL1NHWS divertor valvespring return type***<strong>Ins</strong>tall only one method of HWS temperaturecontrol. The use of an HWS sensor will allowno time control over hot water production.If timed hot water control is required then donot install an HWS sensor, but install onlytimeswitch & cylinder thermostat.On LPG installations where an additionalgas safety shut off valve is required,connect to L1 and N terminals on left sideof lower terminal strip.Alternative connectionfor floating actuatoropenclosedX16Description38
17.0 electricalconnectionsTypical electrical connection schematic to suit system type 5***1 3 4 5 6 = Weiland Plugs / SocketsX3 X16 = Control sockets on control panelupper terminal strip<strong>Ins</strong>tall only if direct-on-boiler weathercompensated flow temperature arerequired.<strong>Ins</strong>tall only one method of external time androom temperature control. If room and stattime switch are required, then do not installRE2132 room unit and vice versa.X361015PRO 1<strong>Ins</strong>tallation code2 1LPENHeating Pump 2A MaxOutside sensorinstalled. Room stat &time switch installed.No outside sensor.Room stat & time switchinstalled.Outside sensorinstalled. RE2132modulating room unitinstalled.No outside sensor.RE2132 modulatingroom unit installed.Supply230VL1PEN34R1R2R3**Room ThermostatAnd Time SwitchL1NL2L1N1 2O S4 3 2 5 1lower terminal strip6233202 pin plug on X4X16QAW44optionalRemote Sensor**RE2132ModulatingRoom unitGNDPMW+24V* OutsideAir Sensorcylinderthermostat ***HWSsensor1256L1NLN***<strong>Ins</strong>tall only one method of HWS temperaturecontrol. The use of an HWS sensor will allowno time control over hot water production.If timed hot water control is required then donot install an HWS sensor, but install onlytimeswitch & cylinder thermostat.On LPG installations where an additional gassafety shut off valve is required, connect to L1and N terminals on left side of lower terminalstrip.DescriptionLtd.E n e r g y T e c h n o l o g y39
17.0 electricalconnectionsTypical electrical connection schematic to suit system type 6101 3 5 7 912 14 16 18 20 2224 26 28 30 32 34 36 38X1 X2 X411 13 15 17 1921 23 25 27 29 313335 37Not Used AdditionalBoilers4 3 2 5 1246LNPELNPELNPE* QAW44 optionalRemote Sensor*RE2132ModulatingRoom unitGNDPMW+24V16 18 20 2215 17 1921X2Supply230VSupply230VLNPELNPEBoilerNo. 1BoilerNo. 2R2R3R2R3Supply230VLNPEBoilerNo. 3R2R311Alternative ExternalControl OptionsNOTE: No connectionsother than those shownare to be made to theboilers.1* HWS PrimaryPump 230V 2AMax* Heating CircuitPump 230V 2AMax* Cylinder Stat / HWSTime Switch* External Controls forHeating Circuit* - If Required<strong>Ins</strong>tallation code3571DescriptionCascaded boiler (KKM2) installation withoutDHW sensor or withDHW control viathermostat and threeway valveCascaded boiler (KKM2) installation withDHW sensor andpumped DHW circuit.R2 and R3 on boilerupper terminal switchSupply230V40
17.0 electricalconnectionsTypical electrical connection schematic to suit system type 7MRO 3***upper terminal strip<strong>Ins</strong>tall only if direct-on-boiler weathercompensated flow temperature arerequired.<strong>Ins</strong>tall only one method of external time androom temperature control. If room and stattime switch are required, then do not installRE2132 room unit and vice versa.X310562 11Supply230VL1PEN34R1R2R3**Room ThermostatAnd Time SwitchL1NL21 2O S4 3 2 5 1lower terminal strip2 pin plug on X4X16QAW44optionalRemote Sensor**RE2132ModulatingRoom unitGNDPMW+24V* OutsideAir Sensorcylinderthermostat ***HWSsensor5612L1NL1NLN***<strong>Ins</strong>tall only one method of HWS temperaturecontrol. The use of an HWS sensor will allowno time control over hot water production.If timed hot water control is required then donot install an HWS sensor, but install onlytimeswitch & cylinder thermostat.On LPG installations where an additional gassafety shut off valve is required, connect to L1 andN terminals on left side of lower terminal strip.LPENUnderfloor Zone VTPump 2A MaxNOTE: All Connections intoMRO 3 are made vialabelled factory fittedCables with the exceptionof the underfloor zoneRE2132 which is cabled bythe installerR4R5R64 3 2 5 1LPENRadiator Zone Pump2A MaxL1NUnderfloor Zone VTMixing ValveL2RE2132ModulatingRoom unit forunderfloor zoneGNDPMW+24VUnderfloor ZoneVT Flow Sensor<strong>Ins</strong>tallation codeDescription11Outside sensor installed.MR03 mixing valvecontroller and 2 x RE2132installed25No outside sensor. MR03mixing valve controllerand 2 x RE2132 installedLtd.E n e r g y T e c h n o l o g y41
17.0 electricalconnectionsTypical electrical connection schematic to suit system type 8***upper terminal strip<strong>Ins</strong>tall only if direct-on-boiler weathercompensated flow temperature arerequired.<strong>Ins</strong>tall only one method of external time androom temperature control. If room and stattime switch are required, then do not installRE2132 room unit and vice versa.lower terminal stripX310651Not Used<strong>Ins</strong>tallationcode2 pin plug on X4X162 1No outside sensor.Room stat & time switchinstalled.Supply230VL1PEN1234R1R2R356L1NL1NL2L1N23MML L 3 4 5 6 7 N N E <strong>EC</strong>yl StatR / StatCH M / V HW M / VOn LPG installations where an additional gas safetyshut off valve is required, connect to L1 and N terminalson left side of lower terminal strip.Junction BoxL N P ESystem Pump2A MaxL NHWOFFHWONCHOFFCHON ETypical ProgrammerDescription42
17.0 electricalconnectionsRemote Fault IndicationThe MICROMAT <strong>EC</strong> boiler includes a built in fault alarm relay with volt freecontacts for interface with, if required a remote alarm indicator.The volt free contacts within the boiler control panel will close in the eventthat the boiler goes to a fault resulting in boiler lockout. The volt free contactsindicate “common alarm” upon closing. The actual fault description will bedisplayed upon the LCD screen of the boiler.Connection to the volt free contacts is made via an alarm plug and leadassembly available from <strong>RVR</strong> Ltd.X9 Socket1 2X9 Alarm Plugand LeadAssemblyThe alarm plug and lead connects to socket x9 located in the lower area ofthe boiler control panel.Remote AlarmCircuit18.0 commissioningthe micromat <strong>EC</strong> boilerThe MICROMAT <strong>EC</strong> boiler should be expertly commissioned by a competent engineer who will need, in additionto standard hand tools, a U tube manometer and a combustion analyser.Before attempting to set the MICROMAT <strong>EC</strong> boiler to work, the following check list must be worked through.See 18.1.Ltd.E n e r g y T e c h n o l o g y43
18.1 pre-commissioningchecksa) Ensure system has been thoroughly cleansed and flushed, any strainers have been cleaned and that theappropriate water treatment has been added to the system to prevent corrosion, scale formation etc.b) Ensure the system and boiler has been properly and fully flooded and vented of air and the cold fill pressureat the boiler is at a minimum 0.5 Barc) Check that the pumps within the boiler are free to rotate by removing the vent screw in the end of both pumpmotors and checking that the impeller shafts rotate freely when turned with an appropriate sized screwdriver.Replace vent screws.d) Ensure Gas supply has been purged and them is the availability of working inlet pressure of nominal 20 mbar(Nat gas) or 37 mbar (LPG).e) Check that the flue installation has been properly made.f) Check that a condensate pipe (in plastic - copper tube is not acceptable) has been connected to the boilerand that the syphon cleaning point cap is in place.g) Where the appliance is taking air for combustion from the room in which it is installed - ensure an adequateprovision for ventilation has been made.h) Ensure that there is an adequate heat load available.i) Ensure that the electrical connections have been made correctly.j) Ensure that the appliance has been correctly configured with the appropriate installation code for the system,See tables page 45 onwards.44
18.2 installationcodesWeather compensated control without DHW sensor or with DHW control viathermostat and three way valve.Function NumberLow Temperature heating 1with RE2132 Room UnitMedium Temperature heating 2Weather Compensationwithout mixing circuit.(Direct Heating Only)with Room ThermostatHigh Temperature heating 3Low Temperature heating 4Medium Temperature heating 5High Temperature heating 6without room unit or thermostat or with RE2 room regulatorLow Temperature heating 7Medium Temperature heating 8High Temperature heating 9with two RE2132 Room UnitsMedium Temperature Direct heating 10Weather CompensatedDirect Heating andmixing circuit withMR03(the mixing circuitis always low temperatueheating)R t twith one RE2132 Room Unitwith Room Thermostatwithout room unit or thermostat or with RE2 room regulatorHigh Temperature Direct heating 11Medium Temperature Direct heating 12High Temperature Direct heating 13Medium Temperature Direct heating 14High Temperature Direct heating 15Medium Temperature Direct heating 16High Temperature Direct heating 17Room temperature controlled (without weather compensation) without DHWsensor or with DHW control via thermostat and three way valveLow Temperature heating 18Room Temperaturecontrol without mixingcircuit. (Direct HeatingOnly)with RE2132 Room Unitwith Room ThermostatMedium Temperature heating 19High Temperature heating 20Low Temperature heating 21Medium Temperature heating 22High Temperature heating 23Room temperaturecontrolled Direct Heatingand mixing circuit withMR03 (the mixing circuitis always low temperatueheating)with two RE2132 Room Unitswith one RE2132 Room Unitwith Room ThermostatMedium Temperature Direct heating 24High Temperature Direct heating 25Medium Temperature Direct heating 26High Temperature Direct heating 27Medium Temperature Direct heating 28High Temperature Direct heating 29Ltd.E n e r g y T e c h n o l o g y45
18.2 installationcodesFlow temperature control(without room controller and without weathercompensation) without DHW sensor or with DHW control via thermostat andthree way valveLow Temperature heating 30without mixing circuit(Direct heating only)Without outside temperature sensor, room unit, room thermostat(Fixed point control)Medium Temperature heating 31High Temperature heating 32Direct Heating andmixing circuit with MR03(the mixing circuit isalways low temperatueheating)Without outside temperature sensor, room unit, room thermostat(Fixed point control)Medium Temperature heating 33High Temperature heating 34Cascaded boiler installation without DHW sensor or with DHW control viathermostat and three way valve<strong>MAN</strong> Kaskade manager(KKM) with PWM signal. (Connected to R2 and R3)Other cascade controller with 0 - 3V output signal (connection to ...)Max heating temperature is set inthe KKMMax heating temperature is set inthe cascade controller3536Weather compensated control with DHW sensor and pumped DHW circuit.Low Temperature heating 37with RE2132 Room UnitMedium Temperature heating 38Weather CompensatedDirect Heating withoutmixing circuit (directheating only)with Room Thermostatwithout room unit or thermostat or with RE2 room regulatorHigh Temperature heating 39Low Temperature heating 40Medium Temperature heating 41High Temperature heating 42Low Temperature heating 43Medium Temperature heating 44High Temperature heating 45with two RE2132 Room UnitsMedium Temperature Direct heating 46Weather CompensatedDirect Heating andmixing circuit (the mixingcircuit is always lowtemperatue heating)with one RE2132 Room Unitwith Room Thermostatwithout room unit or thermostat or with RE2 room regulatorHigh Temperature Direct heating 47Medium Temperature Direct heating 48High Temperature Direct heating 49Medium Temperature Direct heating 50High Temperature Direct heating 51Medium Temperature Direct heating 52High Temperature Direct heating 5346
18.2 installationcodesRoom temperature controlled (without weather compensation) with DHWsensor and pumped DHW circuit.Function NumberLow Temperature heating 54Room Temperaturecontrol without mixingcircuit. (Direct HeatingOnly)with RE2132 Room Unitwith Room ThermostatMedium Temperature heating 55High Temperature heating 56Low Temperature heating 57Medium Temperature heating 58High Temperature heating 59Room temperaturecontrolled Direct Heatingand mixing circuit (themixing circuit is alwayslow temperatue heating)with two RE2132 Room Unitswith one RE2132 Room Unitwith Room ThermostatMedium Temperature Direct heating 60High Temperature Direct heating 61Medium Temperature Direct heating 62High Temperature Direct heating 63Medium Temperature Direct heating 64High Temperature Direct heating 65Flow temperature controlled (without room controller & without weathercompensation) with DHW sensor and pumped DHW circuit.Function NumberLow Temperature heating 66Without mixing circuit(Direct heating only)t outside temperature sensor, room unit, room thermostat (Fixed pointMedium Temperature heating 67Direct Heating andmixing circuit (the mixingcircuit is always lowtemperatue heating)Without outside temperature sensor, room unit, room thermostat(Fixed point control)High Temperature heating 68Medium Temperature heating 69High Temperature heating 70Cascaded boiler installation with DHW sensor and pumped DHW circuit.<strong>MAN</strong> Kaskade manager(KKM) with PWM signal. (Connected to R2 and R3)Other cascade controller with 0 - 3V output signal (connection to ...)Max heating temperature is set inthe KKMMax heating temperature is set inthe cascade controllerFunction Number7172Ltd.E n e r g y T e c h n o l o g y47
18.3 firstfiringNotesThe MICROMAT <strong>EC</strong> boiler has a single heat exchangeand burner assembly. There is one gas valve servingthe assembly.a) Ensure gas & electricity suppl<strong>ie</strong>s are turned on tothe appliance.Menu/ResetButtonDisplayON/Off switchb) Switch on the boiler at the on/off switch. (See figureto the right) The appliance will purge the combustionchamber with air from the burner fan and then will pulsethe pumps on/off (deaerating).c) Attach U tube manometer to inlet pressure test pointon gas valve (See figure 8). The nominal pressureshould be 20mb for NG or 37mb for LPG.Summer/Winterand “+” buttonEngineersand “-” buttonTest buttond) Press the Engineers test button twice - the screenshould/must display [10 min Low]. To reduce the burnerto its lowest firing rate press the ‘-’ key until the fanspeed reduces to its minimum revs (see section 18.5).In the event that ignition of the burner does not occurafter 4 attempts the appliance will go to ignition failurelockout. Remove the cover cap screws from Qminadjustment on gas valve (See figure 8(3)) turnadjustment screw half turn clockwise.Press reset button, appliance will post purge and ventagain.Press Engineers test button twice to reset appliance to“I0 min Low” and ignition sequence will start again. Ifignition fails again after 4 attempts, then further increaseQmin on gas valve by half turn until burner ignites.Flue Gas CO 2% SettingsGastypeNatGas G20LPG G31CO2% at Min Output 9-9.511-12CO2% at Max Output 8.7-9.210-11Figure 8e) Observe the colour of burner flame - correct colourshould be dull red. Adjust colour of burner flame usingQmin until flame colour is correct. Following thisprocedure will avoid poisoning your combustionanalyser.f)Remove flue gas analysis test point cap or plug (fromtop right of combustion chamber) of the heat exchangerand insert probe of combustion analyser Adjust asnecessary Qmin of valve to obtain required C02% value.(See table 2) Make adjustments slowly and wait at least2 minutes for reading to stabilise before re-adjusting.Remove analyser and refit cap/plug to test point.NOTE: Test period expires after 10 minutes - if thisexpires whilst commissioning is still in progress, pressEngineers button twice to reset and carry on withnecessary checks and adjustments. To exit “10 min Low’test period - press Engineers button once, this will setcontrols to auto.4321Q maxQ minBurner offsetpressure testpointGas inletpressure testpointg)Press the ‘+’ button until the fan is at its maximumrate (see section 18.5) This will set the burner tomaximum output.AdjustmentsTurning 3 clockwise increases min output & CO2%Turning 4 clockwise increase max output & CO2%48
18.3 firstfiringh)Check CO2% of heat exchanger and adjust as necessary screw (4) Q max of right hand valve, to obtain requiredvalue. (See table I)NOTE: Adjustment of either (3) Q min or (4) Q max will affect the other adjustment to a lesser or greater extent.Following either adjustment of (3) or (4) check the effect on the setting of the other adjustment and correct asnecessary.i)Remove analyser from upper heat exchanger and refit cap/plug to test point.j)Press Engineer ‘s test button once to exit 10 minute test mode.k)Turn off electricity and gas suppl<strong>ie</strong>s and remove manometer from inlet pressure test point and refit test pointscrew.l)Turn on gas and electricity suppl<strong>ie</strong>s.Ltd.E n e r g y T e c h n o l o g y49
18.4 commissioning -pop-up menu& weather compensationExplanation of the [install] pop up menuMenu Point Parameter Minimum Maximum Default value Adjustment Unit[1] Curv 20C CH -20 20 0 1 0 C[2] Curv -1C CH -20 20 0 1 0 C[3] Pump min 35 Pump max 35 1 %[4] Pump max Pump min. 100 100 1 %[5] Curv 20C MV -20 20 0 1 0 C[6] Service in 1 1500 365 1 Day[7] Pump Continue Off On Off[8] <strong>EC</strong>O+ Off On On[9] Postrun HW 0 5 1 1 Minute[10] Postrun CH 0 20 3 1 Minute[11] Min Power Min speed Max ?? Min speed 1 %[12] Max Power Min speed 100 100 1 %[13] Function Nr 1 72 9[14] Back[1] fixed point of of the direct heating circuit.Using menu point [1] the flow temperature at an outside air70temperature of 20°C may be adjusted between -20°C and +20°C.[2] Design point of the direct heating circuit.Using menu point [2] the design point of the direct heating circuitmay be set at an external temperature of -15°C.5040High Temperature HeatingThe adjustable range is 60°C - 100°C30Medium temperature HeatingThe adjustable range is 50°C - 90°C20Low temperature heatingThe adjustable range is 35°C-75°CNotes:100Frost protectionDo not set underfloor heating to a temperature greater than20 15 10 5 0 -5 -10 -1545°C. Comfort will be optimised by low floor heatingOutside Air Temperature °Ctemperatures.Fixed Point Adjustment RangeIf menu point [13] [function no.] is set to ‘no external sensor’then the weather compensation settings will not work. The Micromat <strong>EC</strong> will then heat according with themax. temperature set in [function no.]. The flow temperature control will then be taken over by a modulatingroom controller or a cascade controller.The adjustable range for the design point temperature depends on which heating system has been entered in [functionno.]. This function also determines the control function ( High temp : 80°C, Medium Temp : 70°C, Low Temp : 55°C)This setting does not replace the safety thermostat for underfloor heating!Flow Temperature °C60100 +209090+20Flow Temperature °C8070605040300-20Flow Temperature °C8070605040300-20Flow Temperature °C807060504030+200-2020202020 15 10 5 0 -5 -10 -15Outside Air Temperature °C20 15 10 5 0 -5 -10 -15Outside Air Temperature °C20 15 10 5 0 -5 -10 -15Outside Air Temperature °CHigh Temperature heating Medium Temperature Heating Low Temperature Heating50
18.4 commissioning -pop-up menu& weather compensation[3] The minimum pump revolution setting [pump min]To set the minimum pump revolutions select menu item [3] and press the ‘reset’ key to confirm. The value may thenbe changed by using the ‘+’ and ‘-’ keys. Confirm the selection by pressing the ‘menu’ key.[4] The maximum pump revolutions setting [pump max]To set the maximum pump revolutions select menu item [4] and press the ‘reset’ key to confirm. The value may thenbe changed by using the ‘+’ and ‘-’ keys. Confirm the selection by pressing the ‘menu’ key.[5] Setting the fixed point of a mixed flow circuit.If the mxing valve controller MR03 is connected to the Micromat <strong>EC</strong> then menu item [5] may be used to set the fixedpoint for the mixed circuit weather compensation curve. The f<strong>ie</strong>xed point may be adjusted from -20°C up to 20°C atan outside temperature of 20°C.[6] Service [Service In]To reset the sevice interval back to 365 days select menu item [6] and press the ‘menu’ key twice‘. this will removethe service request from the display.If a servicing is carr<strong>ie</strong>d out before the service interval has expired, and if no service request appears on the displaythen menu item [6] must still be reset to 365days by pressing the ‘menu’ key twice. If no service request is requiredto appear on the display then set the number of days in menu item [6] to OFF (
18.5 commissioning -the status indicatorOverv<strong>ie</strong>w of fan revolutions per minuteBoiler typeBoiler Absolute Start Revs Max HK?? Min. Boiler standard Min. Boiler absoluteMin. rev/min Max. Rev/min Rev/min Rev/min [%] Rev/min [%] of max. HC Rev/min [%] of max. HC<strong>EC</strong> 11/22 900 6000 2200 3000 100 1380 46 900 30<strong>EC</strong> 15/22 900 6000 2200 4080 100 1380 33 900 22<strong>EC</strong> 23/28 900 6000 2200 4680 100 1380 29 900 19<strong>EC</strong> 31/36 900 6000 2200 4860 100 1380 28 900 18<strong>EC</strong> 40 H 1260 6300 2200 6300 100 1380 22 1260 19in case of a boiler controlpanel exchange (<strong>EC</strong> 11/22 - <strong>EC</strong> 40) the Revs per min. should correspond to the back-uppanel instructions.Status IndicatorThe status indicator gives information in clear text on the operating condition of the boiler. Status reports appearas non flashing messages and fault reports appear as flashing text.Status report (non flashing)The following status reports are given during normal operation of the micromat <strong>EC</strong>1. [No Demand] The burner is switched off and the circulating pump is operating in accordance with heatrequirements.2. [Pre-Purge] The fan is purging the burner.3. [Ignition] The gas/air mix is being fired.4. [Heating] burner and circulating pumps are heating the system5. [Storage] burner and/or circulating pumps are heating strorage water.6. [Post-Purge] the fan is purging the burner.7. [Legionella] tha anti-Legionella program is active.8. [S/D] The boiler is in Summer mode / day mode (heating up stage)9. [S/N] The boiler is in Summer mode / night mode.10. [W/D] The boiler is in Winter mode / day mode (heating up stage)11 [W/N] The boiler is in Winter mode / Night mode (cooling down stage)The following status reports are exceptions to these:1. [Service] A yearly maintenance must be carr<strong>ie</strong>d out on the Micromat <strong>EC</strong>. The boiler will continue to work asnormal when this display is showing.2. [Fault M. Ru]???? The connection to the room unit is broken. The Micromat <strong>EC</strong> will heat to the recommendedroom temperature of 20°C.3. [Fault M. ET]???? The connection to the external temperature sensor is broken. In this instance the Micromat<strong>EC</strong> will heat as for a 0°C external temperature.4. [Fan High] The boiler fan revolutions per minute are too high5. [Fan Low] The boiler fan revolutions per minute are too low.6. [Deaeration]???? The boiler is undergoing a short ventilation program.7. [Limit F/R]???? The boiler is exper<strong>ie</strong>ncing a high flow / return temperature momentarily.Fault Report (flashing indicator)A table of fault reports and possible sources of the faults can be found in the section entitles ‘Screen display /Diagnosis of faults’ on pages _____When the source of the error has been found and corrected the report must be deleted by using the ‘reset’ key. Ifthe fault occurs again,please contact the <strong>RVR</strong> Customer Care Department.The boiler is locked when the status display shows a flashing indicator (fault report).
18.6 setting domestichot water temperatureA) With HWS sensor in/on calorif<strong>ie</strong>rPress and hold the menu/reset button on the boiler conbtrol panel for over 3 seconds. Next press the ‘+’key until [temp DHW] appears on the display. Press the menu/reset button to enter adjustment mode. Press the‘+’ or ‘-’ key to adjust the setpoint. The maximum temperature temperature setting is 60°C.B) With cylinder thermostat in/on DHW calorif<strong>ie</strong>rSet desired stored hot water temperature by the adjustment of the cylinder thermostat. With thisarrangment time control of hot water charging is possible by installing a time switch in ser<strong>ie</strong>s with the cylinderthermostat, but hot water charging always takes priority over the heating demand.18.7 output for charginghot waterThere is no adjustment necessary or possible, as the boiler controls are self learning and will self adapt theoptimum output to hot water according to the heat transfer capabilit<strong>ie</strong>s of the connected hot water calorif<strong>ie</strong>r orcylinder.19.0 setting the boilerto work1. To fit casing to boiler ensure hooks on top rear edge of boiler case engage properly into rear chassis assembly.Latch bottom case fixings and tighten central locking screw.2. Turn ON on/off switch and set any external controls to auto operation.3. Set <strong>EC</strong>O/<strong>EC</strong>O plus option to <strong>EC</strong>O position for systems without additional heating circuit pump OR Set<strong>EC</strong>O/<strong>EC</strong>O plus switch to <strong>EC</strong>O plus position for systems with a local low velocity header and additional heatingcircuit pump.4. With boiler operating (burners on) press “Test” button on boiler control panel to test overheat controls in theboiler. The boiler must shut-down and then re-ignite.20.0 servicinginstructionGENERALIn general, maintenance/inspections should take place:a) When the display on the unit indicates that inspection is required (status shows [SERVICE]).b) At least every 18 months, before carrying out any maintenance the unit must be inspected.
20.1 inspectiona) Ask the user about any problems with the boiler unit or any other comments.b) Check the water pressure of the installation.c) Remove the casing of the unit and inspect all pipes and connections for water leaks.d) <strong>Ins</strong>pect the top of the casing and/or the top of the upper heat exchanger for water leaks or signs of waterfrom the flue air supply tube.e) Open the siphon cleaning rinsing point at the base of the unit.f) If you have a notebook computer, connect it and check the service page for any errors, messages, startsand successful restarts. (Special communication lead and service software required)g) Run the unit at maximum capacity and measure the input and the CO2%.h) Run the unit at minimum capacity and measure the input and the CO2%.i) Listen to the sound of the in built pumps.j) Disassemble each burner by removing the six M6 nuts around the burner door, removing the ignition cable andpulling the burner forwards. When the burner has been pulled forwards to halfway across the burner area, theplug on the fan cable must be removed from the fan motor. Check the interior of the heat exchanger.k) Disassemble the plastic box at the suction side of the fan, inspect the fan blades.I) Check the distance between the electrode and the burner; this should be 4 to 5 mm.20.2 maintenanceDepending on the results of the inspection carry out any maintenance and if necessary any preventivemaintenance.Possible actions include:at a) The remarks and comments of the cl<strong>ie</strong>nt must be taken seriously and the cause(s) of any faults or problemsmust be found.at b) The pressure of the installation must be between 1 and 2 bar: any possible leaks in the system must beidentif<strong>ie</strong>d; if necessary, have a pipework engineer solve the problem.at c) Possible leaks or weeping must be resolved immediately.at d) In case of water leakage or ingress from the air supply pipe, the cause must be found.at e) If the condensation in the siphon is highly contaminated, the siphon must be rinsed. With the burnersremoved, use a filling hose to insert water into the heat exchanger, which will automatically reach the siphon.at f) Draw your conclusions from the service screen and attend to those parts that have caused any faults.at g) and at h) If necessary, adjust the gas setting on the gas valves.at i) If the in built pumps make an un-natural noise, and in particular if the pumps are more than 5 years old, it isrecommended that the pumps should be replaced by way of preventive action.Note the pumps are fully modulating and do have characteristic a “yet yet” noise which is normal at low speeds.at j) NEVER CLEAN THE BURNER ITSELFIf the interior of the heat exchanger is contaminated and/or there is a deposit on the surfaces of the coiledstainless steel pipes, the latter must be removed with a hard brush or citric acid. (DO NOT USE A STEELBRUSH!) Then remove any dirt with a vacuum cleaner
at k) If dirt has deposited on the fan blades, each blade must be carefully cleaned, until the blade material isvisibleagain. If this is not done evenly the fan will not rotate properly and be out of balance.at I) Carefully bend the electrode without touching the burner, until the correct distance has been reachedIMPORTANT NOTEIF ANY WATER CARRYING JOINT WITHIN THE BOILER IS DISASSEMBLED THEN THE “0” RINGSEAL MUST ALWAYS BE REPLACED, LIKEWISE IF ANY OTHER SEAL IS NOTED TO BE DEFORMEDTHEN THEY SHOULD ALSO BE REPLACED.WATER SEALING “0” RINGS ARE A ONE TIME USE ONLY AND SHOULD NOT BE RE-USED.Cancelling the Service MessageFollowing the maintenance operations, the service message (when displayed) must be cancelled. This is done bypressing and holding in the service button for at least 10 seconds.
21.0 screen displaydiagnosis of faults2.1 Screen displayThe control panel of the MICROMAT <strong>EC</strong> boiler has an LCD screen, displaying two lines of data. This screen providesinformation about the operation of the appliance; it shows operation messages (non flashing) and fault messages(flashing display). The first line contains text information about the status of the unit.It shows:STATUS MESSAGES (NON FLASHING) FOR NORMAL OPERATIONStandbyPre-purgeIgnitionCH DemandDHW DemandFlue-emission10min LowPost-purgeLimit F/RNo heat demand (boiler not required to be on)Combustion chambers are being pre-ventilated with air from the burner fansThe ignition sequence of the burners is initiatedThe boiler is operating in central heating modeThe boiler is operating to produce domestic hot waterThe boiler is operating in test mode at mid output to enable flue gas emissions to be checked(auto expires after 10 mm)The boiler is operating in engineers test mode for adjustment purposes (auto expiresCombustion chambers are being post-ventilated with air following boiler operationThe flow and/or return temperature is too high (currently)Fan high The lower burner fan is running too fast (currently)Fan low The lower burner fan is running too slow (currently)Fault room uFault outsideDeaeratingThere is a fault with the modulating unit (RE 132) or Cascade manager (KKM2) or afault in the wiring to these controls (in these circumstances the boiler runs continuouslyin heating mode to protect the building)There is a fault in the outside air sensor or in the wiring to the sensor or the dip switches areincorrectly set to ask the boiler to look for an outside sensor when there is none installedThe in built pumps are operating to remove any possible collection of air from the heat exchangers.(Occurs when power turned off/on and after reset of fault)The second line of text displays values such as temperature, percentages etc and the red reset button may be used toscroll through (for information) the values of the various sensors that are/may be connected in the boiler plus fan speedsand pump speed etc.56
21.1 screen displaydiagnosis of faultsSTATUS MESSAGES (FLASHING DISPLAY) INDICATING A FAULTA flashing display indicates a fault and that the boiler has shutdown (lockout). The boiler will not attemptto operate until the red’ reset button is pressed.Any repetitive flashing fault message should be investigated, the cause found and corrective action taken.For each flashing display message there is a possible cause, see list of cause numbers following the flashingstatus’ list.Display Message Meaning cause number/sFLASHINGWat 1 Lockout high limit stat has tripped. 5,6,7,8,21,24,25,26,31Wat 2/Flue Lo ht/exch high limit or flue 2,5,6,7,8,21,24,25,26,31limit stat has trippedFan High burner fan speed is too high 9,11,29,31,33Fan Low burner fan speed during 9,10,11,14,18,29,31,33pre-purge is too lowFan oper Lower burner fan is detected as 3,4,11,29,31operating when should be idleIgnit fault Ignition to burner has not 12,13,15,16,17,19,22,been successful after 4 attempts 23,27,29,30,31,35Flame 1 out Flame at burner has been lost 13,15,17,19,20,23on 4 consecutive occasions duringoperationFlame 1 on w/ Flame is detected at the lower burner 17,19,30when there should be no flameS3 ht/exch flow temperature 3,5,33sensor interruptedS4 Return temperature sensor 3,5,33InterruptedS7 Mixed flow temperature sensor 1,3,5,33Interrupted. Only when MR03Unit installedProgram endFollows reprogramming of controlpanel with laptop PC, not a fault-just press reset buttonLtd.E n e r g y T e c h n o l o g y57
21.1 Screen display/Diagnosis of faults (contd)Gas valve Connection to gas valve interrupted 16,26,28,29,31,33Soft fault Error in software in the control 29Reset button There is a fault with the reset button 29,31,34Eeprom There is a fault in the EEPROM in the control 2921.2 (possible) causes of fault& corrective actionCAUSE No.REASON/ACTION1 - Dip switches not set correctly / Check and correct settings2 - Unsound electrical connections to flue limit stat / Check and correct3 - Sensor not correctly connected or sensor defective/Check connections andor replace sensor4 - Short circuit in wiring / Check and rectify5 - Short circuit in wiring to sensor / Check and rectify6 - Boiler pumps not rotating (seized or defective)/Free seized shaft orif defective replace pump7 - System lacks water / Investigate, refill and vent8 - Connections to heat exchanger limit stat unsound /check & rectify9 - Unsound electrical connection to fan / Check integrity of fan connection plug10 - Fan blades heavily contaminated / Clean fan11 - Fan is defective / Replace fan12 - There is no gas supply available / Investigate, restore gas supply13 - Low gas pressure / Investigate and rectify14 - Fuse defective / Check fuses and replace as necessary15 - Gas valve mm output setting is incorrect / Check and adjust mm output C02%17 - Poor ignition lead connection to electrode or damp connection or lead damagedand shorting to earth / Check and rectify18 - Transformer defective / Replace transformer19 - Condense siphon is blocked or condense waste blocked or frozen / Clear siphon orwaste pipe20 - Flue gas leakage from connection at rear of heat exchanger / Check, reposition orreplace seal21 - System strainer blocked, isolation valve closed. Or some other interruption to waterflow / Check and rectify58
21.2 (possible) causes of fault& corrective action22 - Unacceptably high resistance in flue or air supply tubes or flue blocked / Check fluefor suitability or clear obstruction23 - Leakage of flue gas from flue gas tube into air tube vitiating the combustion air / Stripout flue system and remake joints24 - Zone pumps not running / Check and rectify25 – Heat exchangers fouled internally with silt or scale / Clean, descale heat exchangersand system and re-dose system with water treatment26 - Heat exchanger high limit stat defective / Replace limit stat27 - Boiler set for wrong gas type / Convert boiler to burn the gas being suppl<strong>ie</strong>d28 - Flue gas limit stat defective / Replace limit stat29 - Boiler control panel defective / Replace control panel30 - Incorrect position of ignition electrode / Reset gap 4-5mm31 - moisture in-on electrical connections or components / Dry carefully using warm airfrom a hair dryer32 - Incorrect electrical connection / Check and rectify33 - Wiring interrupted (broken wire) / Check and rectify34 - reset button stuck / Press button in attempt to free sticking contacts. If no successthen replace control panel35 - Ignition electrode damaged or broken / Replace electrodeLtd.E n e r g y T e c h n o l o g y59
For further information please contact:<strong>RVR</strong> LimitedKenmareCo KerryIrelandTel: +353 64 41344Fax: +353 64 41511email: man@rvr.<strong>ie</strong>