Assembly instructions âSideWinder Roller Bannersâ - UK Exhibition
Assembly instructions âSideWinder Roller Bannersâ - UK Exhibition
Assembly instructions âSideWinder Roller Bannersâ - UK Exhibition
You also want an ePaper? Increase the reach of your titles
YUMPU automatically turns print PDFs into web optimized ePapers that Google loves.
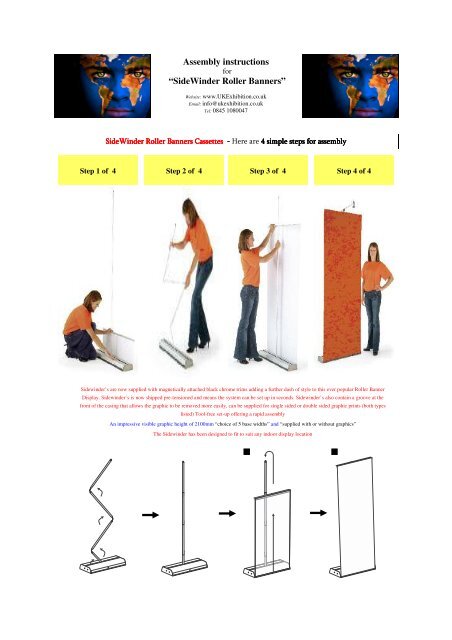
<strong>Assembly</strong> <strong>instructions</strong>for“SideWinder <strong>Roller</strong> Banners”Website: www.<strong>UK</strong><strong>Exhibition</strong>.co.ukEmail: info@ukexhibition.co.ukTel: 0845 1080047SideWinder <strong>Roller</strong> Banners Cassettes - Here are 4 simple steps for assemblyStep 1 of 4Step 2 of 4 Step 3 of 4 Step 4 of 4Sidewinder’s are now supplied with magnetically attached black chrome trims adding a further dash of style to this ever popular <strong>Roller</strong> BannerDisplay. Sidewinder’s is now shipped pre-tensioned and means the system can be set up in seconds. Sidewinder’s also contain a groove at thefront of the casing that allows the graphic to be removed more easily, can be supplied for single sided or double sided graphic prints (both typeslisted) Tool-free set-up offering a rapid assemblyAn impressive visible graphic height of 2100mm “choice of 5 base widths” and “supplied with or without graphics”The Sidewinder has been designed to fit to suit any indoor display location
Photographs for easy identificationWebsite: www.<strong>UK</strong><strong>Exhibition</strong>.co.ukEmail: info@ukexhibition.co.ukTel: 0845 1080047Attaching the graphics to the Sidewinder <strong>Roller</strong> BannerAttach top rear of graphic panel to doublesided tape on top hanger.Attach front bottom edge of graphic panel todouble sided tape on leader sheet, asshown.Holding onto graphic, remove locking pin andallow graphic to slowly retract into unit.Attach End-TrimsTensioning the graphicInsert a standard screwdriver into the slot located at the end of the trim and turn clockwise to add tension to the graphicRemoving the tension:Insert a standard screwdriver into the slot and push to disengage the ratchet, hold in and turn anti-clockwise until tension inspring is released.To remove the graphic:Once tension has been released, carefully peel the graphic off the leader sheet, the graphic hanger can also be removed, repeatfor adding fresh graphicsImportant:To ensure a strong bond to the graphic and the double sided tape, we at <strong>UK</strong> <strong>Exhibition</strong> always add a further tape on the rearsection, this we advice our customers to do if they are attaching the graphics them selves


