ShowTec MultiDim
ShowTec MultiDim
ShowTec MultiDim

Create successful ePaper yourself
Turn your PDF publications into a flip-book with our unique Google optimized e-Paper software.
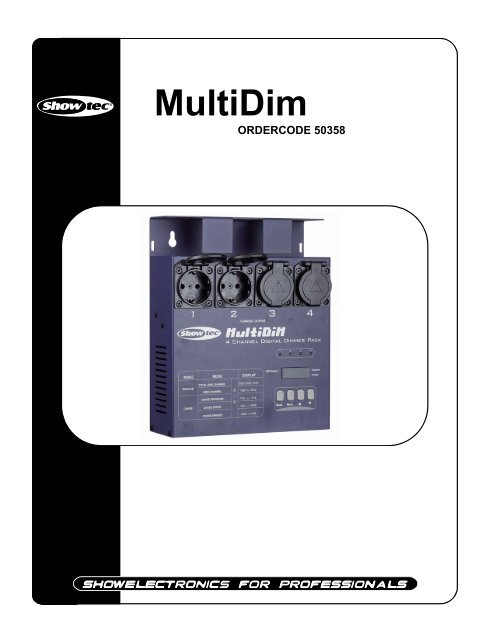
<strong>MultiDim</strong>ORDERCODE 50358
ShowtecShowtec <strong>MultiDim</strong> Product GuideWarning..…...................................................................................………………………………………….Safety-instructions………………………………………………………………………………………….….Operating Determinations…………………………………………………………………………………….Description..…..............................................................................……….…………………………………Backside…….……………………………………………………………………………………….……...….Installation...............................................................................…...…………………………………….…..Installing <strong>MultiDim</strong> ....................................................……………………………….……..………………Set Up and Operation.....................................................................……..…………………………………Operating instructions ......................................................................……………………………………Chase Mode..................................................................…………………………………………………..Receive Mode..................................................................…………………………………………………Maintenance...................................................................................………..………….…….……………...Replacing the Fuse........................................................................…………………….…………………Troubleshooting............................................................................………………….………………….…..Product Specifications.................................................................……………….…….………………….22345666668999101
WARNINGCAUTION!Keep this device away from rain and moisture!Unplug mains lead before opening the housing!FOR YOUR OWN SAFETY, PLEASE READ THIS USER MANUAL CAREFULLYBEFORE YOUR INITIAL START-UP!SAFETY INSTRUCTIONSEvery person involved with the installation, operation and maintenance of this device have to:- be qualified- follow the instructions of this manualCAUTION! Be careful with your operations.With a dangerous voltage you can suffera dangerous electric shock when touching the wires!Before your initial start-up, please make sure that there is no damage caused by transportation. Shouldthere be any, consult your dealer and do not use the device.To maintain perfect condition and to ensure a safe operation, it is absolutely necessary for the user to followthe safety instructions and warning notes written in this manual.Please consider that damages caused by manual modifications to the device are not subject to warranty.This device contains no user-serviceable parts. Refer servicing to qualified technicians only.IMPORTANT:The manufacturer will not accept liability for any resulting damages caused by the non-observance ofthis manual or any unauthorized modification to the device.• Never let the power-cord come into contact with other cables! Handle the power-cord and allconnections with the mains with particular caution!• Provide occasional ventilation during use.• Place this unit in a stable location, away from humidity, vibration or bumps.• Never remove warning or informative labels from the unit.• Do not insert objects into air vents.• Do not switch the device on and off in short intervals, as this would reduce the system’s life.• Do not open the device.• Only use device indoor, avoid contact with water or other liquids.• Avoid flames and do not put close to flammable liquids or gases.• Always disconnect power from the mains, when device is not used or before cleaning! Only handlethe power-cord by the plug. Never pull out the plug by tugging the power-cord.• Make sure that the available voltage is not higher than stated on the rear panel.• Make sure that the power-cord is never crimped or damaged. Check the device and the power-cordfrom time to time.• In case of a malfunction (burning smell, etc.), immediately stop operation, disconnect power andcontact your Showtec dealer.• If device is dropped or struck, disconnect mains power supply immediately. Have a qualifiedengineer inspect for safety before operating.2
• If the device has been exposed to drastic temperature fluctuation (e.g. after transportation), do notswitch it on immediately. The arising condensation water might damage your device. Leave thedevice switched off until it has reached room temperature.• If your Showtec device fails to work properly, discontinue use immediately. Pack the unit securely(preferably in the original packing material), and return it to your Showtec dealer for service.• For replacement use fuses of same type and rating only.• This device falls under protection class I. Therefore it is essential to connect the yellow/greenconductor to earth.• Repairs, servicing and electric connection must be carried out by a qualified technician.• WARRANTY: Till one year after date of purchase.OPERATING DETERMINATIONSIf this device is operated in any other way, than the one described in this manual, the product may sufferdamages and the warranty becomes void.Any other operation may lead to dangers like short-circuit, burns, electric shock, explosion, crash etc.You endanger your own safety and the safety of others!Improper installation can cause serious damage to people and property !3
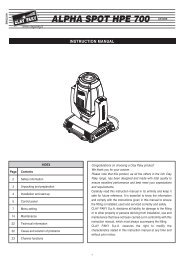
Description of the deviceFeatures• 3-pin standard DMX IN/OUT ports• 0-100% dimming level• 16 built-in programs subject to Speed and Dimmer• Provide dimmer control information to 4 channels, using DMX-512 protocol• Power failure memory• 4 digits Segment Display shows current activity and function stateOverviewFig. 11) Channel Output: 5 A per channel, total 16 A max.2) Channel LEDs: Shows the intensity of the channel in use.3) Segment Display: Shows current activity or function state.4) MODE button: Press to select operating mode between Chase and Receive.5) MENU button: Press to select desired menu setting.6) ▲ button: Press to increase the display value.7) ▼ button: Press to decrease the display value.4
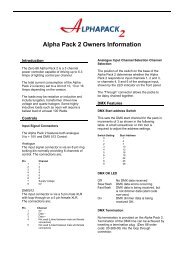
There are 2 versions from the <strong>MultiDim</strong>:Fig. 2 Fig. 3Standard version ordercode 50358UK-version ordercode 50358URear Panel89Fig. 410 11 128) Channel Fuse: F6.3A 250V 5x20mm9) Power Switch: Press to turn ON/OFF the power.10) Power Cable: Connect to an appropriate power outlet rated AC 230V~50Hz.11) DMX In: 3-pin XLR male, used to receive DMX data.12) DMX Out: 3-pin XLR female, used to transmit DMX data.5
InstallationRemove all packing materials from the <strong>MultiDim</strong>. Check that all foam and plastic padding is removed.Screw the equipment onto the wall. Connect all cables.Always disconnect from electric mains power supply before cleaning or servicing.Damages caused by non-observance are not subject to warranty.Set Up and OperationBefore plugging the unit in, always make sure that the power supply matches the product specificationvoltage. Do not attempt to operate a 120V specification product on 230V power, or vice versa.OPERATING INSTRUCTIONS1. Turn the power switch on.2. Operating mode is controlled by MODE.3. You can select the operating mode: Chase or ReceiveChase Mode1. Press MODE to select Chase mode.2. Tap ▲ or ▼ to your wanted chase within 01-16 built-in chases.6
3. Press MENU to enter Chase Speed mode.4. Tap ▲ or ▼ to your desired speed.5. Press MENU to enter Chase Dimmer mode.6. Tap ▲ or ▼ to set the intensity for the chase.7
Receive Mode1. Press MODE to select Receive mode, the Segment Displayshows CH:01, CH:02 or CH:04.2. Tap ▲ or ▼ for desired channel settings.When CH:01 appears, overall channel output is controlled by oneDMX channel;When CH:02 appears, every two channel output is controlled by oneDMX channel;When CH:04 appears, each channel output is controlled by one DMXchannel.3. Press MENU to set DMX initial address for the channel.4. Tap ▲ or ▼ for desired channel settings.If you assign address 25 for the first channel, then address 26, 27and 28 for the rest channels in sequence.8
MaintenanceThe Showtec <strong>MultiDim</strong> requires almost no maintenance. However, you should keep the unit clean.Disconnect the mains power supply, and then wipe the cover with a damp cloth. Do not immerse in liquid.Keep connections clean. Disconnect electric power, and then wipe the audio connections with a damp cloth.Make sure connections are thoroughly dry before linking equipment or supplying electric power.Replacing a FusePower surges, short-circuit or inappropriate electrical power supply may cause a fuse to burn out. If the fuseburns out, the product will not function whatsoever. If this happens, follow the directions below to do so.1. Unplug the unit from electric power source.2. Insert a screwdriver into the slot in the fuse cover. Turn the screwdriver to the left, at the same time gentlypush a bit (Turn and Push). The fuse will come out.3. Remove the broken fuse. If brown or unclear, it is burned out.4. Insert the replacement fuse into the holder where the old fuse was. Reinsert the fuse cover.Be sure to use a fuse of the same type and specification. See the product specification label for details.TroubleshootingThis troubleshooting guide is meant to help solve simple problems. If a problem occurs, carry out the stepsbelow in sequence until a solution is found. Once the unit operates properly, do not carry out followingsteps.If the <strong>MultiDim</strong> does not operate properly, refer servicing to a technician. If the fuse is burned out, replacethe broken fuse with a new one, with the same specifications.Response: Suspect three potential problem areas: the power supply, the fuse or menu settings.1. Power supply. Check that the unit is plugged into an appropriate power supply.2. The fuse. Replace the fuse. See page 9 for replacing the fuse.3. Check if the menu settings are correct.9
Product SpecificationModel: Showtec MultidimVoltage: AC 230V-50Hz (CE)Channel Output: 5A/CH., Total 16A (CE)DMX OUT: 3-pin XLR FemaleDMX IN: 3-pin XLR MaleChannel Fuse: F6.3A 250V 5x20mmDimensions: 212x188x71mm (LxWxH)Weight: 2.4 kgDesign and product specifications are subject to change without prior notice.10