Fitting instructions manual - Ansell Protective Solutions
Fitting instructions manual - Ansell Protective Solutions
Fitting instructions manual - Ansell Protective Solutions

You also want an ePaper? Increase the reach of your titles
YUMPU automatically turns print PDFs into web optimized ePapers that Google loves.
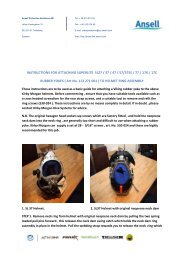
VIKING QUICK CONNECT COLLARPRODUCT INSTRUCTIONSThe Viking Quick Connect Collar system allows for an innovative method of replacing neckseals in the field, without the need for messy adhesives and extended down time. This isespecially important if you are on a diving holiday or in a working environment where timeis money. The system also allows the diver the option of fitting a latex or neoprene hoodwhich is also easily replaceable.There are 5 kits available as follows:Art No. 112 550 030: Quick connect collar, QC lock ring, QC universal neck seal, assemblytool.Art No. 112 550 010: Quick connect collar, QC lock ring, QC universal neck seal, QC latexhood M, assembly tool.Art No. 112 550 020: Quick connect collar, QC lock ring, QC universal neck seal, QC latexhood L, assembly tool.Art No. 112 550 040: Quick connect collar, QC lock ring, QC universal neck seal, QC neoprenehood M, assembly tool.Art No. 112 550 050: Quick connect collar, QC lock ring, QC universal neck seal, QC neoprenehood L, assembly tool.WARNING! This assembly is not approved for contaminated water diving situations.WARNING! The Quick Connect Collar must be fitted to the suit at the time of purchase orsubsequently by Trelleborg Viking or an authorised Trelleborg repair facility. There is arange of adhesives designed for attaching the QC neck ring to a suit which is dependent onthe suit material.WARNING! The Quick Connect Locking Ring (073 105 415) should be replaced after 5insertions in order to maintain proper contact inside the QC collar.WARNING! Only use VIKING QC neck seals and hoods with a rolled edge for safety.WARNING! The Quick Connect Collar shall always be subject to a visual and physicalinspection (pull the seal and/or hood) to check for correct fitment prior to EVERY dive.Trelleborg <strong>Protective</strong> Products ABJohan Kocksgatan 10, SE-231 81 Trelleborg, SwedenTel: +46 (0)410-510 00, Fax: +46 (0)410-518 50, E-mail: protective@trelleborg.comwww.trelleborg.com/protective | www.trelleborg.com/trellchem | www.trelleborg.com/vikingdivingEdition 100803
ASSEMBLY INSTRUCTIONSThe Quick Connect collar features 2 grooves, one inside and one outside the suit. If the collaris to be used with a neck seal only, then the neck seal should be fitted to the groove on theoutside of the collar.If the Quick Connect collar is to be used with a neck seal and a hood, then the neck sealshould be fitted to the inside groove, and the hood fitted into the outside groove.ASSEMBLY OF LATEX NECK SEAL ONLYOpen the zip to expose the inside of the suit. Lay the suit so that the QC collar is flat to thetable, as pressure will need to be applied. The seal will be fitted so that the shiny surface willappear to the outside of the suit and the sizing rings are to the inside of the seal. Lay theneck seal on the ring and start to push the locking ring into the seal and down into thegroove, starting at the cut-out in the ring. Use the rounded end of the tool to push thelocking ring and seal into the groove. Try to keep the amount of seal that you are insertinginto the groove as even as possible. Ensure that the locking ring is pushed fully into thegroove.Once the neck seal is fully in place, turn the suit the right way round and attempt to pull thelatex seal to ensure that it is fully locked into place. If the seal moves, then repeat the fittingprocedure until you are sure that the seal and ring are locked into place.Trelleborg <strong>Protective</strong> Products ABJohan Kocksgatan 10, SE-231 81 Trelleborg, SwedenTel: +46 (0)410-510 00, Fax: +46 (0)410-518 50, E-mail: protective@trelleborg.comwww.trelleborg.com/protective | www.trelleborg.com/trellchem | www.trelleborg.com/vikingdivingEdition 100803
ASSEMBLY OF LATEX NECK SEAL AND LATEX OR NEOPRENE HOODFit the latex neck seal to the inside of the neck ring as detailed above.Working on the outside of the suit, find the centre front of the neck ring and make a mark onthe ring. Find the centre front of the hood and then make sure that the two marks arealigned. This ensures that the opening of the hood will be in the centre of the suit formaximum comfort.Start fitting the locking ring into the hood and into the neck ring groove, using the roundedend of the assembly tool, starting from the front centre of the hood. Again check that thelocking ring has been fully depressed into the groove and that the hood is evenly spaced intothe ring. When fully fitted, try to pull the hood to ensure that it is properly fitted.Trelleborg <strong>Protective</strong> Products ABJohan Kocksgatan 10, SE-231 81 Trelleborg, SwedenTel: +46 (0)410-510 00, Fax: +46 (0)410-518 50, E-mail: protective@trelleborg.comwww.trelleborg.com/protective | www.trelleborg.com/trellchem | www.trelleborg.com/vikingdivingEdition 100803
CHANGING A SEAL OR A HOODRemoval of a seal or hood is exactly the opposite of fitting. Using the pointed end of theassembly tool, start at the cut-out in the groove of the QC collar and push the angled end ofthe tool underneath the locking ring, until it starts to lift away from the groove in the neckring. Then re-insert a new seal or hood as above.Trelleborg <strong>Protective</strong> Products ABJohan Kocksgatan 10, SE-231 81 Trelleborg, SwedenTel: +46 (0)410-510 00, Fax: +46 (0)410-518 50, E-mail: protective@trelleborg.comwww.trelleborg.com/protective | www.trelleborg.com/trellchem | www.trelleborg.com/vikingdivingEdition 100803