Force 5 Door Systems Warranty Inspection Guide ... - Endura Products
Force 5 Door Systems Warranty Inspection Guide ... - Endura Products
Force 5 Door Systems Warranty Inspection Guide ... - Endura Products

You also want an ePaper? Increase the reach of your titles
YUMPU automatically turns print PDFs into web optimized ePapers that Google loves.
<strong>Force</strong> 5 ® <strong>Door</strong> <strong>Systems</strong><strong>Warranty</strong> <strong>Inspection</strong> <strong>Guide</strong>Step-by-Step Manual onProper Procedures, Responsibilities,Root Causes and RemediesRev. Date 6.28.12©<strong>Endura</strong> <strong>Products</strong>, Inc.www.enduraproducts.com800.334.20068817 West Market StreetColfax, NC 27235
Investigating aPotential Issueand Submittinga ClaimPage 1
<strong>Warranty</strong> Claim Form<strong>Endura</strong> RepThis form or an e-mail with the same information, will serve to initiate the claim process.This form can be submitted by the Homeowner/<strong>Warranty</strong> Holder or on behalf of theHomeowner/<strong>Warranty</strong> Holder by the Distributor. Please fax form to <strong>Warranty</strong> Department,<strong>Endura</strong> <strong>Products</strong>, Inc. at 336-668-4478 or e-mail warrantyclaims@enduraproducts.comThis <strong>Force</strong> 5 ® <strong>Door</strong> System <strong>Warranty</strong> Claim Form will serve as written notice to <strong>Endura</strong> <strong>Products</strong>, Inc. of a claim regarding a<strong>Force</strong> 5 system not performing to stated criteria. This form must be received by <strong>Endura</strong> within 30 (thirty) days of the originalcomplaint. Upon receipt of this form, <strong>Endura</strong> will open a claim to investigate the damages listed below and determine cause. Asstated in <strong>Endura</strong>’s <strong>Force</strong> 5 <strong>Warranty</strong>, <strong>Endura</strong> reserves the right to inspect, repair or replace a part or product to meet the needsof its original purpose. <strong>Endura</strong> reserves the right to mitigate any damages arising from this guarantee with the original purchaserof the product to the mutual satisfaction of both parties.Complainant Information<strong>Force</strong> Five <strong>Door</strong> Tag Number:Dates of:Name:Address:Tel:Fax:e-mail:Original Homeowner? Yes NoHome Purchase:Complaint:Reciept of <strong>Warranty</strong>Claim Form/e-mail:Pre-<strong>Inspection</strong>(if applicable):Builder and Pre-Hanger InformationBuilder InformationContact:Company:Address:Pre-Hanger InformationContact:Company:Address:Tel:Fax:Tel:Description of <strong>Warranty</strong>-Related Issue and Associated Damage(attach a photo if available)Page 4Signature:
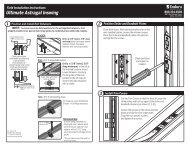
<strong>Inspection</strong> Checklist:A Quick <strong>Guide</strong> for the DistributorDistributorStep 1 Step 2Confirm Utilization of All Required <strong>Force</strong> 5 ComponentsCheck Unit For:123456789Z-Series Sill (Adjustable Inswing or Bumper Outswing)<strong>Force</strong> 5 PE650 Weatherstrip<strong>Force</strong> 5 Simple Solution Corner Pads<strong>Force</strong> 5 <strong>Door</strong> BottomUltimate Astragal, Ultimate Multi-Point,W&F and Hoppe Compatible (French <strong>Door</strong>s)Continuous HeaderContinuous Sill (Mull Units Only)<strong>Endura</strong> Approved Sill Pan<strong>Force</strong> 5 <strong>Door</strong> Top (Outswing Only)1. <strong>Door</strong> Unit Maintenance:Is the door unit maintained per <strong>Force</strong> 5Owners Manual and <strong>Warranty</strong> <strong>Guide</strong>?(Pages 31 - 34)2. Proper Assembly:Is the door unit assembled per<strong>Force</strong> 5 Assembly Instructions?(Pages 35 - 38)3. Proper Installation:Is the unit square, plumb, level, etc. per<strong>Force</strong> 5 Installation Instructions?(Pages 39 - 42)**<strong>Force</strong> 5 <strong>Door</strong> Tag62**954317Shown: French <strong>Door</strong> with 2 Sidelites8Page 5
Distributor Questions for the HomeownerPlease reference and check the following when calling thehomeowner to better understand the door unitconditions that may justify a claim.DistributorQuestion: What is the issue with the door unit?Notes:Light infiltration atthe sealsAir infiltrationWater infiltrationQuestion: When is air infiltration detected?- Time of year (date)- Outside wind present Y N- Outside wind speed (scale of 1 to 7)1 2 3 4 5 6 7(no wind)(straight line)Question: Where is water infiltration detected?Between door jamband panel – sides,bottom corner(s)?Between door silland panel?Under door sill?Back side of jambs?At bottom of mullion?Question: What are exterior weather conditions during water infiltration?Page 6- Wind speed, duration- Rain rate, duration (scale of 1 to 7)1 2 3 4 5 6 7(light drizzle)(sustained downpour)- What direction does the door unit face?N S E W- Is the door unit covered by an overhang or fully exposed?
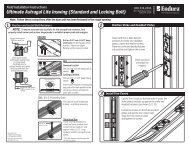
Distributor Questions for the HomeownerPlease reference and check the following when calling thehomeowner to better understand the door unitconditions that may justify a claim.DistributorCRITICAL: This list of questions will help confirm if the homeownerhas maintained the door unit in accordance with <strong>Force</strong> 5 <strong>Door</strong>System Owners Manual and <strong>Warranty</strong> <strong>Guide</strong>Caulking and ResealingThe homeowner is expected to inspect and recaulk once per year as described in the<strong>Force</strong> 5 Owners Manual and <strong>Warranty</strong> <strong>Guide</strong>.Question: Is the door unit caulked and sealed properly?IMPROPERPROPERNotes:Caulking and ResealingProperImproperSee OwnersManual and<strong>Warranty</strong><strong>Guide</strong>Pages 31 - 34Uneven Caulking<strong>Door</strong> Sill AdjustmentThe homeowner is expected to inspect the door sill once per year and adjustas needed, described in the <strong>Force</strong> 5 Owners Manual and <strong>Warranty</strong> <strong>Guide</strong>.Question: Is the door sill cap adjusted properly?IMPROPERPROPERNotes:<strong>Door</strong> Sill Cap AdjustmentProperImproperSill Cap Screws Overtightened<strong>Door</strong> Bottom SealThe homeowner is expected to inspect the door bottom once per year, and replace it ifneeded, as described in the <strong>Force</strong> 5 Owners Manual and <strong>Warranty</strong> <strong>Guide</strong>.Question: Is the door bottom seal worn or damaged?IMPROPERPROPERNotes:<strong>Door</strong> Bottom Seal ConditionGood ConditionWorn or DamagedPage 7
Distributor Questions for the HomeownerPlease reference and check the following when calling thehomeowner to better understand the door unitconditions that may justify a claim.DistributorWeatherstrip ConditionThe homeowner is expected to inspect the weatherstrip once per year as described inthe <strong>Force</strong> 5 Owners Manual and <strong>Warranty</strong> <strong>Guide</strong>.Question: Is the weatherstrip positioned improperly, worn or damaged?See OwnersManual and<strong>Warranty</strong><strong>Guide</strong>Pages 31 - 34IMPROPERPROPERNotes:Weatherstrip Conditionand PositionGood Position/ConditionWorn or DamagedWeatherstrip Kerf Not Inserted CorrectlyIMPROPERPROPERWeatherstrip Too Long and Bunched UpSimple Solution ® Corner Pad ConditionThe homeowner is expected to inspect the Simple Solution Corner Pad once per year asdescribed in the <strong>Force</strong> 5 Owners Manual and <strong>Warranty</strong> <strong>Guide</strong>.Question: Is the Simple Solution Pad positioned improperly,worn or damaged?IMPROPER POSITIONPROPER POSITIONNotes:Simple Solution Corner PadCondition and PositionGood ConditionWorn and DamagedPage 8Simple Solution Pad Not Seatedon Sill
Distributor Questions for the HomeownerPlease reference and check the following when calling thehomeowner to better understand the door unitconditions that may justify a claim.DistributorAstragal #1The homeowner is expected to inspect the astragal margins once per year as describedin the <strong>Force</strong> 5 Owners Manual and <strong>Warranty</strong> <strong>Guide</strong>.Question: Is the margin between the closed doors less than 1/8”evenly along the top, middle and bottom?IMPROPERPROPERNotes:See OwnersManual and<strong>Warranty</strong><strong>Guide</strong>Pages 31 - 34Astragal MarginsProperImproperImproper Margin BetweenClosed <strong>Door</strong>sAstragal #2The homeowner is expected to inspect the astragal operating parts once per year asdescribed in the <strong>Force</strong> 5 Owners Manual and <strong>Warranty</strong> <strong>Guide</strong>.Question: Are astragal header and sill flush bolt receiversinstalled (drilled to 1-3/8” deep) and operating properly?IMPROPERPROPERNotes:Astragal Sill andHeader Flush BoltsFunctioning ProperlyFunctioning ImproperlyHeader Flushbolt Not SeatingProperlyIMPROPERPROPERSill Flushbolt Not Seating ProperlyPage 9
Distributor Questions for the HomeownerPlease reference and check the following when calling thehomeowner to better understand the door unitconditions that may justify a claim.DistributorAstragal #3The homeowner is expected to inspect the astragal weatherstrip compression with the activedoor once per year as described in the <strong>Force</strong> 5 Owners Manual and <strong>Warranty</strong> <strong>Guide</strong>.Question: Is there continuous contact of the astragal’s weatherstripwith the active door when its closed?See OwnersManual and<strong>Warranty</strong><strong>Guide</strong>Pages 31 - 34IMPROPERPROPERNotes:Astragal WeatherstripCompressionProperImproperExterior Frame/Hardware Adjustments #1The homeowner is expected to inspect the contact between the door panel weatherstriponce per year as described in the <strong>Force</strong> 5 Owners Manual and <strong>Warranty</strong> <strong>Guide</strong>.Question: Is there proper and tight contact between thedoor panel and the weatherstrip?IMPROPERPROPERNotes:Contact Between <strong>Door</strong> Paneland WeatherstripProperImproperPage 10
Distributor Questions for the HomeownerPlease reference and check the following when calling thehomeowner to better understand the door unitconditions that may justify a claim.DistributorExterior Frame/Hardware Adjustments #2The homeowner is expected to inspect if the door panel is level once per year asdescribed in the <strong>Force</strong> 5 Owners Manual and <strong>Warranty</strong> <strong>Guide</strong>.Question: Is the door panel sagging in the frame or are themargins inconsistent?See OwnersManual and<strong>Warranty</strong><strong>Guide</strong>Pages 31 - 34IMPROPERPROPERNotes:<strong>Door</strong> Panel Level?YesSagging or InconsistentFlashing/WeatherproofingThe homeowner is expected to inspect the flashing/weatherproofing once per yearas described in the <strong>Force</strong> 5 Owners Manual and <strong>Warranty</strong> <strong>Guide</strong>.Question: Is the flashing properly installed and maintained?IMPROPERPROPERNotes:Flashing/WeatherproofingProperImproperDamageBeneathSill and NoSill PanPage 11
Troubleshootingand RemediesPage 12
Troubleshooting <strong>Guide</strong>:Issues of ConcernOn-Site Inspector(Distributor/Dealer/Builder)101718451531312197 8 96141112Issues of Concern161Water/Air Leak Under Sill (Page 14)10Water/Air at Top of Astragal (Page 20)2Water/Air Between Sill and Jamb or Mull (Page 15)11Water/Air at Bottom of Astragal (Page 20-22)3Water/Air Around Back Face of Jamb (Page 15)12Water/Air Through Lockset (Page 22)4Water/Air Between Glass and Panel (Page 15)13Water/Air Between Fixed Panel and Frame (Page 22)5Water/Air Over Hinged Panel Top Edge (Page 16)14Water/Air Under Fixed Panel (Page 22)67Water/Air Between <strong>Door</strong> Bottom Sweep & Panel (Pg 16)(Inswing Units Only)Water/Air Over Sill - At Middle (Page 17)(Inswing Units Only)151617Water/Air Between Panel Face and Weatherstrip (Page 23-24)Water/Air Through/Over Sill Pan (Page 24)Astragal Bolts Will Not Engage (Page 25)8Water/Air Over Sill - At Bottom Corners (Page 17-19)18Astragal Bolts Difficult to Slide (Page 26)9(Inswing Units Only)Water/Air Over Sill - At Corners or Along Length (Pg 19)19<strong>Door</strong> Will Not Close/Hard to Close/Hits Frame or Sill (Page 26)(Outswing Units Only)Page 13
Troubleshooting <strong>Guide</strong>:Corrective ActionsOn-Site Inspector(Distributor/Dealer/Builder)Problem Cause SolutionWATER/AIR LEAKUNDERNEATH SILLNo/improper caulkingbetween sill bottomand subfloor.Seal exterior joints under bottom ofsill with high quality exterior gradecaulk (100% silicone or siliconizedacrylic, polyurethane, or polymerbased.)NotCaulked orImproperCaulkingSubfloor is uneven.Remove door unit to allow rework ofsubfloor to flat and level condition,reinstall per <strong>Force</strong> 5 InstallationInstructions. (Page 42, Step 9)Sill bolt cup missing onFrench unit.If subfloor has low spots, shim sillat low spots to a level position. Sealexterior joints under bottom of sillwith high quality exterior grade caulk(100% silicone or siliconized acrylic,polyurethane, or polymer based.)If subfloor has high spots, removedoor unit anchoring fasteners, shimunder frame and sill at low spotsto a level position. Re-attach sill torough opening. Seal exterior jointsunder bottom of sill with high qualityexterior grade caulk (100% siliconeor siliconized acrylic, polyurethane,or polymer based.)Install sill cup per <strong>Endura</strong> UltimateAstragal Field InstallationInstructions.Sill extender joint not/improperly caulked.Seal entire joint per <strong>Force</strong> 5Installation Instructions.(Page 42, Step 9)NotCaulked orImproperCaulkingPage 14
Troubleshooting <strong>Guide</strong>:Corrective ActionsOn-Site Inspector(Distributor/Dealer/Builder)Problem Cause SolutionWATER/AIR BETWEENSILL AND JAMB OR MULLJoints where sill meetsjambs or mulls not/improperly caulked.Seal joints with high qualityexterior grade caulk (100% siliconeor siliconized acrylic, polyurethane,or polymer based) – Refer to <strong>Force</strong> 5Installation Instructions. (Pg. 42, Step 9)CaulkNotCaulked orImproperCaulkingGaskets (sill or mull)damaged or improperlypositioned.Seal joints with high quality exteriorgrade caulk (100% silicone orsiliconized acrylic, polyurethane,or polymer based.)Sill or MullGasketDamagedor Out ofPositionWATER/AIR AROUNDBACK FACE OF JAMB<strong>Door</strong> unit improperlyflashed or sealed tosheathing.ImproperFlashingRe-flash and re-seal door unitperimeter to rough opening andsiding. If necessary, remove sidingand /or door unit to ensure this isproperly done. Ensure headflashing is properly used.WATER/AIR BETWEENGLASS AND PANELGlass frame exteriorside gasket missing,damaged.Caulk perimeter of glass frame whereit meets the panel face and glasswith high quality exterior grade caulk(100% silicone or siliconized acrylic,polyurethane, or polymer based).Glass GasketMissing orDamagedIf flush glazing, replace door panel.If insert glazing, replace glassassembly.Insert glass lite loosein panel cut out.LooseRemove interior side screw holecovers, tighten glass lite framescrews, reinstall hole covers. Caulkperimeter of glass frame where itmeets the panel face and glass withhigh quality exterior grade caulk(100% silicone or siliconized acrylic,polyurethane, or polymer based).Page 15
Troubleshooting <strong>Guide</strong>:Corrective ActionsOn-Site Inspector(Distributor/Dealer/Builder)Problem Cause SolutionWATER/AIR OVER HINGEDPANEL TOP EDGE<strong>Door</strong> panel notcontacting headerweatherstripsufficiently orevenly.Ensure all hinge screws are tight.If short screws are stripped out,replace with longer screws. Ensurelong screws run into rough openingframe (refer to <strong>Force</strong> 5 InstallationInstructions.) (Page 42, Step 4)Header<strong>Door</strong>PanelReplace door panel.Remove existing door unit anchoringfasteners, square door unit, shim andre-anchor to ensure proper marginsand consistent weatherstripcompression. (Refer to <strong>Force</strong> 5Installation Instructions.) (Pages 39-42)Outswing Units Only -<strong>Door</strong> top seal missing,damaged.Replace door top seal per <strong>Force</strong> 5Assembly Instructions. (Page 37,Step 6)<strong>Door</strong> TopSeal Missingor DamagedWATER/AIR BETWEEN DOORBOTTOM SWEEP AND PANEL(Inswing Units Only)Joint between top ofsweep and bottom ofpanel not/improperlycaulked.Remove door bottom sweep frompanel. Reinstall per <strong>Force</strong> 5Assembly Instructions. (Page 37, Step6) Use new sweep if existing one isdamaged during removal.NotCaulked orImproperCaulkingLeak through glassdown inside panel, outbottom of door skin.Caulk perimeter of glass frame whereit meets the panel face and glasswith high quality exterior grade caulk(100% silicone or siliconized acrylic,polyurethane, or polymer based).If flush glazing, replace door panel. Ifinsert glazing, replace glass assembly.Page 16
Troubleshooting <strong>Guide</strong>:Corrective ActionsOn-Site Inspector(Distributor/Dealer/Builder)Problem Cause SolutionWATER/AIR OVER SILL –AT MIDDLE(Inswing Units Only)<strong>Door</strong> sweep isdamaged.Install new door sweep per <strong>Force</strong> 5Assembly Instructions. (Pg. 37, Step 6)7Damaged<strong>Door</strong> sweep margin istoo large.Adjust sill cap upwards to ensureproper and even sweep compression.(Target spacing is 7/16”)7/16”Subfloor uneven, silldipped down alonglength.Adjust sill cap upwards to ensureproper and even sweep compression.(Target spacing is 7/16”)7/16”Remove door unit to allow reworkof subfloor to flat and level condition,reinstall per <strong>Force</strong> 5 InstallationInstructions. (Pages 39-44)WATER/AIR OVER SILL –AT BOTTOM CORNERS(Inswing Units Only)Simple Solution Cornerpad damaged ormissing.Install new, properly positioned pads.(Refer to <strong>Force</strong> 5 InstallationInstructions.) (Page 41, Step 8)Corner PadSimple SolutionPad damagedor missing8Simple Solution Cornerpad improperlypositioned.Remove existing pad(s). Install new,properly positioned pads. (Refer to<strong>Force</strong> 5 Installation Instructions.)(Page 41, Step 8)Corner PadPage 17
Troubleshooting <strong>Guide</strong>:Corrective ActionsOn-Site Inspector(Distributor/Dealer/Builder)Problem Cause SolutionWATER/AIR OVER SILL –AT BOTTOM CORNERS(Inswing Units Only)(Continued)Simple Solution CornerPad leg not underweatherstrip.Tuck leg under frame weatherstrip.(Refer to <strong>Force</strong> 5 InstallationInstructions) (Page 41, Step 8)Sill cap length shorterthan active panelopening.Remove existing sill cap. Replacesill cap per <strong>Endura</strong> Adjustable CapReplacement Instructions.Joint between sill capand jamb not caulked.Remove existing pad(s). Caulk sill cap/frame joint, then install new pads per<strong>Force</strong> 5 Installation Instructions.(Page 41, Step 8)NotCaulkedWeatherstrip positionincorrect – too low, toohigh.Remove existing weatherstrip.Replace with correct lengthweatherstrip per <strong>Force</strong> 5 AssemblyInstructions. (Page 36, Step 4)ReplaceWeatherstripFrame weatherstripwrinkled, damaged.WeatherstripToo Lowor TooHighWeatherstripWrinkledorDamagedRemove existing weatherstrip.Replace with new weatherstrip per<strong>Force</strong> 5 Assembly Instructions.(Page 36, Step 4)ReplaceWeatherstrip<strong>Door</strong> bottom sweep notflush with panel edge –offset inward or outward.Remove door bottom sweep frompanel. Reinstall per <strong>Force</strong> 5Assembly Instructions. (Page 37,Step 6) Use new sweep if existingone is damaged during removal.Page 18
Troubleshooting <strong>Guide</strong>:Corrective ActionsOn-Site Inspector(Distributor/Dealer/Builder)Problem Cause SolutionWATER/AIR OVER SILL –AT BOTTOM CORNERS(Inswing Units Only)(Continued)<strong>Door</strong> panel does notfully contact SimpleSolution Corner Pad.Ensure all hinge screws are tight. Ifshort screws are stripped out, replacewith longer screws. Ensure long screwsrun into rough opening frame (refer to<strong>Force</strong> 5 Installation Instructions.)(Page 41, Step 4)Replace door panel.Remove existing door unit anchoringfasteners, square door unit, shimand re-anchor to ensure propermargins and consistent contact andcompression. (Refer to <strong>Force</strong> 5Installation Instructions.) (Pages 39-42)WATER/AIR OVER SILL –AT CORNERS OR ALONGLENGTH(Outswing Units Only)<strong>Door</strong> panel notcontacting sillweatherstripsufficiently or evenly.Ensure all hinge screws are tight.If short screws are stripped out,replace with longer screws. Ensurelong screws run into rough openingframe (refer to <strong>Force</strong> 5 InstallationInstructions.) (Pages 39-42)Replace door panel.Remove existing door unit anchoringfasteners, square door unit, shim andre-anchor to ensure proper marginsand consistent contact andcompression. (Refer to <strong>Force</strong> 5Installation Instructions.) (Pages 39-42)Page 19
Troubleshooting <strong>Guide</strong>:Corrective ActionsOn-Site Inspector(Distributor/Dealer/Builder)Problem Cause SolutionWATER/AIR AT TOP OFASTRAGALFinned trim capmissing or damaged.Replace finned trim cap withnew cap.AstragalTrimCap Missingor DamagedReplaceAstragalTrimCapHeader weatherstripnot/improperly slit atfinned trim cap edge.Slit weatherstrip per <strong>Endura</strong>Ultimate Astragal Field InstallationInstructions.WATER/AIR AT BOTTOMOF ASTRAGALSill hole too shallow forbottom bolt pin – Shortcup in sill.Remove short cup. Drill sill andinstall cup per Ultimate AstragalField Installation Instructions.Sill hole too shallow forbottom bolt pin – Nocup in hole.Drill sill and install cup per <strong>Endura</strong>Ultimate Astragal Field InstallationInstructions.Sill hole out of position– Active door weatherstrip compressioninsufficient.Remove existing sill cup and sillcap. Replace sill cap per <strong>Endura</strong>Adjustable Cap ReplacementInstructions. Drill sill and installcup per Ultimate Astragal FieldInstallation Instructions.Page 20
Troubleshooting <strong>Guide</strong>:Corrective ActionsOn-Site Inspector(Distributor/Dealer/Builder)Problem Cause SolutionWATER/AIR AT BOTTOMOF ASTRAGAL(Continued)Bottom or back blackpad(s) missing/improperly positioned/damaged.Remove existing pad(s). Install new,properly positioned pads.BottomBlack PadMissing orDamagedSimple Solution Cornerpad damaged ormissingInstall new, properly positionedpads. (Refer to <strong>Force</strong> 5 InstallationInstructions) (Page 41, Step 8)Corner PadSimple SolutionPad damagedor missingSimple Solution Cornerpad improperly positionedor damagedRemove existing pad(s). Install new,properly positioned pads. (Refer to<strong>Force</strong> 5 Installation Instructions)(Page 41, Step 8)Corner PadSimple SolutionPad improperlypositionedor damagedSimple SolutionCorner Pad leg notunder weatherstripTuck leg under frame weatherstrip.(Refer to <strong>Force</strong> 5 InstallationInstructions) (Page 41, Step 8)Weatherstrip positionincorrect – too low, toohighRemove existing weatherstrip.Replace with correct lengthweatherstrip.ReplaceWithCorrectLengthWeatherstipWeatherstipPositionIncorrectPage 21
Troubleshooting <strong>Guide</strong>:Corrective ActionsOn-Site Inspector(Distributor/Dealer/Builder)Problem Cause SolutionWATER/AIR AT BOTTOMOF ASTRAGALWeatherstrip wrinkled,damagedRemove existing weatherstrip.Replace with new weatherstrip.(Continued)ReplaceWithCorrectLengthWeatherstipWeatherstipDamagedOutswing Only –Bottom Finned trim capmissing or damagedReplace finned trim cap withnew capAstragalTrimCap Missingor DamagedReplaceAstragalTrimCapWATER/AIR THROUGHLOCKSETEscutcheon plateperimeter not properlysealedCaulk perimeter of exterior platewith high quality exterior grade caulk(100% silicone or siliconized acrylic,polyurethane, or polymer based)NotProperlySealedWATER/AIR BETWEEN FIXEDPANEL AND FRAMEJoint not properlycaulkedImproperCaulkingCaulk exterior perimeter of fixed panelat head, jamb and mull with highquality exterior grade caulk (100%silicone or siliconized acrylic,polyurethane, or polymer based)CaulkExteriorWATER/AIR UNDER FIXEDPANELJoint not properlycaulkedCaulk exterior joint of fixed panelat sidelite seat with high qualityexterior grade caulk (100% siliconeor siliconized acrylic, polyurethane,or polymer based)Caulkat SideliteSeatImproperCaulkingPage 22
Troubleshooting <strong>Guide</strong>:Corrective ActionsOn-Site Inspector(Distributor/Dealer/Builder)Problem Cause SolutionWATER/AIR BETWEEN PANELFACE AND WEATHERSTRIP<strong>Door</strong> panel notcontacting jamb, heador mull weatherstripsufficiently or evenlyEnsure all hinge screws are tight. Ifshort screws are stripped out, replacewith longer screws. Ensure longscrews run into rough opening frame(refer to <strong>Force</strong> 5 InstallationInstructions) (Page 41, Step 4)Replace door panelRemove existing door unitanchoring fasteners, door unit,shim and re-anchor to ensure propermargins and consistent contact andcompression. (Refer to <strong>Force</strong> 5Installation Instructions) (Pages 39-42)Strike plate not setfor proper panelcompression onweatherstripAdjust or reset strike plate closerto closed position to increasecompression of weatherstrip whendoor panel is latched closed.Weatherstrip wrinkled,damagedRemove existing weatherstrip.Replace with new weatherstrip.WeatherstrippingJambWeatherstrip paintedRemove existing weatherstrip.Replace with new weatherstrip.WeatherstrippingJambPage 23
Troubleshooting <strong>Guide</strong>:Corrective ActionsOn-Site Inspector(Distributor/Dealer/Builder)Problem Cause SolutionWATER/AIR BETWEEN PANELFACE AND WEATHERSTRIP(Continued)<strong>Door</strong> panel is warpedReplace door panelWATER/AIR THROUGH/OVER SILL PANSill pan end caps,coupler not properlysealed to channel plateNot ProperlyCaulkedRemove existing door unit. Removeexisting sill pan. Replace Sill Pan per<strong>Endura</strong> Approved Sill Pan Instructions.Re-install door unit per <strong>Force</strong> 5Installation Instructions. (Pages 39-42)Rough opening flashingnot shingle lapped overend capsRemove existing door unit. Removeexisting sill pan. Replace Sill Pan per<strong>Endura</strong> Approved Sill Pan Instructions.Re-install door unit per <strong>Force</strong> 5Installation Instructions. (Pages 39-42)Hole through sill pandue to sill anchoringfastener or damageHole ThroughSill PanRemove existing door unit. Removeexisting Sill Pan. Replace sill pan per<strong>Endura</strong> Approved Sill Pan Instructions.Re-install door unit per <strong>Force</strong> 5Installation Instructions. (Pages 39-42)Gap between sill panand sill nosing notcaulkedCaulk gap per <strong>Endura</strong> Approved SillPan Instructions.Not ProperlyCaulked BetweenSill Pan and SillNosingCaulk BetweenSill Pan and SillNosingPage 24
Troubleshooting <strong>Guide</strong>:Corrective ActionsOn-Site Inspector(Distributor/Dealer/Builder)Problem Cause SolutionASTRAGAL BOLTS WILL NOTENGAGEHeader hole/plate outof positionRemove existing header plate.Confirm correct hole location and drillper <strong>Endura</strong> Ultimate Astragal FieldInstallation Instructions. Reattachheader plate.Header hole – tooshallowRe-drill existing hole 1-3/8” deep.Hole tooShallowRe-Drill1-3/8”DeepSill hole too shallow forbottom bolt pin – Shortcup in sillRemove short cup. Drill sill and installcup per Ultimate Astragal FieldInstallation Instructions.Re-Drill andInstallSill CupSill HoleTooShallowSill hole too shallowfor bottom bolt pin –No cup in holeNo Sill CupInHoleDrill sill and install cup per UltimateAstragal Field InstallationInstructions.Re-Drill andInstallSill CupSill hole out of position– Active door weatherstrip compressioninsufficientRemove existing sill cup and sill cap.Replace sill cap per <strong>Endura</strong> AdjustableCap Replacement Instructions.Drill sill and install cup per UltimateAstragal Field InstallationInstructions.Re-Drill andInstallSill CupPage 25
Troubleshooting <strong>Guide</strong>:Corrective ActionsOn-Site Inspector(Distributor/Dealer/Builder)Problem Cause SolutionASTRAGAL BOLTS DIFFICULTTO SLIDEAstragal body channeldamagedRemove bolt assembly. Repairastragal body if possible. If unable torepair, replace astragal. Attach per<strong>Endura</strong> Ultimate Astragal Pre-HangerInstallation Instructions.AstragalBodyChannelDamagedRemoveBoltAssemblyBolt body damagedRemove bolt assembly. Repair boltassembly if possible. If unable torepair, replace astragal.BoltBodyDamagedRemoveBoltAssemblyDOOR WILL NOT CLOSE/HARD TO CLOSE/HITS FRAMEOR SILL<strong>Door</strong> unit rackedEnsure all hinge screws are tight.If short screws are stripped out,replace with longer screws. Ensurelong screws run into rough openingframe (refer to <strong>Force</strong> 5 InstallationInstructions) (Page 41, Step 4)Subfloor is unevenRemove existing door unit anchoringfasteners, square door unit, shimand re-anchor to ensure propermargins and consistent contact andcompression. (Refer to <strong>Force</strong> 5Installation Instructions) (Pages 39-42)Remove door unit to allow rework ofsubfloor to flat and level condition,reinstall per <strong>Force</strong> 5 InstallationInstructions. (Pages 39-42)Hinge edge of doorcontacting frame face(hinge bind)Hinge edgecontactingframe faceRemove screws holding hinge leaf toframe – one hinge at a time. Placeshim between hinge leaf and framepocket. Reattach screws. Resultingmargin on hinge side should be 1/16”.Margin on latch side should be 1/8”.Check hinge jamb or mull forstraightness with a 6’ long level.Move areas too close to panel edgeby drilling a pilot hole underneaththe weatherstrip, then running a longscrew into the rough opening or fixedpanel.Page 26
Job Site <strong>Inspection</strong> Check List (pg. 1 of 3)IMPORTANT: This checklist must be filled out completely and sent to the<strong>Endura</strong> Rep to verify a claim.Distributorand RepDate:Installed Site InformationInspecting Party InformationAddressCompanyNameCityPhone #StateZip CodeCompanyNamePhone #Homeowner NameBuilder NameDistributor NameLocationPhotosPhotos of site, door unit, andproblem details sent towarrantyclaims@enduraproducts.comYesNoPre-Hanger NameLocationConfirm <strong>Force</strong> 5 ComponentsZ-Series Sill (Adjustable Inswing or Bumper OS)YesNo<strong>Door</strong> Unit Description<strong>Force</strong> Five PE650 Weatherstrip<strong>Force</strong> 5 <strong>Door</strong> Tag No.<strong>Force</strong> Five Simple Solution Corner PadConfiguration(Circle one)Size (w x h)Swing DirectionSill Pan Used<strong>Force</strong> Five <strong>Door</strong> BottomUltimate Astragal, Ultimate Multi-Point, W&Fand Hoppe CompatibleContinuous HeaderContinuous SillSill Pan TypeFrameSaver FramesMP Lock UsedMP Lock Type<strong>Door</strong> Top (Outswing Only)<strong>Door</strong> Unit FlashingIs door unit properly flashed?Overhang Present?Width __________ Length __________YesYesNoNo<strong>Door</strong> Panel: Brand ____________ Model _____________Issue DescriptionWeather Conditions During ProblemIssue If Water Leak - Observed Path and LocationPage 27
Job Site <strong>Inspection</strong> Check List (cont. pg. 2 of 3)IMPORTANT: This checklist must be filled out completely and sent to the<strong>Endura</strong> Rep to verify a claim.Distributorand Rep<strong>Inspection</strong> Details<strong>Door</strong> Unit Margins (Squareness)Hinge Side (Target = 1/16”) ActualTop Side (Target = 1/8”) ActualStrike Side (Target = 1/8”) Actual<strong>Door</strong> Unit PlumbTop In or OutAmountPanel Flush With Jamb Thin EdgeYesNoHinge JambWeatherstrip Compression EvenStrike JambStrike Latch Properly AdjustedMullionWeatherstripProper Position (no gaps/folds)Strike JambYesNoCommentsCorner Pads (Inswing Only)Proper Position (flush with cap,leg behind weatherstrip)YesNoCommentsDamage/Tears<strong>Door</strong> Bottom Sweep (Inswing Only)<strong>Door</strong> Bottom Position (ends areflush with door panel)YesNoCommentsDamage/TearsProper Compression with Sill Cap<strong>Door</strong> Top Present (Outswing Only)Proper Seal Position (centered on thepanel with no visible voids to theweatherstrip)YesNoCommentsDamage/TearsAstragal Bolt Pad (Inswing Only)Proper Position (flush with cap,leg behind weatherstrip)YesNoCommentsDamage/TearsLight Through BottomSill Hole Drilled 1-3/8” DeepPage 28
Job Site <strong>Inspection</strong> Check List (cont. pg. 3 of 3)IMPORTANT: This checklist must be filled out completely and sent to the<strong>Endura</strong> Rep to verify a claim.Distributorand Rep<strong>Inspection</strong> Details (Continued)Caulking at JointsTrim/JambYesNoCommentsSill/JambSill/MullSidelite/Jamb-MullSill Extender JointTop of Cap/Jamb<strong>Door</strong> Bottom Sweep/PanelBetween Sill and SubfloorBetween Sill Pan and SubfloorHinge ScrewsLong Screws in Each HingeYesNoCommentsInto Rough FrameDrip EdgeOver the TrimYesNoCommentsProper LengthOther Comments or ObservationsSignaturePage 29
ReferenceMaterialsPage 30
Owners Manualand <strong>Warranty</strong> <strong>Guide</strong>Page 31
Page 32Owners Manualand <strong>Warranty</strong> <strong>Guide</strong>
Owners Manualand <strong>Warranty</strong> <strong>Guide</strong>Page 33
Page 34Owners Manualand <strong>Warranty</strong> <strong>Guide</strong>
AssemblyInstructionsPage 35
Page 36AssemblyInstructions
AssemblyInstructionsPage 37
Page 38AssemblyInstructions
InstallationInstructionsPage 39
Page 40InstallationInstructions
InstallationInstructionsPage 41
Page 42InstallationInstructions
<strong>Force</strong> 5 <strong>Door</strong> SystemLimited <strong>Warranty</strong>Page 43
<strong>Force</strong> Five ® <strong>Door</strong> System Limited <strong>Warranty</strong>This FORCE 5 WARRANTY (“<strong>Warranty</strong>”), extended by <strong>Endura</strong> <strong>Products</strong>, Inc. (“<strong>Endura</strong>”), provides that, subject to the limitations and exclusions below, andfor the duration of the applicable <strong>Warranty</strong> Period (i) the <strong>Endura</strong> Components contained therein (and as detailed in Section 1 below) will be free from nonconformitiesin materials and workmanship and (ii) provides for additional payment by <strong>Endura</strong> of up to a maximum of $1,500 reimbursement if the <strong>Force</strong> 5door system fails to perform (on the basis of water infiltration) to the certified performance criteria of that system. This <strong>Warranty</strong> applies to <strong>Force</strong> 5 certified<strong>Door</strong> <strong>Systems</strong> purchased and installed on or after December 1, 2010.1. Components Incorporated in <strong>Force</strong> 5 System this <strong>Warranty</strong> Covers: Each <strong>Door</strong> System covered under the <strong>Force</strong> 5 <strong>Warranty</strong> shall incorporate <strong>Endura</strong>approved and supplied components matching the specifications and dimensions utilized in tested and certified assemblies on which the <strong>Door</strong> Systemrating is based. Any change in or substitution of components specified below will void the <strong>Force</strong> 5 <strong>Warranty</strong> on the <strong>Door</strong> System. Specific componentssupplied by <strong>Endura</strong>, utilized in <strong>Force</strong> 5 Certified Testing, and applicable to the use and warranty of the <strong>Force</strong> 5 <strong>Door</strong> <strong>Systems</strong> include:• Composite Z Series High Dam ( 1 3/8”) Adjustable Inswing <strong>Door</strong> Sill or Composite Z Series High Dam Bumper Outswing Sill;• Simple Solution Corner Pads, properly installed;• <strong>Force</strong> 5 PE650 or other <strong>Endura</strong> tested and approved <strong>Force</strong> 5 Weatherstrip;• <strong>Endura</strong> <strong>Force</strong> 5 Dual bulb door bottom applicable to door construction/type and <strong>Force</strong> 5 Outswing <strong>Door</strong> Top (outswing only);• <strong>Endura</strong> Ultimate, Ultimate 3 Point Compatible or Multipoint Astragal on double door (French) systems;• Frame components (excluding side frames) for continuous sidelite, hinged patio and additional multiple panel configurations;• <strong>Endura</strong> multipoint lock system or other certified tested and approved multi-point lock system (optional);• <strong>Endura</strong> sill pan installed in accordance with published <strong>Force</strong> 5 instructions (optional)<strong>Endura</strong> reserves the right to, and will from time to time, modify, make improvements to, substitute for or otherwise add components to <strong>Force</strong> 5 requirementsbased upon improvements in product and/or <strong>Force</strong> 5 <strong>Door</strong> System performance. Except as provided by <strong>Endura</strong>, wood components, including but not limited todoor frames, mull posts, brick mould and mull casing are not covered by this <strong>Warranty</strong>. Other <strong>Door</strong> System components, including but not limited to door slabs(and any applied or inserted panels), hinges, glass lites, wood grilles or other hardware are not covered by this <strong>Warranty</strong>.2. <strong>Force</strong> 5 <strong>Warranty</strong> Period: Lifetime non-transferable <strong>Warranty</strong>, applicable to the original homeowner, from the date the <strong>Force</strong> 5 <strong>Door</strong> System waspurchased from an authorized dealer, except in commercial or multi-unit residential applications in which the <strong>Warranty</strong> shall be limited to 5 years fromthe date the <strong>Force</strong> 5 <strong>Door</strong> System was purchased from an authorized dealer and which shall be transferable during and for any balance of the original5 year period.3. <strong>Force</strong> 5 Unit Identification: Each <strong>Force</strong> 5 <strong>Door</strong> System is identified by a non-removable tag. Removal of the <strong>Force</strong> 5 <strong>Door</strong> Tag by any third party installeror residential owner will void the <strong>Force</strong> 5 <strong>Warranty</strong> on the individual <strong>Door</strong> unit.4. <strong>Force</strong> 5 <strong>Warranty</strong> Reimbursement: If the <strong>Force</strong> 5 <strong>Door</strong> System (a) includes all of the applicable components referenced above, (b) has been properlyassembled and installed following recommended <strong>Force</strong> 5 procedures, (c) has not been subjected to changes in rough opening dimensions and stability(i.e. plumb and square) and (d) has been properly maintained by the <strong>Warranty</strong> Holder, and (e) the product (or components) fail to perform to the certifiedand published levels of air and water infiltration applicable to the <strong>Door</strong> System during the <strong>Warranty</strong> Period solely due to non-comformities in the productas warranted, and (f) <strong>Endura</strong> is notified using <strong>Force</strong> 5 <strong>Warranty</strong> Claims Procedures, then <strong>Endura</strong> will:(i) Provide a factory-authorized repair or replacement component, at no cost to the <strong>Warranty</strong> Holder OR at <strong>Endura</strong>’s option, provide replacementcomponent(s) to the <strong>Warranty</strong> Holder or <strong>Endura</strong>’s designated dealer (assembly and installation labor is not included), OR at <strong>Endura</strong>’s option, refundthe <strong>Warranty</strong> Holder’s purchase price (the lesser of the original component purchase price or the original catalogue price), in lieu of repairing orreplacing the components as provided; AND(ii) Pay to <strong>Warranty</strong> Holder either, selected at <strong>Endura</strong>’s option, (a) the fair market value of any other property damaged due to water infiltration causedsolely as a result of such nonconforming component or <strong>Force</strong> 5 <strong>Door</strong> System; or (b) <strong>Warranty</strong> Holder’s actual reasonable costs to repair or replacesuch damaged property or install replacement component(s) supplied by <strong>Endura</strong> as provided above, in either case, up to the maximum amount listedbelow for the specified <strong>Force</strong> 5 <strong>Door</strong> System. <strong>Warranty</strong> Holder must have taken reasonable steps in a timely manner to mitigate any resultingproperty damage, provide evidence of costs or damages incurred as requested by <strong>Endura</strong>, and submit a claim within 30 days as provided below. If thefair market value of any damaged property is unclear, <strong>Endura</strong> may engage a third party inspector or appraiser for assistance.Page 44(a)(b)(c)(d)(e)(continued)$ Amount represents maximum limit on <strong>Force</strong> 5 <strong>Warranty</strong> Claims for <strong>Door</strong> units/components Referenced;Must be a SureSill sill pan or sill pan approved by <strong>Endura</strong> and installed following <strong>Force</strong> 5 procedures;Must be a 3 Point Lock system tested by <strong>Endura</strong> with such door panel and approved by <strong>Endura</strong>;Multiple panel units include French <strong>Door</strong>, Continuous Sidelite and Hinged Patio doors;If the <strong>Force</strong> 5 <strong>Door</strong> System is assembled by a third party NAMI certified distributor/dealer and bears theoriginal NAMI certified assembly label (check door-hinge edge),the Product is a “NAMI Certified Assembly”.
<strong>Force</strong> Five ® <strong>Door</strong> System Limited <strong>Warranty</strong>(Continued)5. <strong>Warranty</strong> Exclusions: The <strong>Force</strong> 5 <strong>Warranty</strong> does not cover the following:(i) FAILURE OF THE FORCE 5 DOOR SYSTEM DUE TO CHANGES TO OR USE OF COMPONENTS WHICH DO NOT ADHERE TO THESPECIFICATIONS PROVIDED TO SUCH THIRD PARTIES BY ENDURA and which have not been utilized in certified <strong>Force</strong> 5 testing forsuch door system;(ii) FAILURE OF THE FORCE 5 DOOR SYSTEM DUE TO USE OF COMPONENTS WHICH ARE NOT GENUINE ENDURA COMPONENTS(as outlined in Section 1 above) and which have not been utilized in certified <strong>Force</strong> 5 testing for such door system;(iii) FAILURE OF THE FORCE 5 DOOR SYSTEM DUE TO IMPROPER ASSEMBLY BY THIRD PARTIES, inconsistent with recommendations andwritten instructions provided by <strong>Endura</strong> or generally available in <strong>Endura</strong>’s Product Manuals as amended time to time by bulletins or otherwritten communications on <strong>Endura</strong>’s website www.enduraproducts.com; this includes failure in performance of the <strong>Force</strong> 5 <strong>Door</strong> Unit dueto separation of the frame and sill components.(iv) FAILURE OF THE FORCE 5 DOOR SYSTEM DUE TO IMPROPER INSTALLATION BY A BUIILDER, REMODELER OR OTHER PERSON ORENTITY THAT INSTALLS, OR HANDLES THE PRODUCT OTHER THAN ENDURA PRODUCTS, INC., inconsistent with recommendations andwritten instructions provided by <strong>Endura</strong> or generally available in <strong>Endura</strong>’s Product Manuals as amended time to time by bulletins or otherwritten communications on <strong>Endura</strong>’s website www.enduraproducts.com;(v) Failure of the <strong>Force</strong> 5 <strong>Door</strong> System due to uses or exposure to conditions for which its use and <strong>Warranty</strong> was not intended, such conditionsto expressly include failure due to mechanically or other non-weather related driven water, utilization of inswing door units and componentsfor outswing applications, further machining of or on the door panel, frame components after pre-hanging, or any other modifications oruses not specified in the <strong>Force</strong> 5 prehanging or installation instructions;(vi) Failure of the <strong>Force</strong> 5 <strong>Door</strong> System due to failure of non-<strong>Endura</strong> supplied components (i.e. door glass assembly, door panel orhardware failure);(vii) Rotting, splitting, warping or swelling of a frame system, unless the frame system is a genuine FrameSaver rot resistant component part.Use of a non-FrameSaver frame system by the <strong>Warranty</strong> Holder (or its builder, installer, contractor, or other agent) will not automaticallyvoid this <strong>Warranty</strong>, HOWEVER this warranty will not apply to <strong>Force</strong> 5 <strong>Door</strong> System non-conformities or damages attributable to or arisingfrom the rotting, splitting, warping, swelling or any other condition of a third party frame product;(viii) Removal, reinstallation or alternation of a <strong>Force</strong> 5 <strong>Door</strong> System or any of its components following original installation except in connectionwith properand timely maintenance of components which incur normal wear and tear, such as the weatherstripping, door bottom andcorner seals, in which case <strong>Warranty</strong> shall only apply if such components are replaced with the applicable <strong>Force</strong>5 components;(ix) Failure of the <strong>Warranty</strong> Holder to provide timely normal maintenance of the <strong>Force</strong> 5 <strong>Door</strong> System;(x) Failure to operate the <strong>Force</strong> 5 <strong>Door</strong> System in accordance with its instructions, including, without limitation, fully engaging the entire <strong>Endura</strong>approved locking system whenever the <strong>Force</strong> 5 <strong>Door</strong> System is closed;(xi) Failure of the <strong>Warranty</strong> Holder to timely take reasonable actions to mitigate any property damage;(xii) Labor, services and materials to paint, stain, or refinish applied to or adjacent to the <strong>Force</strong> 5 <strong>Door</strong> System, or other carpentry or the additionof non-<strong>Force</strong> 5 door system componentry, or other work undertaken that is intended to remedy a <strong>Force</strong> 5 <strong>Warranty</strong> complaint, that is notpart of the <strong>Force</strong> 5 <strong>Door</strong> System, without the prior authorization of <strong>Endura</strong> <strong>Products</strong>, and which itself or in addition to any other propertydamage, exceeds the Maximum <strong>Force</strong> 5 Coverage <strong>Warranty</strong> Limit;(xiii) Failure to file a claim for alleged damages promptly a during the <strong>Warranty</strong> Period;(xiv) Non-application of the <strong>Force</strong> 5 <strong>Warranty</strong> due to any of its stated terms and provisions.6. Claims: Claims under this <strong>Warranty</strong> must be initiated within 30 days following <strong>Warranty</strong> Holder’s earliest awareness of a potential issue for whichrecovery arises under this <strong>Warranty</strong>. Any claims must follow specified procedures for any Claims arising from <strong>Door</strong> <strong>Systems</strong> which do not meet certifiedperformance levels upon and subsequent to installation. Failure to follow <strong>Force</strong> 5 <strong>Warranty</strong> Claim Procedures (either timing or procedures) may void the<strong>Force</strong> 5 <strong>Warranty</strong> on the individual door unit. To obtain help under this <strong>Warranty</strong>, or to initiate a claim, <strong>Warranty</strong> Holder should contact <strong>Endura</strong> <strong>Products</strong>,Inc. in writing at 8817 West Market St., Colfax, NC 27235 “Attn – <strong>Warranty</strong> Claims,” or call (800) 334-2006 or by email at warrantyclaims@enduraproducts.com. The <strong>Force</strong> 5 <strong>Warranty</strong> Claim Procedure will not be initiated until all of the following information is received:(i) Homeowner/<strong>Warranty</strong> Holder Name, Complete Street Address, Email Address, Daytime Telephone Number(ii) <strong>Force</strong> 5 <strong>Door</strong> Tag Number (<strong>Force</strong> 5 <strong>Door</strong> Tag is attached to the frame of the door system near the top hinge)(iii) Date of Home Purchase(iv) Name of Original Home Builder (if known)(v) Description of <strong>Warranty</strong>-Related Complaint and Associated Damage(vi) Attached Photos of <strong>Warranty</strong>-Related Complaint and Associated Damage<strong>Endura</strong> must receive this <strong>Warranty</strong> Claim notification within 30 days following the <strong>Warranty</strong> Holder’s earliest awareness of a potential issue for whichrecovery arises under this <strong>Warranty</strong>. Following receipt of this information, <strong>Endura</strong> <strong>Products</strong> will initiate and facilitate the <strong>Force</strong> 5 <strong>Warranty</strong> Claim Procedure.The <strong>Force</strong> 5 <strong>Warranty</strong> Claim Procedure is as follows:(i)(ii)(continued)Homeowner contacts <strong>Endura</strong> <strong>Products</strong> to initiate the <strong>Force</strong> 5 <strong>Warranty</strong> Claim Procedure. Upon notification <strong>Endura</strong> will (a) provide a copy ofthe <strong>Force</strong> 5 <strong>Door</strong> System Owners Manual and <strong>Warranty</strong> <strong>Guide</strong> to the <strong>Warranty</strong> Holder and (b) notify the <strong>Warranty</strong> Holder that compliance withthe “<strong>Force</strong> 5 Unit Care and Maintenance” procedures outlined within the <strong>Force</strong> 5 <strong>Door</strong> System Owners Manual and <strong>Warranty</strong> <strong>Guide</strong> must beperformed and up-to-date as a prerequisite to continuing the claim process; the <strong>Warranty</strong> Holder must perform door unit maintenance andreassess the complaint before <strong>Endura</strong> proceeds with the <strong>Force</strong> 5 <strong>Warranty</strong> Claim Procedure. Using the <strong>Force</strong> 5 <strong>Door</strong> Tag Number, <strong>Endura</strong><strong>Products</strong> will contact the appropriate <strong>Endura</strong> representative organization (“<strong>Endura</strong> Rep”) to notify them that a <strong>Force</strong> 5 <strong>Door</strong> Unit warrantycomplaint has been received the claim procedure has been initiated.<strong>Endura</strong> Rep will contact the appropriate Distributor and (a) request that the Distributor contact the <strong>Warranty</strong> Holder to arrange an on-site <strong>Force</strong>5 <strong>Door</strong> System <strong>Inspection</strong> and (b) provide the Distributor with an electronic copy of the <strong>Force</strong> 5 <strong>Warranty</strong> <strong>Inspection</strong> <strong>Guide</strong> that will be used bythe Distributor/Dealer/Builder to assess the condition of the door unit.Page 45
<strong>Force</strong> Five ® <strong>Door</strong> System Limited <strong>Warranty</strong>(Continued)(continued)(iii)(iv)(v)(vi)(vii)(viii)Distributor will contact the <strong>Warranty</strong> Holder and (a) confirm the <strong>Warranty</strong> Holder’s compliance with the “<strong>Force</strong> 5 Unit Care and Maintenance”procedures using the “List of Questions for Homeowner” within the <strong>Force</strong> 5 <strong>Warranty</strong> <strong>Inspection</strong> <strong>Guide</strong> and (b) Distributor will arrange an on-sitedoor unit inspection by the Distributor/Dealer/Builder if and only if the care and maintenance procedures are confirmed current and thecomplaint still has not been remedied. <strong>Force</strong> 5 <strong>Door</strong> Unit performance issues due to lack of unit care and maintenance is the responsibility ofthe <strong>Warranty</strong> Holder and neither <strong>Endura</strong> <strong>Products</strong>, nor its Distributors, Dealers nor Builders are deemed liable for any costs associated withmaintenance-related failures or underperformance.As arranged by the Distributor, the Distributor/Dealer/Builder makes an on-site inspection of the <strong>Force</strong> 5 <strong>Door</strong> Unit and completes the “Job Site<strong>Inspection</strong> Check List” within the <strong>Force</strong> 5 <strong>Warranty</strong> <strong>Inspection</strong> <strong>Guide</strong>. At this point, the Distributor/Dealer/Builder will attempt to fix any doorunit issues using the remedies spelled out in the <strong>Force</strong> 5 <strong>Warranty</strong> <strong>Inspection</strong> <strong>Guide</strong> and/or <strong>Force</strong> 5 <strong>Door</strong> System Owners Manual and <strong>Warranty</strong><strong>Guide</strong>. A copy of the “Job Site <strong>Inspection</strong> Check List” and notes of any remedies will be sent to the <strong>Endura</strong> Rep for <strong>Endura</strong>’s records.If the Distributor/Dealer/Builder is unable to fix door unit, the Distributor will contact the <strong>Endura</strong> Rep to arrange for the <strong>Endura</strong> Rep to perform amore detailed inspection to determine the cause of the complaint.During this second, on-site visit, the <strong>Endura</strong> Rep and the Distributor/Dealer/Builder will determine whether or not the door unit in question wasassembled, installed and maintained in accordance with the information set forth in <strong>Endura</strong>’s Assembly Instructions for <strong>Force</strong> 5 <strong>Door</strong> <strong>Systems</strong>,Installation Instructions for <strong>Force</strong> 5 <strong>Door</strong> <strong>Systems</strong> and the <strong>Force</strong> 5 <strong>Door</strong> System Owners Manual and <strong>Warranty</strong> <strong>Guide</strong>, respectively.If the root cause of the compliant is found to be due to improper/out-of-specification Assembly, Installation or Maintenance, then the costs tofix the door unit are to be borne by the responsible party. Specifically, issues resulting from the improper assembly shall be the responsibility ofthe Pre-Hanger or Distributor; issues resulting from improper installation shall be the responsibility of the builder; issues resulting from improper maintenance and care of the door unit shall be the responsibility of the <strong>Warranty</strong> Holder. And, in the event that satisfactory repairs cannot be made to the unit, the cost of replacement of the entire unit shall also be covered by the responsible party.If it is determined that the complaint is due to a faulty door system, meaning that ALL <strong>Force</strong> 5 Assembly, Installation and Maintenanceinstructions were followed, <strong>Endura</strong> will then revert to the conditions stated in the written <strong>Force</strong> 5 <strong>Warranty</strong> to mitigate the problem and/orexisting conditions.7. General Conditions and Exclusions: The <strong>Warranty</strong> set forth in this document is the only express warranty (whether written or oral) applicableto <strong>Force</strong> 5 <strong>Door</strong> <strong>Systems</strong> and no one is authorized to modify or expand this <strong>Warranty</strong>. Some states do not allow the exclusion or limitation of incidentalor consequential damages, so the above limitations or exclusions may not apply to the <strong>Warranty</strong> Holder. This limited <strong>Warranty</strong> provides specific legalrights, but <strong>Warranty</strong> Holder may have other rights that apply from state to state. If this limited <strong>Warranty</strong> is deemed to have failed its essential purpose,in no event will Seller’s entire liability exceed the lesser of the <strong>Force</strong> 5 <strong>Door</strong> System’s or the non-conforming components purchase price.Page 46
<strong>Endura</strong> <strong>Products</strong>, Inc.8817 West Market Street, Colfax NC 27235 800.334.2006 www.enduraproducts.com