Water from Small Dams
Water from Small Dams - SamSamWater
Water from Small Dams - SamSamWater

You also want an ePaper? Increase the reach of your titles
YUMPU automatically turns print PDFs into web optimized ePapers that Google loves.
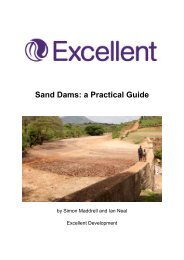
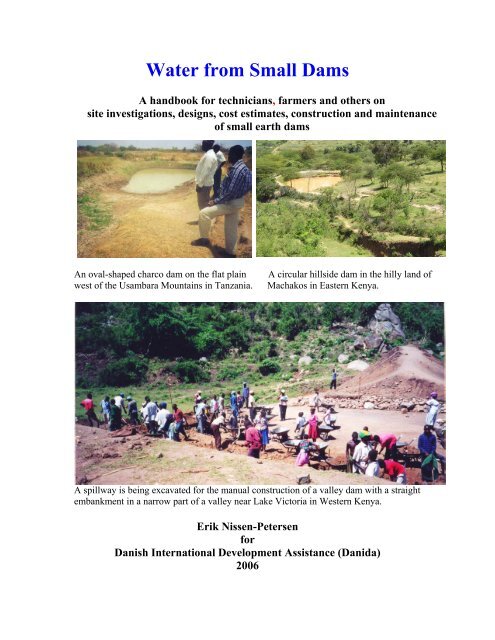
<strong>Water</strong> <strong>from</strong> <strong>Small</strong> <strong>Dams</strong>A handbook for technicians, farmers and others onsite investigations, designs, cost estimates, construction and maintenanceof small earth damsAn oval-shaped charco dam on the flat plainwest of the Usambara Mountains in Tanzania.A circular hillside dam in the hilly land ofMachakos in Eastern Kenya.A spillway is being excavated for the manual construction of a valley dam with a straightembankment in a narrow part of a valley near Lake Victoria in Western Kenya.Erik Nissen-PetersenforDanish International Development Assistance (Danida)2006
Technical handbooks in this series:TitlesContents1 <strong>Water</strong> for rural communities Lessons learnt <strong>from</strong> Kitui pilot projects2 <strong>Water</strong> supply by rural builders Procedures for being rural contractors3 <strong>Water</strong> surveys and designs Survey, design and cost of water projects4 <strong>Water</strong> <strong>from</strong> rock outcrops Rock catchment tanks, masonry and earth dams5 <strong>Water</strong> <strong>from</strong> dry riverbeds Wells, subsurface dams, weirs and sand dams6 <strong>Water</strong> <strong>from</strong> roads Rainwater harvesting <strong>from</strong> roads7 <strong>Water</strong> <strong>from</strong> small dams Ponds and small earth dams built manually8 <strong>Water</strong> <strong>from</strong> roofs Various types of roof catchments for domestic useThese handbooks can be obtained free of charge by either collecting them <strong>from</strong> the office ofASAL Consultants Ltd., or by paying through bank transfer the cost of sending the manuals bycourier. For further details, please contact: asal@wananchi.com with copy toasalconsultants@yahoo.comPublished byASAL Consultants Ltd. forthe Danish International Development Assistance (Danida) in KenyaText, drawings, photos byErik Nissen-PetersenComputer drawings and tracing byCatherine W. WanjihiaProofs and editing byProf. Elijah K. Biamah, Amin Verjee and Steen S. LarsenPrinterModern Lithographic (K) Ltd., P.O. Box 52810-00200, Nairobi, KenyaWebsite byEdwin OndakoDistribution byASAL Consultants Ltd., P.O. Box 739, Sarit 00606, Nairobi, Kenyaasal@wananchi.com asalconsultants@yahoo.comFax/Tel : 254 020 2710296 Mobiles: 0733 619 066 and 0722 599 165Website : www.waterforaridland.com© Copyright.The copyright of the handbooks in this series is the property of the Royal DanishEmbassy in Kenya. Downloading <strong>from</strong> the Internet and photocopying of the handbooks ispermitted provided the source is acknowledged.ii
ContentsAcknowledgement …………………………………………………………viiDisclaimer ………………………………………………………………. viiForeword ……………………………………………………………….. viiiTechnical vocabulary ………………………………………………….. ixIllustrations of technical terms ……………………………………….. xMeasurements and conversions ………………………………………. xChapter 1. Introduction to small dams ……………………… 11.1 Purpose and Scope of this handbook …………………………… 11.2 Types of small dams ……………………………………………. 11.3 Constraints and limitations ……………………………………... 61.4 Other considerations ……………………………………………. 6Chapter 2. Considerations before construction ………….. 72.1 Feasibility and planning for small earth dams …………………. 72.2 Considerations before building small earth dams ……………… 72.3 <strong>Water</strong> quality and health ……………………………………….. 72.4 <strong>Water</strong> requirements …………………………………………….. 82.5 Total water storage requirement ……………………………….. 102.6 Economic feasibility …………………………………………… 102.7 Estimating the benefits of dams ………………………….…….. 112.8 Determining the most cost-effective option ….………….…….. 122.9 Determining the cost and benefit of a hand-dug well …….……. 122.10 Other considerations ……………………………………….…... 132.11 Environmental impact ……………………………………….…. 14Chapter 3. Community participation and management 143.1 Community involvement ……………………………………….. 143.2 Gender issues …………………………………………………… 143.3 Ownership ………………………………………………………. 153.4 Legal requirements ……………………………………………… 153.5 Specific local issues …………………………………………….. 16Chapter 4. Charco dams ………………………………………. 174.1 Site selection ……………………………………………………. 174.2 Design …………………………………………………………… 184.3 Marking out a charco dam ………………………………………. 204.4 Construction …………………………………………………….. 214.5 Constraints ………………………………………………………. 21Chapter 5. Hillside dams …………….………………………... 225.1 Site selection ……………………………………………………. 225.2 Design ………………………………………………………….. 225.3 Construction ……………………………………………………. 26
Chapter 6. Valley dams …………………………………………. 306.1 Legal requirements …… ……………………………………….. 306.2 Financial viability ………………………………………………. 306.3 Site criteria ……………………………………………………… 326.4 Measurements to be taken of a dam site ………………………… 336.5 Design …………………………………………………………… 346.6 Soil for dam walls ……………………………………………….. 366.7 Data for designing valley dams …………………………………. 396.8 Bill of Quantities (BQ) and costs ………………………………. 406.9 An example of a complete design ………………………………. 44Chapter 7. Construction of a valley dam ……………………. 457.1 Check list before starting construction work ……………………. 457.2 The key ………………………………………………………….. 457.3 Foundation ……………….. ……………………………………. 467.4 Draw-off pipe …………………………………………………… 477.5 Spillways ………………………………………………………… 487.6 Borrow pit ……………………………………………………….. 497.7 Building the dam wall …………………………………………… 497.8 Completing the construction of an earth dam …………………… 50Chapter 8. Protection of reservoir and catchment area ….. 518.1 Reservoir protection ……………………………………………… 518.2 Catchment protection …………………………………………….. 52Chapter 9. Repair and maintenance …………………………… 559.1 Leaking dam reservoirs …………………………………………… 559.2 Washed-out dam walls ……………………………………………. 569.3 Washed-out spillways …………………………………………….. 579.4 Silted-up dam reservoirs ………………………………………….. 57References …………………………………………………………….. 58vi
AcknowledgmentsMuch gratitude is due to Birgit Madsen of the Royal Danish Embassy in Nairobi forhaving taken a leading role in documenting the experiences of various techniques ofcreating low-cost water supply structures in the semi-desert, arid and semi-aridregions of the world.Many thanks are also due to Prof. Elijah Biamah, John Gould, Steen Larsen and AminVerje, who assisted with the text and editing, to Edwin Ondako who created thewebsite and loaded this handbook and others onto it, and to Oliver D’Cunha, whomanaged the printing at Modern Lithographic.Thanks are also due to the many engineers, technicians, artisans and self-help groupswho participated in several training courses and other assignments on small earthdams implemented by ASAL Consultants Ltd. for Danida, SIDA, UNDP, EU andother organisations in a dozen countries over the last three decades.This handbook, <strong>Water</strong> <strong>from</strong> <strong>Small</strong> <strong>Dams</strong>, is one of a series of 8 publications on<strong>Water</strong> in Arid Land, financed by the Danish International Development Assistance(Danida).To promote the simple technologies described in the handbooks, they can be read, ordownloaded free of charge, <strong>from</strong> our website www.waterforaridland.com .Erik Nissen-PetersenManaging DirectorASAL Consultants Ltd.P.O. Box 739, 00606, Nairobi, KenyaTel/fax 254 (0)20 2710296Mobile 0733 619066 / 0722 599144asal@wananchi.com asalconsultants@yahoo.comDisclaimerThe designs and construction procedures described in this handbook are based on theauthor’s experiences and observations over 30 years. The earth dams describedherein, when properly constructed and maintained, have performed exceptionallywell. However, local climatic, geological, seismic and soil conditions vary widely, asdoes the quality of materials and workmanship, and while the author and Danida arekeen to encourage the replication of the ponds and dams described in this handbook,they cannot accept liability for the failure of a water harvesting system based on thedesigns and construction procedures described here.vii
ForewordThis handbook on water <strong>from</strong> small dams by Danida in Kenya has been produced at atime when Kenya through the newly restructured Ministry of <strong>Water</strong> and Irrigation hasestablished Regional <strong>Water</strong> Services Boards whose mandate now includes that ofdesigning and constructing small dams for rural water supply. Indeed small earthdams as water sources are needed most in arid and semi arid lands where fresh watersupply is a priority for vulnerable pastoralist communities. Besides the provision ofwater for domestic needs, small earth dams otherwise also referred to as water pansare good water sources for livestock.<strong>Water</strong> <strong>from</strong> <strong>Small</strong> <strong>Dams</strong> is a handbook that is expected to serve as a guide fortechnicians and water users who are contemplating to design and construct small earthdams. It emphasizes the need for feasibility studies during the planning stage and alsodelves into other considerations before construction. Options for water supply areprovided by some descriptions of various types of dams such as charco dams, hillsidedams and valley dams. The issues of concern in planning for small earth dams such asdesign, construction and maintenance, bill of quantities and constraints/limitationshave been discussed as well.This handbook provides insights into site investigations, designs, cost estimates, legalaspects and construction and maintenance of small dams. This information is requiredby local technicians for planning and constructing small dams. Conditions ofownership and other water related legal issues and the significance of environmentalimpact assessments are discussed in the handbook. Photo illustrations and diagramsmake the information more comprehensive and easily understood by any reader.It is with the understanding of the information contained herein that wise decisionscan be reached when choosing the right type and size of small dams for given localenvironmental conditions. Finally, this handbook does underscore the importance ofwater sanitation through catchment and reservoir protection. This would ensure thatthere is quality and quantity in constructed small earth dams.Julius KiptarusDirector of Livestock DevelopmentMinistry of Livestock and Fisheries Developmentviii
TECHNICAL VOCABULARYASAL = Arid and Semi-Arid LandsASALCON = ASAL Consultants Ltd.Batter = Gradient of a dam wallBench mark (BM) = A fixed point for taken measurementsBerm = Area between a reservoir borrow pit and dam wallBase = Foundation for a dam wallBorrow pit = An excavation <strong>from</strong> where soil is takenBill of Quantities (BQ)= List of materials and labour, with costingCatchment = Area draining rainwater run-off to a common pointCentre line = An imaginary line through the centre of a crest atthe upper level of the freeboardContour line = Horizontal line connecting points of equal altitudeCrawler = BulldozerCrest = Top of dam wallDanida = Danish International Development AssistanceDiaphragm = Blanket of soil on upstream side of embankmentDownstream batter = Downstream slope of a dam wallDownstream toe = Downstream edge of a dam wallDraw-off pipe = Pipe draining water by gravityEmbankment = Dam wallEvaporation = <strong>Water</strong> lost as vapour <strong>from</strong> a water surfaceEU = European UnionFreeboard = Safety height of dam wall <strong>from</strong> maximum water levelGradient = SlopeHafir (Arabic term) = A type of earth dam for livestock and peopleInselberg = A massive bare rock outcrop common in the tropicsImpervious = Not letting water throughKey (Cut-off trench) = Trench of clayey soil to prevent seepageLive fencing = Fence of vegetation, preferably thornyMurram = A clayey soil packed with stones found under lateritesoilSeepage = <strong>Water</strong> seeping through soilSediment = Soil deposited in reservoirSettlement = Soil compacting and shrinking in height due to weightSIDA = Swedish International Development AssistanceSill = Low concrete wall across spillwaySiltation = Dam reservoirs being filled with siltSiphon = Pipe lifting water over a high point to a lower levelSODIS = SOlar DISinfection (of water)Spillway = Overflow channel discharging excess floodwaterStorage ratio = Volume of water in relation to volume of soilTurbid = Muddy, unclear water carrying sedimentThrow-back = Length of a reservoir full of waterTopographical = Relating to the shape and height of the landUNDP = United Nations Development ProgrammeUpstream batter = Upstream slope of a dam wallUpstream toe = Upstream edge of a dam wallValley dam = Dam constructed in a valley with a straight embankmentWashout = Section of a dam wall washed out by waterix
ILLUSTRATION OF TECHNICAL TERMSCut-through section of a three-dimensional sketch of a dam wall.MEASUREMENTS AND CONVERSIONSLength 1 metre = 3.28 feet1 km = 0.62 milesArea 1 acre = 4,047 m 2 = 0.4047 hectares (ha)1 ha = 10,000 m 2 = 2.471 acres1km 2 = 100 ha = 247.1 acresVolume 1 litre = 1.75 pints = 0.22 Imp gallons (or 0.26 US galls)1 m 3 = 1,000 litres (l) = 220 Imp gallons (or 260 US gallons)1 Imperial gallon = 4.550 l1 US gallon = 3.785 lWeight 1 tonne = 1,000 kg1 British ton = 1,016 kg1 US ton = 907 kgVolumes and weight of materials1 m 3 water = 1,000 kg1 m 3 dry soil = 1,230 to 2,000 kg1 m 3 compacted soil = 2,180 kg, approximately1 m 3 loose gravel = 1,745 kg, approximately1 m 3 stones = 2,400 kg to 2,900 kgExchange Rate Used in the ManualKsh = Kenya ShillingsKsh 73 = US$ 1.00 (August 2006)x
Chapter 1.Introduction to small dams1.1 Purpose and scope of this handbookThe purpose of this handbook is to provide a guide to communities, technicians,farmers and others who are considering developing a water source for agricultural,livestock watering or domestic purposes. Various options are discussed and thedevelopment of ponds and small earth dams covered in detail. Guidance is providedon site investigation, design, construction, maintenance and repair.The handbook also deals with other important aspects of these water projectsincluding environmental impact (the effect on nature), community participation andmanagement, legal requirements, ownership and gender issues.Since site investigations, design and construction of medium and large size earthdams require experienced engineers and should not be constructed by fieldtechnicians and farmers, they are not included in this handbook.A word of warning: It must be remembered that the construction of any dam doescarry with it a small risk of failure. If the possible collapse of any dam threatenseither property or life then experienced technical advice should be sought.1.2 Types of small dams<strong>Small</strong> earth dams are the subject of this handbook which covers the design andconstruction of small earth dams with storage capacities up to about 10,000 cubicmetres and having embankments up to a height of about 5 metres. <strong>Small</strong> earth damscan be built manually, using animal draught, a farm tractor, a crawler or bulldozer.The three types of small earth dams seen on the front page are covered in thefollowing chapters of this handbook:1) Charco dams for almost flat land, are described in Chapter 4.2) Hillside dams for rolling and hilly land, are described in Chapter 5.3) Valley dams for seasonal water courses and valleys are described in Chapter 6.However, since the word dam is often used for almost any type of water reservoirbuilt of soil, it might to advantageous to have a look at the various types of dams.<strong>Small</strong> earth dams are often called ponds. Their water reservoirs are constructed byexcavating a depression for the water reservoir and depositing the excavated soil onthe lower side of the water reservoir as an embankment that will increase the storagevolume of the excavated water reservoir.In addition to the three types of small earth dams described in detail in this1
handbook, there are also other types of so-called dams which can be classified aspans.Pans are natural depressions in theground where rainwater gathers.Pans do not rely on excavations orembankments to trap runoff. Pansform in natural depressions in whichrainwater accumulates during rainyseasons. Wildlife, livestock and manhave shared this water source sincethe beginning of life on this earth.In the Kalahari Desert large naturalsalt pans are found. They have beenformed by wind action and usuallyonly hold water for a few months ayear.The square hole with water seen inthe photo has been excavated into thesalt pan for extraction of salt.<strong>Small</strong>er natural pans including theSilanka ya Ndovu (elephant dam)are common in arid and semi-aridlands (ASAL) where they have beenscooped out by elephants. The floorsof pans are almost watertight, asanimals trample and compact the soiland droppings, when they enter thepans to drink.Pans are used for watering livestockduring rains and a few monthsthereafter. Some people also use themfor domestic water supply, even thoughthe water is dirty and not suitable fordrinking water or washing.Although it may not always be worthwhile to build new pans, it is sometimesworthwhile deepening or enlarging existing natural pans or creating artificial ones.Farmers in particular appreciate the benefits that natural pans can bring, even thoughmost are seasonal and cannot store water throughout the year.2
Borrow pits, also called murram pits,are found along roads. They are madewhen murram is dug up for roadconstruction. These pits fill withrunoff <strong>from</strong> the road during rains.While borrow pits usually seemunattractive and unproductive, theycan be converted into useful smalldams for livestock, irrigation and fishponds. This is because:• Most borrow pits are dug in firm laterite soil, with little seepage, and are capableof storing water for long periods.• Even small rain showers can fill borrow pits with water, because the road next tothe pit typically has a large surface <strong>from</strong> which runoff can easily be diverted intothe pits, by digging a trench sloping <strong>from</strong> the road into the pit.Since rainwater run-off <strong>from</strong> roads may contain tar, animal manure and otherpollutants, water taken <strong>from</strong> borrow pits should not be used for human consumption.<strong>Water</strong>ing livestock in borrow pits might be a hazard to traffic. It is thereforeappropriate to fence off the water reservoir with thorny vegetation. It might benecessary to seek permission <strong>from</strong> the relevant authorities, if borrow pits are plannedto be converted into ponds for irrigation and other commercial activities.Ground tanks are excavated nearhomesteads for growing fruit treesand irrigating gardens. Ground tanksmay be square, as this one inTanzania pictured on the right,although the most efficient shape is abowl-shape, because it is a stableform that distributes internal andexternal pressure equally on the tankwall. In addition, the shape has theadvantage of giving maximum watervolume for a minimum excavation ofsoil.Where soils are sandy, tanks have tobe plastered to prevent seepage. Acheap plaster can be made by mixingcement with powdered ant-hill, limeand sand in the ratio of 1:8:2:8 andreinforced with chicken mesh andcoated with bitumen. Ground tankscan also be lined with burnt bricks orferro-cement, but these cost more.3
Berkads are ground tanks that areexcavated and lined with concreteblocks or ferro-cement in the semidesertregions of Somaliland.Rainwater is diverted into the berkadsby soil or stone bunds slopingupwards <strong>from</strong> berkads on hillsides.Silt traps, as seen in the lower photo,are made as small berkads beforewater flows into the water reservoir.Strangely, the standard design ofmost berkads is rectangular withvertical walls that crack due toexternal pressure of the soil when theberkads dry up. The much strongercircular and oval-shaped design wasonly observed in a few places. Theconstruction of new berkads inSomaliland is said to have beenbanned, as over-grazing by thelivestock that are watered at theberkads causes desertification.Hafirs are ponds dug into natural depressions in some parts of Sudan’s plains. Soilremoved <strong>from</strong> the hafirs can be used to form banks surrounding the reservoir toincrease its volume. Hafirs typically range in size <strong>from</strong> 500 to 10,000 cubic metresand provide water for both livestock and domestic purposes. In the past most hafirswere dug by hand, but today heavy machinery is used when building larger hafirs.Charco dams, also known as Milambo in Kiswahili, are explained in Chapter 4 of thishandbook and shall therefore not be described in this chapter.Check dams are built across gulliesto check, or impede, theenlargement of the gullies bytrapping sediment, which helps toreduce or even reverse soil erosion.The sediment gradually refillsgullies and can be used to helpimprove soil fertility on adjacentfarmland. Check dams can beconstructed using either stonespacked in gabions or sacks filledwith soil and placed across a gully.Rain-water trapped behind the dam in ‘gully ponds’ also creates a small temporarywater source. Usually, such ponds have a short life-span as a water source, if thecheck dam is effective at refilling the gully.4
Rock catchment dams can either bebuilt on a rock surface with amasonry wall, or be an earth dambuilt at the foot of a rock outcrop, asseen in this photo. More details canbe found in <strong>Water</strong> <strong>from</strong> RockOutcrops.Sub-surface dams are built inriverbeds and have dam walls built ofsoil that stretch across the riverbed inseasonal water courses with sand,also called sand rivers, dry riverbeds,luggahs, wadis, etc.Sub-surface dams block floodwaterthat has infiltrated into the voidsbetween the sand particles. Up to35% of water can be extracted <strong>from</strong>the voids in coarse sand, but muchless <strong>from</strong> fine structured sand. Thisform of water storage has theadvantage of protecting the water<strong>from</strong> evaporation as well as helpingto protect it <strong>from</strong> contamination.Weirs, built of stone masonry orconcrete function as subsurface dams,but can store more water because theycan be built up to 50 cm above thesurface of the surrounding sand. Thehigher capacity of water supply does,however, come at a higher cost due tothe cement required for the masonrywork.Sand dams are structures larger thanweirs, which can be raised to severalmetres above the sand surface ofseasonal water courses and gullies.Although sand dams can producemuch more water than sub-surfacedams and weirs, most of them do notfunction well, due to theircomplicated design, construction andmaintenance.The above three types of dams inriverbeds are described in <strong>Water</strong> <strong>from</strong>Dry Riverbeds.5
1.3 Constraints and limitationsAlthough the dam designs in this handbook are appropriate in ASAL areas, theysuffer <strong>from</strong> a number of constraints common to this environment. These include:1) Low and erratic rainfall and prolonged droughts over several years of belowaverage rainfall may lead to reservoirs failing to fill.2) High evaporation rates leading to significant losses <strong>from</strong> any water stored inopen reservoirs or ponds.3) Siltation due to large amounts of sediment washed into reservoirs duringsevere storms, especially at the end of the dry season, which also make thewater turbid. Siltation can be avoided by trapping inflowing silt in silt trapsand utilizing it for fertilising garden plots.4) Contamination of water in open reservoirs can be caused by livestock enteringreservoirs resulting in poor water quality. Livestock should therefore bewatered downstream of dam reservoirs, where water can be drawn <strong>from</strong> ahand-dug well sunk in an area with seepage <strong>from</strong> the dam reservoir. Cleanwater for domestic use can also be drawn <strong>from</strong> such a well.5) The risk of small children and livestock falling into ponds or reservoirs. <strong>Small</strong>water reservoirs should therefore always be fenced.1.4 Other considerationsAll types of pits, tanks, ponds and dams should be situated at the lowest point in thelocality, so rainwater runoff flows naturally towards the water reservoir by gravity.The catchment area, that collects rainwater, can consist of any compacted soil surfacesuch as the compounds around homesteads or school playgrounds. Road surfaces, orrock outcrops, may also make suitable catchments. Rainwater run-off can also bediverted <strong>from</strong> a nearby gully, provided the reservoir is situated at a lower elevationthan the gully.<strong>Water</strong> reservoirs should be covered, or fenced to prevent people and livestock <strong>from</strong>falling into the water.<strong>Small</strong> water reservoirs can be roofed to reduce evaporation by roofs made of sisalpoles. Useful creepers, such as Passion fruit and Lupher, can be grown on the roof tofurther reduce water loss by evaporation.Uncovered tanks should have in-built steps that can be used for drawing water, and tominimize the risk of children or adults falling into the tanks and not being able to getout again.A fish, Tilapia Nilotica, that feeds on mosquito larvae, can be raised in borrow pits toreduce the risk of malaria. Mudfish, which can survive even when small dams dry up,can also be raised to increase food supply and cash income.6
Chapter 2.Considerations before construction2.1 Feasibility and planning for small earth damsBefore proceeding with any water project, however small, it is important to firstdetermine whether it is feasible. This not only involves determining its’ technical andeconomic viability, but also its’ environmental and social impacts. It is important thatthese can be shown to be generally positive.Further, any project that involves the community needs their full support. Whenconsidering the feasibility for any project it is important to establish that thecommunity has the motivation and capacity to plan, implement, operate and maintainit. The best projects are usually those identified by community groups andimplemented by community members. This instils a greater sense of ownership by thecommunity, who are then more likely to engage in the active maintenance of the dam,reservoir and catchment area.2.2 Considerations before building small earth damsBefore constructing a small earth dam, or any type of communal water source, it isvital to confirm that the project is viable. To determine this it is helpful to ask a fewkey questions at the outset, such as:• Will the water be clean enough, and if not, can the quality be improved?• How much water is needed?• How much water will the new source provide?• What will the project cost and is this affordable?2.3 <strong>Water</strong> quality and healthThe rainwater runoff which fills small water reservoirs usually flows over the groundthat is contaminated. Catchment areas are often covered with animal droppings,human excreta and other debris that can pollute the water.While this water is suitable for watering livestock, or for small scale irrigation, andconstruction work, it is not safe for drinking. If the purpose of a small dam is to getclean water for domestic purposes, then the water should be drawn <strong>from</strong> a hand-dugwell sunk in a seepage line downstream of the dam wall.Drinking untreated water <strong>from</strong> open water sources is not recommended, unless it hasfirst been boiled, or sterilized by the sun’s ultraviolet rays in a transparent bottle for 6hours of sunshine. This technique is called SODIS (= SOlar DISinfection of water).Drinking water that has not been treated by either boiling or SODIS may lead towaterborne diseases such as dysentery, diarrhoea or typhoid. If waterborne diseases,such as Schistosomiasis (Bilharzia) carried by water snails is present in the area,people should be discouraged <strong>from</strong> entering the water.7
2.4 <strong>Water</strong> requirementsTo estimate how much water is required and for how long, some simple calculationsare required. The demand for water for domestic purposes, livestock and irrigationcan be estimated as shown below.In this case we assume that the stored water will be needed for a dry season of 180days in an ASAL region, although this figure will vary in different localities. Thefollowing tables are examples of water use based on a family of 8 people, with 2 milkcows, 10 Zebu cattle, 14 sheep, 10 goats, 3 pigs and ¼ acre of land under dripirrigation.In practice, to determine the water requirement for any particular household, orcommunity, information on the number of people, livestock and any irrigationrequirements need to be gathered. In many cases, due to the availability of betterquality alternative water sources for domestic consumption <strong>from</strong> a hand-dug well, orrainwater tank, water <strong>from</strong> a dam or pond will only be required for livestock2.4.1 <strong>Water</strong> for domestic useIn this example, the daily water use of a typical African household in a semi-aridlocation is taken as 14 litres/person/day, which is equivalent to 112 litres for ahousehold of eight, or half an oil drum of water for each day. This volume is muchhigher than the actual 5 litres/person/day, commonly used for drinking and cooking inASAL regions.Table 1.NumberpersonsExample of water needed for a household in ASALof DailyNumber of Total waterconsumption per days without requirementpersonrain8 x 14 litres x 180 days = 20,160 litres2.4.2 <strong>Water</strong> for livestockThe amount of water required by livestock will vary greatly depending on the season,temperature, moisture content of animal forage and type of animals. Table 2 showsthe dry season requirements for various common types of livestock.Table 2. Example of water requirements for livestock in ASALType and DailyNumber of days Total waternumber of consumption per without rain requirementlivestock animalMilk cows 2 x 50 litres x 180 days = 18,000 litresZebu cows 10 x 27 litres x 180 days = 48,600 litresSheep 14 x 5 litres x 180 days = 12,600 litresGoats 10 x 3 litres x 180 days = 5,400 litresPigs 3 x 10 litres x 180 days = 5,400 litresTotal requirement for watering livestock = 90,000 litresSource of data: Rain Catchment and <strong>Water</strong> Supply in Rural Africa, Nissen-Petersen, E. 1982& Finkel and Segerros 1995 (RELMA Technical Handbook No. 22).2.4.3 <strong>Water</strong> for irrigation8
It is difficult to estimate the water requirement for irrigation because it depends on thetype of irrigation method used, the soil type, climate, crop type and its growingperiod. For example, bucket irrigation of vegetables requires about double the volumeof water required for drip irrigation. Table 3 illustrates the water requirement fortomato/kale production using drip irrigation on a 1/4 acre.Table 3. Example of water requirements for drip irrigationType of Type of crop Daily <strong>Water</strong> Total waterirrigationrequirementfor 90 dayson a ¼ acre(approx. 1000 m 2 )requirementDrip irrigation Tomatoes/kale 1,000 x 90 = 90,000 litresTotal requirements for drip irrigation of 1/4 acre is 90,000 litresSource: Drip Irrigation Project, Kenya Agricultural Research Institute (KARI).2.4.4 Total water requirementA reasonable estimate of the water demand that a pond or small earth dam may beexpected to meet can now be worked out by simply adding together the total waterrequirements for domestic, livestock and irrigation in tables 1, 2 and 3.Table 4. Example of total water requirement for domestic, livestock andirrigationDomestic water for a household for 180 days20, 160 litres<strong>Water</strong>ing 35 animals for 180 days90,000 litresDrip irrigation of 1/4 acre for one growing season90,000 litresTotal water requirement200,160 litresThe total water requirement is estimated as 200,160 litres which can be converted intocubic metres by dividing the figure by 1,000 as follows; 200,160 litres / 1,000 =200.16 cubic metres, say 200 m 3 .2.5 Total water storage requirement9
water storage capacity created, it is the most affordable. It will only cost Ksh19,980 ifoxen are used. In one good rainy season it could potentially fill up with water, andcould produce savings and cash income worth about Ksh 10,000. Thus it could payfor itself in just over two years, thus being a good investment of time and resources.Table 7. Annual value of benefits <strong>from</strong> a 500 m 3 water reservoirExamples of Annual Income and SavingsValuein KshLabour saved on fetching water1,500( Ksh 500 x 3 months )Labour saved on watering livestock1,500( Ksh 500 x 3 months )Income <strong>from</strong> sale of tomatoes and kale <strong>from</strong> ¼ irrigated acre 6,500Value of household consumption of tomatoes and kale <strong>from</strong> ¼ acre 500Total Income <strong>from</strong> a 500 m 3 water reservoir after a rainy season 10,0002.9 Determining the cost and benefit of a hand-dug wellWhere water <strong>from</strong> a dam or a pond is to be used for domestic water, it should bedrawn <strong>from</strong> a hand-dug well sunk in a seepage line downstream of a dam wall. Thisway contaminated water <strong>from</strong> the reservoir is filtered as it seeps through the soil. Ifthis water is to be used for drinking it should always be boiled, or SODIS treated. Anexample of the estimated cost-benefit of a 6 metre deep hand-dug well is shownbelowTable 8. Cost-benefit of a hand-dug wellExpenditureKshConstruction cost of a 6 metre well shaft equipped with windlass 30,000Sale of 20 jerrycans (20 litres) of water/day@ Ksh 5 x 20 x 216 days 21,600Own consumption of 100 litres of water/ day@ Ksh 5 x 5 x 180 days 4,500Less sick days by having clean water;Salary Ksh 100/day x 20 days 2,000Saved medical expenses by having clean water;Ksh 50/day x 20 days 1,000Income <strong>from</strong> a hand dug well in 180 days 29,100The above example shows how to work out the pay back time for the one-time cost ofbuilding a 6 metre deep hand-dug well equipped with a windlass. In this case the costis recovered in just 216 days. Thereafter the owner of the hand-dug well will begenerating a daily income <strong>from</strong> selling water to neighbours. In addition, the owner aswell as his neighbours will save working time on fetching water and suffer fewer sickdays caused by water-borne diseases.2.10 Other considerations12
If the answers to the questions listed in section 2.2 suggest that the building of a dammay be technically and economically feasible, then the next questions are:• Will the project have any major impact on the environment?• What will the impact of the project be on local people and how are they involvedin its planning and management?• Does the project address issues which affect the roles and work of men andwomen in the community (gender issues)?• Are there any laws, cultural or ownership issues associated with the project whichneed to be addressed?2.11 Environmental impactBefore constructing a dam, the environmental impact must be evaluated. <strong>Small</strong> earthdams do not have a major impact, except if many small dams are constructed in thesame catchment, in which case their combined effect could be significant. The impactcan be both negative and positive. If the negative impacts exceed the positive impacts,the dam should not be constructed. The list below can be used as a checklist.Positive impacts of earth dams and ponds1. Irrigating fields and tree nurseries forgenerating income and re-planting forests2. <strong>Water</strong>ing livestock near villages saves timeand reduces erosion caused by cattle.3. Providing domestic water <strong>from</strong> a hand-dugwell generates income and can lead to healthimprovements.4. Raising ducks, geese and fish farming forfood and income.5. Making bricks and construction works forincome generation.6. Reducing water-borne diseases by providingimproved water supply for domestic use.7. Saving peoples' time by reduced walkingdistances to fetch water.8. Reduced impact of floods by storing initialfloodwaters thus lessening erosion.9. Raising the water table downstream of pondsand dams which benefit well levels for handdugwells and trees.10. Increasing the value of land near an earthdam, because of all the above benefits.11. Reducing poverty levels through the incomegeneratingactivitiesNegative impacts of earth dams and ponds1. Loss of some land taken up by the damreservoir and its spillway(s).2. Risk of increased cases of malaria (this can bereduced by fish such as Tilapia Nilotica).3. Risk of increased cases of bilharzia, cholera,dysentery and typhoid (this can be reduced ifthe reservoir is fenced and the water is drawn<strong>from</strong> hand-dug wells or draw-off pipessituated downstream of dam walls, if drinkingwater is boiled and if people do not bathe in,and wash clothes in the reservoirs).4. Increased soil erosion along roads due topeople and animals coming for water at thedam.5. Risk of dam wall collapse if poorly designedor constructed incorrectly, thereby releasing aviolent flash-flood damaging everything in itspath.6. Siltation of dam reservoirs will shorten thelifetime of dams unless proper soilconservation is implemented in the catchmentareas.7. Risk of people and animals drowning if theytry to bathe in or swim across a dam reservoir.8. Impact on downstream users who may bedeprived of water or subject to pollution13
Chapter 3. Community participation and management3.1 Community involvementIf a small dam is being constructed for a community, the whole community must beinvolved in the location, design, construction and maintenance of the dam for severalreasons, such as:1) Common ownership of the water source will help to ensure that it is operated andmaintained properly. It will also increase the likelihood that any communalbenefits are shared in a fair way.2) Community members are more likely to support any future calls to assist in repairor maintenance work, such as removal of sediment <strong>from</strong> the reservoir.3) Even where the construction of dams is for single households, the inclusion of thenearby community members will encourage householders to assist each other inthe heavy and tiring construction work.4) Another benefit of involving the whole community <strong>from</strong> the start is that anypotential issues or obstacles can be identified <strong>from</strong> the outset and appropriateaction taken. This will help to avoid potential future problems.5) Community members who will use a new dam should be involved in all aspects ofplanning and management in a participatory way. Important decisions such as thesite of the dam should be taken at a village meeting. At such public meetings thecommunity should be encouraged to elect a small committee to represent themand keep them informed.3.2 Gender issuesIn most of the developing world the burden of carrying domestic water <strong>from</strong> the source(e.g. river, spring or hand-pump) to the home usually falls on women. The construction ofsmall earth dams is therefore likely to have a positive impact on women, which mayinclude a reduction in time and effort spent collecting water <strong>from</strong> distant sources.If water <strong>from</strong> an earth dam reservoir is used for irrigating vegetables, or other crops thatthe women tend, there may be increased demands on their labour. It is therefore veryimportant that women, as well as men, are included in all discussions relating to theproject, right <strong>from</strong> the planning stage. It is also essential that women should be wellrepresented on any water management committee set up to oversee the operation andmaintenance of the scheme on a long-term basis.14
3.3 OwnershipValley dams are normally built across valleys and small seasonal water courses, whichare often boundaries between two or more landowners. It is therefore important that thelandowners sign a written agreement on sharing the ownership of the dam. Thisagreement should also include sharing of the construction cost, usage of water andmaintenance of the dam. The agreement must be finalised before any survey andconstruction works take place.Valley dams may interfere with people’s water supply downstream. Since valley damscan collapse during exceptionally heavy rainfall due to poor maintenance, incorrectdesign or poor construction work, this could endanger people and structures downstream.For these reasons, approval for the design and permission for the construction works mustbe obtained <strong>from</strong> the authorities.Unhindered access to a community valley dam must also be agreed upon in writing bythe landowners concerned.Usually, it is sufficient that landowners declare the land for a dam, and its access road, as"public land" during an official meeting with their Chief. However, a verbal declarationshould be recorded in the Minutes of the meeting along with a supporting letter <strong>from</strong> theland-owners. This is necessary, because although the existing owners may agree, theirsons and daughters, or future land-owners may disagree without such a written consent.In any case, it is wise to consult the office of the District <strong>Water</strong> Officer (DWO) or similarauthority on the legal issues relating to ownership of water sources.Hillside dams and Charco dams are less complicated because they are built on hillsidesand flat land that is usually owned by just one person or family. Another advantage withthese two types of earth dams is that they are not situated in seasonal watercourses and donot therefore affect people living downstream.Catchment protection is also required to reduce soil erosion and siltation of damreservoirs. The protection can consist of digging trenches, making terraces and plantingof grasses or trees in rows along the contours. It also includes the building of check damsand silt traps in gullies. All land-users in a catchment area should be encouraged toparticipate in all the soil conservation activities, including the maintenance of structuresand vegetation cover.3.4 Legal requirementsLegal requirements vary <strong>from</strong> one country to another. It is always advisable to ask theauthorities before starting any construction works in order to avoid disappointment andlegal cases.Generally, it is understood that farmers may construct ponds and small earth dams ontheir land without asking permission <strong>from</strong> anyone, provided they do not block water runoffto people living downstream.15
Borrow pits along roads can be turned into water reservoirs by digging a trench or twofor diverting run-off <strong>from</strong> a road into a borrow pit. Whether this is allowed depends onthe local authorities in that region. Therefore it is better to ask before digging that trench,instead of being confronted by the authorities or fined afterwards.Subsurface dams, weirs and sand dams built across small streams and dry riverbedscan easily be built using soil, sandbags or rubble stone masonry, thus damming anddiverting water for various purposes. However care should be taken as plans for buildingsuch structures require approvals by the relevant authorities in most countries, becauseweirs may reduce the water supply for people living downstream.3.5 Specific local issuesPast experience has shown that many projects fail for social rather than technical reasons.Failure may be because projects were poorly managed and lacked proper maintenance.This often occurs when it is unclear who is responsible to ensure routine inspection andmaintenance as and when required. Local disputes over access or ownership of watersystems are also a common problem.To avoid this, the local community should be involved <strong>from</strong> the start of any project, bothto plan and later to manage it. This ensures a sense of ownership by everyone involved. Italso gives the community the opportunity to sort out any issues which could threaten thefuture of the project.The small valley dam shown below was built manually by the author on his farm in thesemi-arid Kibwezi area during two weeks in 1976. For the last 30 years, domestic waterhas been drawn <strong>from</strong> lined and unlined hand-dug wells downstream of the dam. Anorchard and a small forest benefit <strong>from</strong> seepage <strong>from</strong> the dam reservoir, despite thesurface water drying up in the water reservoir during long dry periodsThousands of small valleys, as this one, could be turned into evergreen orchards andforests, while also supplying water all year round for domestic use, watering livestockand small-scale irrigation.16
Chapter 4.Charco damsFarmers and cattle owners in semi-arid parts of Tanzania build small earth damsknown as Charco, or Milambo in Kiswahili. These dams are built in a way which triesto reduce evaporation losses by deepening the water reservoirs and minimising theirsurface area. Trees and scrubs are grown on the windy site of the charco dams tofunction as windbreaks that also reduce evaporation.A Tanzanian farmer (with cap) explains the benefits of his charco dam.4.1 Site selectionThe best sites for constructing charco dams are in natural depressions where rainwatereither flows or accumulates during the rainy season. The soil should, preferably, bedeep clay, silt or Black Cotton soil. Coarse textured sandy soils should be avoided asthese are highly permeable and water will drain through them. If seepage is high incharco dams, they can be plastered with clayey soil and compacted using compactorsmade of tree trunks. The most suitable types of soil for dams are shown in Chapter 6.Sites with underlying strata of sand, gravel, limestone or fractured rock at a shallowdepth may also result in high seepage losses, unless they are sealed with clayey soil.Ideally, a charco dam should be located near to a gully or a natural waterway, whichcarries water during and after rainfalls, as this water can easily be diverted into thedam. Avoid building dams near or downstream <strong>from</strong> livestock enclosures to avoidorganic and/or chemical pollution.Charco dams are usually excavated manually by individuals near their homesteads forwatering livestock. The water may also be used for some domestic purposes, if it isboiled or treated by the sun’s UV rays in transparent bottles (SODIS).Farmers dig their ponds during dry seasons and enlarge them every year, until theowner is satisfied with the capacity of the dam.17
A farmer is building his charco dam on theflat plain west of the Usambara Mountainsin Tanzania.Unfortunately, this farmer has onlyone shovel and 3 old jerrycans toexcavate and transport soil.4.2 DesignThe most economical and perfect shape for a charco dam is that of a calabash cut inhalf and used for scooping water. The "handle" is used for the inflow channel and forgiving access to people and livestock, while the “bowl” is the water reservoir.The photo shows the inflow channel to a charco dam seen in the background. Usually,inflow channels have some logs laid across the floor of the inflow channel thatfunction as steps and silt traps to prevent the water reservoir <strong>from</strong> being silted up.18
Since there are no documented guidelines or training on constructing charco dams, theTanzanian farmers build their dams in any shape, although circular and oval designsare preferred, because:1) They give maximum storage volume for a minimum of work.2) The internal and external pressures are evenly distributed and this preventscave-in of the soil in the walls of the water reservoir.3) In sandy soils, they can be lined successfully with clayey soil, because theshapes do not have any corners.The size of a charco dam depends on the following factors:1) A farmer’s financial capacity to hire labourers to assist him with excavation.2) The expected volume of run-off water <strong>from</strong> the catchment.3) The area available for constructing the pond.4) The soil type.Recommended plan and profiles for a standard design of charco dams.19
4.3 Marking out a charco damBefore the excavation work of a charco dam can be started, the outline of the variousparts of the structure has to be marked with wooden pegs. A standard lay out of acharco dam is shown below.When pegging out a charco dam, always remember that the inflow must be situatedwhere rainwater run-off either accumulates in a shallow pan, or passes by as a smallstream during rains. The volume of rainwater running into a dam can be increased byeither extending the catchment area or diverting a small stream by means of a soilbund stretching upwards with a gradient of 3 cm per 100 cm <strong>from</strong> the inflow.A soil bund that slopes upwards <strong>from</strong> the inflow of a dam will increase the volume ofrainwater flowing into the dam.20
4.4 ConstructionThe construction site should be cleared of all vegetation, including the semi-circulararea where the excavated soil will be placed as the dam wall on the lowest side of thewater reservoir.Then the outlines of the dam reservoir and the half-circular dam wall are drawn andpegged out using a long string tied to the centre of the dam reservoir. A two metrewide space, called a berm, should be left untouched between the dam reservoir andthe dam wall. Its purpose is to facilitate transportation of soil, while also preventingsoil <strong>from</strong> the dam wall to slide back into the excavated reservoir. The excavated soilshould form a semi-circular dam wall (embankment) all around the water reservoir,except at the inflow channel, to reduce wind speed and evaporation. The slopes of thedam wall should be flatter than 1:1 (45 degrees). The top of the dam wall, called thecrest, must be highest opposite the inflow channel to prevent wash-out of the damwall.Rainwater must not be allowed to wash any soil back into the pond. Therefore, treesand grass should be planted on the dam wall to protect it <strong>from</strong> erosion and create awindbreak. More trees should be planted outside the embankment on the side towardsthe prevailing wind to form a windbreak, which will reduce evaporation losses andprovide firewood, poles and timber.Another way to reduce evaporation and conserve water towards the end of the dryseason is to deepen one end of the dam reservoir. As the pond dries out, the remainingwater will accumulate in the deeper section and minimise the area of water exposed toevaporation.A spillway should be built at each end of the curved dam wall that reaches the inflowchannel. These two spillways will facilitate excess water to spill over the waterreservoir safely. Large stones should be placed along the lower side of the twospillways to prevent erosion of the dam wall.A series of silt traps also need to be constructed to reduce the volume of sedimententering the dam reservoir. These can be made by excavating depressions in the flatland before the inflow channel. Sediment trapped in the silt traps should be removedafter rain showers, so the silt traps do not get filled up with silt. The removed silt isrich in nutrient and therefore an excellent fertiliser for a vegetable garden.4.5 ConstraintsThere are a few constraints to the increased adoption of charco dams, such as:1) Lack of technical knowledge for design, construction and maintenance - untilthis handbook is published.2) The volume of the water reservoirs is reduced if silt is not removed <strong>from</strong> thesilt traps after rain showers.3) Seepage losses where dams in sandy soils have not been lined.4) Evaporation losses where dams have insufficient wind breaks.21
Chapter 5.Hillside dams<strong>Small</strong> earth dams with curved walls built on hillsides and sloping land are the simplestand cheapest earth dams to locate, design, construct and maintain. It is thereforesurprising that these dams, known as hillside dams, are not promoted more widely.A bird’s-eye view of a hillside dam.5.1 Site selectionSuitable sites for hillside dams can be found on almost any sloping land that producesrainwater runoff. The catchment can include roads, compounds, roofs, agricultural landand rock outcrops. To avoid contamination of the water, there should not be any pollutionsources, such as drainage <strong>from</strong> villages, slaughter houses, latrines, rubbish pits, cattledips etc., in the catchment area.Naturally, the best soil type for constructing a water reservoir should have a high contentof clay. However, soil types other than the clayey type can also be used, although someseepage may occur downstream. For more details on soil types, please see Chapter 7.Despite seepage being considered as wasted water, the water can still be utilisedconstructively if it was extracted <strong>from</strong> a hand-dug well, thereby providing safe and cleanwater for e.g. domestic use, watering livestock, garden irrigation, making burnt bricks, awood lot, etc.5.2 DesignThe design of hillside dams consists of a semi-circular dam wall, shaped like a newmoon. The curved dam wall is made of compacted earth, which must be higher at themiddle than at both ends to prevent any water spilling over the middle of the dam wall.Each of the two ends of the curved dam wall function as spillways and should thereforebe at the same level. The lower sides of the two spillways are strengthened with rocks toprevent the water <strong>from</strong> spilling over and eroding the ends of the dam wall.22
Simple equipment for measuring levels and gradientsA levelling instrument, called a dumpy level,is expensive to buy and difficult to borrow.A much simpler levelling instrument can bemade <strong>from</strong> a one metre long length oftransparent hosepipe that is bent into a circleand filled halfway with water.When sighting along the two waterlevels in the hosepipe an exact horizontalline is projected forward.Horizontal contour lines are found by Gradients are found by sighting onto atwo persons having the same eye height. stick with measurements and measuringThe person who is sighting, tells the other the distance between the stick and themove up or down until his eye is at the same person.level.Source: <strong>Water</strong> <strong>from</strong> Dry Riverbeds and <strong>Water</strong> Surveys and Designs of this series.A simple tool made of 3 sticks can be used formeasuring out levels, gradients and distances.A mark is made at the exact middle of thehorizontal stick and a small stone is tied with astring to the top of the other two sticks. Tomeasure a horizontal line, the two legs musthave exactly the same length and the stringwith the stone must be perfectly aligned withthe mark. The tool seen to the left is made insuch a way that it will measure a gradient of3:100 for the floor of spillways.23
Plan and profile of a hillside dam.This cross profile of a hillside dam shows that the dam wall should be at least 100 cmhigher in the middle than the two ends that function as spillways. The two ends of thedam wall must be at least 100 cm higher than the level of the spillways.It is not essential to know the runoff volume of rainwater <strong>from</strong> the catchment for hillsidedams, because when the reservoir is filled with water, surplus water will simply spill overthe ends of the dam wall, which are the spillways, and continue its downhill course.24
Another very positive feature of hillside dams is that it is possible to start by constructinga relatively small dam for storing water <strong>from</strong> the first rainy season, and then enlarging itduring the following dry seasons. This can be done a number of times until the reservoirhas been significantly enlarged to the desired capacity as shown below.During the first dry season, it is possible toexcavate a shallow water reservoir and usethe excavated soil to build a low dam wall.Result after deepening the water reservoirand heightening the dam wall withexcavated soil <strong>from</strong> several dry seasons.The enlargement process of hillside dams can also be illustrated as above.Source: <strong>Water</strong> <strong>from</strong> ponds, pans and dams by Erik Nissen-Petersen, RELMA/Sida 2004.25
5.3 ConstructionPegging out the outline of a hillside dam is done by hammering a peg into the run-offline of the rainwater. Preferably, the peg should be placed in a depression in the run-offline, because that will provide free storage capacity.A plan and a photo of a hillside dam that is placed correctly across a run-off line ofrainwater. The two ends of the dam wall must be horizontal to function as spillways. Ahorizontal line can be found by either a transparent hosepipe filled with water or acircular transparent hosepipe filled halfway with water. Please, see Chapter 8 for details.Excavation workThe excavation and soil works for a small earth dam on a hillside site can be donemanually, with oxen, a plough mounted on a farm tractor, or a crawler. The constructionwork involves excavating soil <strong>from</strong> the central pit and placing it in a semi-circular linealong the downstream side of the excavation as shown below.The curved heap of soil will become the dam wall, while the excavated pit will be thewater reservoir. The size of the dam wall and its reservoir depends on the capacity forremoving soil <strong>from</strong> the reservoir and placing it on the dam wall. The gradient (slope) ofthe sides of the dam wall should be 2:1, which is 2m of width for every 1m of height.26
For manual excavation, divide the area to be excavated into “plots”, each plot beingexactly 1 cubic metre as shown above. Each plot is numbered and given to an “owner”.Plots are being marked out with wooden pegs.Excavation work is halfway completedAn ox-scoop with two men and oxen can excavate and move more soil than 12 men.27
The crest (top of dam wall) must always be at least one metre higher at the middle thanat the ends to prevent a wash-out of the middle section by a heavy thunderstorm.In addition, height must be increased by 10% if the soil is compacted by a tractor. Thismust be increased by 20% if compacted by oxen and by 30% if the dam wall is notcompacted at all. These increased heights are called the settlement allowance, becausewhen the reservoir of a newly built dam gets filled with water, the soil in the dam wallwill settle and lower the middle of the dam wall, which endangers the safety of the dam.SpillwaysThe two ends of the curved wall of hillside dams function as spillways to allow surpluswater <strong>from</strong> the reservoir to flow safely out of the dam. Heavy rain-showers on largecatchments produce huge volumes of run-off water that must pass over the spillwayswithout eroding the ends of the dam wall otherwise water might destroy the whole damwall.Spillways should therefore be reinforced by placing large stones against the ends of thedam walls. Long-rooted grass with runners should be planted between the stones toprevent overflowing water <strong>from</strong> eroding the stones. The floor of the spillways should alsobe covered with stones interplanted with grass to prevent erosion. If the floor of thespillways is steep a concreted stone-masonry structure may be needed.Enlarging a catchmentShould the volume of run-off water not be sufficient to fill a pond, then a catchment canbe enlarged by diverting run-off water <strong>from</strong> another catchment into the pond by means ofsoil bunds as explained in the former chapter.Enlarging a water reservoir<strong>Dams</strong> having catchments with sufficient run-off can be enlarged to hold much morewater by deepening the reservoir and using the excavated soil to increase the height of thedam wall. Labour for enlargement of dams might be obtained by:• Allowing neighbours to collect water free of charge, if they will excavate andtransport one wheelbarrow of soil for every one jerrycan of water they fetch.• Charging people a fixed amount for every jerrycan of water they fetch and using themoney raised to hire people for further excavation work.28
A hillside dam built by a tractorploughing in circles against the damwall in Zambia. It took the farmertwo weeks to complete theconstruction works.A hillside dam built manually at thefoot of a rock outcrop in Kitui,Kenya, some 40 years ago. The damis still providing clean water fordomestic use <strong>from</strong> a hand-dug wellsunk into a seepage line downstreamof the dam wall.An example of a hillside dam harvesting rainwater run off the Machakos-Kitui road.29
Chapter 6.Valley damsAn earth dams built in a valley is the cheapest way to create a water storage, because theexcavation work is less than for Charco dams and hillside dams. However, the gain incost per volume can be lost overnight by flooding <strong>from</strong> one heavy thunderstorm orshower, which, unfortunately seem to be bigger every year. The wash-out of a dam wallcan be very serious and endanger both lives and property. For this reason experiencedtechnical help should always be sought for the design and construction of valley damswhich might present a possible threat to downstream households.The series of photos for this chapter on valley dams were taken during a training courseon manual construction of valley dams. A team of 25 engineers and technicianssurveyed, designed and supervised the construction of Kimuu dam at Kibwezi in 1998. Inspite of all precautions taken and all design criteria being followed, the dam was washedaway after 72 hours of a continuous and heavy downpour. The rains were soexceptionally heavy that a nearby valley dam, Kamuti, which was built in 1956 and hadsurvived El Nino, was also washed away that night.The lesson of these two disasters is that the width of spillways and the height offreeboards should no longer be calculated on the basis of the maximum rainfall per hourfor the last 50 years. A bigger safety margin, of say 25%, has to be added.6.1 Legal requirementsAs mentioned earlier, there are more legal requirements for valley dams than for charcoand hillside dams. The reason being that valleys often have seasonal, or even perennialstreams of water on which people living downstream depend for their livelihood. Apermit for building a dam and extraction of water is therefore required <strong>from</strong> the localauthorities, such as a District <strong>Water</strong> Bailiff.Another requirement is a professional design with BQ and cost, and an environmentalassessment report might have to be produced and approved by the local authorities.A third legal aspect is that the floors of valleys are often boundaries between differentlandowners. Their permission and cooperation is required for, among other things, thedam construction, the usage of the water, and the protection of the catchment area. Thiscan be a time-consuming task if the landowners live far away, or are perhaps never seen.Nevertheless, if the construction of a valley dam is still desirable, the next issue is toevaluate the financial viability in order to avoid potential losses.6.2 Financial viabilityIt is always worthwhile to make a rough estimate of whether it is economically viable toconstruct a dam, before spending a lot of time and money for labour on it. The firstcriteria should therefore be whether a dam can supply sufficient water to pay back theinvestment over some 10 years.30
The rainwater runoff <strong>from</strong> the catchment area must therefore be sufficient to fill theproposed water reservoir during a rainy season. On the other hand, if the catchment is toolarge, the volume of run-off water might be so voluminous that the dam risks beingwashed away, even if spillways are extra large.Since it is very difficult to obtain precise rainfall data, a simple and reliable method onestimating the volume of run-off can be applied as shown below.Long-time residents’ knowledge about the biggest flood ever experienced can be used asthe basis for calculating the size of spillways, as follows: Multiply the width of the floodwith its depth and divide by 2. In this example: 10 x 1 m /2 = 5 square metres of flood. Ifthe flood moves with a velocity of 1 metre per second, and if the valley is flooded for anaverage of 3 hours, the volume of rainwater run-off will be:5 sq.m. x 1 m x 60 seconds x 60 minutes x 3 hours = 9,000 cubic metres of water.Now the question is: What are the approximate dimensions of a water reservoir for avalley dam that should be able to store 9,000 cubic metres of water?The question can be answered by the formula for estimating the volume of a reservoir fora valley dam, which is:Maximum width x maximum depth x maximum throw-back (length) /6 = Volume.For example: 50 m max. width x 5 m max. depth x 220 m max length / 6 = 9,167 cubicmetres storage volume, which can store the required 9,000 cu.m. run-off.31
The next question is: How much soil work will it take to construct a dam wall capable ofstoring the 9,000 cu.m. water? A rule of thumb states the following:Since the dam wall has to be about 2 metres higher than the water level, it will have amaximum height of 7 m. The maximum width of its base, with a batter gradient of 2.5:1,will be 7 m x 2.5 x 2 sides = 35 m, plus 2 m crest = 37 m width at the highest part.The soil work will therefore be approximately:7 m height x 37 m width x 50 m length / 4 = 3,238 cubic metres of soil, which isto be excavated <strong>from</strong> the two spillways, situated at either each end of the dam wall.The cost of excavating, transporting and compacting 3,238 cu.m. of soil depends onwhether it will be carried out by manual labour, animal draft, a farm tractor with a scoopor a crawler. Naturally, the cost of these means of soil works varies locally and countrywise.Nevertheless, the following estimates can be used as guidelines.Method of soil worksKshAnimal draught of 3,238 cu.m. of soil @ Ksh 60/cu.m = 194,280Manual labour of 3,238 cu.m. of soil @ Ksh 75/cu.m. = 242,850Farm tractor of 3,238 cu.m. of soil @ Ksh 100/cu.m = 323,800Crawler of 3,238 cu.m. of soil @ Ksh 200/cu.m = 647,600If the legal aspects and the economical estimate seem reasonable, then look for a viablesite that can fulfil the following site criteria:6.3 Site criteria1) The wall of the earth dam should be situated in a narrow part of the valley thatwidens just upstream to give additional free storage capacity for water.2) The dam wall needs to be built in a part of the valley which provides animpervious (water tight) valley floor of clayey soil.3) The valley floor should be flat, because it will give free storage volume.4) The dam wall should be situated at least 100 m <strong>from</strong> any bends in the valley toprevent currents causing erosion when heavy runoff occurs.5) Suitable clayey soils for building the dam wall should be available <strong>from</strong> a borrowpit in the reservoir and <strong>from</strong> excavating the spillways.6) Reservoirs should not contain boulders or rock outcrops because they might causeleakages; this can be prevented if covered with clayey soil.7) Natural depressions in the banks of a reservoir, when present, should be used forspillways in order to reduce construction costs.32
6.4 Measurements to be taken of a dam siteWhen a suitable site has been found, the following measurements are required to draw adesign and calculate the Bill of Quantities (BQ) and estimate construction costs:1) Bench Mark (BM)Make a bench mark (BM) on a tree or rock, orconcrete a few stones together near one end ofthe proposed dam wall. Mark the BM pointwith white paint to make it visible <strong>from</strong> adistance. Plot the position of the bench markonto a contour map of 1:50,000 if available,otherwise draw a sketch on graph millimetrepaper to a scale of 1 centimetre being equal to 2metres.From now, all measurements, levels andheights will be taken <strong>from</strong> this BM and drawnin the sketch.Plan of a dam site with a BM on the leftside <strong>from</strong> where all measurements,levels and heights are taken.2) Maximum water level (WL)Draw a builder’s line and a long tape measureacross the valley <strong>from</strong> the BM to the oppositeend of the dam wall as shown in the photo.Insert the ring at the end of another long tapemeasure onto the builder’s line in such a waythat the tape measure can slide across the valley.Then take the vertical measurements <strong>from</strong> thebuilder’s line to the floor of the valley for every2 metres, which is read on the tape measurehanging on the builder’s line.Also measure the length and depth of themaximum flood that has ever passed throughthe valley. This data shall be used for estimatingthe width and depth of the spillways.The photo shows a builder’s line and along tape measure being drawn over aa narrow point in the valley33
6.5 DesignThe measurements taken <strong>from</strong> the builder’s line can be recorded as:Measurement no. 1 2 3 4 5 6 7 8 9 10 11 12 13 14Horizontal m 2 2 2 2 2 2 2 2 2 2 2 2 2 2Vertical m 0 2 3 5 6 6 5 4 5 5 4 3 2 0Max. flood level 0 0 0 1 2 2 1 0 1 1 0 0 0 0These measurements were converted into a profile of the riverbed as shown below.BM 1 2 3 4 5 6 7 8 9 10 11 12 13 14A profile drawn according to the measurements taken <strong>from</strong> the builder’s line drawnacross a narrow part of the valley where the dam wall will be constructed.SpillwaysThe maximum flood level (MAX. FL) is 15 m wide and 2 m at its deepest. That givesa cross section of: 15 m x 2 m / 2 = 15 square metres. The size of the spillways shouldbe the double of that, namely 30 m wide and 1 m deep = 30 square metres.The maximum water level, and the depth and width of the spillways can now bedrawn on the profile as seen below.The sketch shows the maximum water level (MAX. WL), which is 1 m below theground level, and the two spillways having a width of 30 m and depth of 1 m, equal to30 square metres, below the ground level.FreeboardThe next sketch shows the 1.5 m high freeboard, which ensures that floodwater risingabove the MAX. WL will spill over into the spillways without damaging the damwall. The sketch also shows the crest (top of the dam wall) that must be higher in themiddle than at its ends to cater for settling (sinking) of a new dam wall.34
The sketch shows that a freeboard 1.5 m high has been added to the MAX WL, andthat the dam wall has been raised above the freeboard with a convex (upward) crestto cater for settling of the soil in a new dam wall.Convex crestThe settling of soil in a new dam wall depends mainly on the method of compactingthe soil when building the dam wall. Therefore the crest of an earth dam shouldalways be highest at the middle and lowest at the ends (convex). This is to avoid awashout of the middle section of the dam wall in case the spillway is blocked, orcannot cope with the peak discharge in a heavy storm. Should a washout happen, it iseasier to repair the end of a dam wall instead of repairing the deep middle section.Soil used for building dams is excavated and transported to the site by baskets,wheelbarrows, ox-carts, donkey carts or tractor trailers, and off-loaded on the damwall. During the process, soil is broken into small pieces with voids filled by air.No matter whether the soil is compacted manually or by animals, tractors or evencrawlers, the height of a newly built dam wall will settle when the reservoir is filledwith water for the first time. This settling occurs because the soil, made pliable andheavy by water, will press air out of the voids in the soil.Many new earth dams have been washed away by floods over-topping their crestswhich had become too low (concave) at their middle due to soil having settled morethan expected. Dam walls must therefore always be made higher (convex) at theirmiddle section.The height of a convex crest above the freeboard depends on the height of the damwall measured <strong>from</strong> the floor of the valley to the freeboard as follows:10 % of the height of the dam wall when compacted dry by machinery.20 % of the height of the dam wall when compacted dry by people and livestock.30 % of the height of the dam wall when not compacted at all.The width of the crest of a dam wall should be sufficient to allow traffic to use thecrest as a road spanning across a valley. The minimum width of a crest should be 2 mfor walking and 3 m for vehicles, if they want to pass over the dam wall.35
Key under dam wallsTo prevent seepage passing under dam walls, it is necessary to build a key, also calleda cut-off trench, or a core trench. The key consists of a trench dug immediately belowthe centre line or crest of the dam wall. The key must extend along the dam wall andinclude all sections that lie below the maximum water level.The key must be excavated down through all layers of sand and gravel until it is atleast 0.6 metres into watertight soil, like clay and murram. The width of a key shouldbe at least 2.5 metres with its sides sloping at 45 degrees. A key is back-filled andcompacted with the most clayey soil found on or near the construction site.A sketch showing the key under a dam wall.6.6 Soil for dam wallsBefore the cross section of a dam wall can be drawn, it is necessary to analyse somesoil samples taken on the site, because the type of soil available on the site determinesthe type of the dam wall to be constructed. Soil can be classified as follows:Well graded gravel = GW Inorganic silt with low liquid = MLPoorly graded gravel = CL Inorganic clays with low liquid= CLSilty gravel = GM Organic silts with low liquid = OLClayey gravel = GC Inorganic silt with high liquid = MHWell graded sand = SW Inorganic clay with high liquid= CHPoorly graded sand = SP Organic clay with high liquid = OHSilty sands = SM Peat and highly organic soils = PtClayey sand = SC Source: Nelson, K.D. 1985A simpler method is to remove the cap and bottom of some transparent plastic bottles.Place the bottles upside down in sand or between stones. Fill the bottles halfway withsoil samples and top up with water. The soil with the slowest seepage is the best forbuilding dam walls, because it has the highest clay content.36
Homogeneous dam walls can be built of the soil types classified as GC, SC, CL andCH, and if the soil has a clay content of 20% to 30%. (See Chapter 7 for soil analysis).A homogeneous dam wall built of one type of soil. The letters refer to the soiltypes listed above.Zoned dam walls consist of a core of clayey soil whose sides are supported withsandy soil. It is a more stable and economic design than a homogenous dam wallbecause it can be built with steeper slopes, thereby reducing the cost of earth works.A zoned dam wall with a core of clayey soil supported by sandy soil.Diaphram dam walls are used where there are plenty of rocks and/or stones or gravelon a site. These pervious materials are covered on the upstream side with animpervious blanket (diaphragm) of soil with a clay content of 12% to 40%. Theblanket must start below the front toe to prevent seepage under the dam wall.A diaphragm dam wall with a blanket of clay soil covering pervious materials.37
Sisal strings have been drawn to mark the gradient of a dam wall and sandy soil is beingplaced against the core of clayey soil on both the upstream and downstream side.6.7 Data for designing valley damsThe table below shows the conditions required for designing a valley dam.CatchmentArea - 150haMean average rainfall - 800mmCoverage - Thick scrubLength - 2 kmSlope - Steep & hillySoil type - Fair permeabilityMax. run-off volume - 18,900 m 3 in 24 hoursDam wallVolume of soil - 3,345 m 3Height - 6.05 mLength - 41.60 mWidth of crest - 3 mConvex crest - 10% of heightUpstream batter - 3:1Downstream batter - 2.5:1SpillwayWidth - 10mDepth - 1.5mFloor gradient - 3:100Length - 60mExcavation volume - 600m 3ReservoirMax. width - 40 mMax. depth - 4.5 mThrow-back - 150 mSoil excavated<strong>from</strong> borrow pit - 2,745m 3<strong>Water</strong> Storage Volume - 4,500m 339
6.8 Bill of Quantities (BQ) and costsIn order to work out the cost of survey, design, tools, equipment, materials and labourwhich make up the overall Bill of Quantities it is first necessary to calculate the amountof material which needs to be excavated. The box shows how this can be calculated.The formula for estimating the volume of soil works for a dam wall is:-V = 0.216HL (2C + HS)Where:-V is the volume of soil in cubic metres.H is the maximum height of the dam wall in metres - before settling = 7.7 mL is the length of the crest in metres= 41.6 mC is the width of the crest in metres= 3 mS is the sum of the upstream and downstream slope = 5.5(Upstream slope 3:1 + Downstream slope 2.5:1 = 5.5)Therefore:-V, the volume of soil needed for the dam wall, can be found as follows:V = 0.216 H L x (2C + HS)V = 0.216 x 7.70 x 41.6 x (2C + HS)V = 69.19 x (2C + HS)V = 69.19 x (2 x 3 + 7.7 x 5.5)V = 69.19 x (6 + 42.35)V = 69.19 x 48.35 = 3,345 m 3The soil for the dam wall will come <strong>from</strong> a borrow pit dug in the reservoir and theexcavation of the spillway. The quantity <strong>from</strong> each source can now be worked out asshown below.Soil to be excavated <strong>from</strong> a 1m deep, 10 m wide and 60m long spillwayWidth x mean Depth x Length10m x 1m x 60 m = 600 m 3Soil to be excavated <strong>from</strong> a borrow pit = 3,345m 3 - 600m 3 = 2,745m 340
Where manual labour is being paid for, its cost obviously has to be calculated. Even if thelabour is being provided voluntarily it is necessary to calculate how many person days arerequired. It is worth estimating the value of this local contribution so that the significanceof this contribution is rightly recognised and shared with the community. The value ofcommunity labour in this example, which involves the manual excavation of 3,345m 3 ofsoil works, is shown below.Clearing the site and road; 10 persons for 8 days @ Ksh 100 8,000Survey and test pits; 10 persons for 3 days @ Ksh 100 3,000Soil works, 3,345 cu.m. @ Ksh 100 334,500Total value of community labour 345,500The cost of surveying, designing and supervising the construction of the earth dam isshown in the table below. It should be noted that this figure does not include the cost ofany external technical assistance, such as consultancy fees for assistance with survey anddesign work.Fee for survey and design (excl. consultant's fee) 20,000Fee for Construction Supervisor for 30 days @ Ksh 2,000 60,000Fee for <strong>Water</strong> Permit 3,900Total cost of survey, design and supervision 83,90041
The table below shows all the tools, equipment and costs needed for constructing a smallearth dam using manual labour.Item Quantity KshCompactors, short tree trunks for compacting soil 5 Self-madeCircular level (for measuring level & slopes) 1 100Iron bar (for loosening large stones) 1 650Adjustable spanner (for tightening nuts on wheelbarrows) 1 45Flat files (for sharpening pangas) 2 500Mattocks with handles (for excavating soil in spillway) 15 7,200Nylon lines (for marking out dam wall) 4 400Pangas (large knife for clearing dam site and road ofbushes)4 800Wooden pegs (for outlining spillway and dam wall) 50 Self-madePick-axes with handles (for excavating soil in spillway) 15 5,700Shovels (for loading soil onto wheelbarrows) 30 5,400Sledge hammer (for breaking large stones) 1 395Wheelbarrows (for transporting soil to dam wall) 30 54,000Tape measures: 1 x 50 m and 1 x 30 m 2 5,000Total cost of tools and equipment 80,19042
The cost of tools and materials for incorporating draw-off piping is shown below.Item Quantity KshPipe wrenches 2 units 924Masonry tools 1 set 1,576Galvanised iron pipes, 1" diameter 84 m 15,000Cement 5 bags 2,500<strong>Water</strong>tap, filter, fittings and lockable man-hole 1 unit 7,000Total cost of tools and materials for draw-off piping 27,000Summary of costsThe costs of all the different aspects involved in building an earth dam, namely survey,design, tools, materials and labour as outlined above in Tables 15, 16, 17 and 18 aresummarised below in Table 19. By adding together all of these separate components ofthe work, the total cost for the earth dam can be calculated.Item Costs KshCost of survey, design and supervision (excluding consultant) 83,900Cost of tools and equipment 80,190Cost of tools and materials for draw-off piping 27,000Sub-Total for tools and materials 191,090Value of free community labour 345,500Total cost of constructing an earth dam 536,59043
6.9 An example of a complete designThe Kimuu Valley Dam described in this handbook.44
Chapter 7.Construction of a valley dam7.1 Check list before starting construction workBefore construction work begins it is important to check that the following criteria havebeen met and relevant procedures followed according to the sequence listed below:1) A suitable site for the dam has been identified and its feasibility investigated interms of the issues highlighted in Chapter 2.2) A written agreement on the ownership of the dam site, an access road, usage ofwater <strong>from</strong> the dam and conservation of the catchment has been completed.3) Design drawings and bill of quantities for the dam are ready.4) A decision regarding the method of excavation of soil works whether manual labour,draught power or machinery. Quotations for purchases and hiring of labour ormachinery or prior agreement with community regarding free labour inputs.5) Any legal requirements have been addressed.6) Funds for survey, design and construction of the dam have been secured.7) Construction of valley dams should only be done during dry seasons where there isvery little risk of heavy rainfall because a dam under construction can easily beswept away by a thunderstorm or heavy shower.7.2 The keyThe key under the dam wall prevents water <strong>from</strong> seeping through layers of sand orsandy soil under a dam wall. The two ends of a key should extend to the maximum levelof water in a reservoir.Place two pegs at both ends of the lowernylon string to show the width of the key,which should have a width of 2.5 metres.Attach a nylon string between these 4 pegsto mark the full extent of the key.When a key has been excavated to a depthof 60 cm below any layer of sand or sandysoil, the vertical sides of the key are cut toa slope of 45 degrees for stabilising theexcavation.45
It is a good idea to have an experiencedperson to inspect an excavated key and toadvise on selecting and compacting thebest soil for building a water-tight key.The best soil for a key is clayey soil whichcan be found using the seepage test inplastic bottles as described in Chapter 6.The soil is filled into an excavated key inlayers of 15 cm depth all along the lengthof the key.Where water is easily available it can beused to moisten the soil before it iscompacted. Where water is scarce, thesoil can be compacted without water ifall clayey lumps are broken into dust.The key has been excavated into solid soilwith some test pits to prove that there areno layers of sand underneath the key.The pipe seen on the photo drains a small stream of water through the dam wall. Whenthe dam wall is near completion, the pipe will be closed and the stream will fill the waterreservoir.Preferably, the soil should be compacted in15 cm thickhorizontal layers using a short length of a tree trunk with ahandle nailed onto its top as shown to the right.7.3 FoundationFoundations of earth dams, as well as keys, should be madewatertight to prevent seepage under the dam walls. This canbe achieved by removing all vegetation together with its rootsand all patches of sandy soil within the base of dam walls.The outline of the foundation for a dam wall is determined by the depth <strong>from</strong> the lineshowing the maximum water level to the ground and the upstream and downstreamslopes of a dam wall (gradients of batters).46
The outline of the base for a dam wall is determined by multiplying the verticalmeasurements <strong>from</strong> the maximum water line to the ground with the gradient of theupstream and downstream batter. The upstream measurements are taken <strong>from</strong> theupstream side of the key and the downstream measurements are taken <strong>from</strong> thedownstream side of the key as shown in the table below.PointDepth <strong>from</strong>centre lineto theground(m)Gradient ofupstreambatter3:1Upstreamlength ofbase <strong>from</strong>key (m)Depth <strong>from</strong>centre lineto theground (m)Gradient ofdownstreambatter2.5:1Downstreamlength ofbase <strong>from</strong>key (m)1 1.2 X 3 = 3.6 1.2 X 2.5 = 3.002 1.7 X 3 = 5.1 1.7 X 2.5 = 4.253 4.0 X 3 = 12.0 4.0 X 2.5 = 10.004 5.1 X 3 = 15.3 5.1 X 2.5 = 12.755 5.5 X 3 = 16.5 5.5 X 2.5 = 13.756 4.8 X 3 = 14.4 4.8 X 2.5 = 12.007 4.5 X 3 = 13.5 4.5 X 2.5 = 11.258 1.8 X 3 = 5.4 1.8 X 2.5 = 4.509 1.1 X 3 = 3.3 1.1 X 2.5 = 2.757.4 Draw-off pipeWhere a draw-off pipe is required, it should be laid when the foundation has beenexcavated. To prevent seepage along the pipe, it is laid in blocks of concrete every 3metres or so.Alternatively, a siphon pipe can be laid over one of the two spillways as shown below.A siphon pipe laid over one of the two spillways. A non-return valve is fitted onto theintake and a watertap onto the outlet. The siphon is started by closing the watertap andfilling the primer with water until all air is out. Then close the primer and open the tap.47
<strong>Water</strong> drawn directly <strong>from</strong> a dam reservoir is not suitable for domestic use, unless thewater is boiled, or sterilised by the sun’s ultraviolet rays in a transparent bottle (theSODIS method). However, clean water can nearly always be drawn <strong>from</strong> a hand-dug wellsunk into a seepage line somewhere downstream of an earth dam.7.5 SpillwaysA spillway should be sited at a distance of at least 10 metres <strong>from</strong> either end of a damwall to avoid floodwater eroding the dam wall. The depth of the spillway is measured<strong>from</strong> the line of maximum water level, which is equal to the lower line of the freeboard.The floor of a spillway is made level at the centre line. From there the floor should slope3 cm for every 100 cm towards its upstream and downstream edge. The gradient can befound using a simple tool consisting of a spirit level placed on a 3 metre long timber thathas a 9 cm long leg at one of its ends. When the spirit level shows it is horizontal, the legwill be situated 9 cm lower than the other end of the timber, thus marking the requiredslope of 3 cm per 100 cm. (as 3 cm per 100 cm = 9 cm per 300 cm.)A spirit level placed horizontally on a 300 cm long piece of timber having a 9 cm longleg at one end gives a gradient of 3:100, which is required for the floor of spillways.Where the floor of the spillway does not consist of weathered rock, then sills(small walls) of stone-masonry should be constructed across the width of the spillway todistribute an even flow of water in the spillway and prevent erosion.Further protection <strong>from</strong> erosion can be achieved by building a low wall of large stones setin mortar along the side of the spillway next to the dam wall.To minimise the risk of a thunderstorm flooding a reservoir and destroying an incompletedam wall, it is important to excavate a part of the spillway to its final depth before majorconstruction work on the dam wall begins, so that water has an outlet, if needed.Soil taken <strong>from</strong> the spillways should be used for the construction of the dam wall. If thevolume of soil is insufficient, soil has to be taken <strong>from</strong> either widening the spillway or<strong>from</strong> a borrow pit in the reservoir. For safety reasons it is wiser to widen the spillwaythan to enlarge the borrow pit.48
7.6 Borrow pitAnalysis of soil samples will show whether a borrow pit in the floor of a reservoir canprovide the most clayey soil for making a watertight key and foundation of the dam wall.The excavation of the borrow pit within the reservoir has the advantage of enlarging thereservoir volume and also not leaving any scar on the landscape as the borrow pit will besubmerged when the reservoir fills. It is however important that the depth of a borrow pitis never deeper than the bottom of the key, because otherwise water might seep under thekey emptying the reservoir. A borrow pit must be at least 10 metres upstream of the fronttoe of the dam wall to avoid seepage under the wall.7.7 Building the dam wallTo reduce the need to transport soil, the key and the lower part of a dam wall should bebuilt of soil excavated <strong>from</strong> a borrow pit dug in the floor of the reservoir. The upper partof a dam wall is built of soil excavated <strong>from</strong> its spillways. When a key has beencompacted with clayey soil and the foundation has been cleared of vegetation, roots andsandy soil, the construction of a dam wall can begin as follows:The key under a dam wallThe top soil of a borrow pit and spillways is usually the most clayey soil and shouldtherefore be used for building the watertight key under the dam wall.The core in the middle of a dam wallA core is an extension of the keyand its purpose is to preventwater seeping through dam wallsmade of sandy soils. A core isbuilt in layers of about 20 cmthicknesses upon the key andcompacted for each layer untilthe height of the maximum waterlevel is reached withoutbothering about the final width ofthe dam wall. This is because it isimportant to reach the finalheight of the core before an The core of an earth dam is built of clayey soil,unexpected thunderstorm may while sandy soil is used for the upstream andproduce a flood that could wash downstream sides of the dam wall.away a dam wall that is too low.Experience has shown that 30% height must be added to the core to compensate for thesettling of soil during flooding of the water reservoir.The sides of a dam wallWhen the core has reached its final height, the sides of the dam wall are built to theirfinal gradients and height. Several nylon strings are drawn <strong>from</strong> the crest to the outline ofthe upstream and downstream foundation to show the gradients.49
Usually, soil for building the sidesis excavated <strong>from</strong> the borrow pitand off-loaded on the upstreamside of the dam wall, while soilexcavated <strong>from</strong> the spillway(s) isoff-loaded on the downstream sideof the dam wall. This helps reducethe distance soil needs to bemoved.The depth of spillways are measured <strong>from</strong>nylon strings drawn over the spillways.The upward curved crest (top of the dam wall) should have its various heights marked outusing sticks or poles inserted along the edges of the crest. Soil is thereafter added to thecrest until the final correct height and curvature of the convex crest is achieved.7.8 Completing the construction of an earth damUpon completion of a dam wall with its convex crest and with an allowance for settling,its sides and crest are made even and smooth using shovels. Trees and bushes in thereservoir are cut down and removed. Holes made by rodents in the floor of the reservoirare filled in with soil and the ground smoothened.Larger stones should be placed along the side of the spillway that faces the dam wall toprotect it <strong>from</strong> erosion. <strong>Small</strong>er stones can be embedded in mortar between the largerstones to form a low stone masonry wall.Medium-sized stones should bepacked on the lower side of thedownstream side of the dam wallto form a rock-toe (or backtoe)drain and grass planted betweenthe stones.The stone apron will preventerosion of the dam wall by waterand soil seeping out through theback.Grass with runners is planted on the upstream sideof a dam wall, while stones are packed onto thedownstream side.50
Chapter 8.Protection of reservoir and catchment area8.1 Reservoir protectionFencing the reservoirWhere feasible, it is often appropriate to fence off reservoirs to keep livestock out. Thishelps to maintain better quality water and avoids the problem of livestock getting stuck inthe mud. Since fencing material is expensive and gets broken down by thirsty livestock,the planting of a live fence of cactus or similar thorny vegetation is much better.Washing stands and bathing roomsTo prevent contamination of dam reservoirs by people washing clothes and bathingdirectly in the water reservoirs, it is advisable to build washing stands and bath rooms.The waste water <strong>from</strong> washing clothes and <strong>from</strong> the hand-dug well should be diverted toirrigate a small vegetable garden. A watering trough for livestock, situated furtherdownstream, should also be part of the water point.LatrinesMany rural people have a habit of relieving themselves behind a bush, instead of usinglatrines. During the rainy seasons, rainwater run-off washes the excrement into damreservoirs where germs and pathogens can multiply and transmit human diseases. The useof pit latrines is therefore encouraged. Latrines must always be situated downstream ofhand-dug wells.51
The usual types of pit latrines with walls of burnt bricks and tin roofs are expensive and,due to poor craftsmanship, some latrines collapse during rainy seasons. Lack ofventilation pipes also give latrines bad smell and encourages flies.A new type of latrine, the AborLoo, can be built for the cost of only one bag of cement,for making the slab. The walls and roof are made of locally available materials such asmats or sticks. The pit is dug to only 1 metre depth and covered with the slab. Dry soilmixed with wood ash is placed in a corner of the latrine and a handful of it dropped intothe latrine after use, to avoid bad smells and facilitate the process of composting. Whenthe pit is almost full, a new pit is dug nearby and the slab and walls are transferred to thenew pit, and a tree is planted in the fertile soil of the old pit.The removable slab for an Aborloo. An Aborloo with walls of grass.Source: Ecological Sanitation in Zimbabwe by Dr. Peter Morgan.8.2 Catchment protectionIt is important to implement catchment protection, also called soil conservation, on theland <strong>from</strong> where rainwater runs off into the dam reservoirs. Otherwise layer upon layer ofsilt and soil will fill up a dam reservoir, thus reducing the volume of water it can hold.In the worst scenario, dam reservoirs will be filled to the brim with soil and cannot holdany water at all. Since de-silting of such reservoirs is more expensive than building newreservoirs, silted-up dams are often abandoned altogether. However, for dam reservoirssituated on sandy soils, a thin layer of siltation is beneficial because the silt seals the floorof a reservoir against seepage.52
As soon as an earth dam has been built and is holding water, people will bring theirlivestock for watering and that is the beginning of siltation. Later on, if people startbuilding houses near the dam and clearing land for agriculture without soil conservation,then siltation may reduce the lifetime of an earth dam to 8 years, or even less.Catchment protection on farmland can be implemented in several ways such as:Maintaining the natural vegetation cover within the catchment by avoiding overgrazingby livestock and cutting of trees for timber and charcoalContour lines of fodder grassesContour lines of fodder grasses, such asNapier Grass or the more droughtresistantBana Grass, can be grown oncontour banks, called Fanya Juu, toprevent a dam reservoir <strong>from</strong> silting up.The intervals between the banks dependon the gradient of the land. On landsloping about 3 cm per 100 cm, thedistance should be about 20 metres. Onsteeper land the distance between thebanks should be reduced.Fodder grasses grow on the contour banks.Contour lines with multi-purpose treesMulti-purpose trees, such as Prosopis,Leucaena, Melia Volkensii andAzadirachta Indica (Neem), and bananasgrow well in the ditches <strong>from</strong> where soilwas taken to make the contour banks.Contour lines of trees make windbreaksthereby reducing wind erosion of barefarmland. Windbreaks also reduceevaporation <strong>from</strong> water reservoirs byreducing the wind speed over surfacewater. Contour lines of trees improverainwater infiltration for growing crops, Bananas planted in the ditch behind a contourand provide windbreaks, firewood, bank, called a Fanya Juu.charcoal, fodder and timber.53
Silt traps made of vegetation planted between stonesSilt traps can be made of perennialvegetation planted between stones thatare laid across the inflow channel toponds and earth dams. The silt trapsreduce the velocity of the in-flowingwater thereby giving soil particles timeto settle in and above the silt traps.After flooding, most of the accumulatedsilt should be removed and used forfertilisation of adjacent farmland.Check damsCheck dams are almost similar to silttraps, but are usually made of largestones placed across inflow channels.Perennial grasses are planted in soilpacked in between the stones for"cementing" them together.Without soil conservation, rainwater andwind will transport the top soildownstream where it silts up earth damsand riverbeds.After the top soil has gone, the oncefertile land will change to a lunarlandscape with a stony surface cut bydeep gullies, where nothing can grow.54
Chapter 9. Repair and maintenance9.1 Leaking dam reservoirsNewly built earth dams do not usually hold water for as long a period as expected duringthe first couple of years, due to leakages. The reasons and recommendations for curingleakages may be summarised as follows:Leakage problems in reservoirs and recommended solutionsPROBLEM REASON SOLUTION<strong>Water</strong> disappearsthrough the floorof a damreservoir.<strong>Water</strong> seepsthrough anewly-built damwall.The floor wasnot madewater-tight,and holesmade byrodents,rotten treeroots, oldant-hills,forgotten pitsand trial pits,all drainwater into thegroundbelow.The soil inthe dam wallcontains airand waterfilledvoids.The holes must be sealed with clayey soil andcompacted. Stones and boulders must be removed<strong>from</strong> the floor, as water can seep along them intothe ground below. If some boulders are too large toremove, these should be covered with a thick layerof clayey soil to prevent seepage.Should a dam reservoir still leak after the floor hasbeen prepared as described above, the floor shouldbe compacted by either driving a tractor or a herd ofcattle repeatedly over the floor of the reservoir untilthe soil has been compacted firmly.Should the floor of a reservoir still leak aftercompaction, it can be sealed (puddled) with a layerof water-resistant materials, such as clay, powderedant-hills or lime, which are compacted onto thefloor.The voids will be compressed and the seepagesealed by the weight of the soil in the dam wallitself. This process will be faster when the soil ismoist and made flexible by water infiltrating <strong>from</strong>the reservoir, especially when it is full.<strong>Water</strong> seepsunder the key of adam wallThe key doesnot seal asandy layersituated deepunder the keyThe layer of sand can be sealed by placing avertical and upstream-curved arch membrane madeof thick plastic and/or ferro-cement along either theupstream or the downstream toe of the dam wall.An arched wall, made of plastic sheeting placedagainst ferro-cement and built along a raised stoneapron at the downstream toe, has proved successful.55
9.2 Washed-out dam wallsThere are several reasons for a dam wall being washed-out, but the most common reasonis that the spillways became blocked, or were made too small and therefore unable todischarge floodwater sufficiently quickly. The water level in a reservoir will thereforerise and flow over the dam wall at its lowest point and thereby create a wash-out.Recommendations to prevent wash-outs of dam walls:• Spillways must always be designed and built to their required width and depth.• Any obstruction, including trees and bushes brought into a reservoir by floods, whichblock the spillway, should be cleared immediately.• Dam walls must always be constructed and maintained, with their crests being at least10% higher at the middle (convex) so that a wash-out will not take place at the middleof a dam wall, where it will require the greatest repair work, but at the end of a damwall where it is easier to repair.• The height of dam walls built without crawler compaction must be increased 30% tocompensate for the settling of soil when the reservoir is flooded.• The freeboard must be l.5 metres on new dams. The freeboard may be reduced to 1.2metres after a reservoir has been flooded several times and the soil in the dam wallhas settled completely.The wash-out of the Kimuu dam wall, which is described in this handbook, wasdue to heaviest rainfall in 72 hours for more than 50 years, and blockage of thespillways by trees that were uprooted by the rains.56
9.3 Washed-out spillwaysSpillways can be washed-out to such depths that they drain all floodwater out of theirdam reservoirs either due to erosion caused by excessive floodwater, or because the floorof a spillway was not made to withstand erosion, as recommended below.Recommendations to prevent washed-out spillways:• A huge volume of rainwater runs off a large catchment during heavy rains. If asmaller dam is built with a large catchment, the reservoir will fill up with waterquickly and a huge surplus of water will pass over the spillway, where it may causeerosion.• It is therefore recommended that smaller valley dams (storage capacities below10,000 m 3 .) should not be constructed in valleys with catchments larger than about400 hectares (1,000 acres).• Where the floors of spillways consist of sandy soil, they may be washed-out bysurplus water <strong>from</strong> even small catchments. This can be prevented by either:a) Planting drought-resistant and short perennial grasses with runners(Star Grass or Kikuyu Grass) in contour lines spaced about 30 cmacross the floor of spillways.b) Cover the floor of spillways with stones packed closely together and interplantedwith the type of grass mentioned above.c) Construct low walls of stone-masonry as horizontal steps across the floorof spillways, where they will function as a staircase and reduce the speedof the overflowing water. The walls should be built in keys 30 cm deepand spaced about 2 metres apart.d) The slope of the spillway floor should not exceed 3 cm in 100 cm.9.4 Silted-up dam reservoirsRainwater transports topsoil and other light surface particles <strong>from</strong> a catchment to a damreservoir where some of it settles to the floor of the reservoir as a layer of silt.A layer of silt being only a few centimetres thick is beneficial to a dam reservoir becauseit reduces seepage, but thicker layers of silt decrease the storage capacity, reducing thevolume of water and the lifespan of dam reservoir.Catchments without soil conservation, and earth dams without silt traps, may result indam reservoirs that cannot store any water at all within less than 10 years.57
ReferencesBrown, L.N. 1965. <strong>Small</strong> earth dams. University of California, USA.Gould, J. and Nissen-Petersen. E. 1999. Rainwater Catchment Systems for DomesticSupply. Intermediate Technology Publications, London, UK.Fowler, J. 1977 The Design and Construction of <strong>Small</strong> Earth <strong>Dams</strong>, AppropriateTechnology Vol 3. No. 4, IT Publications, London.Hatibu, N. and Mahoo, H.F. 2000. Rainwater Harvesting for Natural ResourceManagement. RELMA/Sida.Hudson, N.W. 1975. Field Engineering for Agricultural Development. Clarendon Press,Oxford, UK.Kenya-Belgium <strong>Water</strong> Development Programme. 1992. Guidelines for the design,construction and rehabilitation of small earth dams and pans in Kenya..Mburu, C.N. 1995. Management of watershed & silt load. Kenya-Belgium <strong>Water</strong>Development Programme.Nelson, K.D. 1985. Design and Construction of <strong>Small</strong> Earth <strong>Dams</strong>. Inkata Press,Melbourne, Australia.Nissen-Petersen, E. 1990. <strong>Small</strong> Earth Dam built by Animal Traction.Danida, Kenya.Nissen-Petersen, E. 2004. <strong>Water</strong> <strong>from</strong> ponds, pans and dams. RELMA/Sida, Nairobi,Kenya.Norton, J. 1997. Building with Earth. Intermediate Technology Publications, London,U.K.Orlate, M.J. 1995. Guidelines for community participation in dams and water pansconstruction and rehabilitation. Kenya- Belgium <strong>Water</strong> DevelopmentProgramme, Kenya.Shaw. D.N. and Rhod. M. 1977. A guide to design and construction of medium sizedearth dams in Zimbabwe. Ministry of <strong>Water</strong> Development, Zimbabwe.Smout I. and Shaw R. 1996. Technical Brief 48: <strong>Small</strong> Earth <strong>Dams</strong>, <strong>Water</strong>lines, Volume14, No. 4, p15-19, Intermediate Technology Publications, London.58