Sistema di Sorveglianza
1. Supporto di 32 canali
1. Supporto di 32 canali

You also want an ePaper? Increase the reach of your titles
YUMPU automatically turns print PDFs into web optimized ePapers that Google loves.
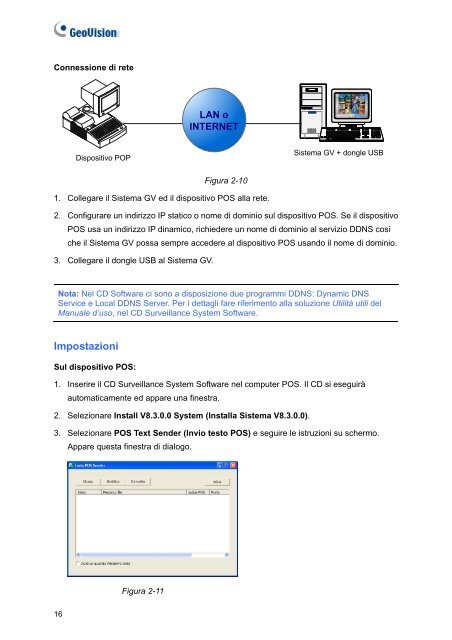
Connessione <strong>di</strong> reteLAN oINTERNETDispositivo POS DevicePOP<strong>Sistema</strong> GV-System + dongle USB dongle USBFigura 2-101. Collegare il <strong>Sistema</strong> GV ed il <strong>di</strong>spositivo POS alla rete.2. Configurare un in<strong>di</strong>rizzo IP statico o nome <strong>di</strong> dominio sul <strong>di</strong>spositivo POS. Se il <strong>di</strong>spositivoPOS usa un in<strong>di</strong>rizzo IP <strong>di</strong>namico, richiedere un nome <strong>di</strong> dominio al servizio DDNS cosìche il <strong>Sistema</strong> GV possa sempre accedere al <strong>di</strong>spositivo POS usando il nome <strong>di</strong> dominio.3. Collegare il dongle USB al <strong>Sistema</strong> GV.Nota: Nel CD Software ci sono a <strong>di</strong>sposizione due programmi DDNS: Dynamic DNSService e Local DDNS Server. Per i dettagli fare riferimento alla soluzione Utilità utili delManuale d’uso, nel CD Surveillance System Software.ImpostazioniSul <strong>di</strong>spositivo POS:1. Inserire il CD Surveillance System Software nel computer POS. Il CD si eseguiràautomaticamente ed appare una finestra.2. Selezionare Install V8.3.0.0 System (Installa <strong>Sistema</strong> V8.3.0.0).3. Selezionare POS Text Sender (Invio testo POS) e seguire le istruzioni su schermo.Appare questa finestra <strong>di</strong> <strong>di</strong>alogo.Figura 2-1116