Fiberock Aqua-Tough Interior Panels Guide ... - USG Corporation
Fiberock Aqua-Tough Interior Panels Guide ... - USG Corporation
Fiberock Aqua-Tough Interior Panels Guide ... - USG Corporation

Create successful ePaper yourself
Turn your PDF publications into a flip-book with our unique Google optimized e-Paper software.
<strong>Guide</strong><br />
Specifications <strong>Fiberock</strong>® <strong>Interior</strong> <strong>Panels</strong><br />
<strong>Aqua</strong>-<strong>Tough</strong><br />
Part 1: 1.1 Specify to meet project requirements.<br />
General Scope<br />
1.2 All materials, unless otherwise indicated, shall be manufactured by United States Gypsum Company and shall<br />
Qualifications be installed in accordance with its current printed directions. For interior use only.<br />
1.3 All materials shall be delivered in their original unopened packages and stored in an enclosed shelter providing<br />
Delivery and protection from damage and exposure to the elements. Damaged or deteriorated materials shall be removed<br />
Storage of from the premises.<br />
Materials<br />
WARNING: Store all <strong>Fiberock</strong> ® Brand AquA-<strong>Tough</strong> <strong>Interior</strong> <strong>Panels</strong> flat. <strong>Panels</strong> are heavy and can fall over, causing<br />
serious injury or death. Do not move unless authorized.<br />
1.4 In cold weather and during AquA-<strong>Tough</strong> <strong>Interior</strong> Panel installation, joint finishing, and tile application,<br />
Environmental temperatures within the building shall be maintained at a minimum of 55 °F. Adequate ventilation shall<br />
Conditions be provided to carry off excess moisture. Wood framing shall approximate the moisture content it will<br />
reach in service prior to the application of the panels. Allow AquA-<strong>Tough</strong> <strong>Interior</strong> <strong>Panels</strong> to acclimate to the<br />
temperature and humidity conditions at the jobsite prior to installation.<br />
1.5 Steel or wood wall framing to receive AquA-<strong>Tough</strong> <strong>Interior</strong> <strong>Panels</strong> shall be structurally sound and in general<br />
Framing compliance with local building code requirements. Damaged and excessively bowed studs shall be replaced<br />
before installation of AquA-<strong>Tough</strong> <strong>Interior</strong> <strong>Panels</strong>. Framing shall be designed not to exceed L/360 deflection<br />
for tile applications. For fire-resistant or abuse-resistant construction, steel framing must be 20-gauge or<br />
heavier with corrosion-resistant metal coating equivalent to G40 hot-dipped galvanized.<br />
1.6 Cut AquA-<strong>Tough</strong> <strong>Interior</strong> <strong>Panels</strong> to size with a utility knife and straight edge. Use a power saw only if equipped with a<br />
Installation dust-collection device. <strong>Panels</strong> may be cut by scoring and snapping or by sawing, working from the face side.<br />
Practices When using the score-and-snap method, score the panel twice and snap the panel away from the cut face.<br />
The backside of the panels is then broken by snapping the panel in the reverse direction. If a power-operated<br />
saw is used, a low-RPM unit with 3-1/2� carbide blade is recommended.<br />
When necessary, use a rasp or SurForm ® to smooth cut edges. Holes for pipes, fixtures and other small<br />
openings can be cut out with a saw or a drywall router equipped with a special bit (available from Rotozip<br />
Tool <strong>Corporation</strong>). When a router is used, hold panels away from the wall.<br />
Contractors installing tile and tile-setting materials should always follow current ANSI specifications,<br />
TCA guidelines and the specifications of the surfacing materials manufacturer.<br />
Part 2: 2.1 A. AquA-<strong>Tough</strong> <strong>Interior</strong> <strong>Panels</strong>, 1/2� or 5/8� thickness, 48� width and lengths of 8� to 12�.<br />
Products Materials B. Joint Reinforcement<br />
– Tiled areas: Durock ® Brand Joint Tape with latex-fortified mortar or latex-based Type I mastic.<br />
– Untiled areas: SheeTrock ® Brand Joint Tape, SheeTrock ® Brand DurAbonD ® Setting-Type Joint Compound.<br />
C. Fasteners<br />
– Corrosion-resistant Type W or Type S ® buglehead screws for wood framing (tile surfaces only).<br />
– Hot-dipped galvanized roofing nails for wood framing.<br />
– Type S buglehead screws for 25 ga. steel framing.<br />
– Corrosion-resistant Type S-12 ® buglehead screws for 20-14 ga. steel framing.<br />
D. Adhesives/Mortars—Products:<br />
– Meeting ASTM C557.73: multiple purpose adhesives.<br />
– Meeting ANSI A136.1: type I organic adhesive.<br />
– Meeting ANSI A118.4: latex modified portland cement mortar.<br />
E. Grout—Products meeting ANSI A118.6, A118.3 (Epoxy): specify type.<br />
F. Tile—Tile shall meet ANSI A137.1.
Part 3: 3.1 A. Framing – Space wood and steel framing a maximum of 24� o.c. Framing shall be designed not to exceed L360<br />
Execution Wall Applications deflection for tile and L240 for flexible finishes like paint.<br />
B. Cut panels to size with a utility knife and straight edge. Use a power saw only if equipped with a dust-collection<br />
device.<br />
C. Position all ends and edges of panels over framing members, except when joints are at right angles to framing<br />
members, as in perpendicular applications or when end joints are back-blocked.<br />
D. Install panels vertically whenever possible. End joints should be loosely fit. Install panels a minimum of 3/8� above<br />
the floor. Stagger end joints in successive courses with joints on opposite sides of a partition placed on different<br />
studs.<br />
E. Attach panels to framing supports by spacing fasteners not less than 3/8� from edges and ends of panels<br />
and drive as recommended for specified fastening method. Drive fasteners in field of panels first, working<br />
toward ends and edges.<br />
a. Wood framing – Use corrosion-resistant Type W or Type S buglehead screws or hot-dipped galvanized roofing<br />
nails. Fasteners must be of sufficient length to ensure a minimum 3/4� penetration into wood framing.<br />
b. Steel Framing – Use Corrosion-resistant Type S or Type S-12 buglehead screws for 20-12 ga steel framing. When<br />
using 25 ga steel framing fasteners should be spaced no grater than 8� o.c. Fasteners must be of sufficient length<br />
to ensure a minimum of 3/8� penetration into steel framing.<br />
3.2 A. Panel Application—After tub, shower pan or receptor is installed, place temporary 1/4� spacer strips or shims<br />
Tub Surrounds around lip of fixture. Pre-cut board to required sizes and make necessary cut-outs. Fit ends and edges closely<br />
but not forced together. Install board abutting top of spacer strip. Stagger end joints in successive courses.<br />
Fasten panels to wood studs spaced max. 24� o.c. with corrosion-resistant screws or hot-dipped galvanized<br />
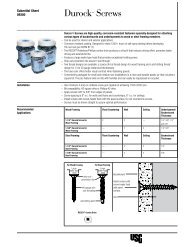
roofing nails. For steel studs (14-25 ga.), use corrosion-resistant screws. For fastener spacing requirement,<br />
refer to table on page two.<br />
B. Seal all openings around pipes, fittings and fixtures with waterproof flexible sealant. Allow areas to dry<br />
thoroughly prior to tile application. Wipe excess material from surface of panels. Remove spacer strips and seal<br />
gap at the bottom of panel.<br />
C. A waterproof membrane (ANSI A118.10) must be applied to horizontal surfaces in wet areas.<br />
3.3 A. Framing—Must be capable of supporting the total ceiling system dead load, including insulation, ceramic tile,<br />
Ceilings bonding materials and panels, with deflection not exceeding L/360 of the span for tiled surfaces.<br />
B. Panel Application—Center end or edge joints on framing. Stagger end joints in successive courses. Fit ends<br />
and edges closely but not forced together. Fasten boards to framing using recommended fastener table on<br />
page one.<br />
3.4 A. For Tiled Areas—Embed Durock Joint Tape in latex-fortified mortar or latex-based Type I mastic over<br />
Joint Treatment the joint. Use the same material as specified for tile setting.<br />
Application B. For Untiled Areas—Embed SheeTrock Joint Tape in DurAbonD Setting-Type Joint Compound and wipe with<br />
a joint knife, leaving a thin coating of joint compound over all joints and interior angles. Complete to level<br />
of finish specified in project requirements.<br />
3.5 Follow ANSI Specifications and TCA <strong>Guide</strong>lines.<br />
<strong>Interior</strong> Ceramic Tile<br />
Application<br />
2
Good Design 1 System Performance Systems covered herein have been tested and evaluated for use as described. For other system applications,<br />
Practices consult your local representative.<br />
All details, specifications and data contained in this literature are intended as a general guide for using<br />
AquA-<strong>Tough</strong> <strong>Interior</strong> Panel systems.<br />
Information in this publication should be used only for AquA-<strong>Tough</strong> <strong>Interior</strong> Panel systems, as physical<br />
properties of competitive products may vary. United States Gypsum Company assumes no liability for failure<br />
resulting from the use of alternative materials or improper application or installation as specified herein.<br />
United States Gypsum Company will provide building officials and design professionals upon written request<br />
with certification for published fire, sound and structural data covering systems constructed with these products<br />
and assembled to meet established performance requirements.<br />
2 Expansion Surfaces should be isolated with surface control joints or other means where: (a) a wall abuts a structural<br />
and Contraction element; (b) construction changes within the plane of the wall.<br />
Location of control joints is the responsibility of the design professional/architect. Double-framing members<br />
at control joints shall be spaced 1/2� apart. Attach control joint with 9/16� staples spaced 6� o.c. maximum<br />
in each flange. Cut end joints square and align for neat fit. Remove protective tape when joint treatment is<br />
completed. Do not apply tile or finishes over control joint. For alternate methods of forming control joints,<br />
refer to the Gypsum Construction Handbook (<strong>USG</strong> literature item H17).<br />
3 Vapor Retarder <strong>Panels</strong> to receive an impervious finish, such as ceramic tile, should not be installed over a vapor retarder<br />
or on a wall acting as a vapor retarder.<br />
3
Product Information<br />
See usg.com for the most<br />
up-to-date product information.<br />
Trademarks<br />
The following trademarks<br />
used herein are owned by <strong>USG</strong><br />
<strong>Corporation</strong> or its subsidiaries:<br />
AquA-<strong>Tough</strong>, <strong>Fiberock</strong>, DurAbonD,<br />
Durock, SheeTrock, uSg. Type S<br />
and Type S-12 are trademarks<br />
of ITW Buildex. SurForm is a<br />
trademark of The Stanley Works.<br />
Manufactured by<br />
United States Gypsum Company<br />
550 West Adams Street<br />
Chicago, IL 60661<br />
Note<br />
Products described here may<br />
not be available in all geographic<br />
markets. Consult your U.S.<br />
Gypsum Company sales office<br />
or representative for information.<br />
800 <strong>USG</strong>.4YOU (874.4968)<br />
usg.com<br />
Notice<br />
We shall not be liable for<br />
incidental and consequential<br />
damages, directly or indirectly<br />
sustained, nor for any loss<br />
caused by application of these<br />
goods not in accordance with<br />
current printed instructions<br />
or for other than the intended<br />
use. Our liability is expressly<br />
limited to replacement of defective<br />
goods. Any claim shall be<br />
deemed waived unless made<br />
in writing to us within thirty<br />
(30) days from date it was or<br />
reasonably should have been<br />
discovered.<br />
Safety First!<br />
Follow good safety and industrial<br />
hygiene practices during handling<br />
and installation of all products<br />
and systems. Take necessary<br />
precautions and wear the<br />
appropriate personal protective<br />
equipment as needed. Read<br />
material safety data sheets<br />
and related literature on products<br />
before specification and/<br />
or installation.<br />
F265/ECM/rev. 6-07<br />
© 2007, United States Gypsum Company<br />
Printed in U.S.A.