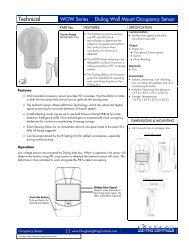
WTI-2332-FT
WTI-2332-FT Telephone Interface - Douglas Lighting Control
WTI-2332-FT Telephone Interface - Douglas Lighting Control
- No tags were found...

You also want an ePaper? Increase the reach of your titles
YUMPU automatically turns print PDFs into web optimized ePapers that Google loves.
Parts<br />
<strong>WTI</strong>-<strong>2332</strong>-<strong>FT</strong> Telephone Interface<br />
Password Enable Button & LED<br />
To activate password protection,<br />
press and hold button, then<br />
press Reset button. Keep<br />
holding until LED comes ON.<br />
LED is ON when password<br />
protection is activated.<br />
Password Disable Button & LED<br />
to disable password protection<br />
press and hold button, then press<br />
Reset button. Keep holding till LED<br />
comes ON.<br />
LED is ON when password<br />
protection is disabled.<br />
Power Indicator LED<br />
Flashes when unit is receiving power.<br />
Reset Button<br />
Press and hold at startup<br />
to restore defaults.<br />
Ring LED<br />
Flashes when a call is<br />
being sent.<br />
Telephone Online<br />
Indicator LED<br />
On when the modem is active.<br />
RJ11 Jack<br />
Connect the telephone line here.<br />
Pressing Reset Button<br />
will cause a software<br />
reboot of the <strong>WTI</strong>-<strong>2332</strong>.<br />
Device Status<br />
Ring<br />
Blinking= OK<br />
Telephone<br />
Line<br />
To Enable Password Protection<br />
Press and Hold,<br />
the press Reset button once,<br />
keep holding till LED goes ON.<br />
To Disable Password Protection<br />
Press and Hold,<br />
the press Reset button once,<br />
keep holding till LED goes ON.<br />
Whichever LED is ON indicates<br />
password protection state.<br />
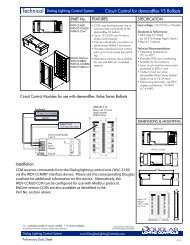
Reset<br />
On Hook<br />
LED ON<br />
when USB<br />
connected<br />
24VAC POWER<br />
BLUE<br />
WHITE<br />
Group ON/OFF<br />
Use to test.<br />
Button actuates<br />
a preprogrammed<br />
relay group.<br />
Relay Group #<br />
ON=Multiple Commands / Call<br />
OFF=Single Command / Call<br />
Tones allowed<br />
during voice prompts<br />
ON=Relay Group Control<br />
OFF=Relay Control<br />
USB<br />
<strong>WTI</strong>-<strong>2332</strong>-<strong>FT</strong><br />
Telephone Interface<br />
Service<br />
Wink<br />
Lonworks<br />
<strong>FT</strong>T-10 Signal<br />
EARTH<br />
NET B<br />
NET A<br />
www.DouglasLightingControl.com<br />
Power Terminals<br />
Connected to 25VAC/120VAC transformer.<br />
Test Button<br />
Press button to toggle pre-selected<br />
(during system configuration) LonWorks<br />
group ON and OFF.<br />
OFF<br />
ON<br />
1<br />
2<br />
3<br />
DIP Switches<br />
Factory setting is all switches in ON (right)<br />
position.<br />
1 ON = single command mode.<br />
2 ON = command can be started before<br />
voice prompt ends.<br />
3 ON = default menu is relay groups<br />
activated.<br />
1 OFF = multiple command mode.<br />
2 OFF = command cannot be started<br />
until voice prompt ends.<br />
3 OFF = default menu is individual relays<br />
activated.<br />
Service LED and Pin<br />
LED: flashes when unit is malfunctioning.<br />
Pin: press to identify unit to network for<br />
diagnosis.<br />
Wink LED and Pin<br />
LED: flashes when network Wink<br />
command received.<br />
Pin: press to clear Wink command.<br />
USB Port and LED<br />
Connect the USB from a pc here<br />
for using the pc's hyperterminal<br />
to configure the unit.<br />
LED flashes when a pc is<br />
connected and a signal is being<br />
transmitted.<br />
Data Signal Terminals<br />
Connect network data signal here.<br />
For LonWorks networks: data signal is<br />
<strong>FT</strong>T10 (78kbs), wiring is 16AWG<br />
twisted pair, non-polarized unshielded<br />
striated or solid.<br />
For MC-6000 networks: connect to the<br />
LonWorks signal input terminals on the<br />
MC-6210N-GTW card.<br />
<strong>WTI</strong>-<strong>2332</strong>-<strong>FT</strong>: Directions & Applications page 2 lighting controls