

Amateur Radio Today - Free and Open Source Software
Amateur Radio Today - Free and Open Source Software
Amateur Radio Today - Free and Open Source Software
- No tags were found...

Create successful ePaper yourself
Turn your PDF publications into a flip-book with our unique Google optimized e-Paper software.
12VAC/DC<br />
..,<br />
I .GV<br />
*'0<br />
18<br />
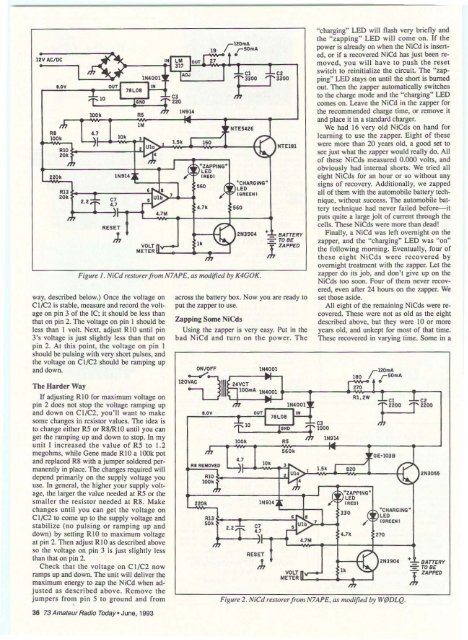
Figure I . N,Cd restorerfrom N7APE, as modified by K4GOK.<br />
way, described below.) Once the voltage on<br />
Cl!C2 is stable, measure <strong>and</strong> record the voltage<br />
on pin 3 of the IC; it should be less than<br />
that on pin 2. The voltage on pin I should be<br />
less than 1 volt. Next, adjust RIO until pin<br />
3's voltage is just slightly less than that on<br />
pin 2. At this point. the voltage on pin 1<br />
should be pulsing with very short pul ses, <strong>and</strong><br />
the voltage on CI/C2 should be ramping up<br />
<strong>and</strong> dow n.<br />
The Harder Way<br />
l,..Ol<br />
If adjusting RIO for maximum voltage on<br />
pin 2 docs not stop the voltage ramping up<br />
<strong>and</strong> down on Cl/C2, you'll want to make<br />
some changes in resistor values. The idea is<br />
to change e ither R5 or R8/R1O until you can<br />
get the ramping up <strong>and</strong> down to stop. In my<br />
unit I increa se d th e value o f R5 to 1.2<br />
megohms. while Gene made R IO a l OOk pot<br />
<strong>and</strong> replaced R8 with a jumper soldered permanently<br />
in place. The changes required will<br />
depend primarily on the supply VOltage you<br />
use. In general, the higher you r supply voltage,<br />
the larger the value needed at R5 or the<br />
smaller the re sistor needed at R8 . Make<br />
changes until you can get the voltage on<br />
CI/C2 to come up to the supply voltage <strong>and</strong><br />
stabilize (no pulsing or ramping up <strong>and</strong><br />
down) by setting RIO to maximum voltage<br />
at pin 2. Then adjust R IO as described above<br />
so the voltage on pin 3 is just slightly less<br />
than that on pin 2.<br />
Check that the voltage on CI /C2 now<br />
ramps up <strong>and</strong> down. The unit will deliver the<br />
maximum energy to zap the NiCd when adjusted<br />
as described above. Remove the<br />
jumpers from pin 5 10 ground <strong>and</strong> from<br />
,<br />
" LM '"'<br />
across the battery box. Now you are ready to<br />
put the zapper to use.<br />
Zapping Some NiCds<br />
Using the zapper is very easy. PUI in the<br />
bad NiCd <strong>and</strong> tu rn on the power. The<br />
"charging" LED will flash very briefly <strong>and</strong><br />
the "zapping" LED will come on. If the<br />
power is already on when the NiCd is inserted,<br />
or if a recovered NiCd has just been removed,<br />
you will have to push the reset<br />
switch to reiniti alize the circuit. The "zapping"<br />
LED stays on until the short is burned<br />
OUI. Then the zapper automatically switches<br />
to the charge mode <strong>and</strong> the "charging" LED<br />
comes on. Leave the NiCd in the zapper for<br />
the recommended charge time. or remove it<br />
<strong>and</strong> place it in a st<strong>and</strong>ard charger.<br />
We had 16 very old NiCds on h<strong>and</strong> for<br />
learn ing to use the zapper. Eight of these<br />
were more than 20 years old, a good set to<br />
see just what the zapper would really do. All<br />
of these NiCds measured 0.000 volts. <strong>and</strong><br />
obviously had internal shorts. We tried all<br />
eight NiCds for an hour or so withou t any<br />
signs of recovery. Add itionally, we zapped<br />
al1 of them with the automobile ba ttery technique,<br />
without success. Tbe automobile battery<br />
technique had never failed before-it<br />
puts quite a large jell of current through the<br />
cells. These NiCds were more than dead!<br />
Finally, a NiCd was left overnight on the<br />
zapper, <strong>and</strong> the "charging" LED was " on"<br />
the following morni ng. Eventually, four o f<br />
the se e ight NiCds were r eco ve red b y<br />
overnight treaunent with the zapper; Let [he<br />
zapper do its job. <strong>and</strong> don't give up on the<br />
NiCds too soon. Four of them never recovered,<br />
even after 24 hours on the zapper. We<br />
set those aside.<br />
All eight of the remaining NiCds were recovered.<br />
These were not as old as the eight<br />
described above. but they were 10 or more<br />
years old, <strong>and</strong> unkept for most of that time.<br />
These recovered in varying time. Some in a<br />
.-<br />
ON/ OFF<br />
IH4001<br />
';]111<br />
,.. r 50I'IIA<br />
12<br />
•<br />
~ eevcr<br />
I 210<br />
100..A IN'OOl<br />
+ f 2<br />
1N4001 2200 Z200<br />
m :::j,i AI,2W -*fl<br />
."<br />
I .GV<br />
J8L08 "<br />
*1'<br />
; 0 03<br />
'"<br />
"1000<br />
'00' R'<br />
m IH914<br />
m<br />
560 k<br />
,..<br />
...<br />
III IIE.llOVEO<br />
y~ • , Uk 1<br />
RIO<br />
'00'<br />
,. r<br />
l 201WA<br />
rSOI'llA<br />
•<br />
27<br />
1N4001~1 '"<br />
;f:f' -ff'<br />
I....DJ<br />
"<br />
.., * ?20<br />
m 11\1914<br />
lOOk R'<br />
m 'M<br />
HTE5426<br />
y~ 10. 1<br />
R'<br />
, tOOk<br />
Uk I 1..<br />
m<br />
3300 3300<br />
RIO I • U1. ~ NTElIl<br />
ZO.<br />
",);<br />
m I<br />
....l$.:ZAPPIHG a<br />
LEO<br />
220k lN914~ '" lIlEDI<br />
· CHARGIHG a<br />
2.2;:, C7<br />
•<br />
R"<br />
, •<br />
ZO.<br />
U"<br />
<br />
~<br />
2N39O' • _L.. ~ATT E R Y<br />
J,<br />
-=- TO BE<br />
ZAP~ D<br />
% Ul"<br />
"J:<br />
,<br />
.....@:zAPPING"<br />
LEO<br />
220k IH914 .. '" III EOI<br />
Figure 2. NiCd restorerf rom N7APE, as modified by WODLQ.<br />
J<br />
6E-l039<br />
... • • '" ,<br />
LEO<br />
RU<br />
uy'<br />
IGII[(NI<br />
2.zT g • -; , ' .n ,7


