Tele Vue-60
Tele Vue-60 Operating Guide - TeleVue Optics
Tele Vue-60 Operating Guide - TeleVue Optics
- No tags were found...

Create successful ePaper yourself
Turn your PDF publications into a flip-book with our unique Google optimized e-Paper software.
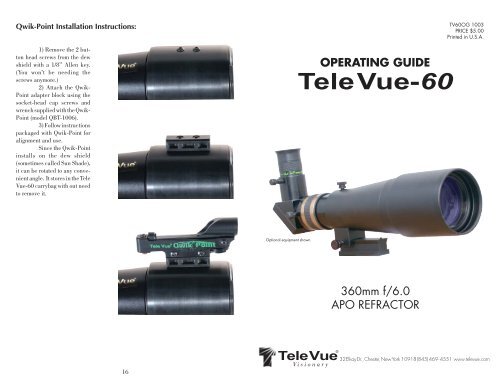
Qwik-Point Installation Instructions:<br />
TV<strong>60</strong>OG 1003<br />
PRICE $5.00<br />
Printed in U.S.A.<br />
1) Remove the 2 button<br />
head screws from the dew<br />
shield with a 1/8” Allen key.<br />
(You won’t be needing the<br />
screws anymore.)<br />
2) Attach the Qwik-<br />
Point adapter block using the<br />
socket-head cap screws and<br />
wrench supplied with the Qwik-<br />
Point (model QBT-1006).<br />
3) Follow instructions<br />
packaged with Qwik-Point for<br />
alignment and use.<br />
Since the Qwik-Point<br />
installs on the dew shield<br />
(sometimes called Sun Shade),<br />
it can be rotated to any convenient<br />
angle. It stores in the <strong>Tele</strong><br />
<strong>Vue</strong>-<strong>60</strong> carrybag with out need<br />
to remove it.<br />
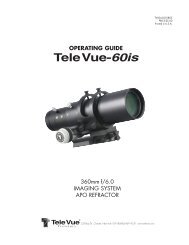
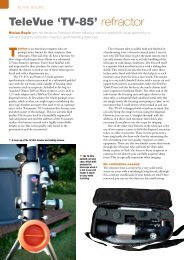
OPERATING GUIDE<br />
<strong>Tele</strong> <strong>Vue</strong>-<strong>60</strong><br />
Optional equipment shown.<br />
3<strong>60</strong>mm f/6.0<br />
APO REFRACTOR<br />
16<br />
<strong>Tele</strong> <strong>Vue</strong> ® 32 Elkay Dr., Chester, New York 10918 (845) 469 - 4551 www.televue.com<br />
Visionary
OPERATING GUIDE<br />
Congratulations on purchasing the <strong>Tele</strong> <strong>Vue</strong>-<strong>60</strong> APO telescope. We worked hard<br />
to ensure that the <strong>Tele</strong> <strong>Vue</strong>-<strong>60</strong> embodies all the performance and features of the fi nest<br />
astronomical-quality telescopes along with the compact size, ease-of-use, and versatility<br />
of a top spotting scope. Please take the time to read this operating guide to familiarize<br />
yourself with the various parts, operating suggestions and care instructions that will enable<br />
you to obtain maximum enjoyment from your new <strong>Tele</strong> <strong>Vue</strong>-<strong>60</strong>.<br />
WARNING: NEVER look at the sun or point the telescope toward or near the<br />
sun without proper solar observing equipment rigidly secured in front of the<br />
objective lens. Instant and permanent eye damage will result from viewing<br />
the sun directly, even during a solar eclipse, or when viewing through thin<br />
clouds, or when the sun is near the horizon.<br />
1. SET-UP SUMMARY<br />
Follow these simple instructions to start using your <strong>Tele</strong> <strong>Vue</strong>-<strong>60</strong> immediately.<br />
However, please read the complete operating guide including care instructions to get the<br />
most enjoyment out of your new <strong>Tele</strong> <strong>Vue</strong>-<strong>60</strong>.<br />
1.1 MOUNTING<br />
(Be sure to tighten the axes of your mount before attaching the <strong>Tele</strong> <strong>Vue</strong>-<strong>60</strong>.)<br />
A) Locate the three ¼-20 tapped holes in the bottom of the DOVETAIL BALANCE<br />
BAR. When using a photo tripod, choose any of the three threaded holes for attachment.<br />
For the <strong>Tele</strong> <strong>Vue</strong> <strong>Tele</strong>-Pod or Panoramic Mounts, use the hardware included with<br />
the mount. Thread the ¼-20 studs into the two holes in the DOVETAIL BALANCE BAR<br />
that correspond with the clearance holes in the mounting’s cradle and lock tightly. Place<br />
the telescope into the cradle so that the studs stick through the cradle’s clearance holes.<br />
Lock the scope down with the wing nuts also supplied with the mount.<br />
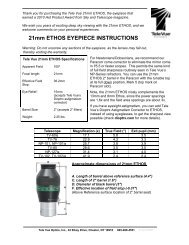
11. SPECIFICATIONS:<br />
Type 2-element APO refractor<br />
Clear Aperture 2.4 inches (<strong>60</strong>mm)<br />
Aperture Gain 73, compared to a 7mm eye pupil<br />
Focal Length 14.2 inches (3<strong>60</strong>mm)<br />
Focal Ratio f/6<br />
Resolution 1.9 arc-sec. (Dawes Limit for a 2.4 inch aperture)<br />
(visual)<br />
Resolution 240 line pairs per mm<br />
(photographic)<br />
Magnifi cation 11x to 180x using <strong>Tele</strong> <strong>Vue</strong> eyepieces<br />
Close Focus Approx. 10 ft.<br />
Field Visual 4.3° at 11x (32 Pl), or 15x (24 Pan)<br />
Field, 35mm fi lm 3.8° by 5.7° (6.8° diagonal)<br />
Image Scale 4.0° per inch<br />
Focuser 1¼" draw tube, plus helical fi ne focus<br />
Mounting Adjustable balance bar with ¼-20 tapped holes for<br />
standard photographic tripods or optional <strong>Tele</strong> <strong>Vue</strong><br />
mountings<br />
Weight approx. 3 lbs. (OTA only)<br />
Length 10" (OTA only)<br />
Tube Black anodized aluminum<br />
Accessories Standard: Carry bag<br />
Optional: soft carrying case<br />
Specifications subject to change without notice.<br />
1.2 SET-UP FOR VIEWING<br />
A) Remove the plug from the end of the FINE FOCUS DRAW TUBE. Make sure<br />
the DIAGONAL LOCK SCREW is loosened enough so that the internal brass clamp ring<br />
is fully retracted. Insert an optional MIRROR DIAGONAL or ERECTING PRISM and<br />
tighten the DIAGONAL LOCK SCREW.<br />
B) Place a low power eyepiece into the installed MIRROR DIAGONAL or ERECT-<br />
ING PRISM and tighten its lock screw.<br />
Note: Mirror diagonals give upright images that are reversed left-right. Mirror<br />
diagonals are highly recommended to get the best optical performance from the <strong>Tele</strong> <strong>Vue</strong>-<br />
<strong>60</strong>. It is required for high power viewing and to obtain maximum image sharpness.<br />
C) Squeeze the tabs on the LENS CAP to remove it.<br />
2<br />
15
cleaning stroke use a fresh applicator. The fewer strokes the better! Any residual “fi lm”<br />
will not effect visual performance.<br />
The star diagonal has a fi rst-surface mirror. It should be cleaned only when absolutely<br />
necessary. The <strong>Tele</strong> <strong>Vue</strong> <strong>60</strong>° and 90° diagonal mirror should be removed for cleaning<br />
by removing the back cover's four screws, lifting the back off the diagonal body and cleaning<br />
the entire mirror surface. First blow loose dust away with a squeeze bulb. CAUTION: Do<br />
not clean mirror with water or water based cleaners such as Windex or any other commercial<br />
lens cleaners: this is not a lens. All contain too much water and will leave a residue.<br />
Use a Q-Tip moistened with pure acetone or methanol or Isopropyl alcohol (reagent grade).<br />
Wipe the surface gently. Use very light pressure and never rub. Slight residual stains or<br />
dust spots will have no visible effects in observing.<br />
Clean either the Porro or 45° prism just like the mirror diagonal.<br />
The black anodized surfaces of the <strong>Tele</strong> <strong>Vue</strong>-<strong>60</strong> can be cleaned with “Windex.”<br />
If you have any questions about the care, operation or performance of your <strong>Tele</strong><br />
<strong>Vue</strong>-<strong>60</strong>, please call <strong>Tele</strong> <strong>Vue</strong> at (845) 469-4551 from 9:00 am to 5:00 pm EST.<br />
9. A LAST WORD<br />
The <strong>Tele</strong> <strong>Vue</strong>-<strong>60</strong> was designed to adapt to your ever-changing interests, to be your<br />
personal “window to the world”. From the details of a bird across a lake, to the cloud bands<br />
of Jupiter, the rings of Saturn, or the craters of the moon, the <strong>Tele</strong> <strong>Vue</strong>-<strong>60</strong> is always ready<br />
to thrill you with the wondrous sights of nature.<br />
Remember to share your experiences with your family and friends. We would like<br />
to hear about your viewing experiences. Always feel free to call or write to us, especially<br />
if you have questions. We feel you are entitled to this level of support with the purchase of<br />
the <strong>Tele</strong> <strong>Vue</strong>-<strong>60</strong>. - And we hope you will feel as much pride in owning the <strong>Tele</strong> <strong>Vue</strong>-<strong>60</strong> as<br />
we have had in building it for you.<br />
We're proud the TV-<strong>60</strong> was given the Smart Money Award for Best Overall <strong>Tele</strong>scope.<br />
Smart Money magazine "wondered: What would the world's top amateur astronomer<br />
think" - of fi ve scopes up to 10" aperture. Besides "giving the best view of Jupiter", this<br />
was David Levy's favorite scope because of its optics and ease of use.<br />
S<br />
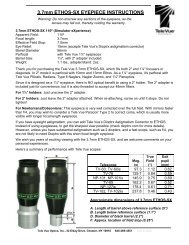
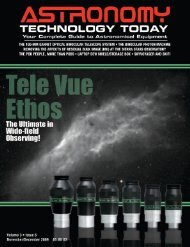
Optical Arrangements:<br />
1) 90° mirror diagonal - This gives an upright image that is reversed left-right. It is best optically and<br />
required for high magnifi cation viewing.<br />
2) <strong>60</strong>° mirror diagonal - same note as above, but the <strong>60</strong>° angle is more comfortable for terrestrial<br />
observing.<br />
3) 45° erecting prism - For normal viewing. Limited to terrestrial viewing up to <strong>60</strong>x.<br />
4) 35mm SLR attachment with optional 1¼" Camera Adapter.<br />
A. 1¼" Eyepiece J. Diagonal Lock screw<br />
B. 1¼" Powermate K. Fine Focus Ring<br />
C. 1¼" Diagonal Mirror L. Coarse Focus Draw Tube<br />
D. <strong>60</strong>° Diagonal Mirror M. Draw Tube Tension Screw<br />
E. 45° Erecting Prism N. Body<br />
G. 35mm SLR O. Sliding Dew Shield (Contains 77mm Filter Threads)<br />
H. T-ring for your camera P. Lens Cap<br />
I. 1¼" Camera Adapter Q. Dovetail Balance Bar<br />
R. Balance Bar Lock Screw<br />
S. Qwik-Point<br />
*<br />
*<br />
*<br />
**<br />
*<br />
*<br />
*<br />
*<br />
*Optional Equipment<br />
10. WARRANTY<br />
The <strong>Tele</strong> <strong>Vue</strong>-<strong>60</strong> is warranted to be free of manufacturing or workmanship defects<br />
for 5 (fi ve) years from the date of purchase. The telescope is individually factory aligned,<br />
and should not be taken apart for any reason. Any adjustment of the front lens cell will void<br />
your warranty. Do not tamper with it.<br />
Returns require proper advance authorization.<br />
14<br />
3
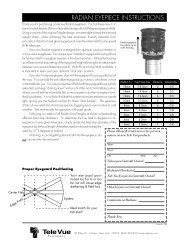
1.3 FOCUSING<br />
A) Rotate the FINE FOCUS RING so it is set halfway through its travel. This will<br />
permit the greatest amount of +/- fine focus travel.<br />
B) Point the scope towards an object you'd like to view.<br />
C) Grasp the rubber grip ring on the FINE FOCUS RING and adjust the DRAW<br />
TUBE TENSION SCREW on top of the telescope body so that the push-pull action is loose<br />
enough to allow easy motion, but not so loose that the COARSE FOCUS DRAW TUBE<br />
slips backwards on its own.<br />
D) Pull the COARSE FOCUS DRAW TUBE out until focus has roughly been<br />
achieved and lightly tighten the DRAW TUBE TENSION SCREW. (CAUTION: DO NOT<br />
REPEATEDLY PUSH OR PULL THE DRAW TUBE QUICKLY. THIS PUMPING AC-<br />
TION CAN DRAW DUST INTO THE TELESCOPE.)<br />
E) Now, rotate the FINE FOCUS RING until your object is in sharp focus.<br />
1.4 BALANCE<br />
The balance of the telescope may change depending on the eyepiece or camera<br />
used. To adjust the balance:<br />
A) Loosen the BALANCE BAR LOCK SCREW.<br />
B) Holding the TELESCOPE BODY, slide the entire telescope fore or aft until<br />
balance is reached.<br />
C) Tighten the BALANCE BAR LOCK SCREW only enough to hold the scope<br />
in position. Do not overtighten.<br />
2. TELESCOPE & SPOTTING SCOPE BASICS<br />
Many people who use telescopes and spotting scopes are curious about just<br />
how they work. What is magnifi cation power, and how does it work? It is very simple.<br />
When we wish to inspect a distant object more critically, we will intuitively bring it (or<br />
ourselves) closer. The “enlargement” from this closer proximity permits us to more easily<br />
see smaller details.<br />
A telescope’s objective lens forms an image of an object as if it were closer to the<br />
observer, like a telephoto camera lens. However, this real “image” is so small that, although<br />
enlarged, it is diffi cult to see any of its fi ne detail. Therefore, a “magnifi er,” called an<br />
eyepiece, is used to look at a portion of the “image” in greater detail. The magnifi cation,<br />
therefore, depends on the relationship between the focal lengths of the objective (to form<br />
the image) and the eyepiece (to enlarge the image). To fi gure out the magnifi cation factor,<br />
divide the telescope's focal length by the eyepiece focal length. For example, the <strong>Tele</strong><br />
<strong>Vue</strong>-<strong>60</strong>’s 3<strong>60</strong>mm objective used with an 20mm eyepiece yields 18 power. (3<strong>60</strong>÷20=18x)<br />
The combined qualities of the objective lens and the eyepiece (as well as anything<br />
else in the light path between them, such as prisms or mirrors—see below) help determine<br />
the quality of the magnifi ed view. One of the secrets of the <strong>Tele</strong> <strong>Vue</strong>-<strong>60</strong>’s extraordinary<br />
optical performance is its partnership with the family of <strong>Tele</strong> <strong>Vue</strong> eyepieces.<br />
For terrestrial use, prisms are often employed to provide a correct presentation of<br />
the objective’s image, as well as folding the light path to make the instrument more compact<br />
and/or easier to use. In most terrestrial spotting scopes, the prisms are built in, and are<br />
not removable. Most astronomical telescopes have no prisms, since the image erecting<br />
4<br />
<strong>60</strong> as you would normally.<br />
With the <strong>Tele</strong> <strong>Vue</strong>-<strong>60</strong> on your camera, you have a 3<strong>60</strong>mm, f/6 telephoto lens! This<br />
is about 7x the magnifi cation of a 50mm lens. The <strong>Tele</strong> <strong>Vue</strong>-<strong>60</strong>’s fast f/6 performance is<br />
great with DSLR's with APS format, ideal for high resolution nature photography.<br />
B) AFOCAL PHOTOGRAPHY — <strong>Tele</strong> <strong>Vue</strong>'s afocal camera adapters permit<br />
your digital camera to zoom into your image! Adapters are available for digital cameras<br />
with 28mm, 37mm and 49mm fi lter threads. If your camera lens (or lens cover tube) has<br />
a different thread, you can usually fi nd a step-up or step-down ring to mate with one of the<br />
<strong>Tele</strong> <strong>Vue</strong> thread sizes of 28/37/49mm. Best results occur with long eye-relief eyepieces<br />
such as 32mm Plössl.<br />
7. ACCESSORIES<br />
A) CARRY BAG — The <strong>Tele</strong> <strong>Vue</strong>-<strong>60</strong> is supplied standard with a GORE-TEX ®<br />
bag which has been sized to fi t the <strong>Tele</strong> <strong>Vue</strong>-<strong>60</strong> optical tube plus diagonal and eyepiece.<br />
Always pull the draw string taut and slide the string lock down against the bag when the<br />
scope is in place.<br />
B) SOFT CARRY CASE — The optional carry case measures just 13" long x 9"<br />
wide x 4" deep, and holds the <strong>Tele</strong> <strong>Vue</strong>-<strong>60</strong> optical tube, diagonal or prism of your choice,<br />
plus three eyepieces in custom die-cut foam. The Nylon soft case is padded and comes<br />
with both a carry handle and shoulder strap.<br />
When packing up for the evening, always install the front lens<br />
cover and close <strong>Tele</strong> <strong>Vue</strong>-<strong>60</strong> in the optional carry case or its bag<br />
box before bringing the telescope inside. Do not open the bag<br />
or box until it reaches room temperature. This will prevent dew<br />
from forming on the telescope. If excessive dew builds up on the<br />
telescope body, wipe it off with a soft cloth.<br />
8. CARING FOR THE TELE VUE-<strong>60</strong><br />
The <strong>Tele</strong> <strong>Vue</strong>-<strong>60</strong> requires no special care. Treat it as you would any fi ne camera<br />
lens. Use the lens cap when the telescope is not in use or being stored.<br />
As stated earlier, do not pump the draw tube in and out quickly. This can cause<br />
dust or airborne grit to be drawn into the telescope.<br />
If you leave your scope idle in dewy conditions it is always a good idea to tilt the<br />
telescope slightly up. If dew forms on the lens during cold weather, it is best to use an<br />
electric hair dryer (on the lowest setting) to gently warm it away. A few specks of dust will<br />
have no effect on the quality of the image, and may be gently blown off with a squeeze bulb.<br />
Do not use compressed air cans to blow dust off any optical surfaces.<br />
Fingerprints, however should be cleaned off. Though the anti-refl ection coatings<br />
are durable, they can be scratched. The simplest cleaning method is to moisten a very soft,<br />
lint-free tissue, cloth, “Q-Tip” or surgical cotton with a lens or glass cleaner and gently<br />
whisk away the stain. Do not apply any solutions directly to the glass surfaces. After every<br />
13
Put a red filter over your flashlight to prevent disturbing your<br />
eyes' dark adaptation.<br />
Objects are best observed when they are as high overhead as<br />
possible. By looking through less air, the amount of atmospheric<br />
turbulence and dimming (caused by absorption) is considerably<br />
reduced.<br />
a television picture, where the closer you get to the tube, the more detail you can see, until<br />
you get so close that you see the screen’s dot pattern. Once the dot pattern is observed, no<br />
additional detail can be seen by moving closer to the set. The same principle applies to<br />
telescope magnifi cation and resolution. When the resolution limit is reached (at higher<br />
magnifi cations and with steady air), stars will appear as small discs with one or more surrounding<br />
faint rings of light.<br />
Experiment with viewing double stars or lunar detail, and you will quickly discover<br />
those magnifications which are best suited to the object, your eyes, and the steadiness (seeing<br />
conditions) of the Earth’s atmosphere. Cold, crisp winter nights offer excellent transparency<br />
for seeing faint and elusive deep-sky objects, but the accompanying air currents (turbulence)<br />
often will make the moon or planets appear as if they are viewed under moving water. This<br />
is the reason that bright stars twinkle so noticeably on these nights. On the other hand,<br />
Faint objects can be more readily detected by using a technique<br />
called “averted vision”. Try looking slightly away from the faint<br />
object you would like to observe and you will notice that it appears<br />
to get brighter. This is due to the position of the more light<br />
sensitive rods lining the outer area of the retina. Experiment with<br />
the direction in which you avert your vision since a particular area<br />
of your eye might be more sensitive than another.<br />
hazy summer nights with still, “dead” air (poor transparency but good “seeing”) are often<br />
ideal for observing fi ne lunar detail, spotting planetary features, and separating close double<br />
stars at the highest magnifications.<br />
You will also enjoy views of the Ring Nebula (M57) and the Dumbbell Nebula<br />
(M27). Close double stars such as Epsilon Lyrae (the “Double-Double”) can be split at high<br />
magnifi cations. Check www.televue.com for more technical articles.<br />
6. THE TELE VUE-<strong>60</strong> AND PHOTOGRAPHY<br />
6.1 PHOTOGRAPHIC METHODS USING THE TELE VUE-<strong>60</strong><br />
The <strong>Tele</strong> <strong>Vue</strong>-<strong>60</strong> can be used with 35mm single lens refl ex (SLR) cameras or as<br />
an afocal system with an eyepiece and digital camera.<br />
A) PRIME FOCUS 3<strong>60</strong>mm TELEPHOTO — For 35mm cameras, remove either<br />
the diagonal or erecting prism and install the optional 1¼" camera adapter (ACM-1250).<br />
A “T”-ring to mate your particular brand of camera to the adapter can be obtained at any<br />
camera store. With camera mounted, look through the viewfi nder and focus the <strong>Tele</strong> <strong>Vue</strong>-<br />
function is unnecessary for viewing the sky. However, mirror diagonals are used to provide<br />
easier viewing postures for the observer. Your <strong>Tele</strong> <strong>Vue</strong>-<strong>60</strong> telescope can be used with<br />
either prisms or mirror diagonals, providing maximum versatility for either use. Since<br />
prisms and mirrors are in the “light path,” they must be of very high quality, or they will<br />
degrade the overall performance of the objective and eyepiece. (All <strong>Tele</strong> <strong>Vue</strong> prisms and<br />
mirror diagonals are individually inspected and tested to ensure the highest quality possible.)<br />
In order for a telescope to be properly and clearly in focus, the eyepiece must be<br />
at the precise distance from the objective lens. This distance may vary with the type of<br />
eyepiece as well as the distance to the object being viewed. For terrestrial viewing, where<br />
the object distance can vary greatly, there ideally should be both gross and fi ne adjustments<br />
in order to handle all focussing situations quickly and easily. The <strong>Tele</strong> <strong>Vue</strong>-<strong>60</strong> can focus<br />
from approximately 10 feet to infinity.<br />
Another factor affecting the focus “position” is the corrective error of the observer’s<br />
eye (i.e. if you require eyeglasses), and whether you are wearing them or not. These variables<br />
are accommodated by the focuser, which provides the mechanical adjustment for a<br />
range of focus positions.<br />
That’s all there is to the basic operation of a telescope or spotting scope.<br />
3. GETTING ACQUAINTED WITH THE TELE VUE-<strong>60</strong><br />
The more you know about each part of the <strong>Tele</strong> <strong>Vue</strong>-<strong>60</strong>, the quicker you will become<br />
familiar with its use and many capabilities.<br />
3.1 OPTICAL TUBE ASSEMBLY<br />
The optical tube assembly is the heart of the telescope. It consists of the front lens<br />
cell with captive dew shield, snap-on lens cover, anodized aluminum body, and focuser. The<br />
<strong>Tele</strong> <strong>Vue</strong>-<strong>60</strong> is an air-spaced doublet apochromatic design using the fi nest quality special<br />
dispersion glasses. The objective produces diffraction limited resolution with color correction<br />
far exceeding that of a "classic" f/15 achromat.<br />
The two lens elements contained in the optical tube assembly are critically aligned<br />
to deliver all the sharpness inherent in this unique design. Never loosen the lock screws<br />
in the lens cell as this will affect collimation and void the warranty.<br />
The end of the dew shield is threaded to accept 77mm photographic fi lters. A fi lter<br />
is recommended to protect the objective lens when observing in shore environments. Care<br />
must be taken to select the highest optical quality fi lter possible so as not to affect the image<br />
quality. It is recommended to always remove any aperture fi lter for astronomical observing.<br />
3.2 1¼" FOCUSER<br />
<strong>Tele</strong> <strong>Vue</strong>-<strong>60</strong>'s 1¼" dual-action draw tube/helical type focuser is individually hand<br />
fi tted to obtain a smooth and accurate focus action. A tension/lock screw is located on top<br />
of the focuser body. It can be used to add resistance against the focuser’s draw tube. This<br />
is especially valuable when using heavy eyepieces and cameras.<br />
12<br />
5
3.3 ERECTING PRISMS AND MIRROR DIAGONALS (OPTIONAL)<br />
A) 45° ERECTING PRISM — The viewing angle allows comfortable terrestrial<br />
and astronomical observing and is best used at low and medium powers, up to approximately<br />
<strong>60</strong>x.<br />
B) <strong>60</strong>° DIAGONAL — The Everbrite dielectric coated mirror takes full advantage<br />
of the performance capability of the <strong>Tele</strong> <strong>Vue</strong>-<strong>60</strong> with a comfortable viewing angle for terrestrial<br />
observing. The image orientation is correct top-to-bottom, but left-right reversed.<br />
C) The 90° 1¼" Star Diagonal can be supplied with either a 96% refl ective<br />
enhanced aluminum mirror coating or 99% refl ective Everbrite coating. The Everbrite’s<br />
optical advantage in neutral coloration and scatter control is seen under critical evaluation<br />
at high power on the Moon and major planets. It is a durable, non-metallic coating which<br />
will maintain its reflectivity over time.<br />
Diagonals offer higher optical performance than prism units, most effectively<br />
noticed at powers above 80x. The image is right side up, but reversed left-right.<br />
All of the above items are available individually, and are interchangeable on the<br />
<strong>Tele</strong> <strong>Vue</strong>-<strong>60</strong>.<br />
3.4 EYEPIECES (OPTIONAL)<br />
As previously discussed, the function of the eyepiece is to magnify the image<br />
formed by the objective. Choosing eyepieces involves making decisions based on object<br />
type, physical constraints and personal preferences. The <strong>Tele</strong> <strong>Vue</strong>-<strong>60</strong> accepts only 1¼"<br />
barrel eyepieces. Consult the magnifi cation table in this operating guide for eyepiece/<br />
Powermate magnifi cations. For more detailed information on eyepiece specifi cations when<br />
used with the <strong>Tele</strong> <strong>Vue</strong>-<strong>60</strong>, try our eyepiece calculator at www.televue.com, or call us for<br />
recommendations.<br />
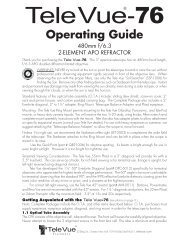
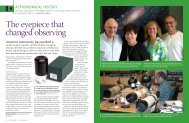
3.5 MOUNTING/BALANCE BAR<br />
The captive dovetail mounting/balance bar, referred to simply as the balance<br />
bar, allows the <strong>Tele</strong> <strong>Vue</strong>-<strong>60</strong> to be attached to a number of tripod or mount types, including<br />
camera/video, alt/azimuth or equatorial. It also slips into the <strong>Tele</strong> <strong>Vue</strong> SCT Bracket (SBB-<br />
1002) making the <strong>Tele</strong> <strong>Vue</strong>-<strong>60</strong> the ultimate fi nder/Rich-Field accessory for your SCT! The<br />
thick aluminum bar provides a solid footprint and resists vibration. A thumb screw locks<br />
the balance position, while providing easy adjustment when necessary.<br />
1 2 3 4<br />
Dovetail Balance Bar — end holes for <strong>Tele</strong> <strong>Vue</strong> mounts, middle holes for camera/video tripods.<br />
Holes 1, 3 & 4 have ¼-20 threads. Hole 2 is for the anti-rotation pin found on camera/video tripods.<br />
6<br />
To easily follow a moving object when viewing with a mirror<br />
diagonal, just remember to push the back of the telescope in the<br />
same direction that the object appears to be moving in the telescope.<br />
For example, if a bird is flying through the field from left to<br />
right, swing the back of the scope from left to right.<br />
of stars, and galaxies will appear different from the photographs and illustrations in books<br />
and magazines. Long duration photos made at major observatories present views of objects<br />
which cannot be duplicated visually by telescopes of any size.<br />
However, the visual observer can perceive contrasts and ranges of brightness that<br />
are impossible to duplicate in any photograph. Ask anyone who has observed the delicate<br />
swirls of the Orion nebula, or better yet, try it out yourself when this nebula is above the horizon.<br />
You can see the jewel-like Trapezium stars at the center of the nebula simultaneously<br />
with the petal-like “arms” of nebulosity that seem to curve up and over the brighter central<br />
regions of gas. Photos in books can show one or the other, but rarely both! The <strong>Tele</strong> <strong>Vue</strong>-<strong>60</strong>'s<br />
unique design provides high contrast and sharpness over a very wide magnifi cation range.<br />
A) LOW POWER VIEWING - Magnifi cations at the lowest end of the <strong>Tele</strong> <strong>Vue</strong>-<br />
<strong>60</strong>'s range provide wide, extremely sharp fi elds - ideal for fi nding your target, for wide angle<br />
sweeps of the Milky Way, and for beautiful views of large open clusters such as the Pleiades<br />
(M45), the Beehive (M44), and the Double Cluster in Perseus. (NGC-869 and NGC-884).<br />
Low power viewing is also the best way to see the Andromeda Galaxy (M31). In<br />
autumn and winter, the rich star clusters in Cassiopeia and Auriga are beautiful.<br />
To reach critical focus, go through each side of focus a few times.<br />
Each time, de-focus less and less. Focus position is critical to both<br />
sharpness and best color correction.<br />
The nightly motion of our moon occasionally causes it to pass through or near rich<br />
star fi elds. A crescent moon fl oating among the bright jewels of the Pleiades is a sight not<br />
soon forgotten. We encourage you to share such beautiful and special celestial events with<br />
your friends and family.<br />
B) MEDIUM AND HIGH POWER VIEWING - Using eyepieces of shorter focal<br />
length increases the magnifi cation of the <strong>Tele</strong> <strong>Vue</strong>-<strong>60</strong>, and lets you direct your attention to<br />
even fi ner lunar and planetary detail, and to the myriad of double and multiple star systems.<br />
Many observers are delighted and surprised with the superior detail seen in high-power<br />
views of some nebulae. These extended objects often have low brightness levels and contrast<br />
poorly against brightly-lit urban and suburban sky backgrounds. By increasing your<br />
telescope’s magnifi cation, the sky background darkens, fainter stars are visible and the<br />
enlarged subject becomes much more striking.<br />
Optical theory tells us that with ideal eyesight you can see all of <strong>Tele</strong> <strong>Vue</strong>-<strong>60</strong>’s<br />
resolution at just 40 power. In practice though, most people require magnifi cation about 2<br />
to 3 times more (80x to 120x) to view all the resolution comfortably. Much like looking at<br />
11
When changing eyepieces, always have the eyepiece you are<br />
changing to in hand and ready to install. This will minimize the<br />
chances for dust or dirt to settle on your diagonal mirror.<br />
5.3 TERRESTRIAL OBSERVING<br />
For terrestrial observing we suggest using a high quality multi-coated, 77mm UV<br />
haze fi lter which screws into the front dew shield. This also helps protect the lens. (You<br />
should remove the fi lter for the sharpest possible high power astronomical viewing.) Terrestrial<br />
observing generally takes advantage of the <strong>Tele</strong> <strong>Vue</strong>-<strong>60</strong>’s low and medium powers.<br />
Low magnifi cations yield wide fi elds-of-view which help you to fi nd object easily.<br />
The upper ends of the medium power magnifi cations reduce your fi eld of view<br />
and are recommended when subject brightness allows. Also, these higher magnifi cations<br />
often increase the blurring-effect of air currents, wind, and vibrations. To maximize viewing<br />
comfort, avoid using over 70x when viewing over asphalt paving or any warm surface,<br />
or through an open window. In these cases, magnifi cation of air currents by the telescope<br />
will signifi cantly degrade image steadiness and sharpness. Image sharpness may also be<br />
reduced when viewing through window glass.<br />
In any case, you will marvel at the clarity of your “window to the world,” whether<br />
as a long distance microscope, a spotter for bird watching, or for viewing over water scenes.<br />
5.4 ASTRONOMICAL VIEWING<br />
The <strong>Tele</strong> <strong>Vue</strong>-<strong>60</strong>’s “diffraction limited” design coupled with its aperture, focal<br />
length, and overall physical size make it a truly portable instrument. It’s easily set up, and<br />
with its optional custom fi tted soft case, it is rugged enough for travel by land, sea or air.<br />
Why not take it along to your favorite distant and exotic viewing sites?<br />
Astronomical viewing presents challenges different from those of terrestrial<br />
viewing. With the exception of the moon, planets, and brighter stars, your viewing targets<br />
are not necessarily visible to your naked eye. Remember that views of nebulae, clusters<br />
For correcting near- or farsightedness, there is generally no need<br />
to wear your glasses, since focusing the telescope will compensate<br />
for your eyesight.<br />
If, however, if you suffer from eyesight astigmatism you will either<br />
need to use your glasses or a <strong>Tele</strong> <strong>Vue</strong> Dioptrx to get the sharpest<br />
view. Dioptrx has some advantages over standard eyewear. First,<br />
it's made of the highest quality optical glass and is multicoated,<br />
just like the lenses in your <strong>Tele</strong> <strong>Vue</strong> eyepieces. Dioptrx is fully<br />
rotatable (tunable) to exactly match the axis of your astigmatism.<br />
Finally, you will always be looking through the center of the<br />
Dioptrx lens for optimal correction. Learn more about Dioptrx at<br />
<strong>Tele</strong><strong>Vue</strong>.com.<br />
4. MOUNTING THE TELE VUE-<strong>60</strong><br />
To use magnifi cations higher than about 10x, you need to stabilize the telescope<br />
by mounting it on a tripod. A quality photo tripod or any in our complete line of mounts<br />
can be used. Several standard ¼-20 tapped holes are provided to accommodate all types<br />
of tripods. If you should change eyepiece sizes or weights, or should mount a camera,<br />
you may have to reposition the <strong>Tele</strong> <strong>Vue</strong>-<strong>60</strong> for best balance. This will reduce the amount<br />
of observable vibration, or tremors seen at higher magnifying powers, and gives you the<br />
smoothest mount movement.<br />
For mounting the <strong>Tele</strong> <strong>Vue</strong>-<strong>60</strong> on any <strong>Tele</strong> <strong>Vue</strong> tripod, follow the instructions<br />
supplied with each unit. All necessary hardware is included with the tripod.<br />
In general, the heavier the tripod, the more stable and effective it is at high magnifi<br />
cation (100x to 150x). For specifi c mounting instructions, refer to the documentation<br />
provided with your mount.<br />
4.1 TELE VUE MOUNTING OPTIONS<br />
A) TELE-POD HEAD — Mounting the <strong>Tele</strong> <strong>Vue</strong>-<strong>60</strong> on a tripod with a standard<br />
camera head is fi ne for terrestrial viewing. However, problems arise when tilting up from<br />
the horizon. The weight of the telescope will always be fi ghting gravity.<br />
The yoke and cradle design of the <strong>Tele</strong>-Pod Head solves this problem by moving<br />
the altitude pivot axis near to the center of gravity of the telescope. In this balanced state<br />
the telescope will stay where it’s pointed. The Sky Tour digital setting circle system and<br />
Eyepiece Caddy Set are great bolt-on accessories.<br />
The <strong>Tele</strong>-Pod head simply threads onto either the center post of your camera tripod<br />
(no need for the camera head) or onto the camera head itself.<br />
B) TELE-POD MOUNT — Weighing 7 lbs. the <strong>Tele</strong>-Pod mount combines the<br />
<strong>Tele</strong>-Pod head with a light weight camera tripod. It is the ideal mount for the <strong>Tele</strong> <strong>Vue</strong>-<strong>60</strong><br />
with the added ability to use the Sky Tour and Eyepiece Caddy Set.<br />
C) PANORAMIC MOUNT — The Panoramic Mount puts the <strong>Tele</strong>-Pod head atop<br />
a beautiful ash or walnut tripod. A convenient accessory tray is included.<br />
4.2 CAMERA TRIPOD MOUNTING<br />
The standard ¼-20 tapped holes in the mounting bar allows the <strong>Tele</strong> <strong>Vue</strong>-<strong>60</strong> to be<br />
mounted on any heavy duty camera tripod.<br />
4.3 ADAPTERS FOR EQUATORIAL MOUNTING<br />
A) <strong>Tele</strong> <strong>Vue</strong> offers an adapter plate (Part# AVT-1011) that allows the <strong>Tele</strong> <strong>Vue</strong>-<strong>60</strong><br />
to be mounted on Great Polaris or Sphinx equatorial mounts from Vixen.<br />
Never underestimate the value of comfort in observing. Use the<br />
star diagonal to avoid “craning” your neck for astronomical observing.<br />
An adjustable height observer’s stool such as <strong>Tele</strong> <strong>Vue</strong>’s<br />
Air-Chair is a great way to keep from getting tired.<br />
10<br />
7
An easy way to center bright objects is to remove the eyepiece<br />
and look down into the diagonal from a foot away. Place the<br />
bright object (moon, planet etc.) as close to center as possible.<br />
Reinstall a low power eyepiece and further center the object.<br />
5. OBSERVING WITH THE TELE VUE-<strong>60</strong><br />
5.1 HOW TO POINT THE TELE VUE-<strong>60</strong><br />
A) LOW POWER EYEPIECE — By inserting low power eyepieces, the <strong>Tele</strong> <strong>Vue</strong>-<br />
<strong>60</strong> can be used as its own fi nder for locating objects to be observed at higher magnifi cations.<br />
For the widest fi eld possible, you should use either the <strong>Tele</strong> <strong>Vue</strong> 32mm Plössl or the 24mm<br />
Panoptic which provides viewing at 11x or 15x respectively with a whopping 4.3° true fi eld<br />
(over 8 full moon diameters).<br />
B) QWIK-POINT — This accessory projects a "red dot" where the telescope is<br />
pointed and attaches to the telescope's dew shield. (See back page for instructions.)<br />
5.2 EYEPIECE RECOMMENDATIONS<br />
The optical performance of your <strong>Tele</strong> <strong>Vue</strong>-<strong>60</strong> telescope is based on its high quality<br />
objective lens. However, every other item in the telescope’s light path will affect the fi nal<br />
image quality. To obtain the highest performance from your <strong>Tele</strong> <strong>Vue</strong>-<strong>60</strong> telescope, you<br />
should select only eyepieces, prism or mirror diagonal assemblies by <strong>Tele</strong> <strong>Vue</strong> Optics .<br />
Although the variety of eyepieces seems daunting, you only need a few to cover<br />
a broad magnifi cation range. Choose the best eyepieces you can afford, rather than the<br />
most. Many factors are involved in choosing the right eyepiece for you. Please call us for<br />
advice. Below are our suggestions for getting started with your <strong>Tele</strong> <strong>Vue</strong>-<strong>60</strong>.<br />
Starting with low power, the 24mm Panoptic at 15x provides the largest true<br />
fi eld, 4.3°. For medium power, a 9mm Nagler Type 6 delivers 40x, great for terrestrial as<br />
well as rich-fi eld deep sky observing. The 8mm Ethos would be a great alternative to the<br />
9mm Nagler At high power your subject will appear to move through the fi eld quickly.<br />
Therefore, if the eyepiece focal lengths were the same, an 82° Nagler eyepiece would<br />
permit longer observing times before having to move the telescope. In practice, the true<br />
fi eld differences for our high power recommendations are small because the magnifi cations<br />
are different. For high power, choosing either a 2.5mm Nagler Type 6 (144x), or 3-6mm<br />
Zoom (<strong>60</strong>x-120x) will give you a minimum of two minutes time to view an object on the<br />
meridian (worst case) before having to reposition the telescope.<br />
Although Ethos eyepieces are larger, heavier and more costly, the 100° apparent<br />
fi eld of view gives a unique "wow" experience. Ethos 13mm, 10mm, 8mm, 6mm and<br />
4.7mm, 3.7mm (with 110°) all work with the TV-<strong>60</strong>. The Delos line with its 20mm of eye<br />
relief is excellent day or night for eyeglass wearers. Available focal lengths 17.3mm, 14mm,<br />
12mm, 10mm, 8mm, 6mm, 4.5mm and 3.5mm.<br />
Though the <strong>Tele</strong> <strong>Vue</strong>-<strong>60</strong> is capable of signifi cantly higher powers, the number<br />
of subjects bright enough for such magnifi cations are limited to the Moon, major planets<br />
and some double stars. Please note going to higher powers than recommended produces<br />
a larger image, but no resolution gain. Atmospheric turbulence will also often limit the<br />
amount of magnification that can be used.<br />
8<br />
Focal<br />
Length<br />
(mm)<br />
Type<br />
Product<br />
Code<br />
Apparent<br />
Field (deg)<br />
Field Stop<br />
Dia. (mm)<br />
<strong>Tele</strong> <strong>Vue</strong>-<strong>60</strong><br />
Eye<br />
Relief<br />
(mm)<br />
9<br />
Weight<br />
(lb.)<br />
Mag.<br />
True<br />
Field<br />
(deg)<br />
Exit<br />
Pupil<br />
(mm)<br />
# of<br />
Elem.<br />
Dioptrx<br />
Ready<br />
1¼" Eyepieces for Wide True Fields<br />
40 Plössl EPL-40.0 43 27.0 28 0.4 9.0 4.30 6.7 4 Y<br />
32 Plössl EPL-32.0 50 27.0 22 0.4 11.3 4.30 5.3 4 Y<br />
24 Panoptic EPO-24.0 68 27.0 15 0.5 15.0 4.30 4.0 6 Y*<br />
13 Ethos ETH-13.0 100 22.3 15 1.3 27.7 3.55 2.2 - Y<br />
16 Nagler 5 EN5-16.0 82 22.1 10 0.4 22.5 3.52 2.7 6 N<br />
19 Panoptic EPO-19.0 68 21.3 13 0.4 18.9 3.39 3.2 6 Y*<br />
25 Plössl EAP-25.0 50 21.2 17 0.3 14.4 3.37 4.2 4 N<br />
17.3 Delos EDL-17.3 72 21.2 20 0.9 20.8 3.37 2.9 - Y<br />
10 Ethos ETH-10.0 100 17.7 15 1.1 36.0 2.82 1.7 - Y<br />
13 Nagler 6 EN6-13.0 82 17.6 12 0.4 27.7 2.80 2.2 7 Y*<br />
14 Delos EDL-14.0 72 17.3 20 0.9 25.7 2.75 2.3 - Y<br />
20 Plössl EAP-20.0 50 17.1 14 0.2 18.0 2.72 3.3 4 N<br />
12† Nagler 4 EN4-12.0 82 17.1 17 1.0 30.0 2.72 2.0 6 Y<br />
1¼" Eyepieces for Medium Powers<br />
12 Delos EDL-12.0 72 15.0 20 0.9 30.0 2.39 2.0 - Y<br />
11 Nagler 6 EN6-11.0 82 14.9 12 0.4 32.7 2.37 1.8 7 Y*<br />
10 Delos EDL-10.0 72 12.7 20 0.9 36.0 2.02 1.7 - Y<br />
15 Plössl EAP-15.0 50 12.6 10 0.2 24.0 2.01 2.5 4 N<br />
9 Nagler 6 EN6-09.0 82 12.4 12 0.4 40.0 1.97 1.5 7 Y*<br />
11 Plössl EAP-11.0 50 9.1 8 0.1 32.7 1.45 1.8 4 N<br />
1¼" Eyepieces for Higher Powers<br />
8 Ethos ETH-08.0 100 13.9 15 1.0 45.0 2.21 1.3 - Y<br />
6 Ethos ETH-06.0 100 10.4 15 1.0 <strong>60</strong>.0 1.66 1.0 - Y<br />
8 Delos EDL-08.0 72 9.9 20 1.0 45.0 1.58 1.3 - Y<br />
7 Nagler 6 EN6-07.0 82 9.7 12 0.5 51.4 1.54 1.2 7 Y*<br />
4.7 Ethos SX ETH-04.7 110 8.9 15 1.3 76.6 1.42 0.8 - Y<br />
6 Delos EDL-06.0 72 7.6 20 1.0 <strong>60</strong>.0 1.21 1.0 - Y<br />
3.7 Ethos SX ETH-03.7 110 7.0 15 1.1 97.3 1.12 0.6 - Y<br />
5 Nagler 6 EN6-05.0 82 7.0 12 0.5 72.0 1.11 0.8 7 Y*<br />
8 Plössl EAP-08.0 50 6.5 6 0.1 45.0 1.03 1.3 4 N<br />
4.5 Delos EDL-04.5 72 5.6 20 1.1 80.0 0.89 0.8 - Y<br />
3.5 Nagler 6 EN6-03.5 82 4.8 12 0.5 102.9 0.76 0.6 7 Y*<br />
3.5 Delos EDL-03.5 72 4.4 20 1.1 102.9 0.70 0.6 - Y<br />
2.5 Nagler 6 EN6-02.5 82 3.4 12 0.5 144.0 0.54 0.4 7 Y*<br />
1¼" Zoom Eyepieces for Medium and Higher Powers<br />
6-3<br />
4-2<br />
Nagler<br />
Zoom<br />
Nagler<br />
Zoom<br />
ENZ-0306 50 5.1-2.6 10 0.3<br />
ENZ-0204 50 3.3-1.7 10 0.4<br />
<strong>60</strong>.0-<br />
120.0<br />
90.0-<br />
180.0<br />
0.81-<br />
0.41<br />
0.53-<br />
0.27<br />
†12mm Nagler T4 not recommended for daytime use. *Additional Dioptrx Adapter required<br />
1.0-<br />
0.5<br />
0.7-<br />
0.3<br />
5 N<br />
5 N