Tele Vue-60is
Tele Vue-60is Operating Guide - TeleVue Optics
Tele Vue-60is Operating Guide - TeleVue Optics
- No tags were found...

You also want an ePaper? Increase the reach of your titles
YUMPU automatically turns print PDFs into web optimized ePapers that Google loves.
TV<strong>60is</strong>OG 0805<br />
PRICE $5.00<br />
Printed in U.S.A.<br />
OPERATING GUIDE<br />
<strong>Tele</strong> <strong>Vue</strong>-<strong>60is</strong><br />
360mm f/6.0<br />
IMAGING SYSTEM<br />
APO REFRACTOR<br />
<strong>Tele</strong> <strong>Vue</strong> ® 32 Elkay Dr., Chester, New York 10918 (845) 469 - 4551 www.televue.com<br />
Visionary<br />
Page 1
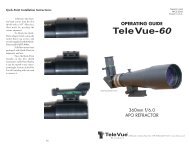
Retractable<br />
Dew Cap<br />
Tube Ring<br />
Tube<br />
Positioning<br />
Screws<br />
Focus<br />
Tension<br />
Screws<br />
Field Flattener/<br />
Diagonal<br />
Lock Screws<br />
Field Flattener<br />
1:1 Focus Knob<br />
T-ring Threads<br />
Safety Stops<br />
Safety Stops<br />
Dovetail<br />
Balance Bar<br />
Micrometer<br />
Cap Screws<br />
Focusmate tm<br />
1:1 Knob<br />
6:1 Knob<br />
Dovetail Position<br />
Lock Screws<br />
Page 2
Congratulations on purchasing the <strong>Tele</strong> <strong>Vue</strong>-<strong>60is</strong> (imaging system) APO telescope. This instrument is diffraction<br />
limited, and will perform visually up to the same standard as its sibling 1¼" focuser model, while having the enormous<br />
field capability of accepting 2" eyepieces, with an optional 2" diagonal.<br />
Its primary goal, of course, is imaging. To that end the <strong>Tele</strong> <strong>Vue</strong>-<strong>60is</strong> features a 2" focuser with double locking<br />
screws bearing against brass clamp rings in both the body and drawtube, Focusmate tm 6:1 fine focus mechanism, screwon<br />
field flattener which covers typical cameras such as the Canon 20DA without vignetting, and a heavy duty balance<br />
bar with a selection of bolt holes for balance and to mate with imaging platforms and adapters. An optional digital<br />
micrometer, with available RS232 port connection, can measure focus position down to 0.00005".<br />
WARNING: NEVER look at or photograph the sun, or point the telescope toward or near the sun without<br />
proper solar observing equipment rigidly secured in front of the objective lens. Instant and permanent<br />
eye damage will result from viewing the sun directly, even during a solar eclipse, or when viewing through<br />
thin clouds, or when the sun is near the horizon. Your CCD camera can also be damaged.<br />
Getting Acquainted<br />
1) Dovetail Balance Bar: Moving the telescope fore and aft by means of the Dovetail Balance Bar will permit balancing<br />
for smooth operation of your mount. To move the scope, loosen the two Dovetail Position Lock Screws on the side of the<br />
Dovetail Channel. Slide the scope fore or aft along the Dovetail Balance Bar until balance is achieved. Tighten the<br />
Position Lock Screws. The top two Safety Stop Screws will prevent the telescope from accidentally sliding off the<br />
Dovetail Balance Bar. The bottom two Safety Stop Screws will prevent the Dovetail Balance Bar from sliding though the<br />
<strong>Tele</strong> <strong>Vue</strong> QRB-1002 Quick Release Bracket which can be used to piggyback the <strong>Tele</strong> <strong>Vue</strong>-<strong>60is</strong> on other telescopes.<br />
1/4-20 threaded holes and corresponding video pin holes for Bogen mounts<br />
Threaded holes for various <strong>Tele</strong> <strong>Vue</strong> adapter plates and <strong>Tele</strong> <strong>Vue</strong> mounts<br />
The threaded holes in the bottom of the Dovetail Balance Bar are spaced for <strong>Tele</strong> <strong>Vue</strong> alt-azimuth mounts and also correspond<br />
to <strong>Tele</strong> <strong>Vue</strong> equatorial mount adapters which are listed on the <strong>Tele</strong> <strong>Vue</strong> website. The series of identically spaced mounting<br />
holes provide additional fore/aft balancing freedom. Should more weight need to be added to the front of the scope even with<br />
the scope pushed all the way forward, then attach the Dovetail Balance Bar to your mounting adapter plate by the rear group<br />
of holes.<br />
2) Tube Ring: The Tube Ring is machined from a single piece of aluminum with two, 3-point suspension rings. The scope<br />
is shipped with the top screws bottomed against the Tube Ring. For maximum adjustment range: hold the telescope,<br />
loosen both top screws halfway through their travel, and tighten each of the lower screws until the telescope is held firmly<br />
against the top screws. Some tube rotation is possible, however complete image orientation can be had by loosening<br />
the Field Flattener and rotating the camera for the most pleasing image composition. (See section 6)<br />
3) Dew Shield: Extend the Dew Shield by simply pulling it forward. Stops on either end retain it on the tube. Two #10-32 button<br />
head screws cover threaded holes in the dew shield. Use these holes to mount a light weight finder such as the <strong>Tele</strong> <strong>Vue</strong> Qwik-<br />
Point. The button head screws may be discarded after installing such a finder.<br />
4) Lens Cap: The <strong>Tele</strong> <strong>Vue</strong>-<strong>60is</strong> objective sits close to the end of the front cell. It is safest to pull the dew shield forward<br />
before removing the lens cap. The plastic will not scratch the objective should it accidentally fall against the first<br />
surface of the objective. Squeeze the two tabs to remove the lens cap from the dew shield.<br />
5) Focuser: The <strong>Tele</strong> <strong>Vue</strong>-<strong>60is</strong> provides a smooth operating rack and pinion focuser plus the dual speed 6:1 reduction<br />
of the Focusmate tm . This level of control permits focusing as fine as 0.00005” as measured by the optional Digital<br />
Micrometer Kit.<br />
Appropriate focus tension and locking is achieved by loosening or tightening the two 10-32 Focus Tension<br />
Page 3
Screws on top of the focus body. A brass clamp ring sits in a recessed<br />
groove within the interior wall of the focuser body and the Focus<br />
Tension Screws tighten against it. The brass clamp ring in turn,<br />
cinches around the Teflon sleeve within which the Draw Tube rides.<br />
The end of the Draw Tube is threaded to accept the Field<br />
Flattener. It also contains two 8-32 screws which tighten against<br />
a brass clamp ring to hold either the Field Flattener or 2” star<br />
diagonal.<br />
The single knob on one side of the focuser is a direct 1:1<br />
drive. The other side has the Focusmate tm . Focusmate tm contains<br />
both 1:1 and 6:1 ratios, with the outer knob being the finer of the<br />
two. If so desired, the Focusmate tm can be switched to the left<br />
side of the instrument. Please call <strong>Tele</strong> <strong>Vue</strong> for instructions.<br />
Field Flattener optimized for 55mm distance from T-ring’s<br />
mating face to image plane.<br />
7) Diagonal Bushing and insert tool: When you want to use the<br />
<strong>Tele</strong> <strong>Vue</strong>-<strong>60is</strong> visually you will need to insert a 2” Star Diagonal<br />
into the draw tube in place of the Field Flattener. The Diagonal<br />
Bushing will add more bearing surface for the diagonal. Holding<br />
the scope horizontally, unscrew the Field Flattener. Thread the<br />
Diagonal Bushing, with the spanner slots facing out, into the<br />
Focuser Draw Tube. As the bushing threads in you may find it<br />
easier to continue by using the insert tool. The tool will also<br />
make removal of the bushing easier. To use the tool, just span<br />
the shorter length of the tool across the slots and continue to<br />
turn. The Diagonal Bushing only needs to be threaded in until<br />
the face is flush with the end of the draw tube.<br />
Detail showing the threading for the Field Flattener, Field<br />
Flattener Lock screws and brass clamp ring.<br />
6) Field<br />
Flattener: The two-element <strong>Tele</strong> <strong>Vue</strong>-<strong>60is</strong> Field Flattener simply<br />
threads into the end of the focuser Draw Tube. The input side is<br />
threaded for 48mm filters. The output side is threaded for camera<br />
T-rings. When attaching a camera, it is recommended to leave the<br />
Field Flattener in the telescope and thread your T-ring on to it. Then,<br />
attach the camera to the T-ring.<br />
The Field Flattener is optimized for 55mm back focus as<br />
used by 35mm SLR and DSLR cameras. Extension tubes may be<br />
required to achieve the 55mm distance from the face of the Field<br />
Flattener to the CCD chip for other camera types.<br />
To change the orientation of the camera for image composition,<br />
leave the Lock Screws loose and unscrew the Field<br />
Flattener until the desired camera angle is achieved (remember,<br />
less than 180° is required). Tighten the two 8-32 Lock Screws<br />
to solidly lock your camera in place.<br />
Insertion of the Diagonal Bushing using the insert tool. It is<br />
easiest to start the threading with your finger and use the tool<br />
for removal.<br />
Optional Digital Micrometer Kit<br />
provides an easy way to index<br />
focus position when focusing by<br />
finding smallest diameter of a<br />
star using the full width<br />
halfmaximum value of a star.<br />
Page 4<br />
8) Optional Micrometer: Focusing for CCD imaging<br />
can be frustrating. The combination of the<br />
Focusmate tm and Digital Micrometer Kit, which can<br />
detect 0.00005” of focus travel, can make the task<br />
easier and quicker. By having an index, the photographer<br />
can always go back to a previous focus point.<br />
For installation, set-up and use of the Micrometer Kit<br />
see the instructions included with the kit.
Page 5<br />
9) Case: The <strong>Tele</strong> <strong>Vue</strong>-<strong>60is</strong> case is fitted for the<br />
telescope with a DSLR camera attached. When<br />
packing the scope in the case be sure to place the<br />
rigid ethafoam filler over the scope’s objective.<br />
The top two screws in the mount ring will protrude<br />
through the aperture in the ethafoam.<br />
CARE:<br />
The <strong>Tele</strong> <strong>Vue</strong>-<strong>60is</strong> requires no special care. Treat<br />
it as you would any fine camera lens. Use the lens<br />
cap when the telescope is not in use.<br />
If you leave your scope idle in dewy conditions<br />
it is always a good idea to tilt the telescope<br />
slightly up. If dew forms on the lens during cold<br />
weather, it is best to use an electric hair dryer (on the lowest setting) to gently warm it away. A few specks of dust will<br />
have no effect on the quality of the image, and may be gently blown off with a squeeze bulb. Do not use compressed<br />
air cans to blow dust off any optical surfaces.<br />
Fingerprints should be cleaned off. Though the anti-reflection coatings are durable, they can be scratched. The<br />
simplest cleaning method is to moisten a very soft, lint-free tissue, cloth, “Q-Tip” or surgical cotton with a lens or glass<br />
cleaner and gently whisk away the stain. Do not apply any solutions directly to the glass surfaces. After every cleaning<br />
stroke use a fresh applicator. The fewer strokes the better! Any residual “film” will not effect visual performance.<br />
The star diagonal has a first-surface mirror. It should be cleaned only when absolutely necessary. The <strong>Tele</strong> <strong>Vue</strong><br />
60° and 90° diagonal mirror should be removed for cleaning by removing the back cover's four screws, lifting the back<br />
off the diagonal body and cleaning the entire mirror surface. First blow loose dust away with a squeeze bulb. CAUTION:<br />
Do not clean mirror with water or water based cleaners such as Windex or any other commercial lens cleaners: this<br />
is not a lens. All contain too much water and will leave a residue. Use a Q-Tip moistened with pure acetone or methanol<br />
or Isopropyl alcohol (reagent grade). Wipe the surface gently. Use very light pressure and never rub. Slight residual<br />
stains or dust spots will have no visible effects in observing. Clean the Porro or 45° prisms just like the mirror diagonal.<br />
The black anodized surfaces of the <strong>Tele</strong> <strong>Vue</strong>-<strong>60is</strong> can be cleaned with “Windex.”<br />
WARRANTY<br />
The <strong>Tele</strong> <strong>Vue</strong>-<strong>60is</strong> is warranted to the original owner,<br />
to be free of manufacturing or workmanship defects<br />
for 5 (five) years from the date of purchase. Please return<br />
the warranty card for easy identification. If your<br />
<strong>Tele</strong> <strong>Vue</strong>-<strong>60is</strong> requires warranty service, please call<br />
<strong>Tele</strong> <strong>Vue</strong> to discuss the defect, upon which you will<br />
receive a return authorization. NO RETURNS ARE AC-<br />
CEPTED WITHOUT PRIOR AUTHORIZATION.<br />
The warranty does NOT include: collimation,<br />
defects caused by mis-handling, defects of subjective<br />
nature, coverage for any telescope purchased through<br />
an unauthorized <strong>Tele</strong> <strong>Vue</strong> dealer, or purchased outside<br />
the home country where <strong>Tele</strong> <strong>Vue</strong> has representation.<br />
Warranty work will be performed at <strong>Tele</strong> <strong>Vue</strong>’s discretion<br />
and may only be performed by <strong>Tele</strong> <strong>Vue</strong> Optics.<br />
The telescope must be shipped in its case with<br />
proper inner and outer packaging. Return shipping and<br />
insurance charges are the purchaser’s responsibility.<br />
A LAST WORD<br />
Please contact us with any thoughts, experiences or<br />
questions regarding your <strong>Tele</strong> <strong>Vue</strong>-<strong>60is</strong>. Finally, we<br />
hope you feel as much pride in owning the <strong>Tele</strong> <strong>Vue</strong>-<br />
<strong>60is</strong> as we have had in building it for you.<br />
SPECIFICATIONS:<br />
Type<br />
2-element APO refractor<br />
Clear Aperture 2.4 inches (60mm)<br />
Aperture Gain 73, compared to a 7mm eye pupil<br />
Focal Length 14.2 inches (360mm)<br />
Focal Ratio f/6<br />
Resolution<br />
(visual) 1.9 arc-sec. (Dawes Limit)<br />
Resolution<br />
(photographic) 240 line pairs per mm<br />
Magnification 9x to 150x using <strong>Tele</strong> <strong>Vue</strong> eyepieces<br />
Close Focus Approx. 10 ft.<br />
Field Visual 7.3° at 6.5x (55 Pl), 8.7x (41 Pan)<br />
Field, 35mm film 3.8° by 5.7° (6.8° diagonal)<br />
Image Scale 4.0° per inch<br />
Focuser 2" rack and pinion, plus 6:1 fine focus<br />
Mounting 6-pt. adjustable mount ring. Balance<br />
bar with ¼-20 holes for optional <strong>Tele</strong><br />
<strong>Vue</strong> mounts or equatorial adapters<br />
Weight<br />
approx. 6 lbs. (OTA only)<br />
Length<br />
10" (OTA only) 11.5" (with f.f.)<br />
Tube<br />
Black anodized aluminum<br />
Accessories Standard: Carry bag
Design<br />
Focal<br />
Length<br />
(mm)<br />
Barrel<br />
Diameter<br />
(inch)<br />
Eye Relief<br />
(mm)<br />
Dioptrx<br />
Ready<br />
Apparent<br />
Field (°)<br />
True Field<br />
(°)<br />
Power<br />
Power w.<br />
2x Barlow<br />
or<br />
Powermate<br />
Power w.<br />
2.5x<br />
Powermate<br />
Power w.<br />
3x barlow<br />
Power w.<br />
4x<br />
Powermate<br />
Plössl<br />
55<br />
2 38<br />
Y 50<br />
7.<br />
3 6.<br />
5 13.<br />
1 - - 26.<br />
2 -<br />
Panoptic<br />
41<br />
2 27<br />
Y 68<br />
7.<br />
3 8.<br />
8 17.<br />
6 - - 35.<br />
1 -<br />
Nagler<br />
T5 31<br />
2 19<br />
Y 82<br />
6.<br />
7 11.<br />
6 23.<br />
2 - - 46.<br />
5 -<br />
Panoptic<br />
35<br />
2 24<br />
Y 68<br />
6.<br />
2 10.<br />
3 20.<br />
6 - - 41.<br />
1 -<br />
Ethos<br />
21<br />
2 15<br />
Y 100<br />
5.<br />
8 17.<br />
1 34.<br />
3 - - 68.<br />
6 -<br />
Nagler<br />
T5 26<br />
2 16<br />
Y*<br />
82<br />
5.<br />
6 13.<br />
8 27.<br />
7 - - 55.<br />
4 -<br />
Nagler<br />
T4 22<br />
2 19<br />
Y 82<br />
5.<br />
0 16.<br />
4 32.<br />
7 - - 65.<br />
5 -<br />
Panoptic<br />
27<br />
2 19<br />
Y 68<br />
4.<br />
9 13.<br />
3 26.<br />
7 - - 53.<br />
3 -<br />
Ethos<br />
17<br />
2 15<br />
Y 100<br />
4.<br />
7 21.<br />
2 42.<br />
4 - - 84.<br />
7 -<br />
Nagler<br />
T5 20<br />
2 12<br />
Y*<br />
82<br />
4.<br />
4 18.<br />
0 36.<br />
0 - - 72.<br />
0 -<br />
Power w.<br />
5x<br />
Powermate<br />
Plössl<br />
40<br />
1¼<br />
28<br />
Y 43<br />
4.<br />
3 9.<br />
0 18.<br />
0 22.<br />
5 27.<br />
0 36.<br />
0 45. 0<br />
Plössl<br />
32<br />
1¼<br />
22<br />
Y 50<br />
4.<br />
3 11.<br />
3 22.<br />
5 28.<br />
1 33.<br />
8 45.<br />
0 56. 3<br />
Panoptic<br />
24<br />
1¼<br />
15<br />
Y*<br />
68<br />
4.<br />
3 15.<br />
0 30.<br />
0 37.<br />
5 45.<br />
0 60.<br />
0 75. 0<br />
Nagler<br />
T4 17<br />
2 17<br />
Y 82<br />
3.<br />
9 21.<br />
2 42.<br />
4 - - 84.<br />
7 -<br />
Ethos<br />
13<br />
2/1¼<br />
15<br />
Y 100<br />
3.<br />
6 27.<br />
7 55.<br />
4 69.<br />
2 83.<br />
1 110.<br />
8 138. 5<br />
Nagler<br />
T5 16<br />
1¼<br />
10<br />
N 82<br />
3.<br />
5 22.<br />
5 45.<br />
0 56.<br />
3 67.<br />
5 90.<br />
0 112. 5<br />
Panoptic<br />
19<br />
1¼<br />
13<br />
Y*<br />
68<br />
3.<br />
4 18.<br />
9 37.<br />
9 47.<br />
4 56.<br />
8 75.<br />
8 94. 7<br />
Plössl<br />
25<br />
1¼<br />
17<br />
N 50<br />
3.<br />
4 14.<br />
4 28.<br />
8 36.<br />
0 43.<br />
2 57.<br />
6 72. 0<br />
Radian<br />
18<br />
1¼<br />
20<br />
Y 60<br />
2.<br />
9 20.<br />
0 40.<br />
0 50.<br />
0 60.<br />
0 80.<br />
0 100. 0<br />
Ethos<br />
10<br />
2/1¼<br />
15<br />
Y 100<br />
2.<br />
8 36.<br />
0 72.<br />
0 90.<br />
0 108.<br />
0 144.<br />
0 180. 0<br />
Nagler<br />
T6 13<br />
1¼<br />
12<br />
Y*<br />
82<br />
2.<br />
8 27.<br />
7 55.<br />
4 69.<br />
2 83.<br />
1 110.<br />
8 138. 5<br />
Plössl<br />
20<br />
1¼<br />
14<br />
N 20<br />
2.<br />
7 18.<br />
0 36.<br />
0 45.<br />
0 54.<br />
0 72.<br />
0 90. 0<br />
Panoptic<br />
15<br />
1¼<br />
10<br />
N 68<br />
2.<br />
7 24.<br />
0 48.<br />
0 60.<br />
0 72.<br />
0 96.<br />
0 120. 0<br />
Nagler<br />
T4 12<br />
2/1¼<br />
17<br />
Y 82<br />
2.<br />
7 30.<br />
0 60.<br />
0 75.<br />
0 90.<br />
0 120.<br />
0 150. 0<br />
Nagler<br />
T6 11<br />
1¼<br />
12<br />
Y*<br />
82<br />
2.<br />
4 32.<br />
7 65.<br />
5 81.<br />
8 98.<br />
2 130.<br />
9 163. 6<br />
Radian<br />
14<br />
1¼<br />
20<br />
Y 60<br />
2.<br />
3 25.<br />
7 51.<br />
4 64.<br />
3 77.<br />
1 102.<br />
9 128. 6<br />
Ethos<br />
8 2/1¼<br />
15<br />
Y 100<br />
2.<br />
2 45.<br />
0 90.<br />
0 112.<br />
5 135.<br />
0 NR<br />
NR<br />
Plössl<br />
15<br />
1¼<br />
10<br />
N 50<br />
2.<br />
0 24.<br />
0 48.<br />
0 60.<br />
0 72.<br />
0 96.<br />
0 120. 0<br />
Nagler<br />
T6 9 1¼<br />
12<br />
Y*<br />
82<br />
2.<br />
0 40.<br />
0 80.<br />
0 100.<br />
0 120.<br />
0 160.<br />
0 NR<br />
Ethos<br />
6 2/1¼<br />
15<br />
Y 100<br />
1.<br />
7 60.<br />
0 120<br />
NR<br />
NR<br />
NR<br />
NR<br />
Nagler<br />
T6 7 1¼<br />
12<br />
Y*<br />
82<br />
1.<br />
5 51.<br />
4 102.<br />
9 128.<br />
6 154.<br />
3 NR<br />
NR<br />
Plössl<br />
11<br />
1¼<br />
8 N 50<br />
1.<br />
4 32.<br />
7 65.<br />
5 81.<br />
8 98.<br />
2 130.<br />
9 163. 6<br />
Radian<br />
8 1¼<br />
20<br />
Y 60<br />
1.<br />
3 45.<br />
0 90.<br />
0 112.<br />
5 135.<br />
0 180.<br />
0 NR<br />
Ethos-SX<br />
3.<br />
7 2/1¼<br />
15<br />
Y 110<br />
1.<br />
1 97.<br />
3 NR<br />
NR<br />
NR<br />
NR<br />
NR<br />
Nagler<br />
T6 5 1¼<br />
12<br />
Y*<br />
82<br />
1.<br />
1 72.<br />
0 144.<br />
0 180.<br />
0 NR<br />
NR<br />
NR<br />
Plössl<br />
8 1¼<br />
6 N 50<br />
1.<br />
0 45.<br />
0 90.<br />
0 112.<br />
5 135.<br />
0 180.<br />
0 NR<br />
Radian<br />
6 1¼<br />
20<br />
Y 60<br />
1.<br />
0 60.<br />
0 120.<br />
0 150.<br />
0 180.<br />
0 NR<br />
NR<br />
Radian<br />
5 1¼<br />
20<br />
Y 60<br />
0.<br />
8 72.<br />
0 144.<br />
0 180.<br />
0 NR<br />
NR<br />
NR<br />
Nagler<br />
T6 3.<br />
5 1¼<br />
12<br />
Y*<br />
82<br />
0.<br />
8 102.<br />
9 NR<br />
NR<br />
NR<br />
NR<br />
NR<br />
Radian<br />
4 1¼<br />
20<br />
Y 60<br />
0.<br />
7 90.<br />
0 180.<br />
0 NR<br />
NR<br />
NR<br />
NR<br />
Nagler<br />
6 2.<br />
5 1¼<br />
12<br />
Y*<br />
82<br />
0.<br />
5 144.<br />
0 NR<br />
NR<br />
NR<br />
NR<br />
NR<br />
Radian<br />
3 1¼<br />
20<br />
Y 60<br />
0.<br />
5 120.<br />
0 NR<br />
NR<br />
NR<br />
NR<br />
NR<br />
Nagler<br />
Zoom<br />
Nagler<br />
Zoom<br />
3 -<br />
6<br />
2 -<br />
4<br />
1¼<br />
10<br />
N 50<br />
1¼<br />
10<br />
N 50<br />
0.4 -<br />
0.8<br />
0.3 -<br />
0.5<br />
120.0 -<br />
60.0<br />
180.0 -<br />
90.0<br />
240.0 -<br />
120.0<br />
NR<br />
NR<br />
NR<br />
NR<br />
NR<br />
NR<br />
NR<br />
NR<br />
NR<br />
Page 6
PHOTO/VISUAL CONFIGURATIONS<br />
Page 7
Page 8