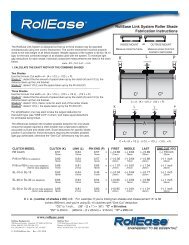
Roller Roman Fabrication
Roller Roman Fabrication - AV Outlet
Roller Roman Fabrication - AV Outlet
- No tags were found...

You also want an ePaper? Increase the reach of your titles
YUMPU automatically turns print PDFs into web optimized ePapers that Google loves.
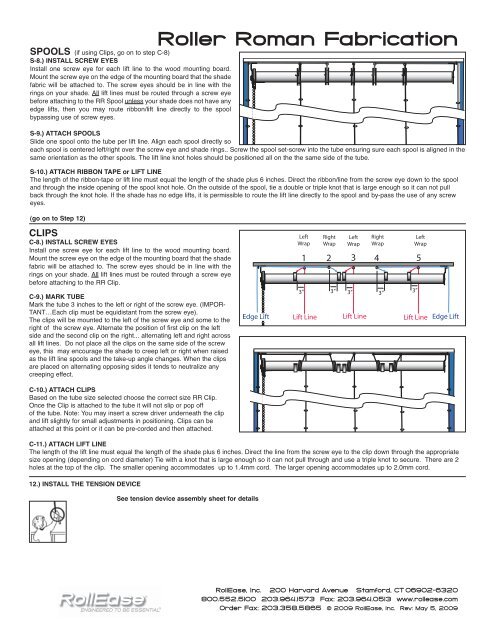
SPOOLS (if using Clips, go on to step C-8)<br />
S-8.) INSTALL SCREW EYES<br />
Install one screw eye for each lift line to the wood mounting board.<br />
Mount the screw eye on the edge of the mounting board that the shade<br />
fabric will be attached to. The screw eyes should be in line with the<br />
rings on your shade. All lift lines must be routed through a screw eye<br />
before attaching to the RR Spool unless your shade does not have any<br />
edge lifts, then you may route ribbon/lift line directly to the spool<br />
bypassing use of screw eyes.<br />
<strong>Roller</strong> <strong>Roman</strong> <strong>Fabrication</strong><br />
S-9.) ATTACH SPOOLS<br />
Slide one spool onto the tube per lift line. Align each spool directly so<br />
each spool is centered left/right over the screw eye and shade rings.. Screw the spool set-screw into the tube ensuring sure each spool is aligned in the<br />
same orientation as the other spools. The lift line knot holes should be positioned all on the the same side of the tube.<br />
S-10.) ATTACH RIBBON TAPE or LIFT LINE<br />
The length of the ribbon-tape or lift line must equal the length of the shade plus 6 inches. Direct the ribbon/line from the screw eye down to the spool<br />
and through the inside opening of the spool knot hole. On the outside of the spool, tie a double or triple knot that is large enough so it can not pull<br />
back through the knot hole. If the shade has no edge lifts, it is permissible to route the lift line directly to the spool and by-pass the use of any screw<br />
eyes.<br />
(go on to Step 12)<br />
CLIPS<br />
C-8.) INSTALL SCREW EYES<br />
Install one screw eye for each lift line to the wood mounting board.<br />
Mount the screw eye on the edge of the mounting board that the shade<br />
fabric will be attached to. The screw eyes should be in line with the<br />
rings on your shade. All lift lines must be routed through a screw eye<br />
before attaching to the RR Clip.<br />
1 2 3 4 5<br />
C-9.) MARK TUBE<br />
Mark the tube 3 inches to the left or right of the screw eye. (IMPOR-<br />
TANT…Each clip must be equidistant from the screw eye).<br />
The clips will be mounted to the left of the screw eye and some to the<br />
right of the screw eye. Alternate the position of first clip on the left<br />
side and the second clip on the right... alternating left and right across<br />
all lift lines. Do not place all the clips on the same side of the screw<br />
eye, this may encourage the shade to creep left or right when raised<br />
as the lift line spools and the take-up angle changes. When the clips<br />
are placed on alternating opposing sides it tends to neutralize any<br />
creeping effect.<br />
C-10.) ATTACH CLIPS<br />
Based on the tube size selected choose the correct size RR Clip.<br />
Once the Clip is attached to the tube it will not slip or pop off<br />
of the tube. Note: You may insert a screw driver underneath the clip<br />
and lift slightly for small adjustments in positioning. Clips can be<br />
attached at this point or it can be pre-corded and then attached.<br />
C-11.) ATTACH LIFT LINE<br />
The length of the lift line must equal the length of the shade plus 6 inches. Direct the line from the screw eye to the clip down through the appropriate<br />
size opening (depending on cord diameter) Tie with a knot that is large enough so it can not pull through and use a triple knot to secure. There are 2<br />
holes at the top of the clip. The smaller opening accommodates up to 1.4mm cord. The larger opening accommodates up to 2.0mm cord.<br />
12.) INSTALL THE TENSION DEVICE<br />
See tension device assembly sheet for details<br />
RollEase, Inc. 200 Harvard Avenue Stamford, CT 06902-6320<br />
800.552.5100 203.964.1573 Fax: 203.964.0513 www.rollease.com<br />
Order Fax: 203.358.5865 © 2009 RollEase, Inc. Rev: May 5, 2009