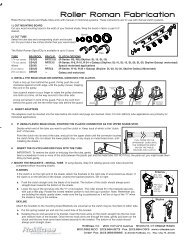
Termination of 24VD150W Power Supply Leads for use with Somfy ST30 Motors
Connecting you Somfy LT30 Motor to the 12V1AT DC ... - AV Outlet
Connecting you Somfy LT30 Motor to the 12V1AT DC ... - AV Outlet
- No tags were found...

You also want an ePaper? Increase the reach of your titles
YUMPU automatically turns print PDFs into web optimized ePapers that Google loves.
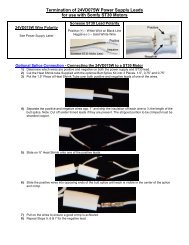
<strong>Termination</strong> <strong>of</strong> <strong>24VD150W</strong> <strong>Power</strong> <strong>Supply</strong> <strong>Leads</strong><br />
<strong>for</strong> <strong>use</strong> <strong>with</strong> <strong>Somfy</strong> <strong>ST30</strong> <strong>Motors</strong><br />
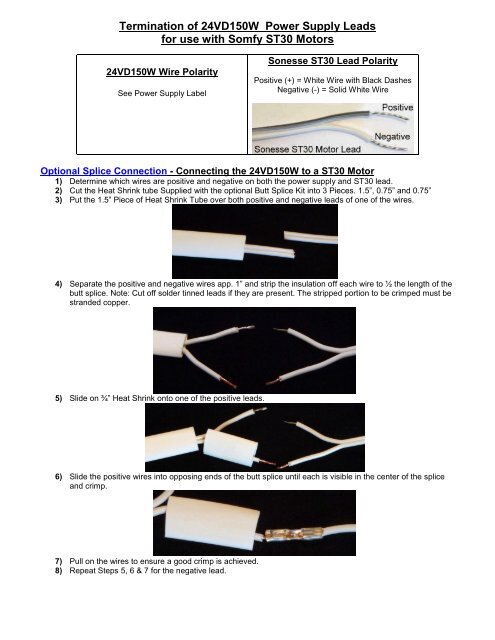
<strong>24VD150W</strong> Wire Polarity<br />
See <strong>Power</strong> <strong>Supply</strong> Label<br />
Sonesse <strong>ST30</strong> Lead Polarity<br />
Positive (+) = White Wire <strong>with</strong> Black Dashes<br />
Negative (-) = Solid White Wire<br />
Optional Splice Connection - Connecting the <strong>24VD150W</strong> to a <strong>ST30</strong> Motor<br />
1) Determine which wires are positive and negative on both the power supply and <strong>ST30</strong> lead.<br />
2) Cut the Heat Shrink tube Supplied <strong>with</strong> the optional Butt Splice Kit into 3 Pieces. 1.5”, 0.75” and 0.75”<br />
3) Put the 1.5” Piece <strong>of</strong> Heat Shrink Tube over both positive and negative leads <strong>of</strong> one <strong>of</strong> the wires.<br />
4) Separate the positive and negative wires app. 1” and strip the insulation <strong>of</strong>f each wire to ½ the length <strong>of</strong> the<br />
butt splice. Note: Cut <strong>of</strong>f solder tinned leads if they are present. The stripped portion to be crimped must be<br />
stranded copper.<br />
5) Slide on ¾” Heat Shrink onto one <strong>of</strong> the positive leads.<br />
6) Slide the positive wires into opposing ends <strong>of</strong> the butt splice until each is visible in the center <strong>of</strong> the splice<br />
and crimp.<br />
7) Pull on the wires to ensure a good crimp is achieved.<br />
8) Repeat Steps 5, 6 & 7 <strong>for</strong> the negative lead.
9) Center the individual ¾” heat shrink over the butt splice connections and shrink the tube using a heat shrink<br />
gun, hair dryer or lighter. Use caution to prevent burning the wire.<br />
10) Center the 1.5” heat shrink over both butt splice connections and shrink the tube using a heat shrink gun,<br />
hair dryer or lighter. Use caution to prevent burning the wire.