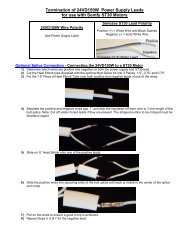
Somfy RTS Motor Programming Instructions
Somfy Sonesse 40 Programming Instructions - AV Outlet
Somfy Sonesse 40 Programming Instructions - AV Outlet

Create successful ePaper yourself
Turn your PDF publications into a flip-book with our unique Google optimized e-Paper software.
<strong>Somfy</strong> <strong>RTS</strong> <strong>Motor</strong> <strong>Programming</strong> <strong>Instructions</strong><br />
<strong>Motor</strong> <strong>Programming</strong> <strong>Instructions</strong> have been rewritten by http://www.AVOutlet.com<br />
Please Read and Follow These <strong>Instructions</strong>.<br />
Please use the motor programming instructions provided here. The remote control<br />
instructions can be used for reference and they are not as accurate as these programming<br />
instructions. Copies of the <strong>Somfy</strong> instructions are also provided for your reference.<br />
Please read installation instructions and programming instructions completely prior to proceeding<br />
with installation and programming. Failure to do so can result in damage to the motor and or the<br />
shade.<br />
Be prepared to stop the shade during programming. The programming step where upper and or<br />
lower stop limits are set will activate the motor to move without stopping on its own. You will need<br />
to stop the motor using the remote as indicated or the shade and motor can get damaged.<br />
If you have any questions regarding programming or installation please call AV Outlet at 1-877-<br />
271-5398<br />
The motors MUST be installed in the tube and the assembly must be mounted into brackets to be<br />
able to program the motor.<br />
Only apply power to the motor being programmed regardless if the other motors have been<br />
programmed or not. This will prevent inadvertent interaction with other motors.<br />
We recommend mapping out the installation before proceeding. This will reduce set-up time and<br />
make life easier. Decide the channels and or additional remotes to be assigned to each shade in<br />
the installation. Each shade should be completely programmed before moving to the next. Have<br />
the necessary remotes and controls ready prior to proceeding.<br />
All motors assigned to the SAME Channel of a multi-channel <strong>RTS</strong> remote will operate at the<br />
same time. All motor assigned to a Single Channel <strong>RTS</strong> remote will always operate at the same<br />
time. If you want individual control you must use separate channels on multi-channel remotes or<br />
separate remotes if using a single channel remote.<br />
The remote controls are generally considered to be dummy devices as they do not store any<br />
motor information or programming information. The motors are the intelligent devices. The motors<br />
store the shade operation limits in their memory and the motors also memorize the specific<br />
remotes or channels assigned to control them. Each motor can have many remotes or channels<br />
controlling them so installation and control is quite flexible.<br />
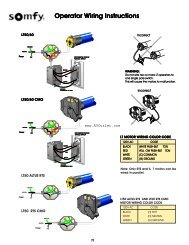
Note: The Telis 4 Remote Control is a 5 Channel Remote control. The 5 th channel is all lights on.<br />
The 5 th channel by default is not a group channel. This channel is not automatically assigned and<br />
must be programmed.
Please read the previous page before proceeding.<br />
Step 1 - Assign a <strong>RTS</strong> Channel to the Remote<br />
1-A) Select the <strong>RTS</strong> Remote Control and Channel you want to use.<br />
1-B) Press and hold both the UP and DOWN buttons simultaneously until the motor jogs, then<br />
release. (A jog is a short up and down movement of the motor)<br />
Step 2 - Check <strong>Motor</strong> Direction and Change if Necessary<br />
2-A) Check the direction of operation (the motor will operate in momentary fashion).<br />
Confirm that the UP button brings the shade up and Down brings the shade down.<br />
2-B) To Change the direction, press the STOP or MY button for more than 5 seconds until the<br />
motor jogs, then release. Re-Check the direction.<br />
Step 3 - Set Lower and Upper Shade Limits<br />
3-A) Move the shade to the desired lower limit position using the remote control directional control<br />
buttons on the remote control. The shade will only move when the button is being pressed.<br />
3-B) Press both the STOP or MY and UP buttons simultaneously until the motor begins to move<br />
up, then release. Be Prepared to stop the shade manually using the STOP or MY button. Stop the<br />
shade and adjust to your desired upper limit position.<br />
3-C) Press both the STOP or MY and DOWN buttons simultaneously until the motor begins to<br />
move Down, then release. The shade will move down to the already set lower limit position and<br />
will stop on its own.<br />
Step 4 - Store the Limits in the <strong>Motor</strong> Memory<br />
4-A) Press the STOP or MY button for 5 seconds until the motor jogs. The limits are now<br />
recorded. The shade will NOT move in an automatically move to a limit with one button press<br />
yet!! Perform the next step.<br />
Step 5 - Exit and Save Initial <strong>Programming</strong><br />
5-A) Press the program button on the remote control for app. 3 seconds until the motor jogs once.<br />
This jog is usually a long jog. The program button is typically on the backside of a hand held<br />
remote control or front of a wireless wall switch. A paperclip will be needed to press the program<br />
button. Note: These program buttons do not need to be pressed hard. If you are having difficulty<br />
pressing the button please use a larger diameter paperclip.<br />
You can now use the shade if no additional remotes are to be assigned to the motor or if you are<br />
not going to set an intermediate MY customer preferred position. With one momentary button<br />
press of the remote control button the shade should move the programmed limit.
Optional <strong>Programming</strong> Tasks<br />
These procedures can be done at any time but we do recommend performing all desired<br />
additional tasks before moving onto the next shade. All shades not being programmed should<br />
have the power disconnected.<br />
Set the Customer Preferred MY Intermediate Position<br />
1) Using the remote position the shade to the location you would like as your intermediate<br />
customer preferred position<br />
2) Press the STOP button for app. 3 seconds until the motor jogs, then release.<br />
Note: Simply repeat these steps if you want to changed the intermediate position to a new<br />
position even if one has already been programmed.<br />
Add a Remote or Channel to Control the Same Shade (If Desired)<br />
1) To ADD another remote control or another <strong>RTS</strong> channel to the motor memory, press the<br />
programming button on the previously recorded remote control until the motor jogs.<br />
2) Select the new remote or <strong>RTS</strong> channel to add to the motor memory and press its programming<br />
button until it jogs, then release.<br />
Delete a Remote or Channel from the <strong>Motor</strong> Memory<br />
1) To DELETE a remote control or channel, press the programming button of a previously<br />
recorded channel or remote until the motor jogs. (This remote or Channel is the one to keep)<br />
2) Select the remote or channel to delete and press its programming button until the shade jogs,<br />
then release.<br />
Adjusting the Lower Limit<br />
1) Move the shade to its current lower limit position and let it stop.<br />
2) Press the UP and DOWN buttons simultaneously until the motor jogs, then release.<br />
3) Adjust to a new lower limit position. Press and hold STOP button until the motor jogs, then<br />
release.<br />
Adjusting the Upper Limit<br />
1) Move the shade to its current upper limit position and let it stop.<br />
2) Press the UP and DOWN buttons simultaneously until the motor jogs, then release.<br />
3) Adjust to a new upper limit position. Press and hold STOP button until the motor jogs, then<br />
release.
LT30 Specific Reset Procedures<br />
Resetting and Clearing the <strong>Motor</strong> Memory (LT30)<br />
1) Press the program button on the <strong>Motor</strong> until the shade jogs 3 times while continuously pressing<br />
the button. If you only get one 2 jogs and then let go of the button you will have to start over and<br />
get 3 jogs consecutively. There will be a pause between jogs so please be patient. The button is<br />
in a hole located next to the power connection and is in the clear plastic housing near the motor<br />
antenna. A paperclip will be needed to press the program button. Note: These program buttons<br />
do not need to be pressed hard. If you are having difficulty pressing the button please use a<br />
larger diameter paperclip.<br />
Sonesse 30 Specific Reset Procedures<br />
Resetting and Clearing the <strong>Motor</strong> Memory (ST30)<br />
1) Press the program button on the <strong>Motor</strong> until the shade jogs 3 times while continuously pressing<br />
the button. If you only get one 2 jogs and then let go of the button you will have to start over and<br />
get 3 jogs consecutively. There will be a pause between jogs so please be patient. The Sonesse<br />
30 has two holes with recessed buttons. The White hole has the program button and the yellow is<br />
for manually activating the shade to move. Note: These program buttons do not need to be<br />
pressed hard. If you are having difficulty pressing the button please use a larger diameter<br />
paperclip.<br />
Sonesse 40 & 50 and LS40 & LT50 Specific Reset Procedures<br />
Assigning a New Remote (Only if original Remote is lost or broken)<br />
1) Disconnect power for 3 seconds.<br />
2) Connect power for 5 to 15 seconds.<br />
3) Disconnect power for 3 Seconds and then leave it on. The motor will rotate in one direction.<br />
4) When the motor stops, press and hold the programming button on the NEW <strong>RTS</strong> remote until<br />
the shade jogs once and then release. The motor should now respond to the new remote and<br />
with the previously set limits.<br />
Resetting and Clearing the <strong>Motor</strong> (Requires DUAL POWER CUT).<br />
1) Disconnect power for 3 seconds.<br />
2) Connect power for 5 to 15 seconds.<br />
3) Disconnect power for 3 Seconds and then leave it on. The motor will rotate in one direction.<br />
4) When the motor stops, press and hold the programming button (App. 10 sec) on any <strong>RTS</strong><br />
remote until the shade jogs twice. There will be a pause between the jogs. Do not release the<br />
program button until the second jog is complete. (The remote used does not have to be the one<br />
already programmed to the shade) The motor is now ready for programming from the beginning.
www.somfy.com<br />
Sonesse ® 40 <strong>RTS</strong><br />
Ref: 5064823A
EN<br />
Installation instructions page 2<br />
SOMFY hereby declares that this product complies with the essential requirements and<br />
other relevant provisions of Directive 1999/5/EC. A Declaration of Conformity is available<br />
at the web address www.somfy.com/CE. Suitable for use in EU, CH and NO<br />
EN<br />
FR<br />
Notice d’installation page 16<br />
Par la présente, <strong>Somfy</strong> déclare que l’appareil est conforme aux exigences essentielles et<br />
aux autres dispositions pertinentes de la directive 1999/5/CE. Une déclaration de conformité<br />
est mise à disposition à l’adresse internet www.somfy.com/ce. Utilisable en UE CH et NO.<br />
FR<br />
IT<br />
Guida di installazione pag. 30<br />
<strong>Somfy</strong> dichiara che questo dispositivo è conforme ai requisiti essenziali e alle altre disposizioni<br />
pertinenti della Direttiva 1999/5/CE. Una dichiarazione di conformità è disponibile<br />
all’indirizzo Internet www.somfy.com/ce.<br />
IT<br />
ES<br />
Guía de instalación página 44<br />
Por la presente, <strong>Somfy</strong> declara que el aparato cumple las exigencias esenciales y el resto<br />
de disposiciones pertinentes de la directiva 1999/5/CE. Podrá encontrar una declaración de<br />
conformidad en la página web www.somfy.com/ce.<br />
ES<br />
Copyright © 2011 <strong>Somfy</strong> SAS. All rights reserved - V0 - 06/2011<br />
1
CONTENT<br />
EN<br />
1 Introduction<br />
2 Safety<br />
2.1 General information<br />
2.2 General safety advice<br />
3 Installation<br />
4 Commissioning<br />
4.1 <strong>Programming</strong> the <strong>RTS</strong> transmitter<br />
4.2 Checking the rotation direction<br />
4.3 Adjusting the end limits<br />
4.4 Recording the <strong>RTS</strong> transmitter<br />
4.5 Mode Selection: Roller or Tilting mode<br />
4.6 Favorite position : MY position<br />
Recording MY position.<br />
5 Use<br />
5.1 Up, Down, My: In roller mode<br />
5.2 Up, Down, My: In tilting mode<br />
6 Sun function<br />
6.1 Introduction<br />
6.2 Sun disappearing position<br />
7 Modifying the settings<br />
7.1 End limit re-adjustement<br />
7.2 Favorite position : MY position<br />
Changing the MY position / Delete the MY position<br />
7.3 Modifying the motor rotation direction<br />
7.4 Modifying the wheel rotation direction<br />
7.5 Scroll wheel increment setting<br />
7.6 Replacement of a lost remote control<br />
7.7 Adding/Deleting <strong>RTS</strong> transmitter<br />
7.8 Adding/Deleting <strong>RTS</strong> sensors<br />
7.9 Erase the memory of the motor<br />
8 Troubleshooting<br />
9 Technical data<br />
10 Environment<br />
2 Copyright © 2011 <strong>Somfy</strong> SAS. All rights reserved - V0 - 06/2011
1 Introduction<br />
Product Description<br />
The Sonesse ® 40 is a motor specially dedicated to interior applications.<br />
The Sonesse ® 40 motor range can motorize all interior applications: Roller shades, Venetian<br />
blinds, Roman shades, Pleated & cellular shades, Projection screens.<br />
The Sonesse ® 40 is designed to ensure quiet operations.<br />
EN<br />
Warning: The Sonesse ® 40 isn’t compatible with wind functions.<br />
2 Safety<br />
2.1 General information<br />
• This <strong>Somfy</strong> product must be installed by a professional motorisation and home automation<br />
installer, for whom these instructions are intended.<br />
• Before installation, check that this product is compatible with the associated equipment<br />
and accessories.<br />
• These instructions describe how to install, commission and use this product.<br />
• Moreover, the installer must comply with current standards and legislation in the country<br />
in which the product is being installed, and inform his customers of the operating and<br />
maintenance conditions for the product.<br />
• Any use outside the sphere of application specified by <strong>Somfy</strong> is not approved. Such use,<br />
or any failure to comply with the instructions given herein will invalidate the warranty, and<br />
<strong>Somfy</strong> refuses to accept liability.<br />
2.2 Specific safety advice<br />
The safety instructions that must be observed, besides the usual rules, are<br />
explained in these instructions and in the attached «Safety <strong>Instructions</strong>» document.<br />
Never immerse the<br />
motor in liquid!<br />
Avoid impacts!<br />
Never drill holes in<br />
the motor!<br />
Do not drop it!<br />
Copyright © 2011 <strong>Somfy</strong> SAS. All rights reserved - V0 - 06/2011<br />
3
a<br />
b<br />
3 Installation<br />
EN<br />
<strong>Motor</strong> preparation<br />
1) Fit the crown (a) and drive wheel (b) to the<br />
motor.<br />
2) Measure the length (L) between the end of<br />
the drive wheel and the head end.<br />
Tube preparation<br />
1) Cut the tube to the required length.<br />
2) Deburr the tube and remove the debris.<br />
For smooth roller tubes, cut a notch with the<br />
following measurements: e = 7 mm h = 10 mm<br />
L = …<br />
a<br />
L = …<br />
L<br />
L<br />
b<br />
<strong>Motor</strong>/tube assembly<br />
1) Slide the motor into the tube.<br />
For smooth roller tubes, position the notch<br />
previously cut on the crown.<br />
2) Fix the tube to the motor with self-tapping<br />
screws or steel pop rivets depending on the<br />
dimension (L - 5 mm).<br />
Ø > 37<br />
e h<br />
Ø > 37<br />
e h<br />
Mounting the motorized tube on the<br />
brackets<br />
If necessary, screw the bracket interface on the<br />
motor head.<br />
1) Mount the motorized tube on the end bracket<br />
(c).<br />
2) Mount the motorized tube on the motor<br />
bracket (d).<br />
L<br />
Wiring<br />
1) Switch off the power supply.<br />
2) Connect the motor according to the<br />
information in the table below.<br />
d<br />
c<br />
RANGE<br />
230V-50HZ<br />
120V-60HZ<br />
220V-60HZ<br />
1 Neutral 2 Live<br />
Blue Brown<br />
White Black<br />
Blue Brown<br />
3 Earth<br />
NA<br />
Green<br />
NA<br />
1<br />
2<br />
3<br />
OFF<br />
1<br />
3 x 1,5 mm2<br />
2<br />
3<br />
3 x 0,75 mm2<br />
4 Copyright © 2011 <strong>Somfy</strong> SAS. All rights reserved - V0 - 06/2011
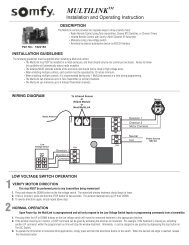
4 Commissioning<br />
4.1 <strong>Programming</strong> the <strong>RTS</strong> transmitter<br />
Switch on the power supply.<br />
Press the UP and DOWN buttons<br />
simultaneously on the <strong>RTS</strong> transmitter: the jogs<br />
(move up and down briefly) and the transmitter<br />
is preprogrammed in the motor<br />
EN<br />
4.2 Checking the rotation direction<br />
1) Press the <strong>RTS</strong> transmitter UP button:<br />
a) If the shade is raised (a), the rotation<br />
direction is correct: move to the section entitled<br />
«Adjusting the end limits».<br />
b) If the shade is lowered (b), the rotation<br />
direction is incorrect: move to the next step.<br />
2) Press the <strong>RTS</strong> transmitter MY button until<br />
the shade jogs: the rotation direction has been<br />
modified.<br />
3) Press the <strong>RTS</strong> transmitter UP button<br />
to check the rotation direction.<br />
1<br />
2<br />
a =<br />
b =<br />
3<br />
4.3 Adjusting the end limits<br />
The limits can be set in any sequence.<br />
1) Press and hold the UP button to move the<br />
shade to the desired Up position. If necessary<br />
adjust the Up position, using the UP or DOWN<br />
buttons.<br />
2) Press the MY and DOWN buttons<br />
simultaneously and release them once<br />
the shade begins to move. The Up limit is<br />
memorized.<br />
3) Press the MY button when it reaches the<br />
desired Down position.<br />
If necessary adjust the Down position, using the<br />
UP or DOWN buttons.<br />
4) Press the MY and UP buttons simultaneously<br />
and release them when the shade begins to<br />
move.<br />
The Down limit is memorized. The shade moves<br />
up and will stop at its upper limit.<br />
5) To confirm the end limits press and hold the<br />
MY button until the shade jogs. The end limits<br />
are recorded.<br />
1 2<br />
3 4<br />
5<br />
Copyright © 2011 <strong>Somfy</strong> SAS. All rights reserved - V0 - 06/2011<br />
5
EN<br />
4.4 Recording the <strong>RTS</strong> transmitter<br />
After recording the end limit:<br />
Press briefly the programming button on the<br />
back of the transmitter. The shade jogs.<br />
The transmitter is recorded.<br />
PROG.<br />
OR<br />
1) Switch off the current.<br />
2) Switch on the current. The shade jogs.<br />
3) Simultaneously press the UP and DOWN<br />
buttons on the <strong>RTS</strong> transmitter.<br />
The shade jogs.<br />
4) Press briefly the programming button on the<br />
back of the transmitter. The shade jogs.<br />
The transmitter is recorded.<br />
1 2<br />
3 4<br />
PROG.<br />
4.5 Mode selection: Roller or Tilting mode<br />
The Sonesse ® 40 <strong>RTS</strong> is designed to work with<br />
2 modes: Venetian blind mode or roller blind<br />
mode.<br />
The Sonesse ® 40 <strong>RTS</strong> is set by default to work<br />
in roller blind mode.<br />
This feature allows the Sonesse ® 40 <strong>RTS</strong> to<br />
be set according to the type of blind you are<br />
working with.<br />
Move the shade away from the end limits.<br />
1) Simultaneously press the UP and DOWN<br />
buttons until the shade jogs.<br />
2) Press and hold the MY and DOWN buttons<br />
simultaneously until the shade jogs to change<br />
from Roller mode to Tilting mode.<br />
1<br />
2<br />
4.6 Favorite position: MY position<br />
Recording MY position.<br />
To set the MY position, move the shade to the<br />
desired position with the UP and DOWN buttons<br />
then press the MY button until the shade jogs.<br />
6 Copyright © 2011 <strong>Somfy</strong> SAS. All rights reserved - V0 - 06/2011
5 Use<br />
5.1 Up, Down, My: In roller mode<br />
1) To move the shade from a limit to the other<br />
limit, press briefly the UP or DOWN button.<br />
2) To stop the shade, press the MY button.<br />
3) To move the shade to the MY position, press<br />
briefly the MY button.<br />
1<br />
2<br />
EN<br />
3<br />
5.2 Up, Down, My: In tilting mode<br />
1) To move the shade from a limit to the other<br />
limit, press briefly (less than 0,5s) the UP or<br />
DOWN button.<br />
2) To stop the shade, press the MY button.<br />
3) To move the shade to the MY position, press<br />
briefly the MY button.<br />
The Venetian blind goes first to the down endlimit,<br />
then to the MY position.<br />
4) To tilt the slats, press and hold the UP or<br />
DOWN button or use the scroll of the remote<br />
control until the slats reach the desired position.<br />
1<br />
2<br />
3<br />
4<br />
Copyright © 2011 <strong>Somfy</strong> SAS. All rights reserved - V0 - 06/2011<br />
7
off<br />
on<br />
6 Sun function<br />
1<br />
off<br />
on<br />
OK<br />
EN<br />
6.1 Introduction<br />
For this function, you need a Telis Soliris<br />
transmitter.<br />
By default, the Sun function is not active.<br />
1) To activate the Sun function, press the<br />
SELECT button on the Telis Soliris transmitter<br />
until the shade jogs.<br />
2) To disactivate the Sun function, press the<br />
SELECT button on the Telis Soliris transmitter<br />
until the shade jogs.<br />
off<br />
on<br />
2<br />
off<br />
on<br />
When the intensity of the daylight exceeds the<br />
threshold set by the Soliris sensor <strong>RTS</strong>, an order<br />
is sent to the shade after 2 min.<br />
The shade goes to the MY position or to<br />
its down limit if no MY position has been<br />
memorised.<br />
When the intensity of the daylight falls<br />
below the threshold set by the Soliris sensor<br />
<strong>RTS</strong>, the shade goes to the sun disappearing<br />
position or stays at its position (MY or Down<br />
limit) if no sun disappearing position has been<br />
memorised.<br />
To set the sun diappearing position, see 6.2 part.<br />
The Wind function is not compatible with<br />
this motor.<br />
8 Copyright © 2011 <strong>Somfy</strong> SAS. All rights reserved - V0 - 06/2011
6.2 Sun disappearing position<br />
This function is available only if a MY position<br />
is recorded.<br />
1) Recording Sun disappearing position<br />
Press and hold the MY and DOWN buttons until<br />
the shade moves.<br />
In tilting mode : The shade will move to the lower<br />
limit and return to the MY position.<br />
In roller mode: The shade will move to the MY<br />
position.<br />
Move the shade to the desired position with the<br />
UP and DOWN buttons.<br />
Press and hold the MY button until the shade<br />
jogs.<br />
The Sun disappearing position is recorded.<br />
1<br />
EN<br />
2) Changing the Sun disappearing<br />
position<br />
Press and hold the MY and DOWN buttons until<br />
the shade moves.<br />
In tilting mode : The shade will move to the lower<br />
limit and return to the Sun disappearing position.<br />
In roller mode: The shade will move to the Sun<br />
disappearing position.<br />
Move the shade to the new desired position with<br />
the UP and DOWN buttons.<br />
Press and hold the MY button until the shade<br />
jogs.<br />
The Sun disappearing position is changed.<br />
2<br />
3<br />
3) Delete the Sun disappearing position<br />
Press and hold the MY and DOWN buttons until<br />
the shade moves.<br />
In tilting mode : The shade will move to the lower<br />
limit and return to the Sun disappearing position.<br />
In roller mode: The shade will move to the Sun<br />
disappearing position.<br />
Press and hold the MY button until the shade<br />
jogs.<br />
The Sun disappearing position is deleted.<br />
Copyright © 2011 <strong>Somfy</strong> SAS. All rights reserved - V0 - 06/2011<br />
9
7 Modifying the settings<br />
1 2<br />
EN<br />
7.1 End limit re-adjustement<br />
UP LIMIT<br />
1) Press the UP button, to move the shade to<br />
the limit to be readjusted.<br />
2) Press and hold the UP and DOWN buttons<br />
simultaneously until the shade jogs.<br />
3) Press and hold the UP or DOWN button to<br />
move the shade to the new desired position.<br />
4) To confirm the new limit press and hold the<br />
MY button until the shade jogs.<br />
DOWN LIMIT<br />
1) Press the DOWN button to move the shade to<br />
the limit to be readjusted.<br />
2) Press and hold the UP and DOWN buttons<br />
simultaneously until the shade jogs.<br />
3) Press and hold the UP or DOWN button to<br />
move the shade to the new desired position.<br />
4) To confirm the new limit press and hold the<br />
MY button until the shade jogs.<br />
3 4<br />
1 2<br />
3 4<br />
7.2 Favorite position : MY position<br />
1) Changing the MY position<br />
To change the MY position go to the new desired<br />
MY position with the UP and DOWN buttons<br />
then press the MY button until the shade jogs.<br />
2) Deleting the MY position<br />
Press the MY button to move to this position<br />
To delete the MY position, move to this position<br />
and press the MY button until the shade jogs.<br />
1<br />
2<br />
10 Copyright © 2011 <strong>Somfy</strong> SAS. All rights reserved - V0 - 06/2011
7.3 Modifying the motor rotation direction<br />
Move the shade away from the end limits.<br />
1) Press the UP and DOWN buttons<br />
simultaneously until the shade jogs.<br />
2) Press the MY button until the shade jogs to<br />
reverse the rotation direction.<br />
3) Press the UP button to check the new rotation<br />
direction.<br />
1 2<br />
3<br />
EN<br />
The motor rotation direction is reversed.<br />
7.4 Modifying the wheel rotation direction<br />
Move the shade away from the end limits.<br />
1) Press the UP and DOWN buttons<br />
simultaneously until the shade jogs.<br />
2) Press the UP, MY and DOWN<br />
buttons simultaneously until the shade jogs to<br />
reverse the wheel rotation direction.<br />
The wheel rotation direction is reversed.<br />
1 2<br />
7.5 Scroll wheel increment setting<br />
1) Press the UP, MY and DOWN buttons<br />
simultaneously until the shade jogs twice.<br />
2) Use the Up and Down buttons to readjust<br />
the scroll wheel movement.<br />
The result can be test in live with the scroll<br />
wheel.<br />
3) To confirm the new setting, press the MY<br />
button until the shade jogs.<br />
X 2<br />
Copyright © 2011 <strong>Somfy</strong> SAS. All rights reserved - V0 - 06/2011<br />
11
EN<br />
7.6 Replacement of a lost remote control<br />
N.B.: This reset deletes all transmitters programmed,<br />
but end-limits, intermediate position and<br />
sensors are retained.<br />
N.B.: Only switch off the current for the motor<br />
where a transmitter is lost.<br />
1) Cut the power supply for 2 seconds.<br />
2) Switch the power supply back on for 10 to 15<br />
seconds.<br />
3) Cut the power supply for 2 seconds.<br />
4) Switch the power supply back on: the shade<br />
moves during 5 seconds (If the shade position<br />
is an end limit, the behavior of the shade will<br />
be a jog).<br />
5) Press the <strong>RTS</strong> transmitter (B) PROG button<br />
until the shade jogs: all the <strong>RTS</strong> transmitters are<br />
cleared and the new <strong>RTS</strong> transmitter is programmed<br />
in the motor.<br />
1<br />
3<br />
5<br />
PROG.<br />
B<br />
2<br />
2 sec 10 to 15<br />
sec<br />
2 sec<br />
4<br />
A<br />
7.7 Adding/Deleting <strong>RTS</strong> transmitter<br />
Find an <strong>RTS</strong> transmitter programmed in the<br />
motor.<br />
Press and hold the <strong>RTS</strong> programmed<br />
transmitter (A) PROG button until the shade<br />
jogs: the motor is in programming mode.<br />
Press briefly the <strong>RTS</strong> transmitter (B) PROG<br />
button to add or delete this transmitter:<br />
the shade jogs and the <strong>RTS</strong> transmitter is<br />
programmed or deleted from the motor.<br />
+<br />
A<br />
PROG.<br />
A<br />
A<br />
B<br />
PROG.<br />
B<br />
A<br />
B<br />
A<br />
B<br />
-<br />
PROG.<br />
A<br />
PROG.<br />
B<br />
12 Copyright © 2011 <strong>Somfy</strong> SAS. All rights reserved - V0 C- 06/2011<br />
A<br />
A<br />
PROG.<br />
PROG.
7.8 Adding/Deleting <strong>RTS</strong> sensors<br />
Find an <strong>RTS</strong> transmitter programmed in the<br />
motor.<br />
Press and hold the <strong>RTS</strong> programmed<br />
transmitter (A) PROG button until the shade<br />
jogs: the motor is in programming mode.<br />
Press briefly the <strong>RTS</strong> sensor (C) PROG button<br />
to add or delete this sensor: the shade jogs<br />
and the <strong>RTS</strong> sensor is programmed or deleted<br />
from the<br />
motor.<br />
+<br />
EN<br />
-<br />
7.9 Erase the memory of the motor.<br />
N.B.: This reset deletes all <strong>RTS</strong> transmitters,<br />
<strong>RTS</strong> sensors, end-limits and intermediate<br />
position programmed.<br />
N.B.: Only switch off the current for the motor<br />
to be reset!<br />
N.B.: Before cutting the power, move the shade<br />
to the middle position.<br />
1) Cut the power supply for 2 seconds.<br />
2) Switch the power supply back on for 10 to<br />
15 seconds.<br />
3) Cut the power supply for 2 seconds.<br />
4) Switch the power supply back on: the shade<br />
moves during 5 seconds (If the shade position<br />
is an end limit, the behavior of the shade will be<br />
a jog).<br />
5) Press the <strong>RTS</strong> transmitter (A) PROG button<br />
until the shade jogs twice: all the <strong>RTS</strong> transmitters,<br />
<strong>RTS</strong> sensors, end-limits and intermediate<br />
position are cleared.<br />
1<br />
3<br />
5<br />
2 sec 10 to 15<br />
sec<br />
4<br />
2 sec<br />
2<br />
Copyright © 2011 <strong>Somfy</strong> SAS. All rights reserved - V0 - 06/2011<br />
13
8 Troubleshooting<br />
EN<br />
The motor doesn’t work:<br />
Verify:<br />
• The wiring of the motor.<br />
• The power supply specifications.<br />
• The compatibility of the control<br />
• The heat generated (wait for the cooling of the motor).<br />
The equipment stops too soon:<br />
Verifiy:<br />
• The operation of end-limits during the rotation of the motor.<br />
• The crown is properly fitted to the tube.<br />
• The end-limits of the motor are properly adjusted.<br />
• That the shade is within the recommended weight limit.<br />
The equipment is noisy:<br />
Verify that:<br />
• The wheel and the crown are well adapted to the used tube.<br />
• The mechanical plays between motor, accessories, tube and end of tube must be decreased<br />
to the maximum.<br />
• The wheel is properly fixed to the tube.<br />
• The equipment is not constrained between the brackets.<br />
• The length of the notch is adapted to the motor hook or to the used crown.<br />
• Debris, screws or other are not in your tube.<br />
• The power supply specifications.<br />
• The temperature of the environment is in conformity with the operating temperature.<br />
14 Copyright © 2011 <strong>Somfy</strong> SAS. All rights reserved - V0 - 06/2011
9 Technical data<br />
Power supply<br />
Frequency<br />
Operating temperature<br />
Protection rating<br />
Maximum number of<br />
transmitters<br />
230V/50Hz - 120V/60Hz - 220V/60Hz<br />
433,42MHz<br />
0°C / 60 °C<br />
IP44<br />
12<br />
EN<br />
Maximum number of<br />
sensors 3<br />
10 Environment<br />
Damaged electric products and batteries should not be disposed of with<br />
normal household waste.<br />
Make sure to drop them in specially provided containers or at an authorized<br />
organization that will ensure they are recycled<br />
Copyright © 2011 <strong>Somfy</strong> SAS. All rights reserved - V0 - 06/2011<br />
15