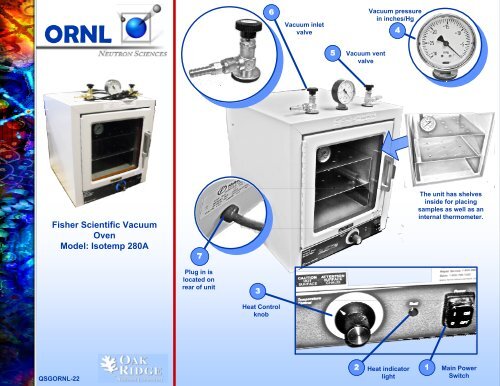
Fisher Scientific Vacuum Oven Model: Isotemp 280A
Fisher Scientific Vacuum Oven Model: Isotemp 280A
Fisher Scientific Vacuum Oven Model: Isotemp 280A

You also want an ePaper? Increase the reach of your titles
YUMPU automatically turns print PDFs into web optimized ePapers that Google loves.
ORNL<br />
<strong>Fisher</strong> <strong>Scientific</strong> <strong>Vacuum</strong><br />
<strong>Oven</strong><br />
<strong>Model</strong>: <strong>Isotemp</strong> <strong>280A</strong><br />
QSGORNL-22<br />
Plug in is<br />
located on<br />
rear of unit<br />
Heat Control<br />
knob<br />
<strong>Vacuum</strong> inlet<br />
valve<br />
<strong>Vacuum</strong> vent<br />
valve<br />
<strong>Vacuum</strong> pressure<br />
in inches/Hg<br />
Heat indicator<br />
light<br />
The unit has shelves<br />
inside for placing<br />
samples as well as an<br />
internal thermometer.<br />
Main Power<br />
Switch
A<br />
B<br />
C<br />
D<br />
E<br />
F<br />
HEAT OPERATION VACUUM OPERATION<br />
Turn on main power.<br />
Place/ check that internal<br />
thermometer is inside unit.<br />
Set temperature on Heat<br />
control. Dial ranges from<br />
1-7 which corresponds to<br />
40 – 200 degrees Celsius.<br />
Heat light will come on.<br />
Allow internal thermometer to<br />
reach desired temperature.<br />
Turn Heat control CCW just<br />
until light goes off. Monitor<br />
temperature. You may<br />
need to readjust in this<br />
manner several times<br />
before stabilization.Let unit<br />
stabilize for a FEW HOURS.<br />
Place sample inside,<br />
making sure to wear proper<br />
PPE. DO NOT PUT sealed/<br />
closed containers in unit<br />
due to vacuum pressure.<br />
A<br />
B<br />
C<br />
D<br />
E<br />
Close vent valve.<br />
Open vacuum inlet valve.<br />
Latch door. Turn on<br />
<strong>Vacuum</strong> pump.<br />
Monitor vacuum gauge.<br />
<strong>Vacuum</strong> gauge ranges from<br />
0 - -30" of Hg(76cm). 0 is<br />
equivalent to 1 atm.<br />
When required vacuum is<br />
reached, CLOSE vacuum<br />
inlet valve and turn off<br />
vacuum pump.<br />
To return to 1 atm, open<br />
vent valve VERY, VERY<br />
SLOWLY and allow for<br />
repressurization. The<br />
speed of valve opening<br />
determines the speed of<br />
repressurization.<br />
ELECTRICAL HAZARD<br />
This equipment contains electrical<br />
units that may come into contact with<br />
skin or liquids.<br />
SLIP HAZARD<br />
Because chemicals are being<br />
moved near this unit, a slip<br />
hazard may be created.<br />
PINCH HAZARD<br />
The lid to this unit may shut and<br />
cause a pinch hazard.<br />
CHEMICAL HAZARD<br />
Because chemicals are being used<br />
near this unit, chemical spills are<br />
possible.<br />
FIRE HAZARD<br />
Any improper use of this unit may<br />
cause a fire hazard.<br />
PREVENTION<br />
EYE PROTECTION<br />
Wear safety glasses while operating.<br />
PROTECTIVE GLOVES<br />
Wear appropriate gloves for heat and<br />
chemical usage.<br />
NON-SLIP, CLOSED SHOES<br />
Wear non-slip, closed shoes to avoid<br />
spills.<br />
READ MANUAL<br />
Become familiar with this guide<br />
before operating.<br />
For additional help contact the Lab<br />
Space Manager