Vinted: Issue No. 1
Vinted Magazine: December 2015 Issue No. 01. This issue was made entirely by members, for the members of Vinted!
Vinted Magazine: December 2015 Issue No. 01. This issue was made entirely by members, for the members of Vinted!
You also want an ePaper? Increase the reach of your titles
YUMPU automatically turns print PDFs into web optimized ePapers that Google loves.
diy<br />
HOLIDAY<br />
DECORATIONS<br />
by Jaztine @jaztinedesiree<br />
WINTER WONDERLAND<br />
HEADPIECE<br />
It is inevitable that during the holidays our<br />
pockets start to empty out faster than usual.<br />
Spending money on loved ones sometimes<br />
makes it hard to go full out on decorating<br />
your home/room/work space to reflect<br />
your holiday spirit. But, this gives you more<br />
room to get creative. A good question to<br />
ask yourself is: Buy or DIY? Do-it-yourself<br />
(DIY) is the way to go if you want to find<br />
an inexpensive way to recreate something<br />
you don’t want to spend full price for. This<br />
tutorial will go over three ways to create<br />
perfect holiday decorations all on your own.<br />
First, let’s go exploring. Search around<br />
the house for little things you could use,<br />
from paints to markers, paper and scissors,<br />
broken toys, old stickers. For things you<br />
might need, take a trip to your local craft<br />
store. You can look in their clearance section<br />
for super cheap ribbons, notepads, and little<br />
decorating knick knacks. I use a glue gun<br />
as adhesive but regular old elmer’s glue or<br />
super glue will work just fine.<br />
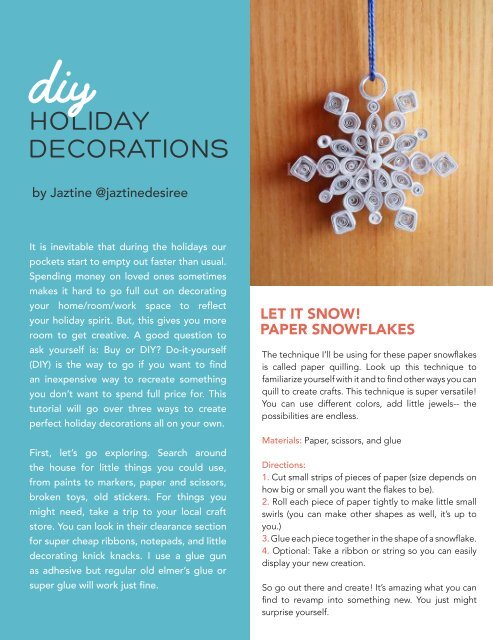
LET IT SNOW!<br />
PAPER SNOWFLAKES<br />
The technique I’ll be using for these paper snowflakes<br />
is called paper quilling. Look up this technique to<br />
familiarize yourself with it and to find other ways you can<br />
quill to create crafts. This technique is super versatile!<br />
You can use different colors, add little jewels-- the<br />
possibilities are endless.<br />
Materials: Paper, scissors, and glue<br />
Directions:<br />
1. Cut small strips of pieces of paper (size depends on<br />
how big or small you want the flakes to be).<br />
2. Roll each piece of paper tightly to make little small<br />
swirls (you can make other shapes as well, it’s up to<br />
you.)<br />
3. Glue each piece together in the shape of a snowflake.<br />
4. Optional: Take a ribbon or string so you can easily<br />
display your new creation.<br />
So go out there and create! It’s amazing what you can<br />
find to revamp into something new. You just might<br />
surprise yourself.<br />
Although the headband looks complicated with all<br />
the elements, it’s actually rather simple.<br />
Materials: satin headband, tulle, beads, glue, and<br />
the main piece (I had old snowflake ornaments but<br />
you can use anything for this part).<br />
Directions:<br />
1. Take your tulle, gather it in one central area, glue<br />
it to the headband in any shape or form; it doesn’t<br />
have to be perfect. (As a replacement for tulle you<br />
can always use ribbon.)<br />
2. Then take the main piece (in my case, the<br />
snowflake) and glue that on top.<br />
3. Add some glue and place some beads to fill in<br />
spots and give it more of that pop.<br />
4. AND, voila! See not as complicated as you<br />
thought right?<br />
<strong>No</strong>w you have an iconic accessory to wear for<br />
that holiday party or the perfect piece for that<br />
December birthday party you were planning to<br />
have for your little one. Remember-- don’t be afraid<br />
to play around with each piece, adding more or<br />
less to it. Make it more you and get creative with<br />
ribbons, stickers, beads, jewels, etc. The more you<br />
experiment, the more variations you’ll get. So go<br />
ahead and DIY!<br />
DIY ORNAMENTS<br />
What better way to personalize your décor than<br />
with the ornaments you want! You can make all<br />
kinds of characters. For this specific tutorial I<br />
created Baymax, but from the pictures you can see<br />
what else you can do. Or just look up a character<br />
followed by the word ornament, and you can try<br />
recreating what you found.<br />
Materials: Clear ornaments, markers, brushes and<br />
paint<br />
Directions:<br />
1. Fill your ornament with the base color (in this<br />
case: white!)<br />
2. Then turn it upside down to filter the paint out.<br />
3. Take a marker or paint on the essential features<br />
to your character (i.e. Baymax’s eyes)<br />
4. Place the top and you’re ready to hang this on<br />
the tree!


