

Samsung HW-J250 Soundbar - HW-J250/ZA - User Manual ver. 1.0 (ENGLISH,9.05 MB)
Samsung HW-J250 Soundbar - HW-J250/ZA - User Manual ver. 1.0 (ENGLISH,9.05 MB)
Samsung HW-J250 Soundbar - HW-J250/ZA - User Manual ver. 1.0 (ENGLISH,9.05 MB)

Create successful ePaper yourself
Turn your PDF publications into a flip-book with our unique Google optimized e-Paper software.
GETTING STARTED<br />
GETTING STARTED<br />
BEFORE READING THE USER’S MANUAL<br />
Note the following terms before reading the user manual.<br />
▶▶Icons used in this manual<br />
Icon Term Definition<br />
Caution<br />
Note<br />
Indicates a situation where a function does not operate or settings may be<br />
canceled.<br />
Indicates tips or instructions on the page that help you operate a function.<br />
▶▶Safety Instructions and Troubleshooting<br />
1) Be sure to familiarize yourself with the Safety Instructions before using this product. (See page 3)<br />
2) If a problem occurs, check Troubleshooting. (See page 22)<br />
▶▶Copyright<br />
©2015 <strong>Samsung</strong> Electronics Co.,Ltd.<br />
All rights reserved; no part of this user’s manual may be reproduced or copied without the prior written<br />
permission of <strong>Samsung</strong> Electronics Co.,Ltd.<br />
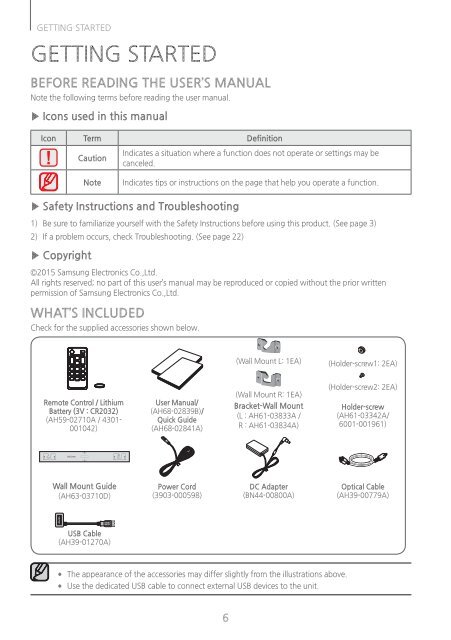
WHAT’S INCLUDED<br />
Check for the supplied accessories shown below.<br />
(Wall Mount L: 1EA)<br />
(Holder-screw1: 2EA)<br />
Remote Control / Lithium<br />
Battery (3V : CR2032)<br />
(AH59-02710A / 4301-<br />
001042)<br />
<strong>User</strong> <strong>Manual</strong>/<br />
(AH68-02839B)/<br />
Quick Guide<br />
(AH68-02841A)<br />
(Wall Mount R: 1EA)<br />
Bracket-Wall Mount<br />
(L : AH61-03833A /<br />
R : AH61-03834A)<br />
(Holder-screw2: 2EA)<br />
Holder-screw<br />
(AH61-03342A/<br />
6001-001961)<br />
Wall Mount Guide<br />
(AH63-03710D)<br />
Power Cord<br />
(3903-000598)<br />
DC Adapter<br />
(BN44-00800A)<br />
Optical Cable<br />
(AH39-00779A)<br />
USB Cable<br />
(AH39-01270A)<br />
●●<br />
●●<br />
The appearance of the accessories may differ slightly from the illustrations above.<br />
Use the dedicated USB cable to connect external USB devices to the unit.<br />
6


