
You also want an ePaper? Increase the reach of your titles
YUMPU automatically turns print PDFs into web optimized ePapers that Google loves.
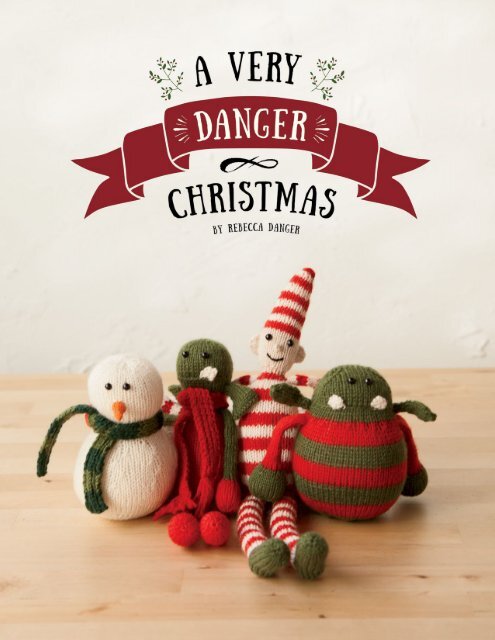
a very<br />
danger<br />
christmas<br />
By Rebecca Danger
CONTENTS<br />
Introduction 4<br />
Christmas Elf 5<br />
Christmas Snowman 8<br />
Tall Christmas Monster 10<br />
Round Christmas Monster 13
introduction<br />
I love Christmas! When I was a little girl, my mom always made the holidays extra<br />
special. We decorated every square inch of our house. We had fun traditions like<br />
going to see the Nutcracker every year. We always had wonderful presents and a<br />
delicious meal on Christmas day itself.<br />
Now that I have my own children I find myself doing what I can to make Christmas<br />
extra special for them, just like I remember. One of the things I like to do for the<br />
holidays is make an ornament or two each year, since I get to put my love into<br />
every stitch. Decorating our tree feels so much more special to me when I unwrap<br />
handmade ornaments from our Christmas boxes. It's like the memories of each<br />
Christmas when I made an item come flooding back when I hold an ornament in my<br />
hands. I have put together this little collection so that you can share in the joy of<br />
creating for the holidays, too.<br />
So grab a cup of cocoa and your needles and yarn and curl up with these projects<br />
while you watch chestnuts roast on an open fire. Happy Holidays!<br />
About the Designer<br />
Since Rebecca Danger really, really,<br />
really likes to knit, she started<br />
knitting rather obsessively and<br />
writing patterns of her original toy<br />
designs in February 2009. She really<br />
likes this since it means she gets to<br />
knit all day, tell the government that<br />
all of her yarn purchases are business expenses, and still be able<br />
to afford to feed her family. She also feels quite proud that all of<br />
that knitting in high school and college has lead to something<br />
more than just frowns and discontented looks from teachers<br />
For pattern support, please contact dangercrafts@gmail.com
Christmas Elf<br />
Finished Measurements<br />
About 14” tall stuffed<br />
Yarn<br />
Knit Picks Palette (100% Peruvian<br />
Highland Wool; 231 yards/50g): MC<br />
Pimento 24246, C1 Cream 23730, C2<br />
Oyster Heather 24559, C3 Clover 24256;<br />
1 ball each.<br />
Needles<br />
US 1 (2.25mm) 32” or longer circular<br />
needle for Magic Loop technique, or size<br />
to obtain gauge<br />
Notions<br />
16 removable stitch markers/9 removable<br />
stitch markers and one fixed marker<br />
Scrap black yarn for mouth<br />
1 set 6mm black safety eyes<br />
Stuffing<br />
Scissors<br />
Tapestry Needle<br />
Row counter (optional)<br />
Gauge<br />
26 sts and 40 rows= 4” in Stockinette<br />
Stitch in the round, blocked<br />
5
Christmas Elf<br />
Notes:<br />
This elf is knit in one piece, placing stitch markers and picking up<br />
stitches for limbs once the body is completed. To knit it in pieces<br />
and sew together once finished, CO the stitches called for in<br />
round 1 and work as written. Use the stitch markers on the body<br />
for placement when assembling and whipstitch the limbs in place.<br />
This pattern is written round by round so that you can use any<br />
weight of yarn you prefer. Simply use smaller needles than those<br />
recommended for your yarn to make a tight fabric your stuffing<br />
won’t show through.<br />
Turkish Cast-On Video by Rebecca Danger: http://bit.ly/turkish_<br />
cast_on<br />
Directions<br />
Body<br />
Using MC and Turkish Cast On, CO 28 sts (14 loops) onto needle,<br />
leaving a long tail. PM to indicate beg of rnd and beg body using<br />
Magic Loop Method:<br />
Rnd 1: K all sts from Turkish CO. Place removable markers in sts<br />
#20 and #23 to mark for legs.<br />
Rnd 2: (KFB, K12, KFB) twice (32 sts)<br />
Rnds 3- 36: K all sts in 4 rnds MC, 4 rnds C1 stripe pattern.<br />
Continue this stripe pattern until noted.<br />
Rnd 37: (K1, SSK, K10, K2tog, K1) twice (28 sts)<br />
Rnd 38: K all sts<br />
Rnd 39: (K1, SSK, K8, K2tog, K1) twice (24 sts)<br />
Rnd 40: K all sts<br />
Rnd 41: (K1, SSK, K6, K2tog, K1) twice (20 sts)<br />
Rnd 42: K all sts. Place removable markers in sts 2, 9, 12, and 19 to<br />
mark for arms.<br />
Rnd 43: K2tog ten times round (10 sts)<br />
Rnd 44: K all sts.<br />
Begin to stuff body.<br />
Rnds 45- 48: Switch to C2, K all sts. You will remain in C2 until<br />
noted otherwise.<br />
Rnd 49: KFB ten times (20 sts).<br />
Rnd 50: K all sts.<br />
Rnd 51: (KFB, K4) four times (24 sts).<br />
Rnds 52- 61: K all sts. Place removable markers for ears and nose<br />
as you work:<br />
Rnd 54: in sts # 1 and 13 for ears.<br />
Rnd 55: in st #6 for nose.<br />
Rnds 62- 64: Switch to MC. K all sts. Work from here to the end of<br />
the hat in 3 rounds MC, 3 rounds C1 stripe pattern.<br />
Rnd 65: (SSK, K10) twice (22 sts).<br />
Rnds 66 - 67: K all sts.<br />
Rnd 68: (K9, K2tog) twice (20 sts).<br />
Rnds 69 -70: K all sts.<br />
Add eyes and more stuffing.<br />
Rnd 71: (SSK, K8) twice (18 sts).<br />
Rnds 72 - 73: K all sts.<br />
Rnd 74: (K7, K2tog) twice (16 sts).<br />
Rnds 75-76: K all sts.<br />
Rnd 77: (SSK, K6) twice (14 sts).<br />
Rnds 78-79: K all sts.<br />
Rnd 80: (K5, K2tog) twice (12 sts).<br />
Rnds 81-82: K all sts.<br />
Rnd 83: (SSK, K4) twice (10 sts).<br />
Rnds 84-85: K all sts.<br />
Rnd 86: (K3, K2tog) twice (8 sts).<br />
Rnds 87-88: K all sts.<br />
Finish stuffing the body. Cut yarn and using a tapestry needle,<br />
pull through remaining sts to close.<br />
Nose<br />
Rnd 1: Using C2, and starting in marker from st #6 on Rnd 55,<br />
PU 1 st and the st next to it. Slide sts to cable to set up for Magic<br />
Loop Method and moving up one round, PU same 2 sts 1 rnd up.<br />
4 sts. First st picked up is first st of rnd. Beg of rnd and beg to<br />
work in rnd using Magic Loop Method:<br />
Rnds 2 -3: K all sts.<br />
Cut yarn and using a tapestry needle, pull through remaining sts<br />
to close and fasten off.<br />
Ears<br />
Rnd 1: With C2 and starting in st 1 on Rnd 54, head up towards<br />
the top of the head and PU 6 sts, 1 per rnd. Slide sts to cable to<br />
set up for Magic Loop Method, move towards the back of the<br />
head 1 st and head in opposite direction PU same 6 sts one st<br />
back. 12 sts. First st picked up is first st of rnd. PM to indicate beg<br />
of rnd and beg to work in rnd using Magic Loop Method:<br />
Rnds 2-3: K all sts.<br />
Rnd 4: K2tog six times (6 sts).<br />
Cut yarn and using a tapestry needle, pull through remaining sts<br />
to close.<br />
Repeat these steps with other marker on Rnd 54 to make other<br />
ear. Move towards the front of the body to PU second line of sts.<br />
Arms<br />
Rnd 1: Using C1 and starting in marker from st #19 on Rnd 42,<br />
PU 4 sts, 1 st per st. Slide sts to cable to set up for Magic Loop<br />
Method and heading opposite direction PU same 4 sts one rnd<br />
up. 8 sts. Be sure beg of rnd is to back of body to minimize jogs<br />
of in the round stripes. First st picked up is first st of rnd. PM to<br />
indicate beg of rnd and beg to work in rnd using Magic Loop<br />
Method:<br />
Rnds 2-48: Knit all sts in 4 C1, 4 rnds MC stripe pattern.<br />
Rnd 49: Switch to C2 for the hand until the end. KFB all sts (16<br />
sts)<br />
Rnds 50-59: Knit all sts. Place removable markers as you work:<br />
Rnd 51: in st #8 to mark for thumb.<br />
Rnd 53: in st #9 to mark for thumb.<br />
6 Christmas Elf
Rnd 60: K2tog eight times (8 sts)<br />
Stuff hand. Cut yarn, leaving a generous tail and use Kitchener<br />
Stitch to close.<br />
Thumb<br />
Rnd 1: Using C2 and starting in st 8 on Rnd 51 of hand, heading up<br />
towards the top of the hand PU 3 sts, 1 per rnd. Slide sts to cable<br />
to set up for Magic Loop Method and heading opposite direction<br />
and starting with marker in st 9 from Rnd 53, PU same 3 sts one<br />
st over. 6 sts. First st picked up is first st of rnd. PM to indicate<br />
beg of rnd and beg to work in rnd using Magic Loop Method:<br />
Rnds 2-5: K all sts<br />
Cut yarn, leaving a generous tail and use Kitchener Stitch to close.<br />
Repeat these steps with other marker on Rnd 42 to make other<br />
arm and thumb.<br />
Legs<br />
Rnd 1: Using C1 and starting in st 20 on Rnd 1, heading towards<br />
the outside of the body PU 6 sts. Slide sts to cable to set up for<br />
Magic Loop Method and heading opposite direction, PU same 6<br />
sts one rnd foward. 12 sts. Be sure beg of rnd is to back of body<br />
to ensure correct heel placement. First st picked up is first st of<br />
rnd. PM to indicate beg of rnd and beg to work in rnd using Magic<br />
Loop Method:<br />
Row 2: Sl1, P to end. Turn.<br />
Repeat rows 1 & 2 four more times, for a total of 4 repeats, and 8<br />
rows. You will end on a purl row.<br />
Rnd 1 of foot: K across 6 heel sts once more. Using same needle<br />
tip, PU 5 sts from gusset edge. Slide sts to cable to set up for<br />
Magic Loop Method K 6 held sts. Using same needle tip, PU 5 sts<br />
from gusset edge. 22 sts. Beg of round is next st to be knitted, PM<br />
to indicate beginning of round and cont in rnd using Magic Loop<br />
Method:<br />
Rnd 2: K all sts.<br />
Rnd 3: K6, K2tog twice, K to last 4 sts, SSK twice (18 sts).<br />
Rnd 4: K all sts.<br />
Rnd 5: K6, K2tog twice, K to last 4 sts, SSK twice (14 sts).<br />
Rnds 6-20: K all sts.<br />
Rnd 21: K2tog seven times (7 sts).<br />
Stuff foot. Cut yarn and using a tapestry needle, pull through<br />
remaining sts to close.<br />
Repeat these steps with other marker on R1 to make other leg.<br />
Finishing<br />
Weave in any remaining ends. Use black scrap yarn and tapestry<br />
needle to embroider on a small mouth below the nose. Add loop<br />
of yarn as a hanger through the head, as desired.<br />
Rnds 2-60: K all sts in 4 rnds C1, 4 rnds MC stripe pattern.<br />
Heel<br />
Weave in ends, stuff beginning of leg.<br />
Switch to C3.<br />
Beg heel by working just first 6 sts of rnd and holding last 6 sts of<br />
rnd on cable of needle.<br />
Row 1: Sl1, K to end. Turn.
Christmas Snowman<br />
Finished Measurements<br />
About 5” tall stuffed<br />
Yarn<br />
Knit Picks Palette (100% Peruvian<br />
Highland Wool; 231 yards/50g): MC<br />
Cream 23730, C1 Clover 24256, C2 Ivy<br />
23999; 1 skein each.<br />
Needles<br />
US 1 (2.25mm) 32” or longer circular<br />
needle for Magic Loop technique, or size<br />
to obtain gauge<br />
Notions<br />
3 stitch markers/2 removable stitch<br />
markers and one fixed marker<br />
Scrap orange sock weight yarn for nose<br />
(less than 5 yds)<br />
1 set 6mm black safety eyes<br />
Stuffing<br />
Scissors<br />
Tapestry Needle<br />
Row counter (optional)<br />
Gauge<br />
26 sts and 40 rows= 4” in Stockinette<br />
Stitch in the round, blocked<br />
8
Christmas Snowman<br />
Notes:<br />
This snowman is knit in one piece, placing stitch markers and<br />
picking up stitches for nose once body is completed. To knit it<br />
in pieces and sew together once finished, CO the stitches called<br />
for in round 1 and work as written. Use the stitch markers on the<br />
body for placement when assembling and whipstitch the nose in<br />
place.<br />
This pattern is written round by round so that you can use any<br />
weight of yarn you prefer. Simply use smaller needles than those<br />
recommended for your yarn to make a tight fabric your stuffing<br />
wont show through.<br />
Directions<br />
Body<br />
Body is knit entirely in MC.<br />
Using MC, CO 6 sts, leaving a long tail for sewing up later. PM to<br />
indicate beg of rnd and beg body using Magic Loop Method:<br />
Rnd1: K all sts.<br />
Rnd 2: KFB eight times (16 sts).<br />
Rnd 3: K all sts.<br />
Rnd 4: (K1, KFB) around (24 sts).<br />
Rnd 5: K all sts.<br />
Rnd 6: (KFB, K2) around (32 sts).<br />
Rnd 7: K all sts.<br />
Rnd 8: (K3, KFB) around (40 sts).<br />
Rnd 9: K all sts.<br />
Rnd 10: (KFB, K4) around (48 sts).<br />
Rnd 11: K all sts.<br />
Rnd 12: (K5, KFB) around (56 sts).<br />
Rnd 13: K all sts.<br />
Rnd 14: (KFB, K6) around (64 sts).<br />
Rnd 15: K all sts.<br />
Rnd 16: (K7, KFB) around (72 sts).<br />
Rnds 17-26: K all sts.<br />
Rnd 27: (K2tog, K7) around (64 sts).<br />
Rnds 28-29: K all sts.<br />
Rnd 30: (K6, K2tog) around (56 sts).<br />
Rnds 31-32: K all sts.<br />
Rnd 33: (K2tog, K5) around (48 sts).<br />
Rnds 34-35: K all sts.<br />
Rnd 36: (K4, K2tog) around (40 sts).<br />
Rnds 37-38: K all sts.<br />
Rnd 39: (K2tog, K3) around (32 sts).<br />
Rnds 40-41: Knit all sts.<br />
Rnd 42: (K2, K2tog) around (24 sts).<br />
Rnds 43-45: K all sts.<br />
Rnd 45: (KFB, K2) around (32 sts).<br />
Rnd 46: K all sts.<br />
Rnd 47: (K3, KFB) around (40 sts).<br />
Rnd 66: (K2tog, K3) around (32 sts).<br />
Rnd 67: K all sts.<br />
Rnd 68: (K2, k2tog) around (24 sts).<br />
Rnd 69: K all sts.<br />
Rnd 70: K2tog twelve times around (12 sts).<br />
Stuff body. Cut yarn and use a tapestry needle to pull through<br />
remaining sts. Do not pull all the way shut so you can add the<br />
safety eyes after knitting the nose.<br />
Nose<br />
Rnd 1: Using scrap orange yarn and starting in st #10 on Rnd 53,<br />
head up towards the top of the head PU 4 sts, 1 per rnd. Slide sts<br />
to cable to set up for Magic Loop Method and heading opposite<br />
direction and starting with marker in st #11 from Rnd 56, PU same<br />
4 sts one st over. 8 sts. First st picked up is first st of rnd. PM to<br />
indicate beg of rnd and beg to work in rnd using Magic Loop<br />
Method:<br />
Rnds 2-5: K all sts.<br />
Rnd 6: (K1, K2tog, K1) twice (6 sts).<br />
Rnds 7-9: K all sts.<br />
Rnd 10: (K2tog, K1) twice (4 sts).<br />
Cut yarn and using a tapestry needle, pull through remaining sts<br />
to close.<br />
Scarf<br />
Scarf is knit flat (back and forth), not in the round.<br />
Using circular CO 8 st in C3. DO NOT JOIN.<br />
Rows 1-114: (K2, P2) twice every row. Work in 6 rows C2, 6 rows C1<br />
stripe pattern. 19 total stripes.<br />
Loosely BO all sts in pattern.<br />
Finishing<br />
Add eyes and finish head. Thread CO tail from body through CO<br />
edge and pull to close. Weave in any remaining ends. Tie scarf<br />
around snowman’s neck. Add loop of yarn as a hangar through<br />
the head as desired.<br />
Rnds 48-65: K all sts. Place removable marker as you work to<br />
mark for nose:<br />
Rnd 53: in st # 10.<br />
Rnd 56: in st # 11.<br />
Christmas Snowman<br />
9
Tall Christmas<br />
Monster<br />
Finished Measurements<br />
About 9” tall stuffed<br />
Yarn<br />
Knit Picks Palette (100% Peruvian<br />
Highland Wool; 231 yards/50g):MC<br />
Pimento 24246 and C1 Clover 24256; 1<br />
skein each.<br />
Needles<br />
US 1 (2.25mm) 32” or longer circular<br />
needle for Magic Loop technique, or size<br />
to obtain gauge<br />
One additional needle, any type, in the<br />
same size as your circular needle for<br />
three needle bind off<br />
Notions<br />
9 stitch markers/8 removable stitch<br />
markers and one fixed marker<br />
Scrap white sock weight yarn for tooth<br />
(less than 5 yds)<br />
1 set 6mm black safety eyes<br />
Stuffing<br />
Scissors<br />
Tapestry Needle<br />
Row counter (optional)<br />
Gauge<br />
26 sts and 40 rows= 4” in Stockinette<br />
Stitch in the round, blocked<br />
10
Tall Christmas Monster<br />
Notes:<br />
Tall Monster is knit in one piece, placing stitch markers and<br />
picking up stitches for limbs once body is completed. To knit in<br />
pieces and sew together once finished, CO the stitches called<br />
for in round 1 and work as written. Use the stitch markers on the<br />
body for placement when assembling and whipstitch limbs in<br />
place.<br />
This pattern is written round by round so that you can use any<br />
weight of yarn you prefer. Simply use smaller needles than those<br />
recommended for your yarn to make a tight fabric your stuffing<br />
won't show through<br />
Turkish Cast-On Video by Rebecca Danger: http://bit.ly/turkish_<br />
cast_on<br />
Directions<br />
Body<br />
Using MC and Turkish Cast On, CO 40 sts (20 loops) onto needle.<br />
PM to indicate beg of rnd and beg body using Magic Loop<br />
Method:<br />
Rnd 1: K all sts from Turkish CO. Place removable markers in sts<br />
#29 and #32 to mark for legs.<br />
Rnds 2-6: Knit all sts.<br />
Rnd 7: (K1, SSK, K17) twice (38 sts).<br />
Rnds 8-9: Knit all sts.<br />
Rnd 10: (K16, K2tog, K1) twice (36 sts).<br />
Rnds 11-12: K all sts.<br />
Rnd 13: (K1, SSK, K15) twice (34 sts).<br />
Rnds 14-15: K all sts.<br />
Rnd 16: (K14, K2tog, K1) twice (32 sts).<br />
Rnds 17-18: K all sts.<br />
Rnd 19: (K1, SSK, K13) twice (30 sts).<br />
Rnds 20-21: K all sts.<br />
Rnd 22: (K12, K2tog, K1) twice (28 sts).<br />
Rnds 23-24: K all sts.<br />
Rnd 25: (K1, SSK, K11) twice (26 sts).<br />
Rnds 26-27: K all sts.<br />
Rnd 28: (K10, K2tog, K1) twice (24 sts).<br />
Rnds 29-30: K all sts.<br />
Rnd 31: (K1, SSK, K9) twice (22 sts).<br />
Rnds 32-33: K all sts.<br />
Rnd 34: (K8, K2tog, K1) twice (20 sts).<br />
Rnd 35: K all sts. Place removable markers in sts #2, 9, 12, and 19<br />
to mark for arms.<br />
Rnd 36: (K1, SSK, K4, K2tog, K1) twice (16 sts).<br />
Rnd 37: K all sts.<br />
Rnd 38: (K1, SSK, K2, K2tog, K1) twice (12 sts).<br />
Switch to C1. You will remain in C1 to the end of the body. Begin<br />
to stuff body now.<br />
Rnd 39: Knit all sts.<br />
Rnd 40: KFB all sts (24 sts).<br />
Rnd 41: Knit all sts.<br />
Rnd 42: (KFB, K1) around (36 sts). Place removable markers in sts<br />
#1 and 18 to mark for ears.<br />
Rnds 43-47: Knit all sts.<br />
Rnd 48: Loosely BO the first 18 sts of the round, then K18 to the<br />
end of the round. (18 sts).<br />
Rnd 49: PU 1 st in just the back loop of each of the 18 sts BO<br />
in the previous round, then K18 to the end of the round. 36 sts.<br />
These 2 rounds will create the mouth.<br />
Rnds 50-60: Knit all sts.<br />
Rnd 56: K2tog eighteen times (18 sts).<br />
Stop now and stuff the head and attach the safety eyes.<br />
Rnd 57: K2tog nine times (9 sts).<br />
Finish stuffing. Cut yarn and using a tapestry needle, pull through<br />
remaining sts to close.<br />
Arms<br />
Rnd 1: Using C1 and starting in marker from st #19 on Rnd 35,<br />
PU 4 sts, 1 st per st. Slide sts to cable to set up for Magic Loop<br />
Method and heading opposite direction PU same 4 sts one rnd<br />
up. 8 sts. First st picked up is first st of rnd. PM to indicate beg of<br />
rnd and beg to work in rnd using Magic Loop Method:<br />
Rnds 2-35: K all sts.<br />
Rnd 36: Switch to MC and knit all sts. You will remain in MC to the<br />
end of the hand.<br />
Rnd 37: (KFB, K1) around (12 sts).<br />
Rnd 38: K all sts.<br />
Rnd 39: (KFB, K2) around (16 sts).<br />
Rnds 40-48: K all sts.<br />
Stop and stuff the hand now.<br />
Rnd 49: K2tog eight times (8 sts).<br />
Finish stuffing. Cut yarn and using a tapestry needle, pull through<br />
remaining sts to close.<br />
Repeat these steps with other marker on Rnd 35 to make other<br />
arm.<br />
Legs<br />
Rnd 1: Using MC and starting in st #29 on R1, heading towards<br />
the outside of the body PU 5 sts. Slide sts to cable to set up for<br />
Magic Loop Method and heading opposite direction, PU same 5<br />
sts one rnd foward. 10 sts. Be sure beg of rnd is to back of body<br />
to ensure correct heel placement. First st picked up is first st of<br />
rnd. PM to indicate beg of rnd and beg to work in rnd using Magic<br />
Loop Method:<br />
Rnds 2-36: Knit all sts in 4 rounds MC, 4 rounds C1 stripe pattern<br />
Heel<br />
Switch to MC. You will remain in MC to the end of the foot. Beg<br />
heel by working just first 5 sts of rnd and holding last 5 sts of rnd<br />
on cable of needle.<br />
Row 1: Sl1, k to end. Turn.<br />
Row 2: Sl1, p to end. Turn.<br />
Tall Christmas Monster<br />
11
Repeat rows 1 & 2 two more times, for a total of 3 repeats, and 6<br />
rows. You will end on a purl row.<br />
Rnd 1 of foot: Knit across 5 heel sts once more. Using same<br />
needle tip, PU 3 sts from gusset edge. Slide sts to cable to set<br />
up for Magic Loop Method knit 5 held sts. Using same needle tip,<br />
PU 3 sts from gusset edge. 16 sts. Beg of round is next st to be<br />
knitted, PM to indicate beginning of round and cont in rnd using<br />
Magic Loop Method:<br />
Rnd 2: K all sts.<br />
Rnd 3: K4, K2tog twice, K4, SSK twice (12 sts).<br />
Rnds 4-6: K all sts.<br />
Rnd 7: K4, KFB, K6, KFB (14 sts).<br />
Rnds 8-9: K all sts.<br />
Rnd 10: K4, KFB, K8, KFB (16 sts).<br />
Rnds 11-18: K all sts.<br />
Rnd 19: K2tog eight times (8 sts).<br />
Using 3 pieces held together and a tapestry needle, add fringe in<br />
3 spots along each end of the scarf. When all of the fringe is on,<br />
trim the ends even to about 1.5” from the edge of the scarf.<br />
Tooth<br />
With head facing upside down, count from the edge to the 7th<br />
stitch (from the monster’s left side) of the mouth. Using scrap<br />
white yarn and beginning in the 7th stitch, PU using 3 sts in the<br />
7th through 5th sts.<br />
Knit 6 rows (garter stitch).<br />
BO all sts.<br />
Finishing<br />
Weave in any remaining ends. Tie scarf around monster’s neck.<br />
Add loop of yarn as a hanger through the head as desired.<br />
Stuff the foot. Cut yarn and using a tapestry needle, pull through<br />
remaining sts to close.<br />
Repeat these steps with other marker on R1 to make other leg.<br />
Ears<br />
The ears are knit entirely in the C1.<br />
Rnd 1: Starting in st #1 on Rnd 42, head up towards the top of the<br />
head and PU 3 sts, 1 per rnd. Slide sts to cable to set up for Magic<br />
Loop Method, move towards the back of the head 1 st and head<br />
in opposite direction PU same 3 sts one st back. 6 sts. First st<br />
picked up is first st of rnd. PM to indicate beg of rnd and beg to<br />
work in rnd using Magic Loop Method:<br />
Rnd 2: (KFB, K2) twice (8 sts).<br />
Rnd 3: Knit all sts.<br />
Rnd 4: (K3, KFB) twice (10 sts).<br />
Rnd 5: Knit all sts.<br />
Rnd 6: (KFB, K4) twice (12 sts).<br />
Rnd 7: Knit all sts.<br />
Rnd 8: (K5, KFB) twice (14 sts).<br />
Rnd 9: Knit all sts.<br />
Rnd 10: (KFB, K6) twice (16 sts).<br />
Rnd 11: Knit all sts.<br />
Rnd 12: (K7, KFB) twice (18 sts).<br />
Rnds 12-14: K all sts.<br />
Use three needle BO to BO all sts.<br />
Repeat these steps with other marker on R42 to make other ear.<br />
Move towards the front of the body to PU second line of sts.<br />
Scarf<br />
The scarf is knit entirely in MC. Scarf is knit flat (back and forth),<br />
not in the round.<br />
Using circular CO 8 sts. DO NOT JOIN.<br />
Work in K1, P1 rib until the scarf measures 11”, about 102 rows.<br />
BO in pattern.<br />
Add some fringe to your scarf! Cut 18 6” pieces of MC for fringe.<br />
12 Tall Christmas Monster
Round Christmas<br />
Monster<br />
FINISHED MEASUREMENTS<br />
About 5” tall stuffed<br />
YARN<br />
Knit Picks Palette (100% Peruvian<br />
Highland Wool; 231 yards/50g): MC<br />
Pimento 24246 and C1 Clover 24256, 1<br />
skein each.<br />
NEEDLES<br />
US 1 (2.25mm) 32” or longer circular<br />
needle for Magic Loop technique, or size<br />
to obtain gauge<br />
NOTIONS<br />
7 stitch markers/6 removable stitch<br />
markers and one fixed marker<br />
Scrap white sock weight yarn for teeth<br />
(less than 10 yds)<br />
1 set 6mm black safety eyes<br />
Stuffing<br />
Scissors<br />
Tapestry Needle<br />
Row counter (optional)<br />
GAUGE<br />
26 sts and 40 rows= 4” in Stockinette Stitch<br />
in the round<br />
13
Round Christmas Monster<br />
Notes:<br />
Round Monster is knit in one piece, placing stitch markers and<br />
picking up stitches for limbs once body is completed. To knit in<br />
pieces and sew together once finished, CO the stitches called<br />
for in round 1 and work as written. Use the stitch markers on the<br />
body for placement when assembling and whipstitch limbs in<br />
place.<br />
This pattern is written round by round so that you can use any<br />
weight of yarn you prefer. Simply use smaller needles than those<br />
recommended for your yarn to make a tight fabric your stuffing<br />
won’t show through.<br />
Directions<br />
Body<br />
Using MC, CO 8 sts. PM to indicate beg of rnd and beg body<br />
using Magic Loop Method:<br />
Rnd 1: K all sts.<br />
Rnd 2: KFB all sts (16 sts).<br />
Rnd 3: K all sts.<br />
Rnd 4: KFB all sts (32 sts).<br />
Rnd 5: K all sts.<br />
Rnd 6: KFB all sts (64 sts).<br />
Rnds 7-12: K all sts in C1.<br />
Rnds 13-36: K all sts in 6 rnds MC, 6 rnds C1 stripe pattern.<br />
Rnds 37-41: K all sts in MC. Place removable markers as you work:<br />
Rnd 40: In sts #3, 30, 33, and 62 to mark for arms.<br />
Rnd 42: (K2tog, K1) to last 4 sts, K2tog twice (42 sts). Break MC.<br />
Rnd 43: Switch to C1 and knit all sts. You will remain in C1 to the<br />
end of the body. Place removable marker in sts #1 and 22 to mark<br />
for ears.<br />
Rnds 44-46: K all sts.<br />
Rnd 47: Loosely BO the first 21 sts of the round, then K21 to the<br />
end of the round. (21 sts).<br />
Rnd 48: PU 1 st in just the back loop of each of the 21 sts BO<br />
in the previous round, then K21 to the end of the round. 42 sts.<br />
These 2 rounds will create the mouth.<br />
Rnd 49: (K1, SSK, K18) twice (40 sts).<br />
Rnd 50: K all sts.<br />
Rnd 51: (K17, K2tog, K1) twice (38 sts)<br />
Rnd 52: K all sts<br />
Rnd 53: (K1, SSK, K16) twice (36 sts)<br />
Rnd 54: K all sts<br />
Rnd 55: (K15, K2tog, K1) twice (34 sts)<br />
Rnd 56: K all sts<br />
Rnd 57: (K1, SSK, K11, K2tog, K1) twice (30 sts).<br />
Rnd 58: (K1, SSK, K9, K2tog, K1) twice (26 sts).<br />
Rnd 59: (K1, SSK, K7, K2tog, K1) twice (22 sts).<br />
Rnd 60: (K1, SSK, K5, K2tog, K1) twice (18 sts).<br />
Stuff the body and head and add the safety eyes. Cut yarn,<br />
leaving a generous tail and use Kitchener Stitch to close.<br />
Arms<br />
Rnd 1: Using MC and starting in marker from st #62 on R40, PU 6<br />
sts, 1 st per st. Slide sts to cable to set up for Magic Loop Method<br />
and heading opposite direction PU same 6 sts one rnd up. 12 sts.<br />
First st picked up is first st of rnd. PM to indicate beg of rnd and<br />
beg to work in rnd using Magic Loop Method:<br />
Rnds 2-25: Knit all sts in MC.<br />
Rnd 26: Switch to C1 and knit all sts. You will remain in C1 to the<br />
end of the hand.<br />
Rnd 27: (KFB, K1) around (18 sts).<br />
Rnd 28: Knit all sts.<br />
Rnd 29: (KFB, K2) around (24 sts).<br />
Rnds 30-38: Knit all sts.<br />
Rnd 39: K2tog twelve times (12 sts).<br />
Stuff the hand. Cut yarn and using a tapestry needle, pull through<br />
remaining sts to close.<br />
Repeat these steps with other marker on Rnd 40 to make other<br />
arm.<br />
Ears<br />
The ears are knit entirely in C1.<br />
Rnd 1: Starting in st #1 on R43, head up towards the top of the<br />
head and PU 2 sts, 1 per rnd. Slide sts to cable to set up for Magic<br />
Loop Method, move towards the back of the head 1 st and head<br />
in opposite direction PU same 2 sts one st back. 4 sts. First st<br />
picked up is first st of rnd. PM to indicate beg of rnd and beg to<br />
work in rnd using Magic Loop Method:<br />
Rnd 2: (KFB, K1) twice (6 sts).<br />
Rnds 3-4: Knit all sts.<br />
Rnd 5: (KFB, K) twice (8 sts).<br />
Rnds 6-7: Knit all sts.<br />
Rnd 8: (KFB, K1) around (12 sts).<br />
Rnds 9-16: Knit all sts.<br />
Rnd 17: (K2tog, K2, K2tog) twice (8 sts).<br />
Rnd 18: Knit all sts.<br />
Rnd 19: K2tog four times (4 sts).<br />
Cut yarn and using a tapestry needle, pull through remaining sts<br />
to close.<br />
Repeat these steps with other marker on Rnd 43 to make other<br />
ear. Move towards the front of the body to PU second line of sts.<br />
Teeth<br />
With head facing upside down, count from the edge to the 8th<br />
stitch (from the monster’s left side) of the mouth. Using scrap<br />
white yarn and beginning in the 8th stitch, PU 3 sts in the 8th<br />
through 6th sts.<br />
K 6 rows (garter stitch).<br />
14 Round Christmas Monster
BO all sts.<br />
With head facing upside down, count from the edge to the 6th<br />
stitch (from the monster’s right side) of the mouth. Using white<br />
scrap yarn and beginning in the 6th stitch, PU 3 sts in the 6th<br />
through 8th sts.<br />
K 6 rows (garter stitch).<br />
BO all sts.<br />
Finishing<br />
Weave in any remaining ends. Add loop of yarn as a hanger<br />
through the head as desired.
Knit Abbreviations<br />
BO<br />
CN<br />
CC<br />
CDD<br />
CO<br />
cont<br />
dec<br />
DPN(s)<br />
EOR<br />
inc<br />
K<br />
K2tog<br />
KFB<br />
K-wise<br />
bind off<br />
cable needle<br />
contrast color<br />
centered<br />
double dec<br />
cast on<br />
continue<br />
decrease(es)<br />
double pointed<br />
needle(s)<br />
every other row<br />
increase<br />
knit<br />
knit two sts<br />
together<br />
knit into the front<br />
and back of stitch<br />
knitwise<br />
LH<br />
M<br />
M1<br />
M1L<br />
M1R<br />
MC<br />
P<br />
P2tog<br />
PM<br />
PFB<br />
PSSO<br />
PU<br />
left hand<br />
marker<br />
make one stitch<br />
make one leftleaning<br />
stitch<br />
make one rightleaning<br />
stitch<br />
main color<br />
purl<br />
purl 2 sts<br />
together<br />
place marker<br />
purl into the<br />
front and back<br />
of the stitch<br />
pass slipped<br />
stitch over<br />
pick up<br />
P-wise purlwise<br />
rep repeat<br />
rev St st reverse stockinette<br />
stitch<br />
RH<br />
rnd(s)<br />
RS<br />
Sk<br />
Sk2p<br />
right hand<br />
round(s)<br />
right side<br />
skip<br />
sl 1, k2tog, pass<br />
slipped stitch over<br />
k2tog: 2 sts dec<br />
SKP sl, k, psso: 1<br />
st dec<br />
Sl<br />
SM<br />
SSK<br />
SSP<br />
slip<br />
slip marker<br />
sl, sl, k these<br />
2 sts tog<br />
sl, sl, p these<br />
2 sts tog tbl<br />
SSSK<br />
St st<br />
sts<br />
TBL<br />
TFL<br />
tog<br />
W&T<br />
WE<br />
WS<br />
WYIB<br />
WYIF<br />
YO<br />
sl, sl, sl, k these<br />
3 sts tog<br />
stockinette stitch<br />
stitch(es)<br />
through back loop<br />
through front loop<br />
together<br />
wrap & turn<br />
(see specific - instructions<br />
in pattern)<br />
work even<br />
wrong side<br />
with yarn in back<br />
with yarn in front<br />
yarn over<br />
16
Knit Picks yarn is both luxe and affordable—a seeming contradiction trounced! But it’s not just<br />
about the pretty colors; we also care deeply about fiber quality and fair labor practices, leaving<br />
you with a gorgeously reliable product you’ll turn to time and time again.<br />
This collection features<br />
Palette<br />
Fingering Weight<br />
100% Peruvian Highland Wool<br />
View these beautiful yarns and<br />
more at www.KnitPicks.com