Purus miniMAX Installation Instructions - RIBA Product Selector
Purus miniMAX Installation Instructions - RIBA Product Selector
Purus miniMAX Installation Instructions - RIBA Product Selector

Create successful ePaper yourself
Turn your PDF publications into a flip-book with our unique Google optimized e-Paper software.
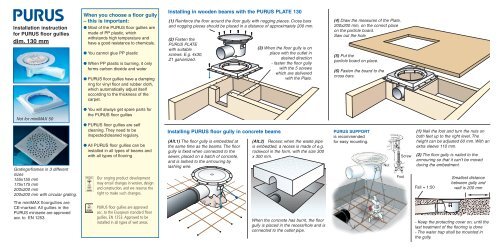
<strong>Installation</strong> instruction<br />
for PURUS floor gullies<br />
dim. 130 mm<br />
Not for <strong>miniMAX</strong> 50<br />
Gratings/frames in 3 different<br />
sizes<br />
155x155 mm<br />
175x175 mm<br />
200x200 mm<br />
200x200 mm with circular grating.<br />
The <strong>miniMAX</strong> floorgullies are<br />
CE-marked. All gullies in the<br />
PURUS miniserie are approved<br />
acc. to EN 1253.<br />
When you choose a floor gully<br />
– this is important:<br />
● Most of the PURUS floor gullies are<br />
made of PP plastic, which<br />
withstands high temperature and<br />
have a good resistance to chemicals.<br />
● You cannot glue PP plastic<br />
● When PP plastic is burning, it only<br />
forms carbon dioxide and water<br />
● PURUS floor gullies have a clamping<br />
ring for vinyl floor and rubber cloth,<br />
which automatically adjust itself<br />
occording to the thickness of the<br />
carpet.<br />
● You will always get spare parts for<br />
the PURUS floor gullies<br />
● PURUS floor gullies are self<br />
cleaning. They need to be<br />
inspected/cleaned regulary.<br />
● All PURUS floor gullies can be<br />
installed in all types of beams and<br />
with all types of flooring<br />
Our onging product development<br />
may entail changes in version, design<br />
and construction, and we reserve the<br />
right to make such changes.<br />
PURUS floor gullies are approved<br />
acc. to the Eruopean standard floor<br />
gullies, EN 1253. Approved to be<br />
installed in all types of wet areas.<br />
Installing in wooden beams with the PURUS PLATE 130<br />
(1) Reinforce the floor around the floor gully with nogging pieces. Cross bars<br />
and nogging pieces should be placed in a distance of approximately 200 mm.<br />
(2) Fasten the<br />
PURUS PLATE<br />
with suitable<br />
screws. E.g. 4x30,<br />
Z1 galvanized.<br />
Installing PURUS floor gully in concrete beams<br />
(Alt.1) The floor gully is embedded at<br />
the same time as the beams. The floor<br />
gully is fixed when connected to the<br />
sewer, placed on a batch of concrete,<br />
and is lashed to the armouring by<br />
lashing wire.<br />
(3) When the floor gully is on<br />
place with the outlet in<br />
desired direction<br />
- fasten the floor gully<br />
with the 5 screws<br />
which are delivered<br />
with the Plate.<br />
(Alt.2) Recess: when the waste pipe<br />
is embedded, a recess is made of e.g.<br />
rockwool in the form, with the size 300<br />
x 300 mm.<br />
When the concrete has burnt, the floor<br />
gully is placed in the recess/hole and is<br />
connected to the outlet pipe.<br />
(4) Draw the measures of the Plate,<br />
200x200 mm, on the correct place<br />
on the particle board.<br />
Saw out the hole.<br />
(5) Put the<br />
particle board on place.<br />
(6) Fasten the board to the<br />
cross bars.<br />
PURUS SUPPORT<br />
is recommended<br />
for easy mounting.<br />
Nut<br />
Foot<br />
Screw<br />
(1) Nail the foot and turn the nuts on<br />
both feet up to the right level. The<br />
height can be adjusted 60 mm. With an<br />
extra sleeve 110 mm.<br />
(2) The floor gully is nailed to the<br />
armouring so that it can’t be moved<br />
during the embedment.<br />
Fall = 1:50<br />
Smallest distance<br />
between gully and<br />
wall is 200 mm<br />
- Keep the protecting cover on, until the<br />
last treatment of the flooring is done<br />
- The water trap shall be mounted in<br />
the gully.
The Miniserie<br />
A system of floor gullies in dim.<br />
130 mm.<br />
The MINISERIEN are made of<br />
polypropenplast (PP).<br />
MINISERIEN has Swedens smallest<br />
build-in volume among floor gully<br />
systems.<br />
MINISERIEN forefill all demands regarding<br />
selfcleaning and temperature<br />
resistance.<br />
RSK 711 35 35<br />
MINI ODEN 50<br />
Polypropen complete with<br />
water trap, grating and clamping<br />
ring. Dim. 130x50 mm.<br />
RSK 711 35 39<br />
MINI BRAGE 50<br />
Polypropen complete with<br />
water trap, grating and clamping<br />
ring. Dim. 130x50.<br />
RSK 711 35 38<br />
MINI BRAGE 110<br />
Polypropen complete with<br />
water trap, grating and clamping<br />
ring. Dim. 130x50.<br />
Floor gully MINI MAX 130<br />
PURUS <strong>miniMAX</strong> in dim. 130 mm<br />
- as floor gully with outlet in dim.<br />
50 and 75 mm<br />
- as outlet funnel with outlet dim. 32, 50<br />
and 75 mm.<br />
PURUS <strong>miniMAX</strong> has low profile, 70 mm<br />
and has a special designed water trap<br />
with NOOD-funktion.<br />
The water trap works independently of<br />
water in the water trap. Effectively stops<br />
back flows, gas leaks, foul air.<br />
The water trap is removeable by the<br />
automatic folding handle.<br />
With the water trap removed The Mini<br />
Max works as an outlet funnel.<br />
The PURUS knife<br />
RSK 711 36 05<br />
PURUS KNIFE: for cutting hole in the vinyl carpet/membrane<br />
(1) Place the the foot<br />
of the knife in the floor<br />
gully.<br />
(4) Remove the foot of<br />
the knife.<br />
(2) Lay the vinyl over the<br />
gully and press until the<br />
pivot on the foot penetrates<br />
the vinyl.<br />
(5) Heat the vinyl.<br />
NOTE: rubber cloths<br />
shall not be heated.<br />
(3) Put the arm of the<br />
knife on the pivot (the<br />
smallest hole) and cut<br />
the hole.<br />
(6) Place the clamping<br />
ring in the gully with the<br />
text facing upwards. Press<br />
it down with the grating.<br />
PURUS GRATINGS can be<br />
locked<br />
Locking device for plastic grating<br />
consists of 2 screws with nuts.<br />
Art. No. 713 84 17<br />
Is it possible to use old<br />
PURUS products in new<br />
PURUS floor gullies?<br />
No. Due to changes in the standards for<br />
type approvals, it is not allowed to use<br />
accessories produced before 1990 in<br />
PURUS floor gullies produced after 1990.<br />
A gentle pressure on the<br />
middle of the arm releases<br />
the knife holder and the<br />
blade<br />
To change the blade, the<br />
holder is pulled up.<br />
Blade: Stanley 5903.<br />
Clamping ring for vinyl<br />
floor and rubber cloth<br />
Clamping ring RSK 714 13 16<br />
Vinyl floor/rubber<br />
cloth<br />
CHECKLIST<br />
● Check that prescribed floor gully is used.<br />
Clamping<br />
ring<br />
Gully<br />
● When choosing mounting place, make sure<br />
that it is possible to clean the floor gully.<br />
● The floor gully should be mounted horizontally.<br />
● The upper edge (the flange edge) of the floor<br />
gully/extension ring, shall be in level with the<br />
surface of the flooring, i.e. in level with the<br />
vinyl floor/sealing cover.<br />
Cleaning and inspection<br />
(1) Pull up the handle and lift off the<br />
water trap.<br />
(2) Press the bottom cup down for access<br />
(3) Clean the parts!<br />
(4) Clean the gully with a smooth brush.<br />
(5) Wet the rubber gasket with water and<br />
press the water trap in place<br />
(6) Check that it is in right place.<br />
Pour in water.<br />
For more info:<br />
www.purus.se