ACCESSIBLE BUS STOP DESIGN GUIDANCE
bus-stop-design-guidance
bus-stop-design-guidance

You also want an ePaper? Increase the reach of your titles
YUMPU automatically turns print PDFs into web optimized ePapers that Google loves.
28 Accessible Bus Stop Design Guidance<br />
Bus stop layouts<br />
6. <strong>BUS</strong> <strong>STOP</strong> LAYOUTS<br />
Introduction<br />
Bus stops unobstructed by kerbside activity are<br />
rare. It is usually necessary to find a means to<br />
sufficiently encourage motorists to keep the bus<br />
stop clear. As discussed in chapter 5, generally<br />
all bus stops should have a marked cage as per<br />
TSRGD diagram 1025.1 with stopping restrictions<br />
operating 24 hours a day.<br />
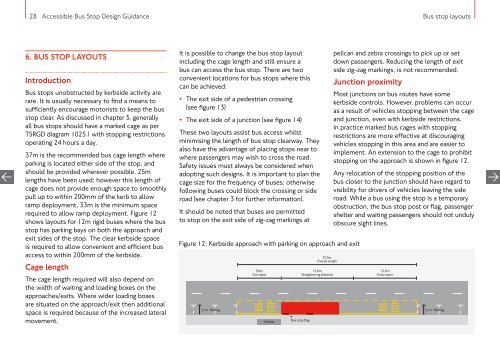
37m is the recommended bus cage length where<br />
parking is located either side of the stop, and<br />
should be provided wherever possible. 25m<br />
lengths have been used; however this length of<br />
cage does not provide enough space to smoothly<br />
pull up to within 200mm of the kerb to allow<br />
ramp deployment, 33m is the minimum space<br />
required to allow ramp deployment. Figure 12<br />
shows layouts for 12m rigid buses where the bus<br />
stop has parking bays on both the approach and<br />
exit sides of the stop. The clear kerbside space<br />
is required to allow convenient and efficient bus<br />
access to within 200mm of the kerbside.<br />
Cage length<br />
The cage length required will also depend on<br />
the width of waiting and loading boxes on the<br />
approaches/exits. Where wider loading boxes<br />
are situated on the approach/exit then additional<br />
space is required because of the increased lateral<br />
movement.<br />
It is possible to change the bus stop layout<br />
including the cage length and still ensure a<br />
bus can access the bus stop. There are two<br />
convenient locations for bus stops where this<br />
can be achieved:<br />
• The exit side of a pedestrian crossing<br />
(see figure 13)<br />
• The exit side of a junction (see figure 14)<br />
These two layouts assist bus access whilst<br />
minimising the length of bus stop clearway. They<br />
also have the advantage of placing stops near to<br />
where passengers may wish to cross the road.<br />
Safety issues must always be considered when<br />
adopting such designs. It is important to plan the<br />
cage size for the frequency of buses; otherwise<br />
following buses could block the crossing or side<br />
road (see chapter 3 for further information).<br />
It should be noted that buses are permitted<br />
to stop on the exit side of zig-zag markings at<br />
Figure 12: Kerbside approach with parking on approach and exit<br />
2.1m Parking<br />
9.0m<br />
Exit taper<br />
Shelter<br />
Bus stop flag<br />
37.0m<br />
Overall length<br />
15.0m<br />
Straightening distance<br />
pelican and zebra crossings to pick up or set<br />
down passengers. Reducing the length of exit<br />
side zig-zag markings, is not recommended.<br />
Junction proximity<br />
Most junctions on bus routes have some<br />
kerbside controls. However, problems can occur<br />
as a result of vehicles stopping between the cage<br />
and junction, even with kerbside restrictions.<br />
In practice marked bus cages with stopping<br />
restrictions are more effective at discouraging<br />
vehicles stopping in this area and are easier to<br />
implement. An extension to the cage to prohibit<br />
stopping on the approach is shown in figure 12.<br />
Any relocation of the stopping position of the<br />
bus closer to the junction should have regard to<br />
visibility for drivers of vehicles leaving the side<br />
road. While a bus using the stop is a temporary<br />
obstruction, the bus stop post or flag, passenger<br />
shelter and waiting passengers should not unduly<br />
obscure sight lines.<br />
13.0m<br />
Entry taper<br />
2.1m Parking